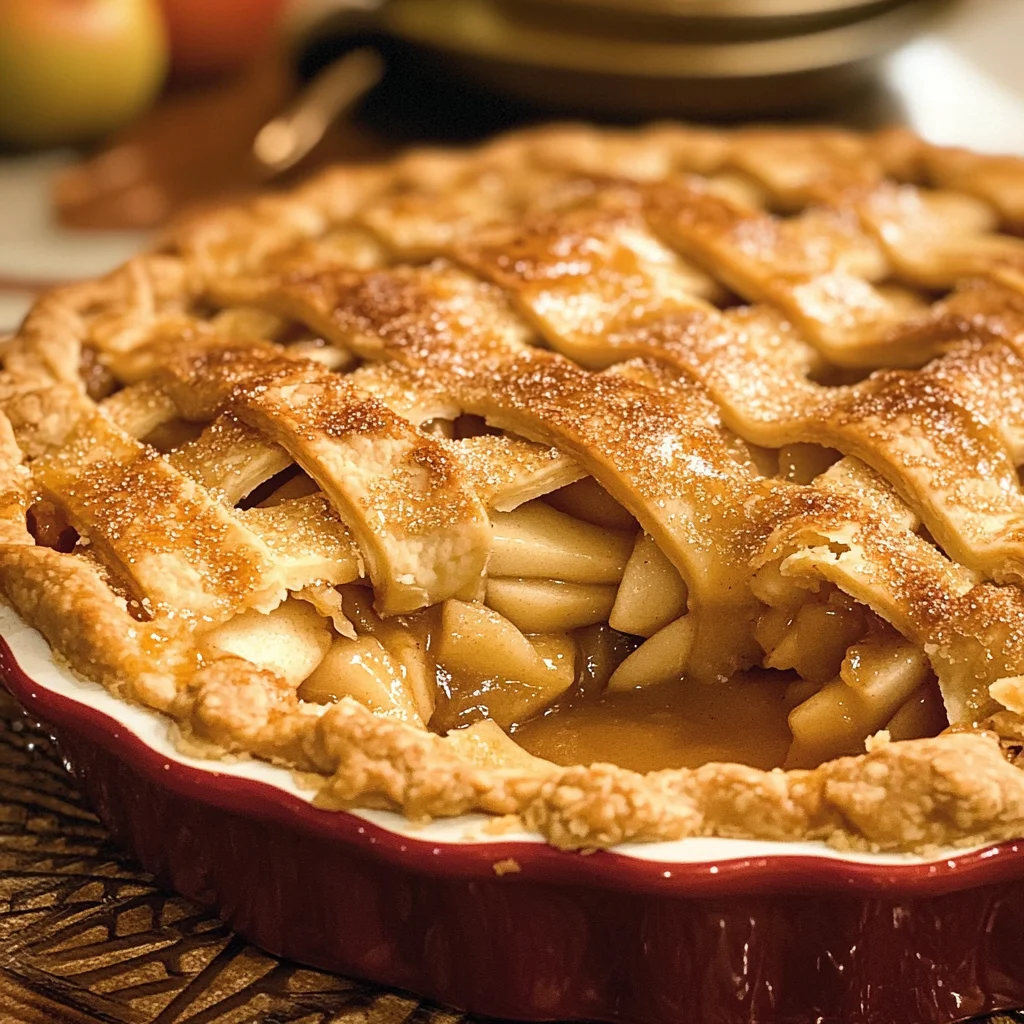
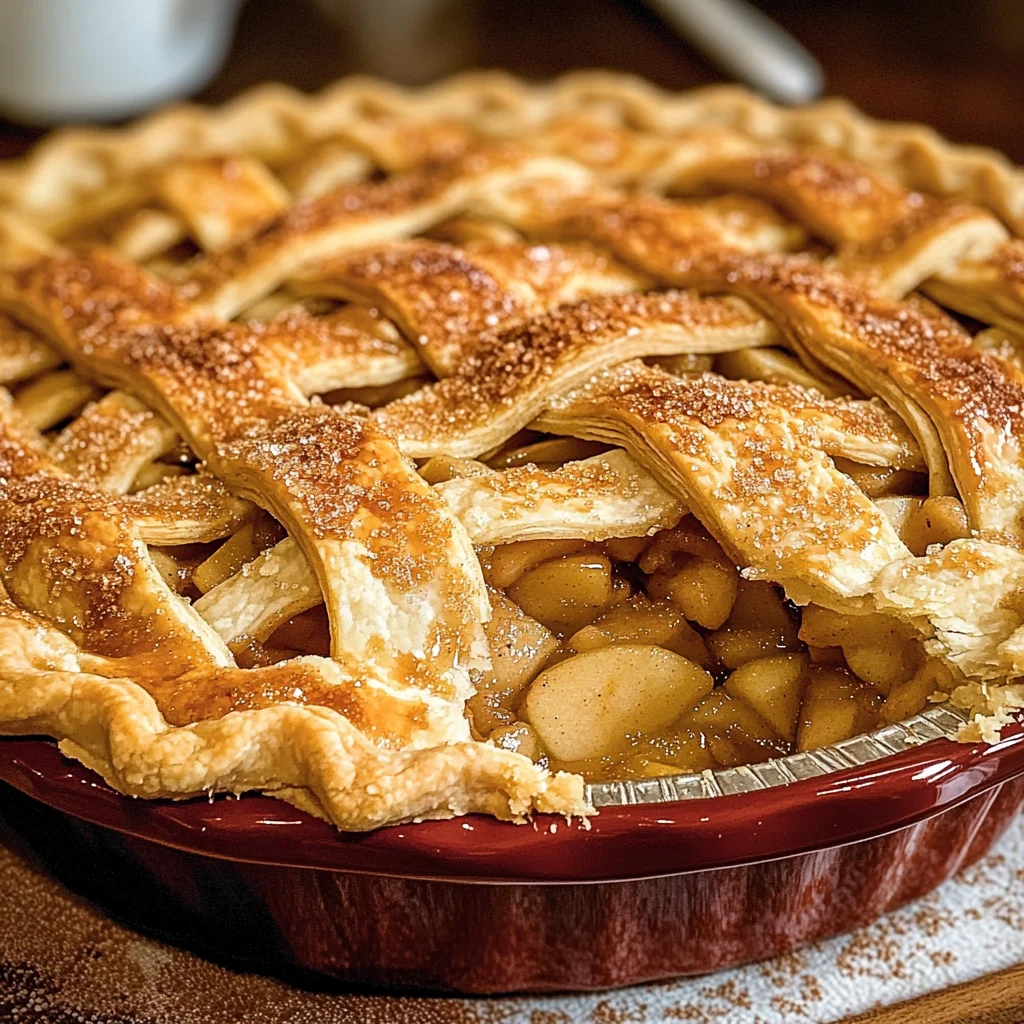
Paula Deen’s Apple Pie
There’s something utterly enchanting about the smell of freshly baked apple pie wafting through the house. It’s a gentle reminder of cozy afternoons spent in the kitchen, where flour dust dances in the sunlight and laughter fills the air. Paula Deen’s Apple Pie is more than just a recipe; it’s like a warm embrace that wraps around you as you take that first bite. The sweet yet tart filling of green apples, infused with aromatic spices like cinnamon and nutmeg, creates a symphony of flavors that resonates deeply with anyone who has ever tasted it. Each slice is adorned with a buttery lattice crust that shatters delicately at the touch, revealing the beautiful golden apples within. This isn’t just dessert; it’s a heartfelt connection to home, family gatherings, and cherished traditions.
As you embark on this culinary journey to create Paula Deen’s Apple Pie, know that every step is crafted with love and intention. You might find yourself reminiscing about family picnics or holiday dinners where apple pie was always the star of the show. Why do we love this pie so much? Perhaps it’s because it brings back memories of baking alongside loved ones, sharing stories while waiting for the timer to ring, or even how each slice feels like an invitation to gather around the table once more. Trust me when I say, this pie is not just about satisfying your sweet tooth; it’s about creating moments that linger long after the last crumb has been devoured.
Paula Deen’s Apple Pie: A Slice of Nostalgia
This classic apple pie recipe is truly one for the books—not only because it comes from Paula Deen but because it embodies everything we love about comforting desserts. With its buttery homemade lattice crust and brown sugar-coated apples, this pie will become a beloved staple in your home, whether you’re celebrating Thanksgiving or simply indulging in a weekend treat. Get ready to dive into a delightful baking experience that will fill your kitchen with warmth and joy!
Ingredients:
Before we dive into creating this masterpiece, let’s gather our ingredients! Each one plays an important role in bringing this pie to life.
- 3/4 cup brown sugar. This rich ingredient is essential for adding depth and complexity to our filling. The molasses in brown sugar contributes a wonderful caramel flavor that beautifully complements the tartness of the green apples. When purchasing brown sugar, look for one that’s moist and packed tightly—this ensures it will dissolve nicely into your filling without leaving any gritty texture behind.
- 1/4 cup flour. Flour acts as a natural thickener for our filling, helping to bind all those delicious juices released by the apples during baking. It absorbs moisture and prevents your pie from becoming too runny—a common pitfall when making fruit pies! Be sure to use all-purpose flour here; it strikes the perfect balance between structure and tenderness.
- 1 tsp cinnamon. Ah, cinnamon—the warm spice that evokes feelings of coziness and nostalgia! This ingredient enhances the sweetness of the apples while adding aromatic notes that make your kitchen smell divine while baking. Choose fresh ground cinnamon if possible; it has a more vibrant flavor compared to older jars sitting on your spice rack.
- Pinch of nutmeg. Just a pinch of nutmeg infuses your pie with an earthy warmth that complements cinnamon beautifully. Nutmeg can be potent, so less truly is more in this case! Consider using freshly grated nutmeg for an extra boost; it’s worth seeking out if you want your pie to sing with flavor.
- 7 medium green apples, peeled and sliced. Green apples are fantastic for pies due to their crisp texture and tangy flavor profile; they hold their shape well during baking without turning mushy! Look for Granny Smith apples—they’re tart enough to balance perfectly with all that sweetness from our brown sugar and spices.
- 1 tbsp lemon juice. Lemon juice brightens up our apple mixture by adding acidity, which helps enhance all those flavors we’ve layered together. It also prevents our sliced apples from browning too quickly before they reach their cozy home in the oven!
- 3 tbsp butter, cubed. Butter adds richness and helps create delicious pockets of flavor throughout our filling as it melts during baking—think liquid gold seeping into every bite! Using cold butter ensures you get those delightful little chunks that melt beautifully while keeping everything moist without being overly greasy.
- 2 unbaked pie crusts. A flaky crust is non-negotiable when it comes to apple pie! Whether you choose store-bought or whip up your own from scratch (which I encourage!), make sure it’s chilled before using—this helps maintain its structure while baking.
- *Egg wash for brushing on crust. Creating that stunning golden finish on top of your pie isn’t just for looks; it’s also about texture! An egg wash gives your crust a lovely sheen while helping any sugar sprinkled on top adhere beautifully.
Equipment You’ll Need:
Having the right tools makes all the difference between an enjoyable baking experience and one fraught with frustration! While these items may not be considered ingredients, they are absolutely essential partners in crafting something wonderful together.
- 9-inch pie dish – A sturdy glass or ceramic dish will give you even heat distribution while allowing you to see how lovely your crust is browning as it bakes! If you’re using metal, keep an eye on cooking time as they tend to bake faster.
- Mixing bowl – A large mixing bowl is perfect for tossing together all those delicious apple slices with brown sugar and spices without worrying about things spilling over!
- Pastry cutter or fork – For those making homemade crusts (and I highly encourage you to try!), having a good pastry cutter—or even just a fork—will help incorporate butter into flour until you reach that desired crumbly texture that’s so vital for flaky pastry!
- Sharp knife or mandoline slicer – Slicing apples thinly ensures they cook evenly throughout without turning too mushy on us—aim for uniform pieces so every bite offers that delightful contrast between tender filling and crunchy crust!
Now that we’re equipped with both our ingredients and tools, let’s dive into preparing Paula Deen’s Apple Pie!
Step 1: Preheat Your Oven
The first step might seem simple but trust me—it sets everything into motion! Preheating your oven to 375°F (190°C) allows us to create an environment where magic happens as soon as we pop our assembled pie inside. This temperature ensures our crust will bake up golden-brown while giving those juicy apple slices enough heat to soften without disintegrating completely—a delicate balance we must achieve!
Step 2: Prepare Your Filling
In a large mixing bowl, combine 3/4 cup brown sugar, 1/4 cup flour, 1 teaspoon cinnamon, and just a pinch of nutmeg until everything is evenly mixed—a process known as dry blending—which helps distribute flavors wonderfully through every scoop later on! Next comes our star attraction: seven medium green apples peeled and sliced thinly (about 1/4 inch thick should do). Toss them gently into this mixture until every piece feels coated—this step ensures no apple slice goes unnoticed by those enticing sugars!
Step 3: Build Your Pie Base
Now let’s bring forth our first unbaked pie crust! Gently press it into your 9-inch pie dish so there aren’t any cracks—this will serve as the stable foundation upon which all these incredible flavors will come together beautifully during baking time ahead! Pour in our apple mixture lovingly pressed down slightly but don’t squish them flat; we want some air pockets left behind for steam escape later on which keeps everything nice & tender throughout!
Step 4: Add Lemon Juice & Butter
It’s time now to drizzle one tablespoon of lemon juice over those glorious piles of fruit—we’re enhancing brightness here folks—and sprinkle three tablespoons cubed butter strategically overtop too! Why do I say “strategically”? Because we want melted pools forming amongst those sweetened slices rather than runoff puddles underneath…we’re aiming high here people!
Baking should be fun…and trust me—you’re well on your way toward creating something profoundly satisfying! Let’s continue assembling this masterpiece in upcoming steps—stay tuned as we finish constructing Paula Deen’s Apple Pie together!
Step 5: Fill That Pie Crust with Apple Goodness
Once you’ve so lovingly prepared your apple filling, it’s time to bring it all together. Take that unbaked pie crust, which should be nestled comfortably in a 9-inch pie dish, and gently spoon in the apple mixture you’ve just tossed. As you do this, allow yourself to feel the joy of each apple slice—each one is like a tiny gem waiting to shine in your dessert. You want to pile those apples high; they will shrink down as they bake, so don’t be shy! It’s quite magical how they transform from crisp slices to tender, caramelized bites that melt in your mouth. Trust me when I say the aroma wafting from your oven will be utterly intoxicating.
Now, here’s a crucial step: drizzle the freshly squeezed lemon juice over your beautiful mound of apples. This isn’t just for show; the acidity from the lemon juice does wonders to brighten the flavors of the apples while also helping to prevent them from browning too much during baking. It adds a layer of complexity that transforms a simple apple pie into something truly extraordinary. Next, sprinkle those little cubes of butter over the filling—this is your secret weapon! As they melt during baking, these pieces will mingle with the sugars and spices, creating a sauce that envelops every apple slice in liquid gold. Don’t skip this step; it’s absolutely paramount to achieving a rich depth of flavor.
Step 6: Lattice or Slits? Crafting Your Pie Crust Top
Now comes one of my favorite parts—the top crust! You have options here: you can either create a beautiful lattice top or simply cut slits into your second unbaked pie crust for venting steam. If you’re going for the lattice top (and I highly recommend it if you have the time), roll out that second crust on a lightly floured surface until it’s about an eighth of an inch thick. Cut it into strips about one inch wide—I usually aim for around eight strips depending on how wide I want my gaps. Starting from one end of the pie, lay down four strips parallel to each other and then weave the remaining strips over and under them, alternating as you go along.
Why is this technique so significant? The lattice not only adds aesthetic appeal but also allows steam to escape during baking, which prevents your pie from becoming soggy—a fate no pie deserves! If you prefer simplicity or are short on time, cutting slits works just as well; just make sure there are enough openings for steam to escape. No matter which route you choose, remember to press down firmly on the edges where the top crust meets the bottom crust. This sealing step is critical because it keeps all those delicious juices inside where they belong!
Step 7: The Art of Egg Washing
Here’s where we can add that final touch that makes all the difference—an egg wash! In a small bowl, crack an egg and whisk it together with a splash of water until combined; this will give your pie crust that gorgeous golden sheen once baked. Using a pastry brush (or even just your fingers if that’s what you have), gently apply this mixture over the top crust before sliding it into the oven. You’ll want to cover every nook and cranny for an even finish—this step not only promotes browning but also enhances flavor thanks to caramelization.
But why bother with an egg wash at all? It creates that beautiful visual contrast between the golden brown crust and bubbling apple filling underneath—it’s all about enticing presentation! Plus, if you’re feeling adventurous, you could sprinkle some sugar on top after applying the egg wash for added sweetness and crunch once baked. So take a moment with this step; it’s worth every flick of your wrist!
Step 8: Baking Your Perfect Paula Deen’s Apple Pie
Now that everything is beautifully assembled, it’s time for the pièce de résistance—baking! Preheat your oven to 375°F (190°C) if you haven’t done so already; this temperature is ideal for achieving that perfect balance between cooking through without burning. Place your pie on a baking sheet lined with parchment paper (this helps catch any potential drips) and slide it into the center rack of your preheated oven.
You’ll want to bake Paula Deen’s Apple Pie for about 55-60 minutes—a range is important here because every oven behaves differently. Keep an eye on those edges! They should turn beautifully golden brown while filling bubbles up through those lovely vents or lattice strips. What you’re looking for is visual cues: when you see juices bubbling vigorously around the edges and catching hints of caramelization peeking through those holes or lattice work, you’ll know you’re getting close! However tempting it might be to open that oven door too soon—don’t rush this step! Each minute counts in developing those flavors and textures we adore.
Once it’s fully baked and has reached its glorious color, carefully remove it from the oven and allow it to cool on a wire rack for at least an hour before slicing into it. This resting phase is non-negotiable; it allows everything—the apples, juices, and crust—to settle together beautifully rather than spilling out onto your plate like a runaway river when cut too soon.
Final Touches: Savoring Your Creation
After what may feel like an eternity (but trust me—it’s worth every second), it’s finally time to slice into Paula Deen’s Apple Pie! The way that flaky crust yields under your knife reveals layers upon layers of tender caramelized apples within—oh my goodness gracious! Serve each slice warm with a scoop of dairy-free vanilla ice cream or dollop of whipped coconut cream if you’re feeling fancy; both complement this classic dessert perfectly by adding creaminess against all that sweet-tart apple goodness.
As you take that first bite—and I promise you will want more than one—you’ll find yourself enveloped in flavors reminiscent of cherished family gatherings or cozy fall evenings spent reminiscing around warm kitchens filled with laughter. This isn’t just pie; it’s memories wrapped up in buttery goodness shared among loved ones—a profoundly satisfying experience indeed!
So go ahead—share this masterpiece with friends or savor its deliciousness solo—either way, know you’ve created something truly special that’s bound to become part of your own cherished culinary legacy! Happy baking!
Storage and Enjoyment Tips for Your Paula Deen’s Apple Pie
Now that your kitchen is filled with the delightful aroma of baked apples and warm spices, it’s time to savor the fruits of your labor! Whether you’re serving it warm right out of the oven or letting it cool to enjoy later, there’s something truly magical about sharing this pie with family and friends. But what if you have leftovers? Fear not! This delectable dessert is just as wonderful the next day, so let’s talk about how to store it properly to maintain its irresistible charm.
Storing Leftover Paula Deen’s Apple Pie
When it comes to storing your precious Paula Deen’s Apple Pie, I recommend placing any leftovers in an airtight container. If you don’t have one handy, wrapping the pie tightly with plastic wrap will do just fine—just make sure it’s sealed up to keep those flavors locked in. Stored this way, your pie will stay fresh for about 3-4 days in the refrigerator. And here’s a little tip from my own kitchen: To keep that crust beautifully flaky, consider placing a slice of bread inside the container with your pie. The bread will absorb moisture, preventing the crust from becoming soggy while infusing a touch of soft texture that complements the filling perfectly. When you take a bite after storage, you’ll be pleasantly surprised at how the flavors meld together even more profoundly; it becomes like an old friend greeting you again after a long absence. For the best experience, serve it warmed up—just pop it in the oven at 350°F for about 10-15 minutes until it’s warmed through and that buttery aroma fills your home once more.
Freezing Paula Deen’s Apple Pie for Later
If you want to extend the life of this delightful dessert even further, freezing is a fantastic option! To freeze your pie properly, allow it to cool completely before wrapping it tightly in aluminum foil or plastic wrap—this will help prevent freezer burn and keep those flavors intact. You can also place it in a freezer-safe container if you prefer. When done this way, your apple pie can be stored in the freezer for up to 2-3 months. Trust me on this—it’s such a treat to pull a homemade apple pie from your freezer on a busy day! When you’re ready to enjoy it again, simply transfer it from the freezer to the refrigerator overnight to thaw. Then reheat as previously mentioned. Imagine gathering everyone around for an impromptu dessert night, revealing that surprise pie from your secret stash—it’s bound to become a cherished moment! The convenience factor alone makes freezing worthwhile; you’ll always have something comforting on hand when cravings hit or unexpected guests arrive.
Paula Deen’s Apple Pie
Indulge in the nostalgia of homemade comfort with Paula Deen’s Apple Pie. This classic dessert features a symphony of green apples coated in brown sugar and warm spices, all enveloped in a flaky, buttery lattice crust. Each slice is not just a treat for the taste buds but a heartwarming experience that evokes cherished memories of family gatherings and cozy afternoons. Perfect for any occasion—from Thanksgiving feasts to simple weekend delights—this apple pie is bound to become a beloved staple in your home. Gather your loved ones, share stories over warm slices, and create moments that linger long after the last crumb has been devoured.
- Prep Time: 30 minutes
- Cook Time: 60 minutes
- Total Time: 1 hour 30 minutes
- Yield: Approximately 8 servings 1x
- Category: Dessert
- Method: Baking
- Cuisine: American
Ingredients
- 3/4 cup brown sugar
- 1/4 cup all-purpose flour
- 1 teaspoon ground cinnamon
- Pinch of nutmeg
- 7 medium green apples (peeled and sliced)
- 1 tablespoon lemon juice
- 3 tablespoons cold butter (cubed)
- 2 unbaked pie crusts
- Egg wash for brushing
Instructions
- Preheat your oven to 375°F (190°C).
- In a large mixing bowl, combine brown sugar, flour, cinnamon, and nutmeg.
- Add peeled and sliced apples to the mixture along with lemon juice; toss until well coated.
- Place one pie crust in a 9-inch pie dish; pour the apple mixture inside.
- Dot the filling with cubed butter.
- Cover with the second crust, creating either a lattice top or slits for venting steam; seal edges tightly.
- Brush the top crust with egg wash for a golden finish.
- Bake for 55-60 minutes until bubbly and golden brown; allow cooling before slicing.
Nutrition
- Serving Size: 1 slice
- Calories: 270
- Sugar: 20g
- Sodium: 180mg
- Fat: 12g
- Saturated Fat: 6g
- Unsaturated Fat: 5g
- Trans Fat: 0g
- Carbohydrates: 38g
- Fiber: 2g
- Protein: 2g
- Cholesterol: 30mg