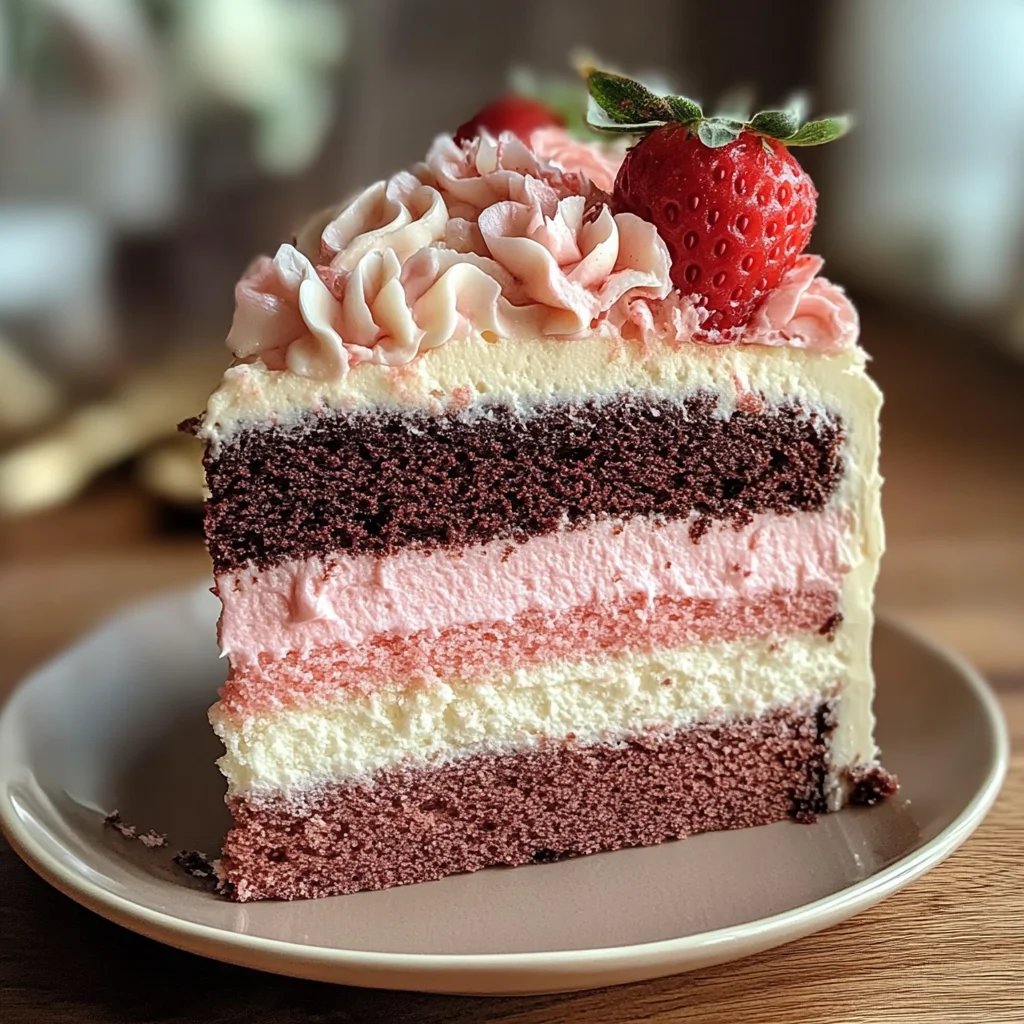
Neapolitan Cake
There’s something utterly magical about baking, don’t you think? It’s an alchemical process that transforms simple ingredients into something extraordinary, a testament to the creativity and love that we pour into our kitchens. When I think of the Neapolitan Cake, my heart swells with memories of laughter-filled gatherings where sweet indulgence meets joyful celebration. This cake is not merely dessert; it’s a delightful journey through layers of chocolate, strawberry, and vanilla, each slice offering a symphony of flavors that dance on your palate. The way the rich cocoa mingles with the bright essence of strawberries and the smoothness of vanilla creates a tapestry of taste so profoundly satisfying that it feels like a warm hug after a long day.
Every bite takes you back to childhood birthday parties, where friends would gather around the table, eyes wide with anticipation as we’d eagerly await our piece of this iconic layered beauty. It embodies tradition while inviting innovation; it dares you to be both bold and nostalgic. So whether you’re celebrating a special occasion or simply indulging yourself on a quiet afternoon, I promise you this Neapolitan Cake will elevate any moment into something truly extraordinary.
Neapolitan Cake: A Layered Delight for Every Occasion
Let me take you on an exciting culinary adventure with this Neapolitan Cake! It’s more than just a recipe; it’s an invitation to explore flavors that sing in harmony. By layering chocolate, strawberry, and vanilla cake batters with luscious cream cheese frosting, you’re not just creating dessert—you’re crafting an experience that will leave your loved ones raving for more. Baking this cake is an opportunity to express your creativity while connecting with those who share in its enjoyment.
Ingredients:
As we embark on this delightful journey together, let’s gather our ingredients. Each one plays a crucial role in crafting this masterpiece—understanding them will make all the difference!
- 2 cups all-purpose flour: This humble ingredient is the backbone of our cake. It provides structure and stability while allowing the other flavors to shine through. Look for high-quality flour; it should feel fine and soft to the touch. If you’re looking for alternatives due to dietary needs, consider using gluten-free all-purpose flour blends designed for baking—they can yield wonderful results too!
- 1 cup unsweetened cocoa powder: This ingredient brings that rich chocolate flavor that makes this cake so irresistible. Choose a high-quality cocoa powder—Dutch-processed cocoa gives a smoother flavor profile and beautiful color, while natural cocoa offers a bolder taste. Cocoa powder is what gives our chocolate layer its depth and intensity; without it, we wouldn’t have that luxurious richness that contrasts beautifully with the lighter layers.
- 2 cups granulated sugar: Sugar does far more than just sweeten; it also helps create tenderness in our cake by retaining moisture as it bakes. When purchasing sugar, look for pure granulated sugar without additives—it dissolves well during mixing and ensures even sweetness throughout each layer. Remember to measure accurately because too much sugar can lead to dense cakes rather than light and airy layers.
- 1 tbsp baking powder: This leavening agent is absolutely paramount for giving our cake its lift and fluffiness. Baking powder works by releasing carbon dioxide when mixed with wet ingredients, creating those delightful bubbles that make your cake rise beautifully in the oven. Always check your baking powder’s expiration date; old baking powder can lead to disappointing results.
- 1/2 tsp salt: Don’t underestimate salt! It’s essential in balancing sweetness and enhancing flavors overall. Just a hint will elevate every layer’s unique taste without overwhelming them. Use fine sea salt or kosher salt for best results—this ensures even distribution throughout your batter.
- 4 large eggs (room temperature): Eggs are vital for structure and moisture in any cake recipe but especially important here as they contribute richness and aid in binding everything together harmoniously. Room temperature eggs blend seamlessly into your batter, making it smoother and ensuring better volume when whipped or folded in.
- 1 cup whole milk: Milk adds moisture while contributing to the tenderness of each cake layer. Whole milk is preferred here because its fat content enhances flavor and achieves that dreamy texture we crave in desserts! If you’re dairy-free or looking for alternatives, almond or oat milk are fantastic substitutes that won’t compromise on taste.
- 2 tsp vanilla extract: This liquid gold infuses warmth into our layers—the fragrant aroma alone is enough to make anyone swoon! Always opt for pure vanilla extract rather than imitation where possible; its complex flavor profile offers depth that’s simply unmatched by synthetic options.
- 1 cup softened butter (for frosting): The butter used here must be softened to room temperature—it’s crucial for achieving that light and fluffy cream cheese frosting everyone loves! Real butter brings richness that’s vital for flavor; consider using European-style butter if you want an even more decadent experience.
- 4 cups powdered sugar (for frosting): Powdered sugar is essential for creating that perfect creamy consistency in frosting while adding sweetness without making it grainy. Sift it before use if possible; this ensures there are no lumps and gives your frosting an incredibly smooth finish.
- 8 oz cream cheese (softened, for frosting): Cream cheese lends a tangy flavor coupled with richness—it’s what makes this frosting truly unforgettable! Ensure it’s at room temperature so it blends easily into your butter mixture without clumps.
Equipment You’ll Need:
Having the right tools when crafting your Neapolitan Cake makes all the difference between good and extraordinary! While these may not be ingredients, they are indeed essential partners in creating something wonderful together.
- Three round cake pans (9-inch) – These pans allow us to bake our layers evenly while providing just enough depth for impressive height once stacked together. If you only have two pans, don’t worry—just bake two layers first before washing out one pan to bake the last layer!
- Mixing bowls – A set of mixing bowls—preferably glass or stainless steel—is ideal for combining our dry ingredients separately from wet ones before they meet their fateful union! These materials are non-reactive which means they won’t alter the flavors of our delicate batter.
- Whisk – A sturdy whisk is crucial for incorporating air into our batter during mixing stages; this ensures lightness in our final product! If you prefer electric gadgets over manual labor, an electric mixer works wonderfully too—but there’s something satisfying about whisking by hand!
- Rubber spatula – Having a good rubber spatula handy allows us to scrape down sides effectively as we mix ingredients together while also helping us spread frosting smoothly between layers later on.
Now we’re ready to dive into preparing the Neapolitan Cake—a delicious adventure awaits!
Step 1: Prepping Your Oven & Pans
Preheat your oven to 350°F (175°C)—this step might seem mundane but trust me when I say it’s crucial! A properly heated oven ensures even baking from start to finish so every layer rises beautifully without collapsing under pressure later on. While that’s happening, take three round cake pans (9-inch) and either grease them generously or line them with parchment paper—this will prevent any sticky situations when it’s time to release those gorgeous cakes from their molds later on!
Step 2: Combining Dry Ingredients
In a large mixing bowl, whisk together 2 cups of all-purpose flour, 1 cup unsweetened cocoa powder, 2 cups granulated sugar, 1 tablespoon baking powder, and ½ teaspoon salt until thoroughly combined—this process not only distributes everything evenly but also aerates these dry components which leads us toward achieving fluffiness once baked! Make sure there are no lumps left behind because those pesky bits can create uneven textures within our glorious layers down the line—a smooth batter equals happy bakers!
Step 3: Mixing Wet Ingredients
In another bowl (yes—we’re multitasking!), blend together 4 large eggs at room temperature along with 1 cup whole milk and 2 teaspoons vanilla extract until perfectly smooth—a whisk works wonders here too! Once you’ve got everything nicely combined without any egg streaks showing through (the visual cue), gradually incorporate this mixture into your dry ingredients using either a spatula or wooden spoon—be gentle though! Overmixing can lead us down paths we don’t want; let’s keep things light yet cohesive as we create magic together!
Step 4: Dividing & Flavoring Our Batter
Now comes one of my favorite parts—dividing up this luscious batter into three portions! Carefully measure out equal amounts into separate bowls since we’re going to transform each portion into its own unique flavor sensation—mix melted chocolate into one bowl (for extra decadence), pureed strawberries into another (to capture summer’s sweetness), leaving the last untouched as classic vanilla goodness remains intact! Pour each flavored batter carefully into their prepared pans before gently smoothing tops out—you’ll want them nice & flat so they stack beautifully when assembled later on!
And there you go—the beginning steps toward mastering your very own Neapolitan Cake! Stay tuned as we continue crafting this masterpiece together—I promise you’ll love every moment spent bringing such joy onto plates around you!
Baking Your Perfect Neapolitan Cake
Step 5: Pouring and Shaping the Batter
Now that you’ve prepared your three flavored batters, it’s time to pour them into your prepared cake pans. This step is not just about getting the batter in the pans; it’s about ensuring each layer gets the attention it deserves. Start by carefully pouring the chocolate batter into one pan, making sure to spread it evenly across the bottom. You want to achieve a smooth surface because this helps with even baking and makes for a stunning presentation when you slice into your cake. Next, do the same with the strawberry batter in another pan, taking care to gently tap each pan on the counter to remove any air bubbles that might have formed during mixing. Finally, pour the vanilla batter into the last pan.
It’s essential to ensure that each batter is poured slowly and deliberately, keeping an eye on consistency as you go. The goal here is to create a beautiful gradient of colors when you cut through the layers later. Trust me on this: if you rush this step or overfill your pans, you might end up with uneven layers or messy overflow. Now, gently place all three pans into your preheated oven and set a timer for 25-30 minutes. As they bake, you’ll notice that delightful aroma wafting through your kitchen—a heavenly mix of chocolate and strawberries mingling with hints of vanilla. To check for doneness, insert a toothpick into the center of each cake; it should come out clean or with just a few crumbs attached.
Step 6: Cooling Time Is Key
Once your cakes are done baking, it’s time for an important step: cooling them properly. I can’t stress enough how crucial this phase is! Remove them from the oven and let them sit in their pans for about 10 minutes; this allows them to firm up slightly and makes it easier to transfer them without breaking apart. After those precious minutes have passed, carefully run a knife around the edges of each cake to loosen them from the sides of the pans—this little trick will save you from any potential disaster later! Then invert each cake onto a wire rack; this allows air to circulate around them so they cool evenly.
As they cool completely—this usually takes about 30-45 minutes—resist every urge to frost them too soon! If you frost while they’re still warm, all your hard work will be undone; melting frosting can lead to a gooey mess rather than that perfect creamy layer we want between our cake slices. Trust me on this: patience pays off big time in baking! While waiting, take a moment to savor this part of the process—the anticipation builds excitement for what’s coming next!
Step 7: Crafting Irresistible Cream Cheese Frosting
Now comes one of my favorite parts—the frosting! It’s where all those flavors come together beautifully, bringing life and vibrancy to our Neapolitan Cake. In a large bowl, beat together softened cream cheese and softened butter until they reach that luscious creamy texture we adore—think silky and utterly intoxicating! You’ll want to use an electric mixer on medium speed for about two minutes; proper creaming incorporates air into your frosting, giving it that lightness which translates wonderfully when layered between cakes.
Gradually add in powdered sugar—about one cup at a time—to achieve just the right sweetness without overwhelming those rich flavors we’ve cultivated in our layers. I recommend sifting it first to avoid lumps; trust me, nobody wants gritty frosting! Once it’s fully incorporated, add a splash more vanilla extract—it’s non-negotiable for depth of flavor! Taste as you go; if you feel like it needs more sugar or vanilla, don’t hesitate! This is your moment to truly craft something extraordinary.
Step 8: Assembling Your Masterpiece
With all components ready—the cooled cakes and velvety cream cheese frosting—it’s finally time for assembly! Place one layer of chocolate cake on your serving plate or cake stand (which makes for beautiful presentation). Now comes the fun part: using an offset spatula or knife (whichever feels comfortable), slather a generous layer of cream cheese frosting over this first layer. You want enough frosting here so that when you bite into it later, there’s that delightful balance between cake and frosting—not too much but certainly not too little either.
Next up is placing your strawberry layer right on top of that frosted chocolate base; watch as those vibrant colors start shining through! Repeat by adding another layer of frosting before gently placing down your final vanilla layer on top—oh my goodness, isn’t it looking gorgeous already? Finally, frost the top and sides of your entire cake with more cream cheese frosting until everything looks even and decadent—a true labor of love! Don’t worry if it’s not perfect; remember, rustic charm adds character!
Final Touches
Step 9: Chill Out Before Serving
Before diving into this masterpiece you’ve created, let’s take one last crucial step—chilling your assembled Neapolitan Cake! Place it in the refrigerator for at least an hour before slicing. Why chill? Well, allowing those layers to meld together helps enhance all those incredible flavors you’ve worked so hard on while giving your frosting some time to firm up beautifully. When you serve a chilled slice after resting in coolness—oh my stars—it becomes an utterly unforgettable experience!
While you’re waiting (I know it’s tough!), clean up your kitchen space—you’ll thank yourself later—and maybe even brew yourself a cup of tea or coffee as a little reward for all your efforts. When you’re finally ready to slice into this beauty after its chill session, you’ll discover perfectly defined layers bursting forth with flavor—the ideal celebration treat worthy of any gathering or simply indulging yourself at home!
So there you have it—a Neapolitan Cake that’s not only visually stunning but also incredibly satisfying with every luscious bite. I promise you’ll be amazed at how swiftly it’ll disappear among friends and family alike! Enjoy every moment spent crafting this piece of art because cooking truly connects us all through love…one delicious slice at a time!
Storage and Enjoyment Tips for Your Neapolitan Cake
Now that your Neapolitan Cake is beautifully assembled and adorned with creamy frosting, it’s time to dig in! But before you slice into this layered delight, let’s talk about how to keep the goodness alive for those moments when you want to enjoy a slice later. After all, this cake is not just a feast for the eyes; it’s a celebration of flavors that deserves to be savored long after the baking is done, and trust me, you’ll want to hold onto that magic!
Storing Leftover Neapolitan Cake
To keep your Neapolitan Cake fresh and delectable, the right storage method is essential. I recommend placing any leftover cake in an airtight container—this is crucial to lock in moisture and prevent the cake from drying out. If you don’t have one handy, wrapping it tightly in plastic wrap works just as well. Stored properly at room temperature, your cake will stay delicious for about three days. However, if it’s particularly warm or humid where you live, consider refrigerating it; just remember that refrigeration can slightly alter the texture. For those who love a little hack, placing a slice of bread in the container with the cake helps maintain its soft crumb—talk about a game changer! Even after a few days of storage, the flavors meld beautifully, creating an even more profound satisfaction as every bite offers a symphony of chocolatey richness paired with fruity strawberry notes and comforting vanilla undertones. When you’re ready to enjoy another slice, simply take it out and let it sit at room temperature for about 15 minutes before serving—this little bit of time allows those flavors to sing once more!
Freezing Neapolitan Cake for Later
If you find yourself left with more cake than you can devour in a few days (though I doubt that!), freezing is an excellent option that allows you to preserve its delightful taste for up to three months! To freeze your beautiful creation without sacrificing quality, wrap each layer separately in plastic wrap followed by aluminum foil to protect against freezer burn. This double-wrapping technique keeps each layer fresh and prevents any unwanted odors from seeping in—trust me on this one! When you’re ready for a sweet treat again, simply thaw the layers overnight in the refrigerator before layering them back together with frosting or enjoying them solo. This convenience factor makes having homemade dessert on hand so easy; imagine pulling out a decadent slice straight from your freezer on a cozy evening when cravings strike! Not only does this method offer flexibility for busy days ahead, but it also means you’re never too far away from that utterly intoxicating taste of Neapolitan Cake.
Neapolitan Cake

Indulge in the delightful experience of baking with our Neapolitan Cake, a stunning layered dessert that showcases the harmonious blend of chocolate, strawberry, and vanilla flavors. This cake is not just a treat; it’s a celebration of sweet moments spent with loved ones. Each slice offers a nostalgic journey through rich cocoa, fresh strawberries, and smooth vanilla, making it perfect for birthdays, gatherings, or simply enjoying at home. With its visually striking layers and creamy cream cheese frosting, this cake is sure to impress everyone at your table. Dive into this baking adventure and create memories that will last a lifetime!
- Prep Time: 30 minutes
- Cook Time: 30 minutes
- Total Time: 1 hour
- Yield: Serves approximately 12 slices 1x
- Category: Dessert
- Method: Baking
- Cuisine: Italian
Ingredients
- 2 cups all-purpose flour
- 1 cup unsweetened cocoa powder
- 2 cups granulated sugar
- 1 tbsp baking powder
- 1/2 tsp salt
- 4 large eggs (room temperature)
- 1 cup whole milk
- 2 tsp vanilla extract
- 1 cup softened butter (for frosting)
- 8 oz cream cheese (softened for frosting)
- 4 cups powdered sugar (for frosting)
Instructions
- Preheat your oven to 350°F (175°C) and prepare three round cake pans by greasing them or lining with parchment paper.
- In a mixing bowl, whisk together the flour, cocoa powder, sugar, baking powder, and salt until well combined.
- In another bowl, mix the eggs, milk, and vanilla extract until smooth. Gradually add this mixture to the dry ingredients and stir gently until combined.
- Divide the batter into three equal portions. Mix melted chocolate into one portion for the chocolate layer; add pureed strawberries to another for the strawberry layer; leave the last as vanilla.
- Pour each batter into prepared pans and bake for 25-30 minutes or until a toothpick comes out clean.
- Allow cakes to cool in pans for 10 minutes before transferring to wire racks to cool completely.
- For frosting, beat together softened cream cheese and butter until creamy. Gradually add powdered sugar and mix until smooth; incorporate more vanilla if desired.
- Once cooled, layer the cakes by spreading frosting between each layer before coating the top and sides with remaining frosting.
- Chill the assembled cake in the refrigerator for at least an hour before serving.
Nutrition
- Serving Size: 1 slice (100g)
- Calories: 400
- Sugar: 36g
- Sodium: 250mg
- Fat: 18g
- Saturated Fat: 10g
- Unsaturated Fat: 8g
- Trans Fat: 0g
- Carbohydrates: 56g
- Fiber: 2g
- Protein: 6g
- Cholesterol: 50mg