Melt-in-Your-Mouth Coffee Butter Cookies for Holiday Joy
There’s something utterly magical about the aroma of freshly baked cookies wafting through your home, isn’t there? The air thickens with warmth and comfort, whispering promises of sweet indulgence. Today, I invite you to embark on a delightful culinary journey as we whip up some Melt-in-Your-Mouth Coffee Butter Cookies for Holiday Joy. These aren’t just any cookies; they are a celebration of rich flavors that meld together in a tender embrace of buttery bliss, all while delivering that perfect caffeinated kick. Trust me when I say, each bite is like a warm hug on a chilly day, and they have an extraordinary ability to transform any gathering into a moment of shared joy.
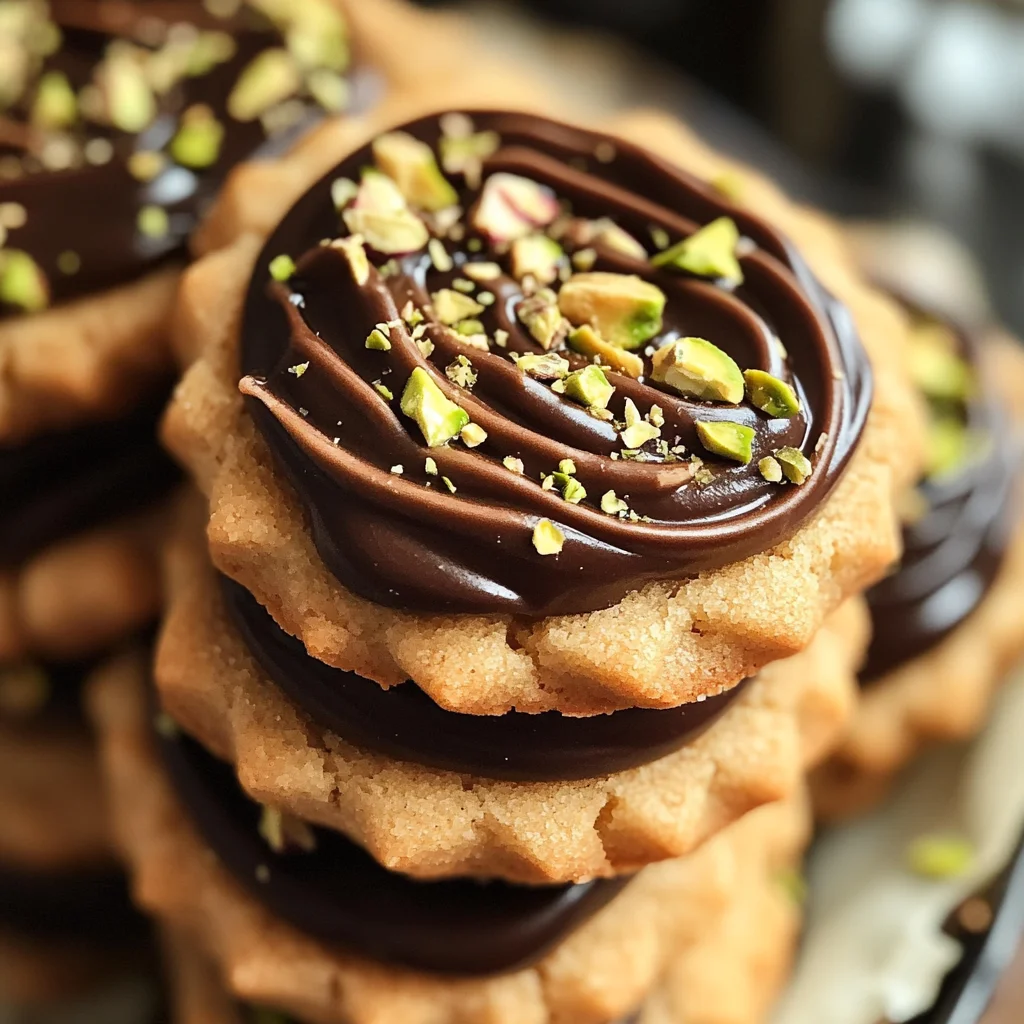
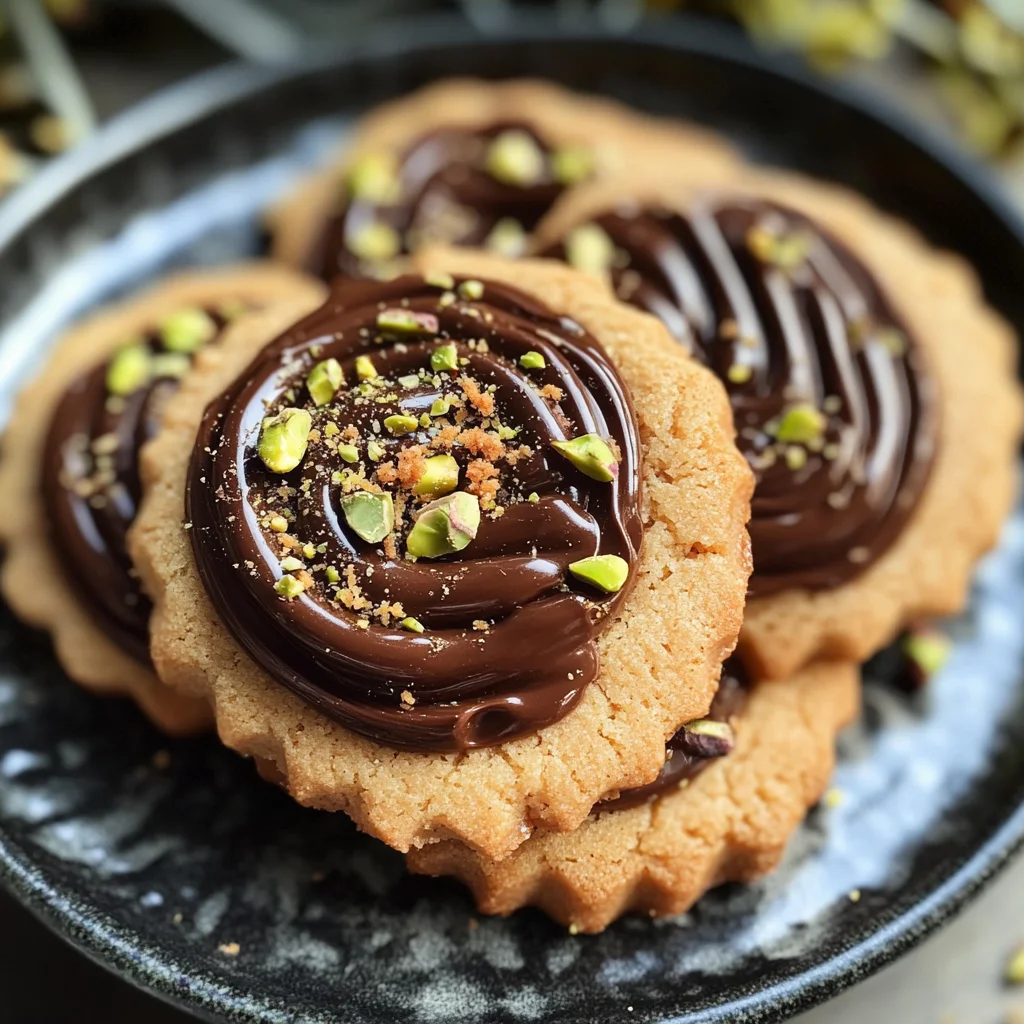
The beauty of these cookies lies not just in their flavor, but in the way they connect us with our loved ones. Imagine the laughter around the table, the smiles as you pass around a platter of these delectable treats, each one adorned with a drizzle of melted chocolate and a sprinkle of chopped pistachios. It’s this balance between tradition and innovation that makes these Melt-in-Your-Mouth Coffee Butter Cookies truly special. They’re perfect for holiday celebrations or simply to enjoy while cozied up with a good book and a steaming cup of coffee. It’s about creating those heartfelt memories that last far beyond the last crumb is eaten.
Melt-in-Your-Mouth Coffee Butter Cookies for Holiday Joy: A Caffeinated Delight
Let’s get right into this comforting recipe! Every step is designed to ensure your cookies come out perfectly every time, so get ready to experience the joy of baking from scratch.
Ingredients:
As you gather your ingredients, take a moment to appreciate each component’s role in crafting these delightful cookies. Each ingredient has its own story—a tale of taste and texture that comes together beautifully.
- 1 tablespoon instant coffee: This is where the magic begins! Using robust coffee granules will infuse your cookies with that rich coffee flavor we crave without overwhelming sweetness. Instant coffee dissolves effortlessly when mixed with hot water, allowing it to blend seamlessly into your cookie dough—trust me, this step is absolutely paramount for achieving that deep flavor profile.
- 2 tablespoons hot water: We use hot water here to activate the instant coffee granules; it helps them dissolve fully before joining the other ingredients. Allow it to cool slightly before mixing—it’s important not to scald your butter in the next steps! This gentle approach ensures that all flavors meld harmoniously.
- 1 cup icing sugar: Also known as powdered sugar, this ingredient lends sweetness and contributes to the melt-in-your-mouth texture we’re aiming for in these cookies. When sifted into your mixture, it adds lightness—creating that ethereal quality—and blends beautifully with butter for creamy perfection.
- 1 stick (1/2 cup or 113g) unsalted butter, softened to room temperature: The star ingredient! Properly softened butter is crucial for creaming effectively with sugar; this creates air pockets that help our cookies rise beautifully while keeping them tender. Look for high-quality butter—European-style works wonders due to its higher fat content which adds richness.
- 1 large egg, beaten: This ingredient acts as both binder and leavener in our cookie dough. The egg provides moisture while helping create structure as they bake. Beating it beforehand ensures an even distribution throughout the dough—don’t skip this step!
- 2 cups all-purpose flour: Flour is essential for structure in any cookie recipe. If you have gluten sensitivities or preferences, feel free to substitute with a gluten-free blend—just make sure it’s one designed for baking! The type you choose will affect texture; all-purpose flour gives that classic chewy consistency we love.
- 1 tablespoon cornstarch: This little wonder helps create an ultra-soft texture by preventing gluten formation during mixing. It’s non-negotiable if you want those melt-in-your-mouth vibes!
- 1 teaspoon ground cinnamon: Ahh, cinnamon—the spice that whispers warmth into our recipes! Adjust according to taste; it can add complexity and depth without being overpowering. It complements the coffee beautifully and evokes cozy holiday memories.
- 1 cup melted dark chocolate (or white chocolate for a sweeter twist): Chocolate brings richness and decadence to these cookies. Whether you choose dark or white chocolate depends on your personal preference—dark offers more robust flavor while white adds creamy sweetness that balances well with coffee.
- 1/4 cup chopped pistachios (or walnuts/almonds): Nuts provide crunch and contrasting flavor notes, enhancing both texture and taste. I adore pistachios here because their slight saltiness plays beautifully against the sweetness of the cookie—but feel free to swap them out if you prefer another nutty option!
Equipment You’ll Need:
Before we dive into making these delightful cookies, let’s talk about some essential tools you’ll need along the way. Having the right equipment will make your baking experience smoother and more enjoyable—think of them as trusty companions on this scrumptious adventure!
- Mixing bowls – A good set of mixing bowls is indispensable; you’ll need them for creaming butter and sugar together as well as combining dry ingredients later on. Choose glass or stainless steel since they hold temperature better than plastic—which can be helpful in controlling dough consistency!
- Electric mixer or whisk – An electric mixer makes creaming butter and sugar effortless while ensuring everything is blended uniformly—a crucial step for achieving fluffy textures! However, if you prefer a workout (and some nostalgia!), using a whisk will do just fine too; just be prepared for some arm exercise!
- Baking sheets lined with parchment paper – These help prevent sticking while ensuring even baking across all your cookies! Parchment paper also makes cleanup a breeze—who doesn’t love less mess?
Now that we’ve gathered our ingredients and tools, let’s dive into preparing these heavenly Melt-in-Your-Mouth Coffee Butter Cookies for Holiday Joy!
Step 1: Brew Your Flavorful Base
Start by brewing your instant coffee with hot water in a small bowl; mix until fully dissolved before letting it cool slightly. This process allows those bold flavors from the granules to awaken fully—think about how much richer your cookies will taste once this caffeine kick spreads throughout! While you’re waiting, take out your softened butter so it can begin warming up further—it should be soft enough to leave an indentation when pressed but not melted; this is crucial for creating that heavenly texture we’re after in our final product.
Step 2: Creaming Time!
In a large mixing bowl (preferably glass), combine your room-temperature unsalted butter and icing sugar using either an electric mixer or whisk until light and fluffy—a process known as creaming. This will take about 3–5 minutes; don’t rush this step! The goal here is to incorporate air into the mixture so that when baked, those cookies have an airy lift rather than being dense little bricks! You want it pale yellow in color—a sign you’ve successfully created those lovely air bubbles within!
Step 3: Add Egg & Coffee Mixture
Once you’ve achieved fluffy perfection in your creamed mixture, carefully add in the beaten egg along with your cooled brewed coffee from earlier—this adds moisture while continuing down our path toward mouthwatering goodness! Mix until well combined but don’t overdo it; we want everything just incorporated without losing all that precious air you’ve worked so hard to create!
Step 4: Flour Power!
Now it’s time to bring out our dry ingredients—the flour mixture along with cornstarch—and gently fold them into wet ingredients using either spatula or wooden spoon until no streaks remain visible but be cautious not to over-mix! Overworking could lead us back down towards dense territory instead of soft cloud-like bites we dream about having at holiday gatherings…so slow down here!
With each step taken lovingly towards crafting these Melt-in-Your-Mouth Coffee Butter Cookies for Holiday Joy completed thus far—you’re already on track towards creating pure delight!
Stay tuned as we continue exploring how best to shape these beauties next…
Step 5: The Art of Chilling the Dough – Patience is a Virtue
Now that your dough is beautifully blended and practically begging to be baked, we must pause for a moment of patience. This step is absolutely paramount! By chilling the dough for at least 30 minutes (or even up to an hour), you’re allowing the butter to firm up, which will result in cookies that hold their shape while baking instead of spreading out like a pancake. This transformation is crucial because it helps create that delightful melt-in-your-mouth texture we’re aiming for with these Coffee Butter Cookies. It also intensifies the flavors as they meld together, leading to a harmonious symphony of taste in each bite.
To chill your dough, simply wrap it in plastic wrap or place it in an airtight container. While you wait, this is a perfect time to preheat your oven to 350°F (175°C) and line your baking sheet with parchment paper. Trust me on this; the parchment paper creates a non-stick surface that ensures your cookies slide off effortlessly once baked, preserving their delicate structure. And remember, don’t rush this step—great cookies require time and love!
Step 6: Shaping Your Cookies – Crafting Little Clouds of Joy
After your dough has chilled and you’ve savored the anticipation, it’s time to shape these little delights into something truly special. Take about a tablespoon of chilled dough and roll it into a ball between your palms—this should feel soft yet firm. Place them spaced about two inches apart on your prepared baking sheet because they will slightly spread during baking; we want each cookie to have its own cozy space without crowding.
Now here comes a fun twist! If you’d like to add some flair, gently press down each ball with the back of a fork or your fingertips to create a little indentation or pattern. This not only makes them visually appealing but also helps them bake evenly. But don’t worry too much about perfection here; remember that each cookie carries its unique character! As you work through this step, take a moment to enjoy the sweet aroma of coffee wafting through your kitchen—it’s utterly intoxicating and an early promise of what’s to come.
Step 7: Baking – Transforming Dough into Cookie Magic
With your cookies shaped and ready, slide them into the preheated oven and set your timer for 8-10 minutes. Keep an eye on them because ovens can be temperamental little creatures! You’ll know they’re done when they turn a light golden color around the edges while remaining soft in the center—this visual cue is essential for achieving that melt-in-your-mouth texture. Over-baking can lead to dry cookies, which we absolutely want to avoid.
As they bake, allow yourself to bask in the delightful aroma filling your home; it’s like wrapping yourself in a warm blanket of holiday cheer! Once the timer goes off, take them out but resist the urge to touch them right away; they need about five minutes on the baking sheet before being transferred to a wire rack. This resting period allows them to firm up just enough so they won’t crumble when you move them—patience really does pay off!
Step 8: Decorating with Chocolate – A Decadent Finishing Touch
Now comes one of my favorite parts—decorating these cookies! While they cool completely on the wire rack, prepare your melted dark chocolate (or white chocolate if you’re feeling adventurous) by placing it in a microwave-safe bowl and heating it in short bursts until smooth—about 20 seconds at a time works wonders without burning it. Stir after each interval until you achieve that luscious liquid gold consistency.
Once cooled, dip half of each cookie into this velvety chocolate goodness or drizzle it over top for an elegant finish. The combination of rich chocolate with coffee flavors creates an utterly extraordinary experience that elevates these cookies from delightful treats to showstoppers worthy of any holiday table. And let’s not forget those chopped pistachios sprinkled on top—they add not just flavor but also texture and visual appeal! Allow the chocolate coating to set at room temperature or pop them into the fridge for quicker results—though I promise they won’t last long enough for anyone to notice!
Next Major Phase – Enjoying Your Melt-in-Your-Mouth Coffee Butter Cookies for Holiday Joy
With all these steps completed, it’s finally time for you (and everyone lucky enough to share in this treat) to enjoy these incredible Melt-in-Your-Mouth Coffee Butter Cookies! They are not just cookies; they embody joy and warmth—the essence of holiday spirit captured within every bite. Serve them alongside steaming cups of coffee or hot cocoa as you gather around with loved ones sharing stories and laughter.
These cookies are sure to become a cherished part of your holiday traditions just as they are in mine. And remember: every batch is made with love, patience, and creativity—a true reflection of who you are as both a baker and an individual. So go ahead, indulge guilt-free because you’ve created something truly magical—and I can’t wait for you to share them with friends and family!
Storage and Enjoyment Tips for Your Melt-in-Your-Mouth Coffee Butter Cookies for Holiday Joy
Ah, the moment we’ve all been waiting for! Your Melt-in-Your-Mouth Coffee Butter Cookies for Holiday Joy are fresh from the oven, their enticing aroma still swirling in the air, and now it’s time to enjoy these little bites of bliss. But what if you find yourself with a few extras? Don’t worry! I’ve got you covered with some fantastic storage tips to ensure every cookie remains as delightful as the day you baked them.
Storing Leftover Melt-in-Your-Mouth Coffee Butter Cookies for Holiday Joy
When it comes to storing your precious cookies, the right container can make all the difference. Opt for an airtight container—something sturdy yet breathable is key; think ceramic or glass rather than plastic. Layer your cookies with parchment paper to keep them from sticking together, and store them at room temperature away from direct sunlight. If stored properly, these cookies maintain their delicious charm for about a week, although I doubt they’ll last that long with how utterly irresistible they are! To keep that melt-in-your-mouth texture alive, try placing a slice of bread in the container; this simple trick will help them stay soft and moist. As they sit, you might notice that the flavors meld together beautifully, creating a symphony of coffee and buttery goodness that’s simply divine. When you’re ready to indulge again, there’s no need to worry about reheating—just dive in as they are or pair them with your favorite hot beverage for an experience that’ll warm your heart.
Freezing Cookies for Later
If you’re planning ahead (which I highly recommend), freezing your Melt-in-Your-Mouth Coffee Butter Cookies is an excellent option! To do this perfectly, allow your cookies to cool completely before arranging them in a single layer on a baking sheet lined with parchment paper. Place this sheet in the freezer until they’re solid—about an hour should do the trick—and then transfer them into a freezer-safe bag or container. They can stay happily frozen for up to three months! When you’re craving something sweet but don’t want to bake anew, simply take out however many cookies your heart desires and let them thaw at room temperature. The best part? They’ll taste just as fresh as when you first made them! This makes it incredibly convenient for unexpected guests or those late-night cravings when you want something special without any fuss. Trust me; having these gems tucked away is like having a little treasure trove of joy waiting for you.
Melt-in-Your-Mouth Coffee Butter Cookies for Holiday Joy

Indulge in the warmth of the holiday season with Melt-in-Your-Mouth Coffee Butter Cookies! These delightful treats are a perfect blend of rich coffee flavor and buttery goodness, creating a cookie experience that is simply unforgettable. Each bite offers a tender texture complemented by a drizzle of melted chocolate and a sprinkle of crunchy pistachios, making them ideal for gatherings or cozy evenings at home. Whether you’re sharing them with loved ones or enjoying them solo with your favorite cup of coffee, these cookies promise to bring joy and comfort to every moment.
- Prep Time: 15 minutes
- Cook Time: 10 minutes
- Total Time: 25 minutes
- Yield: Approximately 24 servings 1x
- Category: Dessert
- Method: Baking
- Cuisine: American
Ingredients
- 1 tablespoon instant coffee
- 2 tablespoons hot water
- 1 cup icing sugar
- 1 stick (1/2 cup) unsalted butter, softened
- 1 large egg, beaten
- 2 cups all-purpose flour
- 1 tablespoon cornstarch
- 1 teaspoon ground cinnamon
- 1 cup melted dark chocolate (or white chocolate)
- 1/4 cup chopped pistachios (or nuts of choice)
Instructions
- Brew instant coffee with hot water until dissolved; set aside to cool.
- In a mixing bowl, cream together softened butter and icing sugar until light and fluffy.
- Add the beaten egg and cooled coffee mixture; mix until combined.
- Gradually fold in flour, cornstarch, and cinnamon until just combined.
- Chill the dough for at least 30 minutes in the refrigerator.
- Preheat oven to 350°F (175°C) and line baking sheets with parchment paper.
- Shape dough into balls, place on baking sheets, and gently flatten if desired.
- Bake for 8-10 minutes until golden at edges; let cool before transferring to wire racks.
- Decorate with melted chocolate and chopped pistachios once cooled.
Nutrition
- Serving Size: 1 cookie (20g)
- Calories: 100
- Sugar: 8g
- Sodium: 30mg
- Fat: 5g
- Saturated Fat: 3g
- Unsaturated Fat: 2g
- Trans Fat: 0g
- Carbohydrates: 12g
- Fiber: <1g
- Protein: <1g
- Cholesterol: 15mg