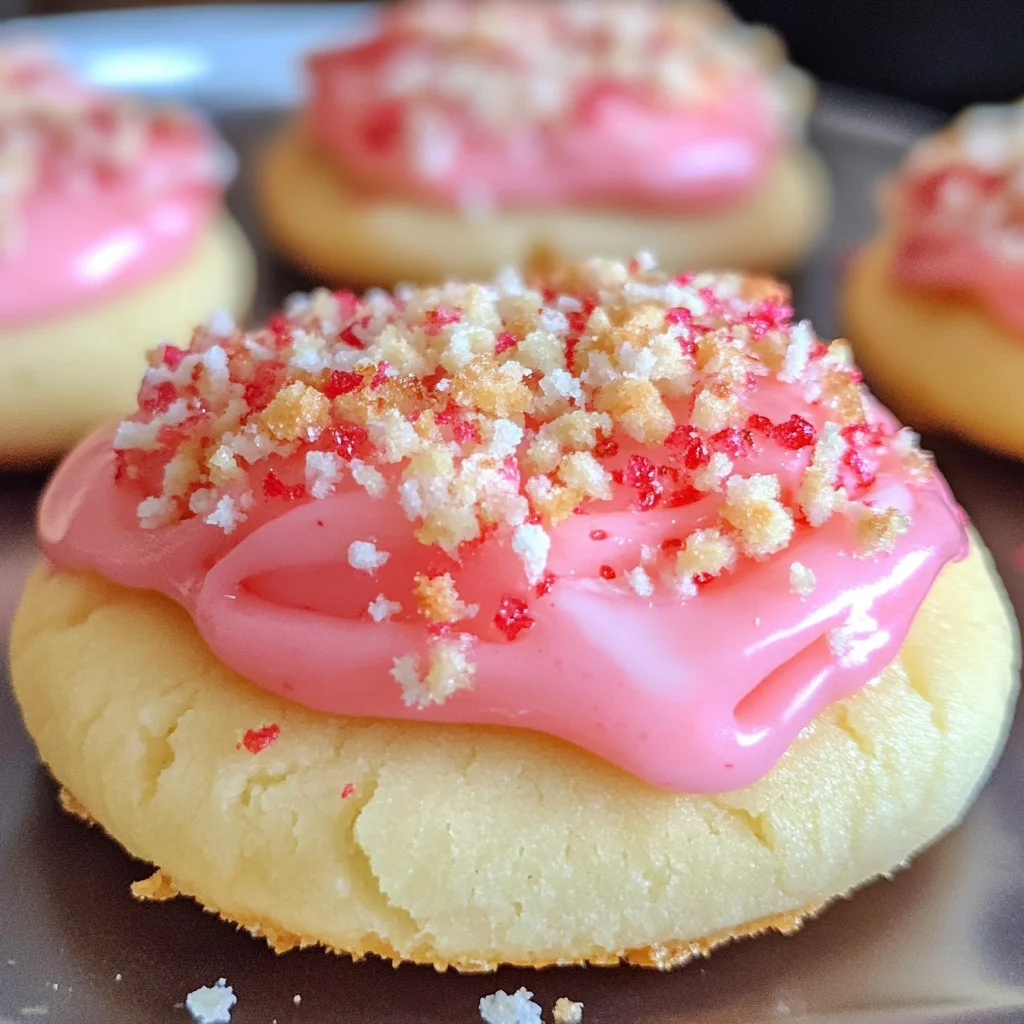
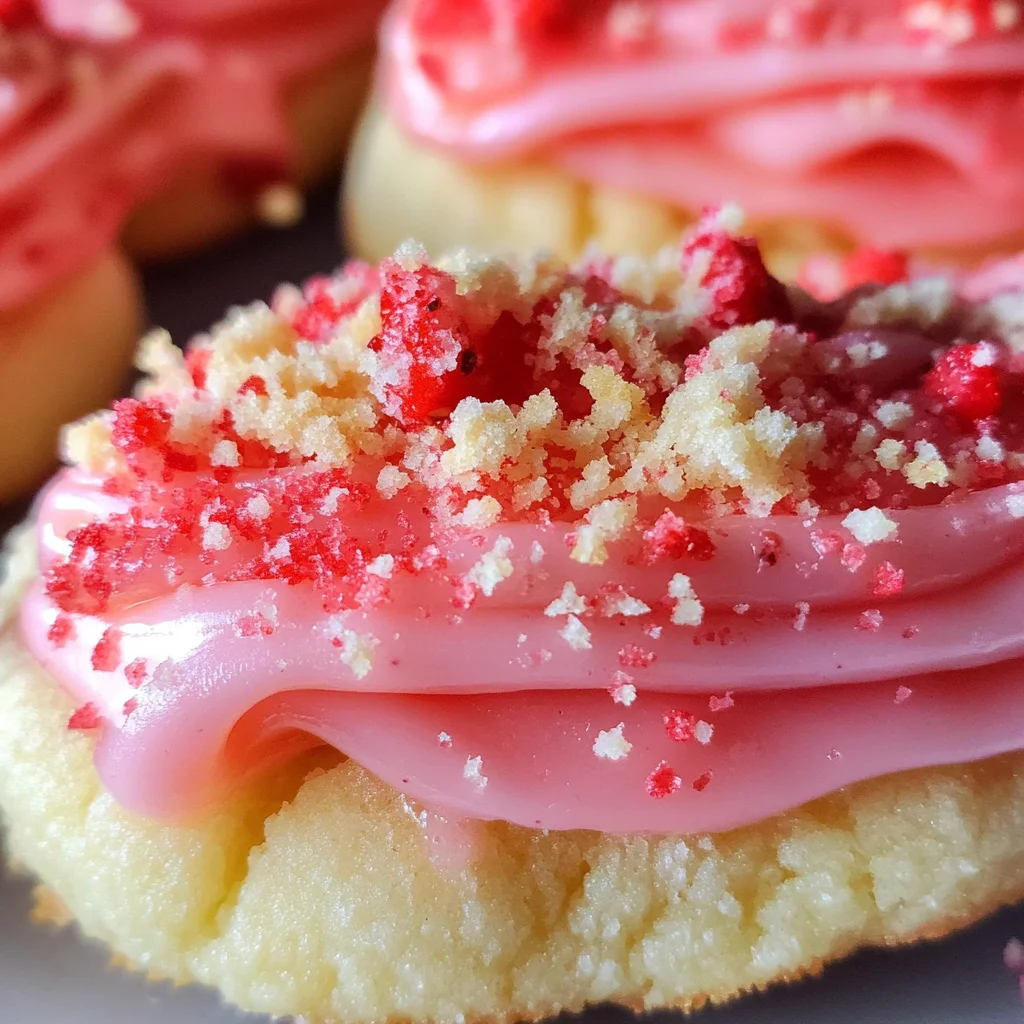
Strawberry Shortcake Sugar Cookies
There’s something truly magical about the aroma of freshly baked cookies wafting through the kitchen, isn’t there? It’s a scent that brings back memories of childhood kitchens filled with laughter and joy, where every bite is a small dose of happiness. This Strawberry Shortcake Sugar Cookies recipe isn’t just about satisfying a sweet tooth; it’s an experience—a delightful journey that bridges the classic world of sugar cookies with the refreshing brightness of strawberries. Imagine biting into a soft, buttery cookie, only to be met with a luscious glaze and a sprinkle of shortcake crumbs that evoke the essence of summer. This isn’t just dessert; it’s a celebration of flavors and textures that dance together in perfect harmony. Trust me when I say that these cookies will not only tantalize your taste buds but also warm your heart.
As we embark on this baking adventure together, you’ll find that each step is infused with love and care. These cookies are perfect for any occasion—be it a cozy evening in or an extravagant Valentine’s Day gift for someone special. The vibrant pink hues from the frosting and the inviting aroma will make anyone feel cherished. I promise you, once you share these treats with friends or family, they’ll be asking for seconds—or even thirds! So, roll up your sleeves and let’s dive into creating these Strawberry Shortcake Sugar Cookies that are bound to leave a lasting impression.
Strawberry Shortcake Sugar Cookies: A Sweet Twist on Tradition
These Strawberry Shortcake Sugar Cookies give a fun twist to the classic sugar cookie we all know and love. With their delicate vanilla flavor enhanced by creamy frosting and crunchy shortcake crumbs, they’re sure to become your new favorite treat! Plus, their charming appearance makes them perfect for gifting or sharing at gatherings.
Ingredients:
Before we get started on this delightful culinary journey, let’s take a moment to appreciate our ingredients. Each one plays a vital role in crafting these scrumptious Strawberry Shortcake Sugar Cookies, ensuring they’re not just good but truly extraordinary.
- 3/4 cup (1 1/2 sticks or 170g) unsalted butter, softened: The butter is absolutely paramount in achieving the perfect texture for our cookies. Softened butter allows us to cream it with sugar effectively, creating tiny air pockets that make our cookies light and airy. When selecting butter, opt for high-quality unsalted varieties as they offer better control over the sweetness of your dough. If you forgot to take it out ahead of time, no worries—just cut it into small pieces and microwave it for about 10-15 seconds until slightly soft but not melted.
- 1 1/2 cups granulated sugar: This sugar adds sweetness but also contributes to the overall texture of our cookies. Sugar helps create that delightful crisp edge while keeping the center soft and chewy. When measuring sugar, spoon it lightly into your measuring cup before leveling it off for accuracy; this ensures you don’t accidentally pack it down too tightly.
- 2 large eggs: Eggs are crucial not only for binding all our ingredients together but also for enriching flavor and moisture. They add richness that’s simply irreplaceable! Make sure to use room temperature eggs as they mix more seamlessly into the batter than cold ones from the fridge.
- 2 teaspoons pure vanilla extract: This ingredient is like liquid gold in baking—it enhances flavors beautifully! Always choose pure vanilla extract over imitation; this little detail elevates your cookie dough from ordinary to extraordinary, providing depth that makes every bite profoundly satisfying.
- 2 3/4 cups all-purpose flour: Flour forms the backbone of our cookie structure—it’s what gives them their form! Sifting your flour is essential here as it aerates it and removes any lumps. When purchasing flour, look for brands labeled ‘all-purpose’ which strike a perfect balance between protein content needed for structure without being overly dense.
- 1/2 teaspoon salt: Don’t skip this step! Salt enhances sweetness while balancing flavors beautifully. It brings out all those natural tastes hidden in our ingredients—trust me when I say it’s non-negotiable!
- 1/2 teaspoon baking powder: This leavening agent ensures our cookies rise perfectly without being too dense or heavy. It’s important to check expiration dates on baking powder regularly because stale leavening agents can lead to flat cookies.
- 4 cups confectioner’s sugar: Used for our frosting, confectioner’s sugar creates that silky smooth glaze we’re after—it’s what transforms our cookies from simple to stunning! Make sure to sift it before mixing; this prevents clumps from forming in your frosting.
- 3 tablespoons milk: Milk adds just enough moisture to bring our frosting together into a smooth consistency that’s easy to drizzle over our lovely cookies. You can substitute almond or oat milk if you want—both work wonderfully!
- Pink food coloring: A dash of pink food coloring adds whimsy and charm to our frosting! Feel free to adjust as per your preference—whether you want soft pastels or vibrant hues; it’s all about making your creations joyful!
- 1 1/2 cups Strawberry Shortcake Crumbs: These delightful crumbs are what tie everything back to classic strawberry shortcake—they provide crunch and texture that contrasts beautifully with the soft cookie base. You can make these by crushing store-bought strawberry shortcake biscuits or preparing them fresh at home if you’re feeling adventurous!
Equipment You’ll Need:
Having the right tools makes all the difference in turning cooking—and especially baking—into a joyful experience rather than a stressful chore! While they may not be ingredients, these essential partners help ensure everything comes together smoothly as you create something wonderful.
- Mixing bowl: A large mixing bowl is where all your magic begins! It should be big enough to allow room for whisking and beating without spilling over. Opt for glass or stainless steel bowls as they resist staining and retain heat well if needed during processes like whipping egg whites.
- Electric mixer (handheld or stand): An electric mixer saves time and effort when creaming butter and sugar together—a crucial step for developing texture in your cookies! Hand mixers are great if space is limited while stand mixers offer convenience if you’re planning multiple batches in one go.
- Measuring cups & spoons: Precision is key when baking; having reliable measuring cups and spoons ensures you’re using accurate amounts which affect both taste and texture significantly. Invest in sturdy sets made from metal or glass—they’ll last longer than plastic!
- Baking sheet: Non-stick baking sheets are best here since they help prevent sticking while promoting even browning on those gorgeous cookie bottoms! If you find yourself using parchment paper often (which I highly recommend), reusable silicone mats can be an eco-friendly alternative!
- Parchment paper or silicone baking mat: These liners protect your baking sheets while ensuring easy cleanup afterward—no one enjoys scrubbing burnt-on bits off pans! They also help distribute heat evenly across your cookies so they bake consistently every time.
Now that we’ve gathered all our ingredients and tools, let’s jump into preparing these delectable Strawberry Shortcake Sugar Cookies!
Step 1: Preheat Your Oven & Prepare Baking Sheets
Start by preheating your oven to 350 degrees Fahrenheit—that’s where we want those delicious aromas wafting through every corner of your home! While it’s heating up, line two baking sheets with parchment paper or silicone mats; this simple act saves you from messy cleanups later on. Taking this precaution ensures even cooking as well—you might notice how beautifully golden brown those edges turn out when baked on quality liners versus directly onto metal surfaces!
Step 2: Cream Butter & Sugar
In a large mixing bowl, combine softened butter with granulated sugar using an electric mixer set at medium speed until creamy—this process known as creaming incorporates air into our mixture which leads us toward those light-as-a-feather cookies we’re after! Allow around four to five minutes here—patience pays off generously as you’ll notice how fluffy things become when creamed properly compared against skipping ahead too quickly without giving adequate time for incorporation (which can lead towards denser results). Look out for that pale yellow color signaling success—the blend should easily hold its shape without falling apart too much at this stage!
Step 3: Add Eggs One at a Time
Next up? Eggs! Lower speed slightly before adding them one at a time into our creamed mixture; let each egg fully incorporate before introducing another (patience again!). Why do we do this? Adding eggs incrementally allows them more opportunity integrating thoroughly instead clumping together awkwardly—a common issue many encounter if dumped all at once! Look out for how shiny everything gets—we want smoothness here without any lumps remaining behind from eggy surprises later down road…
Step 4: Incorporate Vanilla Extract
Once those eggs have joined forces beautifully within their buttery kingdom—it’s time we elevate flavors further by pouring in some glorious vanilla extract too! Use pure vanilla whenever possible since imitation can sometimes lack depth resulting less-than-stellar outcomes… And believe me—the scent alone will ignite joy throughout kitchen even before anything hits oven itself—the warmth radiating spreads smiles everywhere instantly!
Let’s keep going with more steps soon—I can’t wait until these beauties come out smelling heavenly!
Crafting Your Strawberry Shortcake Sugar Cookies
Now that we’ve embarked on this delightful journey of flavor and nostalgia, let’s dive deeper into the process of creating these extraordinary Strawberry Shortcake Sugar Cookies. Each step is crucial not just for the structure of the cookie but also for that enchanting taste that brings smiles to faces and warmth to hearts. Trust me, every moment spent in the kitchen will be filled with the sweet anticipation of what’s to come!
Step 5: The Flour Power – Mixing It In
As we move on to incorporating flour, salt, and baking powder, this step is where the magic really starts to happen. First, take a moment to sift together your 2 ¾ cups of all-purpose flour, ½ teaspoon of salt, and ½ teaspoon of baking powder in a separate bowl. Sifting is not just about making things look pretty; it aerates the flour, allowing for a lighter texture in your cookies. When you combine these dry ingredients with your creamy butter mixture, you’ll want to do so gradually. This will help ensure that everything blends seamlessly without any lumps or dry pockets.
Using a mixer on low speed, gently beat the mixture until just combined—don’t rush this step! You want to avoid overmixing at all costs because it can lead to tough cookies rather than the soft, tender bites we’re aiming for. The dough should come together beautifully into a soft ball that holds its shape yet remains pliable enough to roll later. If you notice it feels too sticky or wet, don’t hesitate to sprinkle in an extra tablespoon of flour at a time until it achieves that perfect consistency; after all, achieving balance in texture is absolutely paramount for these cookies.
Step 6: Time to Shape – Portioning Your Dough
With our dough now perfectly formed, it’s time to portion it out into delightful cookie balls! Using a heaping tablespoon as your guide (approximately 1 ounce), scoop out pieces of dough and gently roll them into smooth balls in your hands. This part always reminds me of making little snowballs during winter—there’s something so satisfying about getting your hands right into the dough! Place each ball onto your prepared baking sheet with ample space between them (about two inches apart) because they will spread slightly while baking.
Now comes the fun part! Flatten each ball down until it’s about ¼ inch thick using either your palm or the bottom of a drinking glass—a technique I adore because it gives you control over their final shape while ensuring even baking. Keep an eye on uniformity here; cookies that are similar in size will bake evenly, which is crucial if you want every bite to be as heavenly as the last. Remember, you’re not just shaping cookies; you’re preparing little bites of joy ready to bring happiness when they emerge from the oven!
Step 7: The Sweet Aroma – Baking Time!
Preheat your oven now if you haven’t already—it should be set at 350 degrees Fahrenheit (175 degrees Celsius). Once you’ve shaped all your cookies and lined them up nicely on the baking sheet, pop them into that preheated oven for about 10 minutes. As they bake, you’ll start smelling an utterly intoxicating aroma waft through your kitchen; I promise you won’t be able to resist stealing a peek every few minutes!
Keep an eye on those little beauties as they bake—the edges will become ever-so-slightly golden brown while centers remain soft and pale. That’s exactly what we want! When you see this beautiful transformation happening around the edges but still feel a bit of softness in the center when lightly touched—consider them done! However, patience is vital here; allowing them just a couple more minutes can elevate their flavor profile by letting those sugars caramelize beautifully without overcooking.
Step 8: Cooling Down – Letting Them Rest
Once baked to perfection, take those fragrant cookies out of the oven and allow them to cool on the sheet for about 2-3 minutes before transferring them onto a wire cooling rack. This resting period plays an essential role; it allows residual heat from the baking sheet to finish cooking those delicious centers without becoming overly firm or crunchy. You don’t want to rush this part—trust me on this—because moving them too soon can cause breakage or give way to uneven cooling.
After those few precious moments have passed and they’re cool enough to handle without burning yourself (and trust me—you’ll want to avoid that!), carefully transfer each cookie onto the wire rack using a spatula. This technique ensures air circulates around each cookie as they cool completely—an important factor in achieving that ideal soft texture we’re all craving! Take a moment here; enjoy watching how they settle, puff up slightly before firming up—it’s like witnessing magic happen right before your eyes!
Conclusion:
As we wrap up this delightful journey through making Strawberry Shortcake Sugar Cookies together, I can’t help but feel excited about what you’re going to create in your own kitchen! This recipe is truly special—each bite brings together the soft sweetness of sugar cookies with the vibrant essence of strawberries and cream through those crumbly shortcake bits. It’s like capturing summer sunshine on your plate! The creamy glaze adds just the right amount of indulgence while bringing out those fresh flavors; it’s an utterly intoxicating combination that makes these cookies stand out from ordinary desserts.
I wholeheartedly believe that this recipe is a must-try—not just for its exceptional taste but also for the sheer joy it brings during its preparation. Each step feels like an act of love, whether you’re mixing together ingredients or drizzling on that beautiful glaze; it invites creativity into your kitchen! These cookies shine at any occasion—be it Valentine’s Day gifts wrapped in lovely paper or as part of a festive dessert table at family gatherings. Imagine pulling these beauties from the oven and feeling that warm embrace of nostalgia—they’re bound to become a cherished favorite.
Now let’s talk pairings because what’s better than enjoying these sweet gems alongside something equally wonderful? Picture savoring one with a steaming cup of chamomile tea as an afternoon pick-me-up or enjoying them with homemade whipped coconut cream drizzled over fresh strawberries for an incredibly decadent experience. They also complement beautifully with vanilla ice cream; trust me when I say it creates an unforgettable dessert moment!
Feeling adventurous? This recipe is wonderfully adaptable! You could swap out strawberry shortcake crumbs with crushed lemon wafers or even use blueberry pie filling instead—both would yield delicious results! Experimenting with flavors opens up new avenues of delight and personal touches; so go ahead and make it uniquely yours! I can’t wait for you to try this recipe and share your experiences with me—it fills my heart with joy knowing we’re creating beautiful moments together through food!
Strawberry Shortcake Sugar Cookies

There’s nothing quite like the joy of biting into a soft, buttery Strawberry Shortcake Sugar Cookie. With each delightful bite, you experience the perfect harmony of sweetness and freshness, enhanced by a luscious glaze and crispy shortcake crumbs. These cookies are not just desserts; they are a celebration of summer flavors that evoke warm memories and bring happiness to any occasion. Whether you’re sharing them at a gathering or gifting them to someone special, these cookies are sure to impress.
- Prep Time: 20 minutes
- Cook Time: 10 minutes
- Total Time: 30 minutes
- Yield: About 24 cookies 1x
- Category: Dessert
- Method: Baking
- Cuisine: American
Ingredients
- 3/4 cup unsalted butter, softened
- 1 1/2 cups granulated sugar
- 2 large eggs
- 2 teaspoons pure vanilla extract
- 2 3/4 cups all-purpose flour
- 1/2 teaspoon salt
- 1/2 teaspoon baking powder
- 4 cups confectioner’s sugar
- 3 tablespoons milk
- Pink food coloring (optional)
- 1 1/2 cups Strawberry Shortcake Crumbs
Instructions
- Preheat your oven to 350°F (175°C) and line baking sheets with parchment paper.
- In a mixing bowl, cream together softened butter and granulated sugar until light and fluffy. Add eggs one at a time, mixing well after each addition, then add vanilla extract.
- In another bowl, sift together flour, salt, and baking powder. Gradually add this mixture to the wet ingredients until just combined.
- Scoop tablespoon-sized portions of dough onto the prepared baking sheets, flattening each ball slightly with your palm. Bake for about 10 minutes or until edges are golden brown but centers remain soft. Allow cookies to cool on a wire rack.
- For frosting, whisk together confectioner’s sugar and milk until smooth. Drizzle over cooled cookies and sprinkle with strawberry shortcake crumbs before the glaze sets.
Nutrition
- Serving Size: 1 cookie
- Calories: 150
- Sugar: 12g
- Sodium: 40mg
- Fat: 6g
- Saturated Fat: 4g
- Unsaturated Fat: 1g
- Trans Fat: 0g
- Carbohydrates: 22g
- Fiber: 0g
- Protein: 2g
- Cholesterol: 20mg