High Protein Twix Bars
There’s something truly magical about the combination of sweet and salty, and I can’t help but feel a little giddy when I think about the nostalgia wrapped up in candy bars. They remind me of carefree afternoons spent in the kitchen, experimenting with flavors, textures, and a little bit of mischief. Today, I’m thrilled to share a recipe for High Protein Twix Bars that transcends mere indulgence—this is a delightful experience that marries health with happiness. Imagine biting into a rich, chocolate-coated bar that offers not just a moment of joy but also a nourishing boost! These bars are made from wholesome, natural ingredients and packed with protein, making them a delightful treat you can feel good about enjoying.
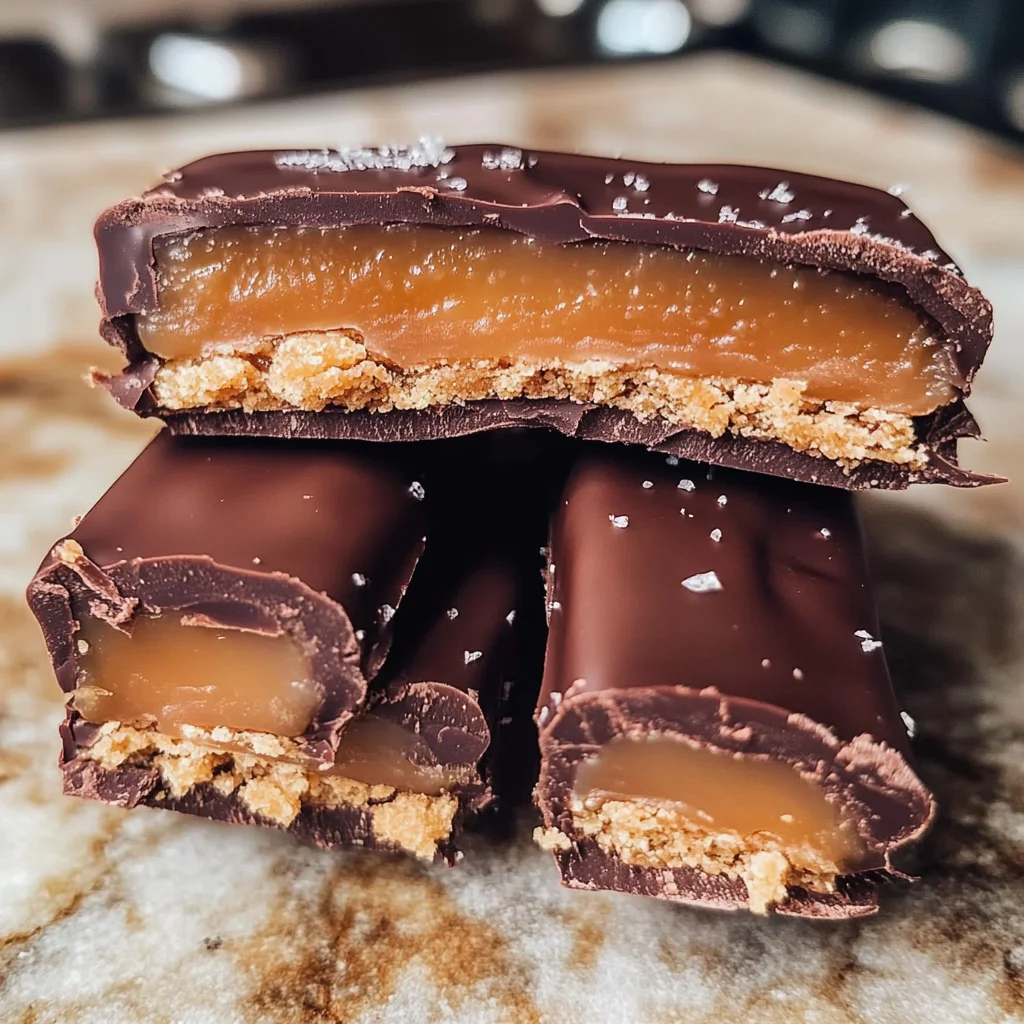
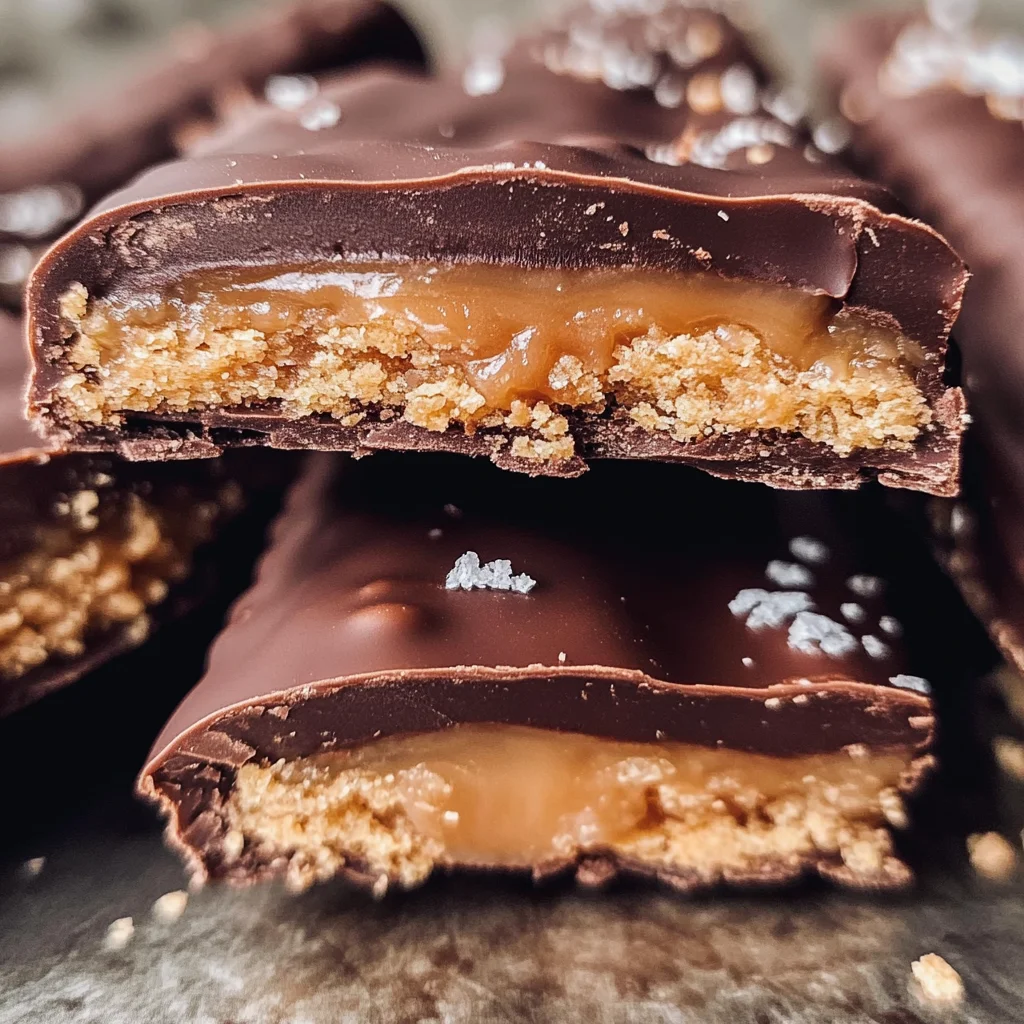
When I first stumbled upon this concept of creating healthier versions of beloved candy bars, it felt like discovering buried treasure. The idea that you could recreate such an iconic treat without sacrificing flavor or nutrition was revolutionary to me! These High Protein Twix Bars embody the essence of what we love about traditional Twix: that perfect balance of crunchy cookie base, gooey caramel layer, and luscious chocolate coating. But here’s the secret sauce—they’re infused with protein powder and free from any animal-derived gelatin or pork products. It’s time to indulge without compromise!
High Protein Twix Bars: A Nutritious Twist on a Classic Treat
Let’s dive into this wonderful culinary adventure together! Making these bars is not only simple but also incredibly rewarding. You’ll be amazed as you transform ordinary ingredients into something extraordinary—just like magic!
Ingredients:
As we embark on this delicious journey, let’s take a moment to appreciate the star players in our recipe. Each ingredient contributes its own unique charm to these delightful bars.
- 1 cup oat flour. This is the foundation of our cookie layer—it’s gluten-free and provides a lovely nutty flavor along with a tender texture that sets the stage for all the other components. Oat flour absorbs moisture well and helps create that satisfying bite we crave in any good dessert bar. If you don’t have oat flour on hand, don’t worry! You can easily make your own by blending rolled oats until they resemble fine flour; it’s super easy and just as effective.
- ½ cup vanilla protein powder. Here’s where we really amp up the nutrition! I’m a big fan of EarthChimp’s protein powder because it blends seamlessly into batters without clumping or overpowering the other flavors. This ingredient not only adds protein to keep you full longer but also enhances the overall taste profile with its subtle sweetness and creamy texture. If you’re looking for alternatives, any plant-based vanilla protein powder should do just fine—just check for added sugars!
- ¼ cup coconut sugar. This delightful sweetener brings warmth and depth to our bars while being less processed than regular sugar. Coconut sugar has a slightly caramel-like flavor that perfectly complements both the chocolate coating and the creamy cashew butter later on. It’s also lower on the glycemic index than white sugar, making it a more stable energy source.
- ¼ cup coconut oil. Liquid gold in every sense! Coconut oil not only helps bind everything together but also adds richness and moisture to our cookie layer. Plus, it solidifies when chilled, helping to create that perfect structure for our treats. When shopping for coconut oil, opt for virgin or extra virgin varieties for maximum flavor and health benefits.
- ¼ cup oat milk (or any milk of choice). This creamy dream is essential for bringing our mixture to life—the liquid component that helps meld everything together beautifully! Oat milk has a mild flavor that won’t overpower your bars while adding richness; however, feel free to use almond milk or any other non-dairy milk you adore!
- ½ cup cashew butter. Ahh, cashew butter—a luxurious spread that’s both creamy and subtly sweet! It’s going to serve as our gooey caramel layer in this recipe, providing healthy fats and an irresistibly smooth texture that’s simply addictive! Be sure to choose a natural variety without added sugars or preservatives; trust me when I say this makes all the difference!
- 3 tablespoons maple syrup. This amber-hued syrup adds natural sweetness and pairs perfectly with cashew butter for an utterly intoxicating caramel flavor reminiscent of classic candy bars! Not only is it delicious, but maple syrup also contains antioxidants—so you can indulge guilt-free!
- 2 tablespoons coconut oil (again). Yes, we’re doubling down on this ingredient because it plays such an important role in transforming our cashew butter mixture into silky smooth caramel goodness! Remember to melt your coconut oil before incorporating it—it ensures everything comes together flawlessly.
- 1 teaspoon vanilla extract. This aromatic extract enhances all our flavors beautifully—it’s like giving each bite an invisible hug! Don’t skimp here; quality matters immensely because you’ll truly taste the difference between pure extract and imitation vanilla.
- 2 cups dark chocolate chips (I like at least 70% dark chocolate). We’re finishing strong with rich chocolate that envelopes our entire creation in decadence! Dark chocolate not only tastes heavenly but also offers numerous health benefits—antioxidants galore! Choose high-quality chips for optimal melting; they’ll coat your bars evenly for that gorgeous glossy finish we all adore.
- 1 tablespoon coconut oil (final touch). This last addition will ensure your melted chocolate is smooth and shiny when it coats those lovely bars—we want them to look as good as they taste!
Equipment You’ll Need:
Having the right tools makes cooking feel like pure joy rather than a chore—it’s like having trusty companions by your side during this culinary escapade! While these items may not be “ingredients,” they are essential partners in creating something wonderful.
- 8×8 or 9×9 baking pan – A square baking pan is crucial because it provides just the right size for shaping our bars; plus, it allows even cooling so every piece sets up beautifully without crumbling apart later on.
- Parchment paper – Trust me; lining your pan with parchment paper is non-negotiable if you want easy removal after chilling! It prevents sticking while allowing you to lift out your creation effortlessly once set.
- Large mixing bowls – You’ll want plenty of space when combining ingredients; large bowls give you room to mix vigorously without spilling over the sides!
- Spatula – A sturdy spatula is essential for spreading those luscious layers evenly across your baking pan; look for one with flexibility since this will help get every last bit out of your mixing bowl!
- Double boiler or microwave-safe bowl – Depending on how you prefer melting chocolate—this equipment is key for achieving that silky-smooth consistency we all crave when dipping our bars!
With our ingredients gathered and tools ready at hand, let’s move on to preparing these delectable High Protein Twix Bars!
Step 1: Get Your Base Ready
First things first—let’s line your baking pan with parchment paper so we can easily lift out our glorious creation later on without any fuss! Take those joyful moments seriously; it’s all part of making cooking enjoyable rather than tedious! Next up, grab yourself a large mixing bowl—the bigger, the better—and combine oat flour, vanilla protein powder, coconut sugar, melted coconut oil (make sure it’s cool enough not to cook anything!), along with oat milk until everything comes together into one smooth dough-like consistency reminiscent of fresh cookie dough.
Step 2: Press Down That Dough
Now comes one of my favorite parts: pressing down our dough mixture into that prepared baking pan until it’s nice and even across every inch—don’t rush through it; take pride knowing you’re building something absolutely scrumptious here! Use either clean hands or spatula action (whichever feels best) while ensuring there are no gaps or uneven spots because we want this base layer firm enough to hold its shape once chilled later on.
Step 3: Create Your Gooey Caramel Layer
Time for some serious flavor magic now—grab another mixing bowl and whisk together cashew butter along with maple syrup until they’re perfectly combined into luscious creaminess before adding melted coconut oil along with vanilla extract next (this step elevates everything!). Once mixed thoroughly again till velvety smoothness reigns supreme within sight—that’s what we’re aiming for here: pure indulgence without guilt attached whatsoever!
Step 4: Pour On That Caramel Goodness
Carefully remove your pressed-down cookie base from the freezer where it might’ve been resting comfortably during preparation—you want those layers set well before pouring over top—but not too long though since we need them pliable enough still so they bond nicely when layered atop each other next (trust me!). Now gently pour caramel mixture across surface area evenly using spatula again as guide while smoothing out edges carefully till every single corner gets covered entirely—this will be vital later during assembly process after cooling down properly overnight if possible too ideally…
Stay tuned as we’ll continue exploring more delicious steps soon—you won’t want to miss out on how these mouthwatering High Protein Twix Bars come together beautifully next!
Crafting Your High Protein Twix Bars: The Sweet Symphony Continues
Step 5: Pouring in the Caramel Layer – The Heart of the Bar
Now, it’s time to create that luscious caramel layer that gives our High Protein Twix Bars their signature flavor and texture. Grab your large mixing bowl and add the creamy cashew butter, sticky maple syrup, velvety coconut oil, and a splash of vanilla extract. This combination is simply magical! Whisk these ingredients together until they meld into a smooth, glossy mixture. The warmth of the coconut oil will help soften the cashew butter, making it easier to mix. As you whisk, take a moment to inhale the sweet aromas—trust me, you’ll feel like you’re in a candy shop!
Why is this caramel layer so crucial? It’s what elevates these bars from simple protein snacks to decadent treats that can satisfy any sweet tooth. The nutty richness of cashew butter brings depth, while the maple syrup adds a hint of sweetness that perfectly balances the other flavors. Make sure to whisk thoroughly—lumps are non-negotiable here because we want that luxurious mouthfeel when you bite into your bars. Once it’s silky smooth, remove your baking pan from the freezer and pour this beautiful caramel concoction over the cookie layer. Use your spatula to spread it evenly; aim for a nice, thick layer that covers every inch of that cookie base. And remember: don’t rush this step! Each bar deserves this lovingly crafted layer.
Step 6: Setting It All Together – Chill Time is Key
After spreading the caramel evenly over your cookie base, it’s time for some patience—yes, I know waiting can be tough in the kitchen! Carefully place the pan back into the freezer to set for at least 30 minutes. This chilling process is absolutely paramount; it allows both layers to firm up beautifully, creating a solid foundation for our chocolate coating later on. During this time, the fats in both coconut oil and cashew butter will solidify as they cool down, which not only enhances texture but also helps keep everything intact when you take those first glorious bites.
While you’re waiting (and maybe dreaming about how delicious these bars will be), take a moment to clean up your workspace or sip on your favorite drink—it’s all part of enjoying this culinary journey! I promise you; once this step is done, you’ll be surprised by how well everything holds together when you cut into those bars later. A quick tip: if you’re feeling extra ambitious, you could use this time to prepare any toppings or decorations you’d like for finishing touches later!
Step 7: Melting Chocolate – The Indulgent Coat
With your layers beautifully set in the freezer and ready for their final transformation, let’s turn our attention to melting the chocolate chips mixed with a touch of coconut oil. Start by using either a double boiler or microwave—both methods are effective but require different approaches. If you’re opting for a double boiler (which I adore because it gives more control), fill a saucepan with water and let it simmer gently before placing a heatproof bowl over it containing your chocolate chips and coconut oil. Stir occasionally as they melt together into liquid gold!
If you’re short on time or prefer convenience, just toss everything into a microwave-safe bowl and zap it in short bursts—about 20 seconds at a time—stirring between each interval until smooth and glossy. Either way works wonders; just keep an eye on it because burnt chocolate is heartbreaking! Once melted, allow it to cool slightly before moving on; this cooling not only prevents burning your fingers but also helps create a nice finish on your bars.
Step 8: Cutting and Dipping – Final Assembly Magic
Now comes one of my favorite parts—cutting those chilled layers into bars! Remove your pan from the freezer and lift out the parchment paper carefully; I recommend doing this slowly so you don’t risk breaking any edges. Place it onto a cutting board and use a sharp knife to slice through those layers into ten evenly-sized bars. Take care here; you want each piece to have that perfect balance of cookie, caramel, and soon-to-be chocolate coating without crumbling apart! If you find them too hard to cut straightaway (sometimes freezing can create really firm textures), give them just a few minutes at room temperature before slicing.
Once you’ve cut out all ten bars, it’s time for their chocolate bath! Dip each bar into the melted chocolate mixture until fully coated—don’t skimp here; every nook should be enveloped in that rich dark goodness! Let any excess chocolate drip off back into your bowl before placing them back onto clean parchment paper to set again. This step is where magic truly happens—the combination of textures will make every bite an experience worth savoring!
Conclusion:
As we wrap up our delightful journey through making these High Protein Twix Bars, I hope you’re feeling as excited as I am about bringing this recipe into your kitchen! From combining wholesome ingredients like oat flour and cashew butter to watching that glorious layer of dark chocolate envelop each bar, every step is not just about cooking but about creating something truly extraordinary. These bars are more than just a sweet treat—they’re a symphony of flavors that come together in perfect harmony, providing both nourishment and satisfaction.
This recipe is a must-try not only because of its mouthwatering taste but also because of the joy it brings while crafting it. Picture yourself sharing these bars with friends during movie night or enjoying one as an afternoon snack while lounging with your favorite book. The process is so rewarding; every time you pull one from the fridge or freezer, you’re greeted by that beautiful glossy finish of chocolate beckoning for a bite—a moment that’s pure bliss!
Imagine savoring one with your morning cup of coffee; the rich notes complementing each other perfectly as they dance on your palate. For an afternoon pick-me-up, why not pair one with some fresh berries? Or perhaps crumble it over yogurt for an indulgent breakfast? Each bite takes you on a journey through textures—from crunchy to creamy—leaving you utterly satisfied and craving more.
Feeling adventurous? This recipe is wonderfully adaptable! You could swap out cashew butter for almond or peanut butter if you’re looking for a different nutty flavor profile. Maybe incorporate some chopped nuts or dried fruit into the cookie layer for added texture or richness. The possibilities are endless! I wholeheartedly invite you to try this recipe out yourself and share your experience with me—let’s connect through our love for food and creativity in the kitchen!
High Protein Twix Bars

Enjoy homemade High Protein Twix Bars made with wholesome ingredients! Indulge guilt-free—try this delicious recipe today!
- Prep Time: 20 minutes
- Cook Time: None
- Total Time: 0 hours
- Yield: Makes approximately 10 bars 1x
- Category: Dessert
- Method: Baking
- Cuisine: American
Ingredients
- 1 cup oat flour
- ½ cup vanilla protein powder
- ¼ cup coconut sugar
- ¼ cup coconut oil (melted)
- ¼ cup oat milk (or any milk of choice)
- ½ cup cashew butter
- 3 tablespoons maple syrup
- 2 cups dark chocolate chips (at least 70% cocoa)
Instructions
- Line an 8"x8" baking pan with parchment paper. In a large bowl, mix oat flour, vanilla protein powder, coconut sugar, melted coconut oil, and oat milk until smooth.
- Press the cookie mixture into the prepared pan evenly and chill in the freezer for about 10 minutes.
- In another bowl, whisk together cashew butter, maple syrup, melted coconut oil, and vanilla extract until smooth. Pour over the chilled cookie layer and spread evenly.
- Freeze for at least 30 minutes until firm.
- Melt dark chocolate chips with a tablespoon of coconut oil using a double boiler or microwave.
- Cut the bars into pieces and dip each piece into melted chocolate. Place back on parchment paper to set.
Nutrition
- Serving Size: 1 bar (50g)
- Calories: 200
- Sugar: 9g
- Sodium: 25mg
- Fat: 11g
- Saturated Fat: 6g
- Unsaturated Fat: 4g
- Trans Fat: 0g
- Carbohydrates: 21g
- Fiber: 3g
- Protein: 7g
- Cholesterol: 0mg