How to Make a Decadent Blackberry Velvet Gothic Cake at Home
There’s something utterly enchanting about baking a cake, isn’t there? It’s like embarking on a little adventure in your kitchen, where each ingredient tells a story and every whisk of the mixer brings you closer to a delicious masterpiece. Today, I’m thrilled to share with you how to make a decadent blackberry velvet gothic cake at home. This isn’t just any cake—it’s an experience that combines the rich, velvety texture of classic velvet cake with the vibrant, tangy notes of fresh blackberries. Imagine slicing through layers of moist cake that boasts deep hues and an intoxicating aroma, only to reveal a creamy filling that melts in your mouth. I promise you, this cake is not just food; it’s a celebration of flavors and textures that will leave your taste buds dancing.
Baking has always been a bridge between tradition and innovation for me. This blackberry velvet gothic cake encapsulates that sentiment so beautifully. The way the sweet-tart blackberry purée intertwines with the soft crumb of the cake creates a symphony of flavors that feels both familiar and refreshingly new. Whether you’re marking a special occasion or simply treating yourself after a long week, this cake is perfect for transforming any moment into something truly extraordinary. Let’s dive into this delightful recipe together!
How to Make a Decadent Blackberry Velvet Gothic Cake at Home: A Slice of Berry Bliss
As we embark on this culinary journey together, it’s essential to gather our ingredients and tools before we begin. Each component plays a vital role in crafting this gorgeous cake, ensuring it’s as scrumptious as it is stunning. So let’s get ready to create some magic in the kitchen!

Ingredients:
Before we get started with mixing and baking, let’s take a moment to appreciate each ingredient that will come together to form our decadent blackberry velvet gothic cake. Understanding what each one contributes can elevate your baking game significantly.
- 2½ cups all-purpose flour. This foundational ingredient is crucial for providing structure to our cake. When selecting flour, look for brands labeled as all-purpose; they have the right balance of protein content which helps create that soft crumb we’re aiming for without being too dense. Remember, sifting your flour before measuring can aerate it and prevent clumping—trust me on this; it makes all the difference!
- 1½ cups granulated sugar. Sugar isn’t just about sweetness; it’s pivotal in creating moisture and tenderness in our cake. As it dissolves during mixing and baking, it helps trap air bubbles which contribute to that lovely rise we want. When purchasing sugar, opt for pure granulated sugar—avoid any flavored or colored types so we can keep the focus on those luscious blackberries.
- 2 tbsp unsweetened cocoa powder. Adding cocoa powder not only gives our cake its characteristic depth but also enhances the overall flavor profile by introducing subtle notes of richness without overpowering the berry essence. Make sure you’re using high-quality cocoa powder here; Dutch-processed varieties will give you deeper color and flavor while maintaining acidity balance.
- 1 tsp baking soda. This leavening agent is absolutely paramount in helping our cake rise beautifully during baking! It reacts with acidic ingredients (like buttermilk) to produce carbon dioxide bubbles which create lift and lightness in baked goods. Always check expiration dates when using baking soda; stale leavening agents won’t do their job effectively.
- ½ tsp salt. Salt might seem like an afterthought, but it plays an essential role in enhancing flavors and balancing sweetness throughout our dessert! It’s like adding an extra layer of complexity—it brings out every note without making things too salty.
- 1 cup neutral oil. Oil keeps our cake moist and tender by coating flour proteins more effectively than butter does during mixing; this ensures we achieve that melt-in-your-mouth texture we desire! A neutral oil like canola or vegetable oil is perfect here since they won’t interfere with the delicate flavor profile.
- 1 cup buttermilk. This ingredient adds not only moisture but incredible tenderness due to its acidity which activates our baking soda! If you don’t have buttermilk on hand, simply mix 1 tablespoon of vinegar or lemon juice into regular milk—let it sit for 5 minutes—and voilà!
- 2 large eggs. Eggs bind everything together while contributing richness and structure to our batter; they also help with leavening when whipped air gets incorporated during beating! Room temperature eggs are best here—they incorporate more easily into the mixture than cold ones.
- 1 cup blackberry purée (strained). This is where the magic happens—the real star ingredient! Fresh blackberries lend their beautiful color and bright flavor while also adding moisture to our batter. Straining removes excess seeds for an ultra-smooth texture which enhances every bite!
- 1 tsp vanilla extract. While vanilla may be subtle, its presence rounds out the flavors beautifully—it adds warmth that complements both chocolatey undertones from cocoa powder and tartness from blackberries seamlessly!
Cream Filling
- 8 oz cream cheese, softened. Cream cheese is critical for creating a smooth filling with rich tangy notes that balances out sweetness perfectly! Make sure it’s fully softened so it incorporates evenly without lumps—trust me; nobody wants lumpy frosting!
- 1 cup heavy whipping cream. The heavy cream gives body and stability while also adding luxurious richness—this filling deserves to be silky smooth! Ensure your cream is chilled before whipping; this helps achieve those perfect peaks.
- ½ cup powdered sugar. Powdered sugar sweetens our filling while also thickening it slightly—all thanks to its fine texture! Sift if necessary to avoid any lumps sneaking into your creamy goodness.
- 1 tsp vanilla extract (again!). Just like before, vanilla elevates every flavor note present in our filling too—it ties everything together harmoniously!

Equipment You’ll Need:
Having the right tools at your disposal makes all the difference when diving into any baking project! While they aren’t technically ingredients, these essentials are your trusted partners in creating something wonderful from scratch.
- Mixing bowls (various sizes) – You’ll need these for combining dry ingredients separately from wet ingredients while ensuring everything comes together smoothly later on! Opt for glass or stainless steel bowls as they’re durable and easy-to-clean options.
- Measuring cups & spoons – Accurate measurements are non-negotiable when it comes to baking! Invest in reliable sets—both dry measuring cups (for flour) and liquid measuring cups (for buttermilk)—to ensure precision at every step.
- Whisk & spatula – A sturdy whisk will help you blend dry ingredients thoroughly while also whipping up cream effortlessly later on! Meanwhile, use a silicone spatula for folding mixtures gently without deflating them—you want those air bubbles intact!
- 9-inch round cake pans (2) – These pans are ideal for achieving those perfect layered cakes everyone loves; make sure they’re greased well before pouring batter inside so cakes release easily post-baking!
Step 1: Prepping Your Kitchen & Pans
Let’s set ourselves up for success by preheating your oven to 350°F (175°C). This step ensures our cakes start cooking immediately upon entering—the heat should be even throughout so they rise uniformly! While that’s happening, grab those round pans mentioned earlier: grease them generously with oil or line them with parchment paper if you prefer extra security against sticking later on—trust me; nobody wants their hard work stuck behind!
Step 2: Mixing Dry Ingredients
In one of those trusty mixing bowls we’ve gathered earlier, combine 2½ cups all-purpose flour along with 2 tablespoons unsweetened cocoa powder, 1 teaspoon baking soda, and ½ teaspoon salt together until they’re fully blended—you want no streaks remaining here as each element contributes uniquely towards achieving ideal texture later on! Use either a whisk or sift through mesh strainer if desired—it aerates everything beautifully while breaking up any potential clumps forming along way!
Step 3: Preparing Wet Ingredients
In another bowl—a larger one preferably since we’ll be adding more volume soon—combine 1 cup neutral oil alongside 1½ cups granulated sugar first until well incorporated by stirring briskly—a wooden spoon works wonders here too if preferred over electric mixer just don’t rush through this process as proper creaming ensures desired lightness achieved within final product itself down road ahead!
Step 4: Incorporating Those Beautiful Eggs & Blackberry Purée
Once oily-sugary mixture looks nice fluffy add in two large eggs next followed closely behind by one cup strained blackberry purée along with one teaspoon vanilla extract then beat them altogether until homogenous consistency reached—it’ll take some time but patience rewards us big time once baked outcome revealed eventually later down line trust me friends when I say these flavors meld magnificently throughout entire batter blend working their magic quietly behind scenes whilst growing ever more fragrant around kitchen space itself…
Stay tuned as we continue building on these steps towards crafting perfection through luscious layers filled creamy delight topped off sweet-tart berry treasures waiting patiently within oven now heating up right beside us…
Step 5: The Art of Mixing the Ingredients
Now that we have our dry and wet ingredients ready, it’s time to bring them together in a harmonious dance that will result in our rich blackberry velvet cake. Begin by taking a large mixing bowl, and into it, sift together the flour, granulated sugar, cocoa powder, baking soda, and salt. Sifting not only ensures that there are no lumps but also aerates the flour, which is absolutely crucial for achieving that light and fluffy texture we all crave. I always find it mesmerizing to watch the ingredients fall into the bowl like a gentle snowfall—it sets the stage for something truly magical.
Next, create a well in the center of your dry mixture. This is where the magic really happens! Pour in your neutral oil, buttermilk, eggs, blackberry purée, and vanilla extract. As you start to gently fold these ingredients together with a spatula or wooden spoon, you’ll notice that the batter begins to take on a beautiful deep hue from the blackberry purée—this vibrant color is not just visually stunning; it also hints at the depth of flavor we’re about to unleash. Mix just until combined; be careful not to overmix! Overworking the batter can lead to gluten development, resulting in a dense cake instead of the soft crumb we desire. Trust me on this—patience during this step pays off tenfold when you take that first bite of your cake!
Step 6: Baking Your Perfect Blackberry Velvet Cake
With our batter beautifully mixed, let’s move on to baking! Preheat your oven to 350°F (175°C) if you haven’t already done so. While that’s happening, prepare your cake pans by greasing them generously with oil or butter and dusting them lightly with flour. This is an essential step because it ensures that your cakes will release effortlessly after baking—a moment of pure joy when you invert those pans and see your perfect cakes! For this recipe, I recommend using two 9-inch round cake pans; they provide just the right height for layering.
Once your oven reaches temperature and your pans are ready, divide the batter evenly between them. You can use a kitchen scale for precision if you’re feeling fancy—about 2 cups per pan should do nicely if you’re eyeballing it. Bake in your preheated oven for about 30 minutes or until a toothpick inserted into the center comes out clean or with just a few moist crumbs attached. Watch closely during those final minutes; ovens can vary widely in temperature! The tops should be set and spring back slightly when pressed gently with your fingertip—this is what tells you they’re perfect! When they’re ready, allow them to cool in the pans for about 10 minutes before transferring them to wire racks to cool completely. Don’t rush this cooling process; if you try to frost warm cakes, you’ll end up with gooey cream filling everywhere—not quite the dramatic presentation we’re aiming for!
Step 7: Whipping Up Your Cream Filling
While our cakes are cooling down nicely (and my heart can’t help but flutter at how gorgeous they look already), it’s time to focus on creating our utterly divine cream filling—a crucial element that brings everything together beautifully! Grab a mixing bowl and add your softened cream cheese. Using an electric mixer fitted with whisk attachments makes this task so much easier—trust me on this one! Begin whipping the cream cheese alone until it’s smooth and creamy; this may take about 2-3 minutes on medium speed.
Once your cream cheese is looking luxurious—and oh-so-silky—add in the heavy whipping cream slowly while continuing to whip at medium-high speed. This gradual incorporation helps achieve volume without splattering everywhere—nobody wants a messy kitchen after all! After about another minute or two of mixing, add in powdered sugar and vanilla extract. The powdered sugar sweetens things up beautifully while also helping stabilize our filling so it holds its shape when layered between those gorgeous cakes. Continue whipping until you reach stiff peaks—this means when you lift your beaters out of the mixture, peaks form and hold their shape without collapsing. Don’t rush this step; developing those peaks properly ensures an exquisite texture that complements our decadent cake perfectly!
Step 8: Assembling Your Decadent Blackberry Velvet Gothic Cake
Now comes one of my favorite parts—the assembly! With both layers cooled completely (a crucial non-negotiable step), place one layer upside down onto a serving platter or cake stand—this keeps things nice and flat on top for easy frosting later on. Spread half of your luscious cream filling over this bottom layer using an offset spatula; take care to spread it evenly all around so every slice will be filled with creamy goodness.
Next, gently place the second layer on top right side up—it should fit snugly against that crest of creamy goodness below! Now it’s time to frost generously around the sides and top of your cake with any remaining cream filling. Don’t worry about being too perfect here; rustic charm is part of its beauty! Plus, as you frost, remember how every swirl hints at all those delightful flavors waiting inside each slice.
If you’re feeling inspired (and why wouldn’t you be?), consider decorating with fresh blackberries atop your frosted masterpiece—their deep purple color provides such striking contrast against all that white filling! This little touch elevates everything visually while giving guests just a hint at what’s inside—a truly extraordinary reveal awaits!
Final Touches: Chilling for Perfection
Before we savor our creation (and I can hardly contain my excitement), let’s give our assembled cake some time to chill in the refrigerator for at least an hour—or even overnight if time permits! Why chill? This crucial step allows everything—the layers and filling—to meld together beautifully while firming up our frosting slightly so when you cut into it later on, each slice holds its shape impeccably without oozing everywhere—a dream come true for presentation!
As tempting as it may be to dive right in (I’ve been there too!), I promise you that patience here rewards you tremendously with enhanced flavors melding together into sheer blissful perfection as those blackberries infuse their essence throughout every bite of creaminess paired against light chocolate undertones from our velvet base.
Once chilled thoroughly, slice into this masterpiece—I guarantee smiles all around as each forkful leads guests through waves of flavor from sweet tangy blackberries dancing alongside rich creaminess amid velvety chocolate notes—it truly is an experience worth celebrating!
And there you have it—the ultimate guide on how to make a decadent blackberry velvet gothic cake at home! I can’t wait for you all to try this recipe—I assure you it’s going to become an instant favorite among friends and family alike! Enjoy every moment spent baking this labor of love; trust me when I say you’ll cherish every last bite too!
Storage and Enjoyment Tips for Your How to Make a Decadent Blackberry Velvet Gothic Cake at Home
Oh, the moment has finally arrived! You’ve lovingly crafted this gorgeous cake, and I can already imagine the delightful aromas wafting through your kitchen. Now that you have this masterpiece, let’s talk about how to savor every last crumb of this decadent blackberry velvet gothic cake. Whether you’re enjoying it right away or saving some for later, I promise you’ll want to keep it fresh and irresistible.
Storing Leftover How to Make a Decadent Blackberry Velvet Gothic Cake at Home
To keep your cake in prime condition, store it in an airtight container—this is absolutely paramount to prevent it from drying out and losing its luscious texture. Ideally, you should place the entire cake in a cake dome or wrap individual slices tightly in plastic wrap before putting them in a container; this helps maintain moisture. Stored properly, your cake will stay delicious for about three days on the countertop or up to a week in the fridge. Trust me when I say that even after a few days, the flavors continue to meld beautifully, creating an utterly intoxicating taste experience that’s slightly different but equally delightful! If you want to take it up another notch—here’s a pro tip: place a slice of bread alongside the cake in the container; this little trick helps keep everything moist and fresh longer. When you’re ready to indulge again, simply pull out a slice and bask in the mouthwatering aroma as it greets you once more!
Freezing the Decadent Blackberry Velvet Gothic Cake for Later
If you’re anything like me, sometimes life gets busy, and having a slice of this divine cake waiting for you can be just what you need! Freezing is such an excellent option for those moments when you’re craving something sweet but don’t have time to bake. To freeze your gorgeous blackberry velvet gothic cake properly, first make sure it’s completely cooled; then wrap each piece tightly in plastic wrap and place them inside a heavy-duty freezer bag or container. This method keeps it safe from freezer burn while preserving its flavor and texture beautifully. You can store it frozen for up to three months—what a fantastic way to have a slice of joy on hand whenever you need it! When you’re ready to enjoy your frozen delight, simply move it from the freezer to the fridge for several hours or overnight to defrost gently; I promise you’ll be amazed at how well it retains its scrumptiousness!
Decadent Blackberry Velvet Gothic Cake
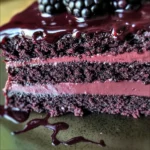
There’s something truly magical about baking, and this recipe for a decadent blackberry velvet gothic cake captures that essence beautifully. With its rich, velvety texture paired with the vibrant tang of fresh blackberries, this cake is more than just dessert; it’s an experience that will dazzle your taste buds. Imagine slicing into layers of moist cake revealing a creamy filling that melts in your mouth—perfect for any occasion or simply as a well-deserved treat after a long week. Let’s embark on this delightful culinary journey together!
- Prep Time: 20 minutes
- Cook Time: 30 minutes
- Total Time: 50 minutes
- Yield: Serves approximately 12 slices 1x
- Category: Dessert
- Method: Baking
- Cuisine: American
Ingredients
- 2½ cups all-purpose flour
- 1½ cups granulated sugar
- 2 tbsp unsweetened cocoa powder
- 1 tsp baking soda
- ½ tsp salt
- 1 cup neutral oil (like canola)
- 1 cup buttermilk (or milk with vinegar)
- 2 large eggs
- 1 cup strained blackberry purée
- 1 tsp vanilla extract
- 8 oz cream cheese, softened
- 1 cup heavy whipping cream
- ½ cup powdered sugar
- 1 tsp vanilla extract
Instructions
- Preheat your oven to 350°F (175°C). Grease two 9-inch round cake pans.
- In a bowl, mix flour, cocoa powder, baking soda, and salt until combined.
- In another bowl, whisk together oil and sugar. Add eggs, buttermilk, blackberry purée, and vanilla; mix until smooth.
- Gradually add dry ingredients to wet ingredients; fold gently until just combined.
- Pour batter evenly into prepared pans and bake for about 30 minutes or until a toothpick comes out clean.
- Cool in pans for 10 minutes before transferring to wire racks to cool completely.
- For the filling, whip cream cheese until smooth; gradually add heavy cream and powdered sugar while mixing until stiff peaks form.
- Assemble by layering one cake upside down on a platter, spreading half of the cream filling over it, then placing the second layer on top and frosting with remaining filling.
Nutrition
- Serving Size: 1 slice (100g)
- Calories: 380
- Sugar: 35g
- Sodium: 200mg
- Fat: 22g
- Saturated Fat: 7g
- Unsaturated Fat: 14g
- Trans Fat: 0g
- Carbohydrates: 40g
- Fiber: 2g
- Protein: 4g
- Cholesterol: 50mg