Double Chocolate Salted Caramel Cookies
When I think about the joy of baking, my mind often drifts to a cherished memory: the warmth of the kitchen, the sweet scent of chocolate wafting through the air, and that moment when you pull a tray of cookies from the oven, watching them glisten with melting chocolate and luscious caramel. This Double Chocolate Salted Caramel Cookies recipe is more than just a treat; it’s a celebration of sweet and salty harmony, an experience that transforms any ordinary day into something extraordinary. The first bite reveals light, crispy edges that give way to a soft, fudgy center, creating a delightful contrast that’s truly captivating. With each morsel, you’re not just tasting dessert—you’re indulging in a moment of pure bliss.
These cookies are an enchanting blend of rich chocolate flavor and gooey caramel, elevated by a sprinkle of sea salt that dances on your tongue. It’s this delightful juxtaposition—the sweetness of the chocolate and caramel combined with the savory touch of salt—that makes these cookies unforgettable. Whether you’re baking them for a gathering or simply treating yourself (because let’s be honest—we all deserve it!), they promise to evoke smiles and warm hearts. Trust me when I say, once they’re out of the oven and your home fills with their intoxicating aroma, you’ll know you’ve created something special.
Double Chocolate Salted Caramel Cookies: A Sweet Indulgence with a Salty Twist
Welcome to your new favorite cookie adventure! These Double Chocolate Salted Caramel Cookies are not just dessert; they’re an experience waiting to happen. With every bite, you’ll discover layers of flavor—rich chocolate complemented by sweet caramel and finished with a pinch of flaky sea salt. Let’s get started on this delightful journey!
Ingredients:
Before we dive into this scrumptious endeavor, let me assure you that every ingredient plays a pivotal role in crafting these heavenly cookies. Each one contributes its own unique character to create that perfect balance between chewy and crispy.
- 2 1/4 cups all-purpose flour. Flour is the backbone of any cookie recipe; it provides structure and stability. When selecting flour, I recommend going for unbleached all-purpose flour as it offers better flavor and texture than bleached varieties. The amount used here ensures that our cookies have enough bulk without becoming dry or crumbly.
- 1/2 cup unsweetened cocoa powder. This ingredient adds deep chocolate flavor without any added sugar—think of it as the heart and soul of our cookie! Look for high-quality cocoa powder for richer taste; brands like Dutch-processed can give a smoother finish. Cocoa powder interacts beautifully with sugar to enhance sweetness while keeping things balanced.
- 1 teaspoon baking soda. This is our leavening agent; it helps our cookies rise gently in the oven. Baking soda reacts with acids in other ingredients (like brown sugar) to produce carbon dioxide bubbles, which create those lovely little pockets in your cookie dough that make them light and airy.
- 1 teaspoon salt. While it may seem counterintuitive to add salt to sweets, trust me—this step is absolutely paramount! Salt enhances flavors and brings out the richness in chocolate and caramel while balancing sweetness beautifully.
- 1 cup unsalted butter (room temperature). Butter is where magic begins! Using unsalted butter allows us to control the saltiness better in our recipe. Room temperature butter creams beautifully with sugar to create air pockets essential for lightness in our cookies—if it’s too cold or melted, we lose that magic!
- 1 cup granulated sugar. This classic sweetener provides sweetness while helping achieve the desired crispiness at the edges of our cookies. Granulated sugar also aids in browning during baking thanks to caramelization—a crucial factor for flavor development!
- 1 cup light brown sugar (lightly packed). Brown sugar is what gives our cookies that chewy texture and rich, molasses undertone we crave in chocolate treats! Its moisture content helps keep cookies soft over time—the more brown sugar we use relative to granulated sugar, the chewier our final product will be.
- 2 large eggs (room temperature). Eggs contribute moisture but also play an essential role in binding everything together while adding richness due to their fat content from yolks! Using room temperature eggs ensures they incorporate smoothly into your batter rather than leaving lumps behind.
- 1 tablespoon vanilla extract. A splash of vanilla does wonders for enhancing flavors! It adds depth beyond just sweetness—it’s like a warm hug for your taste buds, making each bite feel comforting and familiar.
- 1 1/2 cups semi-sweet or milk chocolate chips. Chocolate chips are what take these cookies from great to exceptional! Semi-sweet chips provide contrast against sweet caramel pieces; if you prefer milk chocolate’s creaminess instead? Go right ahead—it’s all about personal preference!
- 1 cup caramel-flavored chips. These little nuggets inject bursts of gooey sweetness throughout each cookie bite! If you’re feeling adventurous or can’t find these gems at your store? You could substitute chopped soft caramels instead—just ensure they’re cut small enough so they melt evenly without turning into hard blocks!
- Sea salt flakes (for sprinkling over top of cookies). A delicate sprinkle afterward adds sophistication while amplifying sweetness—a true game-changer! Sea salt flakes dissolve slowly on warm surfaces compared to table salt because they’re larger; this creates little pockets where flavors mingle ever so perfectly.
- Caramel sauce or dulce de leche (optional—for drizzling over tops): If you want an extra layer of indulgence (and who wouldn’t?), drizzling these over cooled cookies makes for Instagram-worthy treats too! The key here is using quality sauce—it should be thick enough not to run off like water but thin enough so it flows easily off your spoon when warm!
Equipment You’ll Need:
Having the right tools makes all the difference during baking; think of them as your trusty companions on this culinary journey! While they aren’t ingredients per se, having solid equipment at hand can elevate your cookie-making experience immensely.
- Mixing bowls – Essential for combining ingredients efficiently without messes! Opt for glass or sturdy plastic bowls—you’ll see clearer results when creaming butter/sugar since lighter colors help monitor mixtures’ progress visually too!
- Hand mixer or stand mixer with paddle attachment – A must-have tool for whipping butter until fluffy quickly & effortlessly saving time compared against traditional methods like manual whisking which can leave some arm muscles sore afterward!
- Measuring cups & spoons – Precision matters immensely here—baking relies heavily on accurate measurements ensuring consistent results every batch time round whether you’re measuring out flour carefully or scooping up sticky brown sugars!
- Cookie scoop – Having one handy helps portion dough uniformly leading perfectly shaped cookies every single time while also preventing messy hands along process too—who doesn’t love less cleanup afterward?
- Parchment paper or silicone baking mats – These are non-stick heroes protecting both your cookie sheet surface & baked goods themselves from burning/sticking preventing unwanted disasters while making cleanup easier afterward!
Preparing the Double Chocolate Salted Caramel Cookies
Step 1: Setting Up Your Baking Space
First things first: preheat that oven! Adjust your oven rack to just above center level before cranking up temperatures to 375ºF (190ºC). This positioning allows heat circulation around each tray fostering even cooking throughout batches preparing us nicely before beginning mixing stages ahead! While waiting patiently for preheating magic happen—line two cookie sheets using parchment paper/silicone mats ensuring no stickiness will interfere once ready later-on baking delicious treats.
Step 2: Whisking Dry Ingredients
In another bowl (a medium-sized one would do nicely), whisk together all-purpose flour alongside unsweetened cocoa powder followed closely by baking soda plus salt until fully combined then set aside temporarily while we prepare wet components next—as this ensures no lumps remain later down line keeping smooth consistency intact within batter itself after incorporating thoroughly together eventually!
Step 3: Creaming Butter & Sugars
Now let’s get down to business—grab either hand mixer/stand mixer fitted paddle attachment then combine room-temperature unsalted butter along with granulated & light brown sugars beating on medium-high speed until mixture becomes light fluffy delight full volume nearly doubling size appearance-wise—a process known as creaming! This incorporation step introduces air within fats inviting moisture into dough creating those coveted textures later seen post-baking period giving us perfectly baked delights everyone loves savoring endlessly afterwards too!
Step 4: Adding Eggs & Vanilla
Once creamed well enough—add large room-temperature eggs along with tablespoonful vanilla extract continuing gentle mixing until fully blended through giving mixture homogenous appearance across board before scraping sides down bowl ensuring nothing left behind sticking where shouldn’t be present anymore either during this part especially crucial since neglected areas might affect final outcome negatively if skipped altogether causing uneven distribution flavors ultimately ruining overall experience desired here at end goal stage point overall satisfaction wise within equation itself ultimately realized after completing full process diligently done thus far!
Stay tuned as we continue creating these delectable treats together—I promise you won’t regret diving deeper into instructions unfolding ahead full culinary journey awaits ahead laden with plenty more deliciousness awaiting discovery soon enough too!
Step 5: Mixing in the Magic
At this stage, it’s time to bring everything together, and trust me, this is where the magic happens! With your mixer on low speed, gently incorporate the dry ingredients into the wet mixture. It’s crucial that you do this gradually—this is not the moment for haste! Slowly adding the flour mixture allows it to blend perfectly without creating a floury mess or overworking the dough. When everything is just combined, you want to stop mixing. Overmixing can lead to cookies that are tough instead of delightfully tender. Think about how soft and fudgy we want those centers to be; we don’t want to lose that wonderful texture.
Once the dry ingredients are mingled into the wet ones, it’s time for the pièce de résistance: folding in those luscious chocolate chips and caramel-flavored chips. Use a spatula for this part, and with gentle folds, ensure every bit of chip is evenly distributed throughout your dough. This step isn’t just about aesthetics; it’s what creates those glorious pockets of melted chocolate and gooey caramel that will leave everyone wanting more! The contrasting textures of creamy chips against the soft cookie will make each bite a truly extraordinary experience.
Step 6: Scooping with Love
Now that your dough is beautifully combined and bursting with flavor, it’s time to scoop it onto your baking sheets. Using a spoon or a cookie scoop—my favorite is the 1 ½ tablespoon size—drop generous mounds of dough onto your prepared baking sheets. Leave about two inches of space between each scoop because these cookies will spread as they bake, and we wouldn’t want them to crowd each other! Imagine each one as its own individual masterpiece waiting to bake into something utterly intoxicating.
As you scoop, take a moment to appreciate how lovely and thick this dough is; it has such a rich color from the cocoa powder! You can gently shape the mounds into rounds if you’d like; this will help them maintain a nice shape while baking. But don’t stress too much about perfect circles; remember that handmade cookies often have their own unique charm—embrace it! This step not only sets up your cookies for success but also builds anticipation for what’s to come.
Step 7: The Salty Sweet Finish
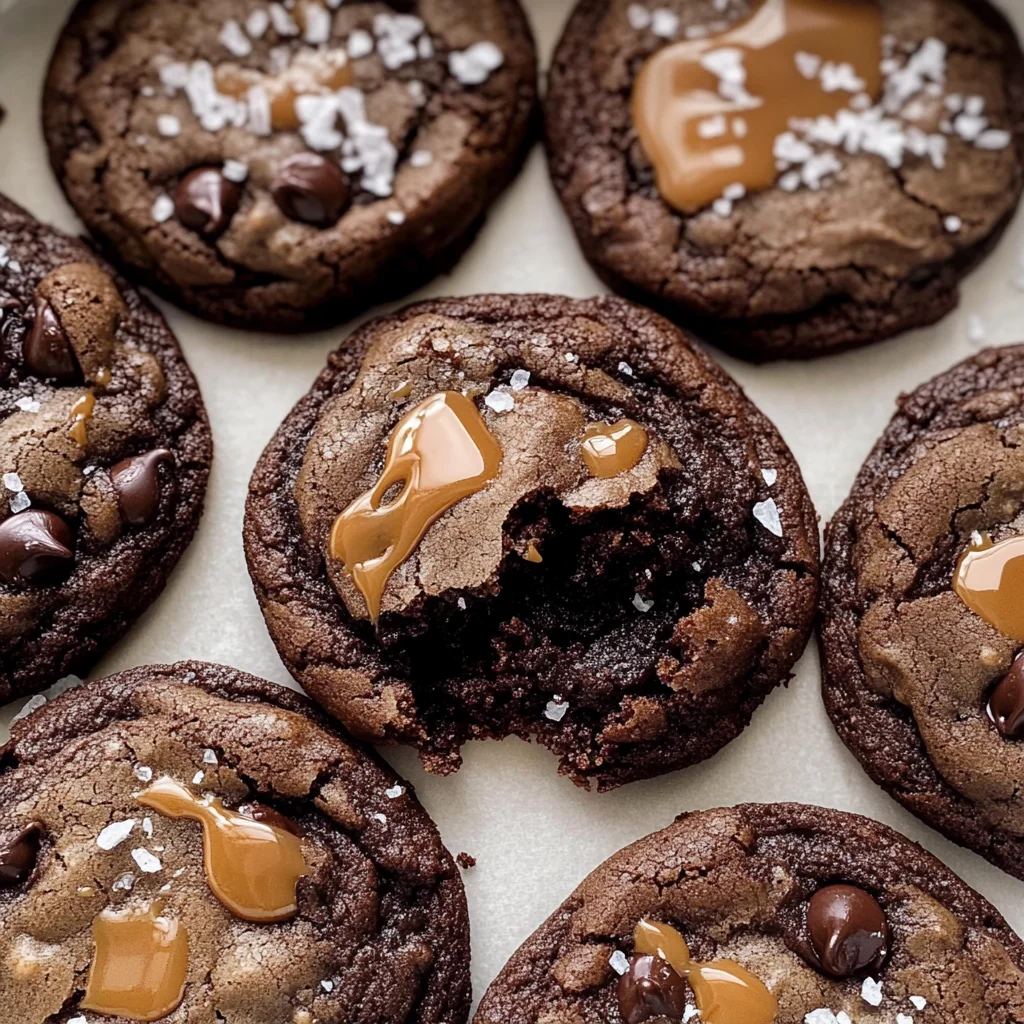
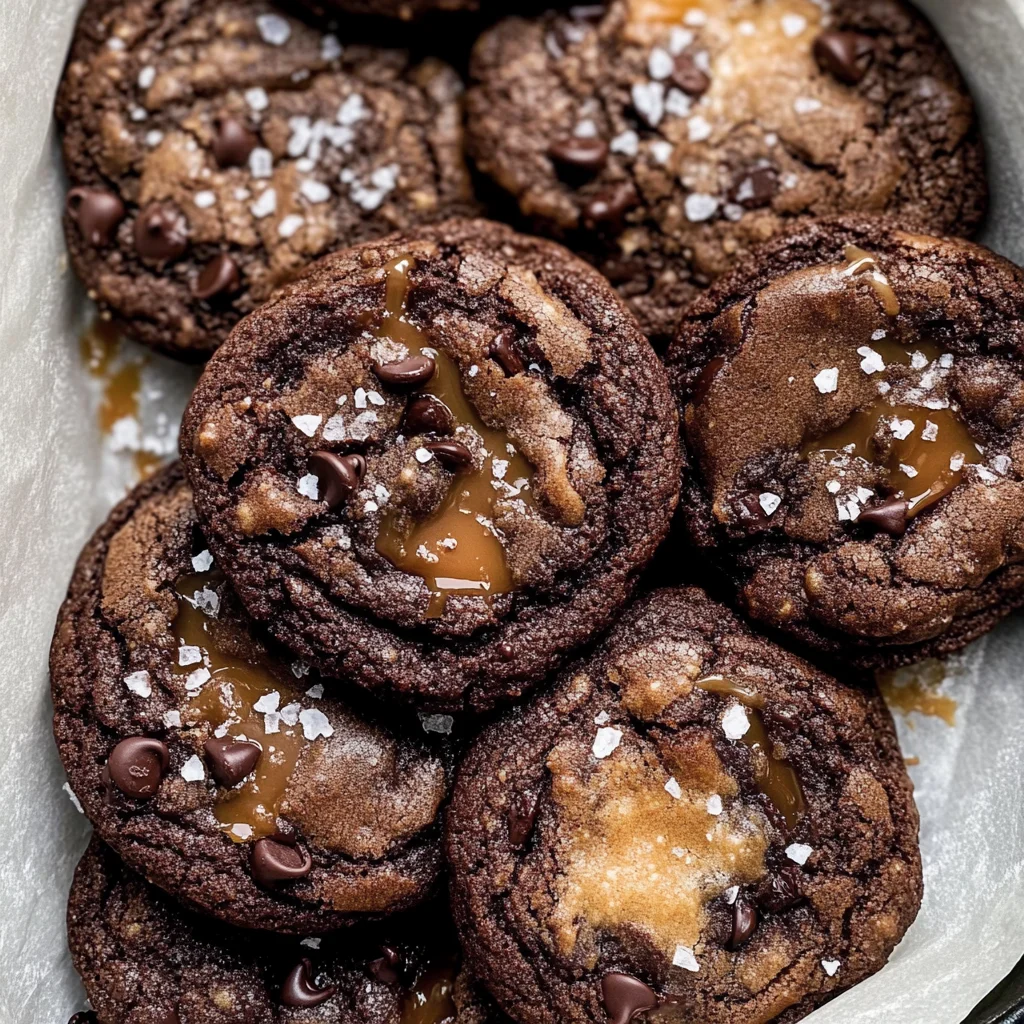
Before they head into the oven, let’s sprinkle those gorgeous sea salt flakes on top of each cookie mound. This step might seem simple, but I promise you—it’s absolutely paramount! A sprinkle of sea salt will elevate these Double Chocolate Salted Caramel Cookies from delicious to divine by balancing out all that sweetness. The salt enhances flavors in ways that can hardly be described; it’s like an unexpected hug from an old friend when you’re least expecting it.
Don’t be shy—use just enough so that each cookie has a light dusting on top without overwhelming it. Remember, we’re looking for harmony here; too much salt could overshadow our beloved chocolate and caramel notes. You should see tiny glistening flakes sitting atop your dough mounds—this visual cue is what perfection looks like before baking! And trust me on this: once they come out of the oven, those little crystals will melt right into the warm surfaces, leaving behind an enchanting flavor profile.
Step 8: Baking Your Perfect Cookies
It’s finally time for these delightful creations to bask in their moment of glory! Slide your baking sheets into that preheated oven at 375ºF and set your timer for 8-10 minutes. Now here comes an essential tip: oven temperatures can vary quite a bit depending on make and model, so keep an eye on them towards the end of baking! You want them to look slightly set around the edges while still being soft in the center—that’s where all that fudgy goodness lies waiting!
As they bake, let yourself be enveloped by that intoxicating aroma wafting through your kitchen—it’s an undeniable sign that something truly special is happening inside your oven! Around the 8-minute mark, start checking for doneness—the edges should appear firm but may still look slightly underbaked in the middle; this is perfect because they’ll continue cooking while cooling outside of the oven. If you see any cracks forming on top—that’s great! It shows they are puffing up nicely.
Next Major Phase: Cooling and Drizzling Delight
Once they’ve achieved that beautiful golden hue around the edges and you’ve checked off all those visual cues for doneness, carefully remove them from your oven. Allow them to cool on the baking sheet for about 5 minutes before transferring them to a wire cooling rack. This resting period is essential—it allows residual heat from the pan to finish cooking those soft centers while giving you crunchy edges without overbaking!
After they’ve cooled off just enough so you won’t burn your fingers (but still warm enough where they’re heavenly), feel free to drizzle some luscious caramel sauce or dulce de leche over each cookie if you’re feeling extra indulgent—it’s completely optional but oh-so-rewarding! Imagine biting into one with gooey caramel cascading down…the combination with rich chocolate and salty bites creates an unforgettable experience.
And there you have it—your very own batch of Double Chocolate Salted Caramel Cookies ready to impress friends and family alike! Store any leftovers in an airtight container with a slice of bread (yes, I know it sounds odd!) to keep them moist and fresh all week long. You deserve every decadent bite—you’ve earned it by pouring love into every step along this journey! Enjoy every crumb; I promise you it’s worth savoring every moment.
Storage and Enjoyment Tips for Your Double Chocolate Salted Caramel Cookies
Oh, my dear friends, your kitchen is now filled with the intoxicating aroma of freshly baked Double Chocolate Salted Caramel Cookies! As you let the enticing scents linger in the air, it’s time to talk about how to keep this delightful treat fresh and scrumptious for as long as possible. After all, these cookies are not just a one-time indulgence; they deserve a special place in your heart and pantry. So let’s dive into some essential storage tips to ensure every bite remains as heavenly as when they first came out of the oven.
Storing Leftover Double Chocolate Salted Caramel Cookies
To preserve that mouthwatering texture and flavor, you’ll want to store your cookies in an airtight container at room temperature. I recommend using a glass or plastic container with a secure lid—trust me, this is crucial for keeping them soft and chewy. If you have any leftover slices of bread lying around, toss one into the container with your cookies; this little trick helps maintain their moisture by absorbing excess air, leaving your cookies delightfully tender even days later. Speaking of which, these beauties can last up to a week—if they last that long! And while they taste fantastic right out of the oven, they age like fine wine; those flavors meld into something truly extraordinary over time. If you want to relive that fresh-baked bliss, pop them in the microwave for just a few seconds—your taste buds will thank you!
Freezing Double Chocolate Salted Caramel Cookies for Later
If you find yourself with an abundance of these delectable treats—or if you simply want to prepare ahead—freezing is a fabulous option! To freeze your cookies properly, let them cool completely after baking and then arrange them in a single layer on a baking sheet. Pop the sheet in the freezer until they’re solid (about an hour), then transfer them to a freezer-safe bag or container. This method keeps them from sticking together and allows for easy snacking later on! They can stay perfectly preserved in your freezer for up to three months. When you’re ready to indulge again, just take out as many as you’d like and let them thaw at room temperature or warm them up in the oven for a few minutes. Trust me on this: having these gems waiting for you in the freezer is not just convenient—it’s pure bliss!
Now that we’ve covered how to keep your cherished cookies fresh and memorable, let’s savor every moment of making and sharing these delightful treats!
Double Chocolate Salted Caramel Cookies

Double Chocolate Salted Caramel Cookies are a delightful treat that perfectly balances rich chocolate flavors with gooey caramel sweetness, enhanced by a touch of flaky sea salt. Each bite offers a satisfying contrast between crispy edges and a soft, fudgy center, making them an irresistible indulgence for any occasion. Whether you’re sharing them at a gathering or enjoying one as a mid-week pick-me-up, these cookies promise to evoke joy and create lasting memories.
- Prep Time: 15 minutes
- Cook Time: 10 minutes
- Total Time: 25 minutes
- Yield: Approximately 24 cookies 1x
- Category: Dessert
- Method: Baking
- Cuisine: American
Ingredients
- 2 1/4 cups all-purpose flour
- 1/2 cup unsweetened cocoa powder
- 1 teaspoon baking soda
- 1 teaspoon salt
- 1 cup unsalted butter, room temperature
- 1 cup granulated sugar
- 1 cup light brown sugar
- 2 large eggs, room temperature
- 1 tablespoon vanilla extract
- 1 1/2 cups semi-sweet or milk chocolate chips
- 1 cup caramel-flavored chips
- Sea salt flakes (for sprinkling)
Instructions
- Preheat oven to 375°F (190°C) and line two baking sheets with parchment paper.
- In a medium bowl, whisk together flour, cocoa powder, baking soda, and salt. Set aside.
- In a large mixing bowl, cream together room-temperature butter, granulated sugar, and brown sugar until light and fluffy.
- Add eggs and vanilla extract to the butter mixture; mix until well combined.
- Gradually add the dry ingredients into the wet mixture until just combined.
- Fold in chocolate chips and caramel-flavored chips using a spatula.
- Scoop cookie dough onto prepared baking sheets, leaving space between each scoop. Sprinkle with sea salt flakes.
- Bake for 8-10 minutes until edges are set but centers are slightly underbaked. Cool on the baking sheet for 5 minutes before transferring to a wire rack.
Nutrition
- Serving Size: 1 cookie (35g)
- Calories: 180
- Sugar: 12g
- Sodium: 100mg
- Fat: 8g
- Saturated Fat: 5g
- Unsaturated Fat: 2g
- Trans Fat: 0g
- Carbohydrates: 24g
- Fiber: 1g
- Protein: 2g
- Cholesterol: 20mg