Russian Peach Cake Recipe
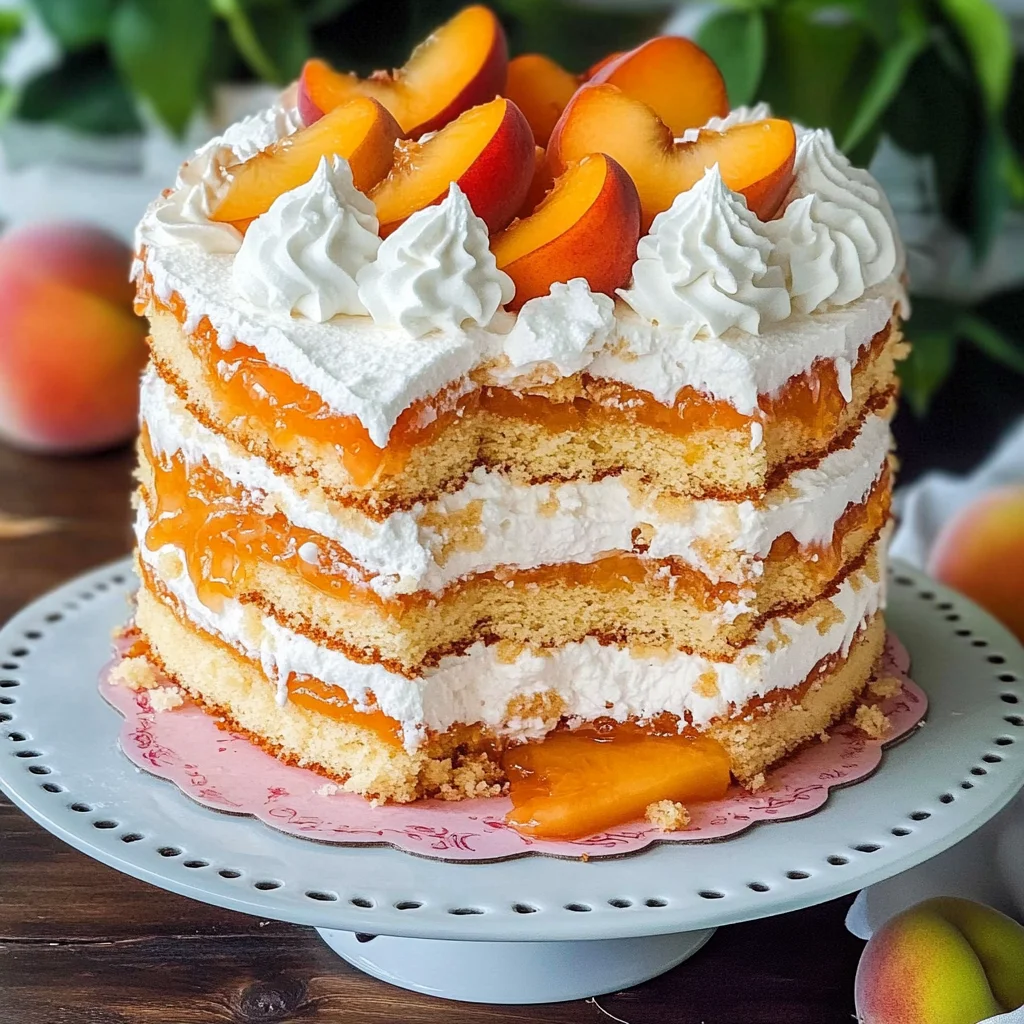
There’s something profoundly magical about baking, isn’t there? The way simple ingredients transform into something extraordinary, filling your kitchen with warmth and comfort, is a dance of creation that I cherish deeply. Today, I want to share with you a recipe that captures the essence of summer sweetness and nostalgia: the Russian Peach Cake Recipe (video). This cake isn’t just a dessert; it’s an experience—a celebration of vibrant peaches nestled between fluffy layers of sponge cake and enveloped in luscious whipped cream. Imagine slicing through its soft exterior, revealing cascading layers of peach preserves and creamy zefir, each bite a reminder of sunny afternoons spent with loved ones. Trust me when I say that this cake will become a cherished favorite in your home.
As we embark on this delicious adventure together, I can’t help but reflect on how food connects us—how sharing a slice of cake can spark laughter and stories around the table. The Russian Peach Cake embodies this spirit perfectly. It’s ideal for birthdays, summer gatherings, or simply as a treat to brighten your day. So, let’s roll up our sleeves and dive into this delightful creation! I promise you’ll be captivated by the flavors and textures as much as I am.
Russian Peach Cake Recipe : A Slice of Summer Bliss
Welcome to my kitchen! Today we’re making a heavenly Russian Peach Cake that will sweep you off your feet. With fluffy sponge layers, fresh peaches, and an airy whipped cream filling complemented by peach zefir—this cake is truly a labor of love that will leave you feeling accomplished and satisfied.
Ingredients:
Let’s gather our ingredients and embark on this culinary journey together! Each element plays a vital role in creating the perfect harmony of flavors and textures in our Russian Peach Cake Recipe (video).
- 6 large eggs. Eggs are the backbone of our sponge cake; they provide structure while also contributing to its lightness. When whisked vigorously with sugar, they create an airy foam that gives our cake its lift. Always choose fresh eggs—look for ones with clean shells and check the expiration date. If you’re aiming for vegan alternatives, aquafaba (the liquid from canned chickpeas) can be used as a remarkable substitute for eggs in many baking recipes.
- 3/4 cup sugar. Sugar does more than just sweeten; it acts as a tenderizer that helps keep our cake moist while enabling that lovely golden crust to form during baking. Granulated sugar is perfect here; it dissolves well into the batter for even sweetness throughout. If you’re looking for lower-calorie options, coconut sugar can work in moderation but may affect texture slightly.
- 1 tsp vanilla. Vanilla extract is like the warm hug of flavor—it enhances all other ingredients beautifully! Always opt for pure vanilla extract rather than imitation for an authentic taste that lingers pleasantly on your palate. If you have vanilla beans on hand, scraping out those tiny seeds will elevate your cake’s fragrance to new heights!
- 1 cup all-purpose flour. This is your foundational ingredient for structure! All-purpose flour has just the right amount of protein to support our sponge without making it tough or dense. When measuring flour, I recommend spooning it into your measuring cup rather than scooping directly from the bag—this prevents packing too much flour which could lead to dryness.
- 1/4 cup almond flour. Almond flour adds both flavor and moisture to our cake, giving it a subtle nuttiness that’s simply divine! It also contributes to achieving that tender crumb we desire in cakes. Make sure you use finely ground almond flour; otherwise, coarser grains might not blend well into the batter.
- 1 tsp baking powder. This little miracle worker ensures our cake rises to perfection while also providing lightness—a crucial aspect when crafting sponge cakes! Be sure to check its expiration date before using; old baking powder won’t give us the lift we need.
- 1 1/2 cups peach preserves. These sweet jewels bring an incredible depth of flavor and moisture to our layers! Look for high-quality preserves made from real fruit without excessive additives; they should sparkle with rich color and aroma reminiscent of ripe peaches on warm summer days.
- 1/2 cup sweet white grape juice. Sweet white grape juice serves as another layer of sweetness while adding moisture without overwhelming flavors—an excellent complement to our peach preserves! For those who prefer homemade alternatives, consider blending fresh grapes until smooth as a natural substitute.
- 1 1/2 cups chilled heavy cream. Heavy cream is essential for whipping up clouds of airy goodness; it creates decadently rich whipped cream frosting that’s utterly intoxicating! Ensure it’s well-chilled before whipping; if it’s too warm or not enough fat content (like light cream), you may struggle to achieve those beautiful stiff peaks we desire.
- 1 cup confectioner’s sugar. This fine sugar dissolves effortlessly into whipped cream frosting, adding just the right amount of sweetness without gritty texture! It’s also great for stabilizing whipped cream if you’re planning to make your frosting ahead of time—win-win!
- 1 tsp vanilla extract (again!). Just like before, it brings warmth and richness to our whipped cream—do not skip this step!
- 3/4 cup water (divided). We’ll need water both for preparing our zefir filling and hydrating some other ingredients along the way—think of it as glue binding everything together!
- 1/4 cup peach jello. While traditional peach jello may contain gelatin derived from animal sources, fear not! We’ll use vegan-friendly options here instead so everyone can enjoy this delightful treat guilt-free!
- 2 tsp agar vegan gelatin. Agar serves as an excellent plant-based gelling agent derived from seaweed—it thickens without compromising taste or texture! It’s non-negotiable if we want our zefir filling to hold its shape perfectly while still offering that lovely chewiness akin to marshmallows.
- 2 cups sugar (for syrup). Yes, sugar again—but this time we’re making syrup that adds sweetness and helps stabilize our zefir mixture once everything comes together!
- 1 tbsp lemon juice. Lemon juice brightens flavors beautifully while balancing sweetness—it cuts through richness while bringing all elements alive on your palate! Freshly squeezed juice is always best; bottled varieties might lack vibrancy.
- 3 large egg whites (yes again!). We’ll whip these separately later on—they’ll contribute volume when combined with hot syrup during zefir preparation!
- 2 large peaches (diced). Fresh peaches are truly what make this cake sing—they add bursts of juicy goodness between layers that’ll remind you why summer fruits are so beloved! Choose ripe but firm peaches so they maintain their texture throughout assembly.
Equipment You’ll Need:
Now that we’ve gathered everything we need let’s talk about some essential tools that will make our baking experience smoother—and trust me when I say having these tools at hand can make all the difference!
- Mixing bowls – Invest in several sizes so you’re never scrambling mid-recipe! Having multiple mixing bowls allows you to keep things organized when combining different components like dry ingredients or separate mixtures necessary for various stages in assembling your peach cake.
- Whisk or electric mixer – Whether you choose good ol’ elbow grease or plug-in power—both methods have their charm! An electric mixer saves time by ensuring thorough mixing results quickly while whisking manually gives you control over consistency—but whichever route you take is entirely up to personal preference!
- Cake pans (8-inch) – Three round pans are essential here since we’ll be creating multiple layers—a must-have if you’re aiming for height in presentation alongside delightful textures as guests slice through each tier!
- Parchment paper – Lining your pans with parchment paper makes removal after baking effortless—the last thing we want is losing precious cake layers due sticky bottoms sticking stubbornly inside!
With these ingredients prepped and equipment ready at hand—we’re well-equipped now emotionally & physically—to create something truly special together: Our Russian Peach Cake awaits us in glorious transformation ahead!
Preparing the Russian Peach Cake Recipe
Step 1: Preheat Your Oven & Prepare Your Pans
First things first—we need heat! Preheat your oven to 350°F (177°C) because starting off at a proper temperature ensures optimal rising during baking time so we achieve fluffy success right from the get-go. While waiting for those heavenly wafts of warmth fill every corner around us—I want you next focused on preparing three 8-inch round cake pans lined with parchment paper inside them—that’s where magic begins unfolding later on! This step is crucial because parchment prevents sticking while keeping edges intact when removing baked layers afterward; believe me—you don’t want any heartache coming from torn cakes here after putting forth all effort thus far!
Step 2: Whisking Up Your Sponge Cake Batter
Now let’s turn our attention towards creating dreamy sponge layers full-fledged ready-to-go inside those pans awaiting their moment under heat waves radiating outward soon enough… In a large mixing bowl whisk together six large eggs along with three-fourths cup sugar plus one teaspoon vanilla extract at high speed until pale & voluminous—takes roughly four-six minutes depending upon how robustly powerful your mixer happens to be today! This process known as ‘creaming’ creates air pockets essential within batter giving rise later on post-bake so don’t rush through it thinking I can skip! No-no-no!! Once finished set aside dry ingredients combined separately: one whole cup all-purpose flour mixed harmoniously alongside quarter cup almond flour plus teaspoon baking powder sifted gently before folding them lovingly back into egg mixture until just combined… Remember not overmix either folks—it’s okay if there are small lumps remaining since they’ll magically disappear once subjected heat exposure shortly thereafter…
Step 3: Baking Those Layers
Time has come now where patience pays off dividends—we’re going divide batter evenly across each lined pan before placing them gently inside preheated oven… Bake away uninterrupted twenty minutes long until golden brown tops appear invitingly beckoning us closer whilst aroma fills surroundings begging attention—incredible scent wafting resembles dreamy desserts conjured straight above cloud nine truly deserves applause indeed!! Once timer rings take care allowing baked beauties cool completely upon wire racks afterwards—not rushing this step means avoiding potential disasters down road where cooling too fast leads potential cracking surfaces ruining aesthetic appeal later down line…
Step 4: Crafting Irresistible Whipped Cream Frosting
As delightful scents linger still around kitchen air let’s shift gears towards creating luscious whipped cream frosting that’ll elevate entire experience beyond boundaries imagined previously… Grab another large bowl alongside chilled heavy cream poured generously within before sprinkling one full cup confectioner’s sugar atop followed closely behind by teaspoon extra dash vanilla extract just because why not indulge even further?! Now grab preferred whisk/electric mixer again starting slow then gradually increasing speed until cloud-like peaks form undeniably inviting us closer considering how good they look already… Aim stop whisking once stiff peaks emerge holding shape firmly without collapsing back down—that’s key indicator showing readiness forthwith onto next steps soon thereafter awaiting patiently ahead…
As we continue through each step together crafting this gorgeous masterpiece layered lovingly filled freshly ripe fruits alongside creamy fillings—all awaiting glory reveal upon final assembly awaits soon ahead my friend—I hope you’re feeling excitement bubbling up already just like mine does every time preparing such delights worth sharing amongst friends family alike forever cherished memories created along way… Stay tuned more detailed instructions await following shortly onward guiding through assembly process next leading ultimately toward showcasing stunning results achieved after putting forth efforts shared today here together!!
Step 5: Whipping Up the Dreamy Cream
Now that we’ve created our beautiful sponge cake layers, it’s time to make the whipped cream that will elevate our Russian Peach Cake to a level of creamy ecstasy that’s simply unforgettable. In a large mixing bowl, pour in the chilled heavy cream—this is crucial because cold cream whips up faster and holds its shape better. Add the confectioner’s sugar and vanilla extract, which not only sweetens but also adds a lovely aromatic note to the cream. I can almost hear you asking, “How long should I whip it?” Well, trust me on this: whisk on high speed for about 3 to 4 minutes until you see those glorious stiff peaks forming. You want it to be thick enough to hold its shape but not so thick that it turns into butter; keep an eye on the texture here!
Remember, patience is key in this step. The air you’re incorporating into the cream helps create that light and airy texture we crave in desserts. If you over-whip, you may end up with grainy butter instead of silky whipped cream, which would be a tragedy for our peach cake. So, take your time and watch as the cream transforms from liquid into a luscious cloud of goodness, perfect for layering in our cake.
Step 6: Crafting the Irresistible Peach Filling
Next up is one of the star players in our Russian Peach Cake—the peach filling! This component brings together all those sweet flavors and adds a burst of fruity goodness to each bite. Start by combining 1 ½ cups of peach preserves with a splash of apple vinegar in a small bowl. Why apple vinegar? It adds just enough tanginess to balance out the sweetness of the peaches and preserves while enhancing their flavor profile beautifully. Give this mixture a good stir until everything melds together seamlessly; it should have a lovely glossy sheen that makes your mouth water just looking at it!
This filling is truly what makes each slice so juicy and delightful. As you spread it between the layers, it acts like a bridge connecting the fluffy sponge cake with the creamy whipped topping, creating an unforgettable experience with each forkful. Don’t rush when applying this layer; be generous! You want your guests to taste every ounce of that peachy goodness rather than just catching hints of it.
Step 7: Creating Your Homemade Peach Zefir
Now we come to one of my absolute favorite parts—making zefir! This delightful vegan marshmallow-like filling will add an enchanting texture and flavor to our cake that’s utterly intoxicating. Begin by preparing your piping bag fitted with a star tip; I recommend using French star tip #8FT for those beautiful swirls that will look like little clouds atop our creation. In a small saucepan, combine ¼ cup of water and your peach vegan gelatin over medium heat. Stir gently until it’s fully dissolved—this process is essential because if any gelatin remains undissolved, you won’t achieve that smooth consistency we’re aiming for.
In another saucepan, combine ½ cup of water with agar vegan gelatin and bring it to a gentle simmer over medium heat; you’ll know it’s ready when it starts resembling applesauce after several minutes of cooking. Gradually add in sugar while continuously stirring until everything dissolves into a syrupy elixir—this syrup is non-negotiable for creating that perfect chewy texture we love in zefir! Once this mixture begins to boil (about 2 minutes), remove it from heat immediately—overcooking could lead to undesired results.
While your syrup cools slightly, whisk those egg whites in your stand mixer on high speed until soft peaks form—this usually takes about a minute or so. Now comes the magic moment: while your mixer runs on medium speed, slowly pour in that hot syrup so it’s incorporated evenly without cooking those egg whites further. Lastly, add in your dissolved peach vegan gelatin and lemon juice before cranking up the speed again for another 6-8 minutes until you see thickening happen right before your eyes! Don’t skip this step; it’s what creates that luxurious mouthfeel everyone will rave about!
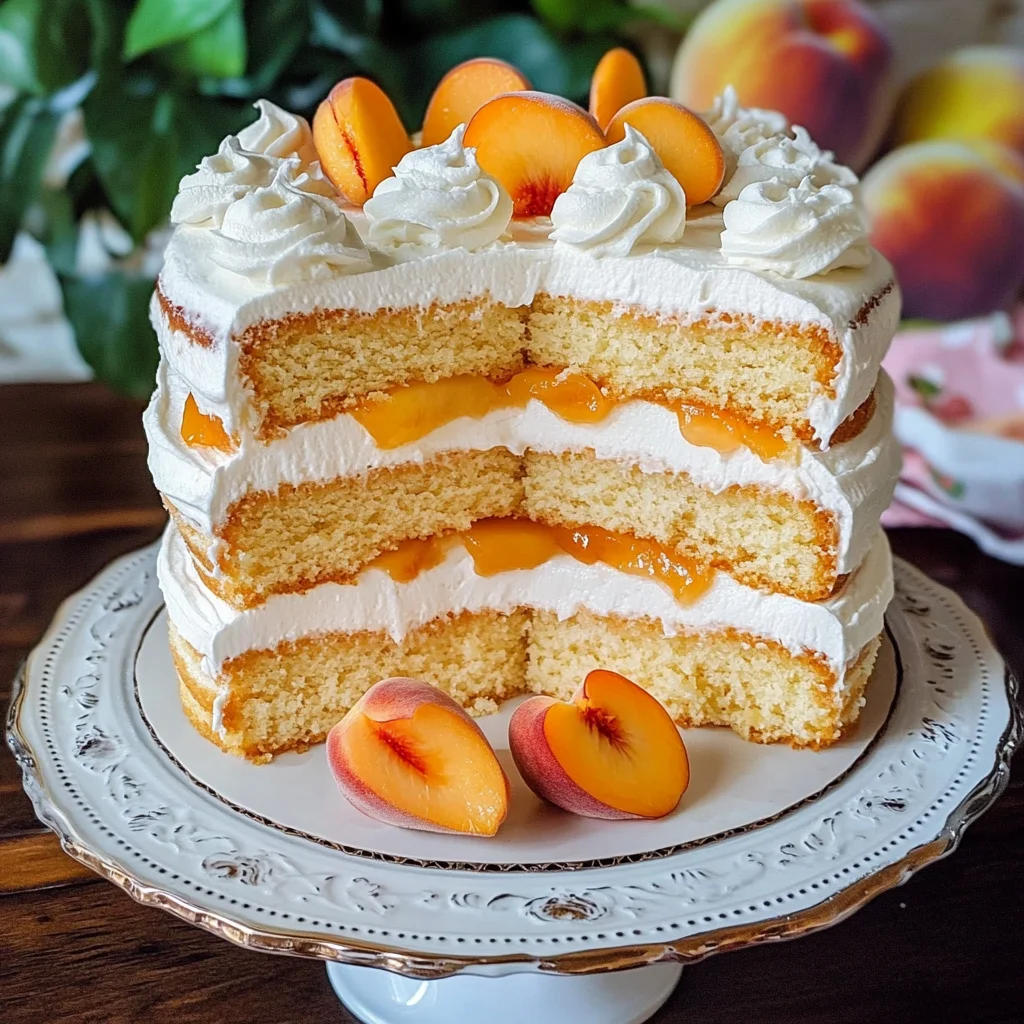
Step 8: Layering Like A Pro
With all components ready, it’s finally time for assembly—a step filled with anticipation as we bring together all those luscious elements into one stunning dessert! Begin by placing one layer of sponge cake on your serving plate or cake stand—it’s crucial to use something sturdy because this beauty deserves all the admiration! Spread an even layer of peach filling across this first layer; don’t skimp here—think about how delicious each bite will be when they taste that rich fruitiness mingling with buttery cake.
Next, generously dollop some whipped cream over your peach filling; this part should feel indulgent! Gently place another sponge layer on top and repeat—layering peach filling followed by whipped cream again before adding yet another sponge layer on top. This is where your patience pays off; these layers need time to meld together beautifully during chilling later on. If you’re wondering why layering matters so much: it’s all about creating harmony among textures and flavors throughout every single bite!
Finally, finish assembling by spreading more peach preserves on top of your last sponge layer before piping zefir around the edges or decorating as desired—you might feel like an artist at this stage! Push diced peaches gently into zefir dollops for added intrigue. The more care you take here translates directly into how enticingly beautiful—and delicious—your Russian Peach Cake will be when served.
Conclusion:
As we wrap up our journey through this enchanting Russian Peach Cake Recipe, I hope you’ve felt my excitement resonate with you! From whisking together eggs until they form clouds of airy sweetness to layering each component with love and care, every step of this recipe has been crafted with joy. What makes this cake so extraordinary is not just its beautiful presentation but also the harmonious blend of flavors—the sun-kissed peaches mingling effortlessly with rich whipped cream and light sponge cake create a symphony that’s utterly intoxicating.
This recipe is truly a must-try for anyone who appreciates the joy of baking. It’s not only accessible but also versatile enough for various occasions—from summer picnics to elegant dinner parties. Imagine pulling this stunning cake from the refrigerator on a warm afternoon, slicing into its layers, and watching as each piece reveals its luscious fillings—a sight that brings smiles all around! There’s something magical about sharing homemade desserts; they feel like little pieces of love wrapped in sweetness.
For serving suggestions, imagine enjoying a slice alongside your favorite cup of tea or coffee; perhaps even pairing it with fresh berries drizzled with honey for an extra burst of flavor! For an afternoon pick-me-up with friends or family, serve slices topped with additional peach preserves or even some crunchy granola sprinkled on top—how delightful would that be? And if you’re feeling adventurous after mastering this classic version, think about incorporating other fruits like strawberries or raspberries next time. Feeling bold? You could even add a splash of citrus zest to enhance those peachy notes further! This recipe is wonderfully adaptable—encouraging creativity while still delivering mouthwatering results.
I invite you to embark on this baking adventure yourself! Dive into this Russian Peach Cake Recipe, immerse yourself in the process, and share your experiences with me—I can’t wait to hear how yours turns out! Whether it’s a cozy family gathering or just treating yourself on a quiet evening at home, I promise this cake will bring warmth and happiness into your kitchen!
Russian Peach Cake Recipe
Indulge in the delightful Russian Peach Cake, a perfect blend of fluffy sponge layers, luscious peach preserves, and airy whipped cream. This enchanting dessert captures the essence of summer with its vibrant flavors and light textures. Each bite unveils juicy peaches nestled between layers of soft cake and creamy zefir, making it an ideal centerpiece for birthdays, summer gatherings, or simply a treat to brighten your day. Easy to make and even easier to enjoy, this cake promises joy-filled moments around any table.
- Prep Time: 30 minutes
- Cook Time: 20 minutes
- Total Time: 50 minutes
- Yield: Approximately 16 servings 1x
- Category: Dessert
- Method: Baking
- Cuisine: Russian
Ingredients
- 6 large eggs
- 3/4 cup sugar
- 1 tsp pure vanilla extract
- 1 cup all-purpose flour
- 1/4 cup almond flour
- 1 tsp baking powder
- 1 1/2 cups peach preserves
- 1/2 cup sweet white grape juice
- 1 1/2 cups chilled heavy cream
- 1 cup confectioner's sugar
- 3 large egg whites
- 2 large peaches (diced)
- 2 tsp agar vegan gelatin
Instructions
- Preheat oven to 350°F (177°C). Prepare three 8-inch round cake pans by lining them with parchment paper.
- In a large bowl, whisk eggs, sugar, and vanilla on high speed until pale and voluminous.
- In another bowl, sift together flour, almond flour, and baking powder before gently folding into the egg mixture until just combined.
- Divide batter evenly among prepared pans and bake for about 20 minutes or until golden brown. Cool on wire racks.
- To make whipped cream frosting, combine chilled heavy cream, confectioner’s sugar, and vanilla in a bowl; whip until stiff peaks form.
- For the peach filling, mix peach preserves with sweet white grape juice.
- Assemble by layering sponge cake with peach filling and whipped cream; repeat until all layers are used.
- Chill for at least one hour before serving.
Nutrition
- Serving Size: 1 slice (100g)
- Calories: 230
- Sugar: 18g
- Sodium: 50mg
- Fat: 11g
- Saturated Fat: 7g
- Unsaturated Fat: 4g
- Trans Fat: 0g
- Carbohydrates: 32g
- Fiber: 1g
- Protein: 3g
- Cholesterol: 70mg