No-Bake Pecan Pie Bites
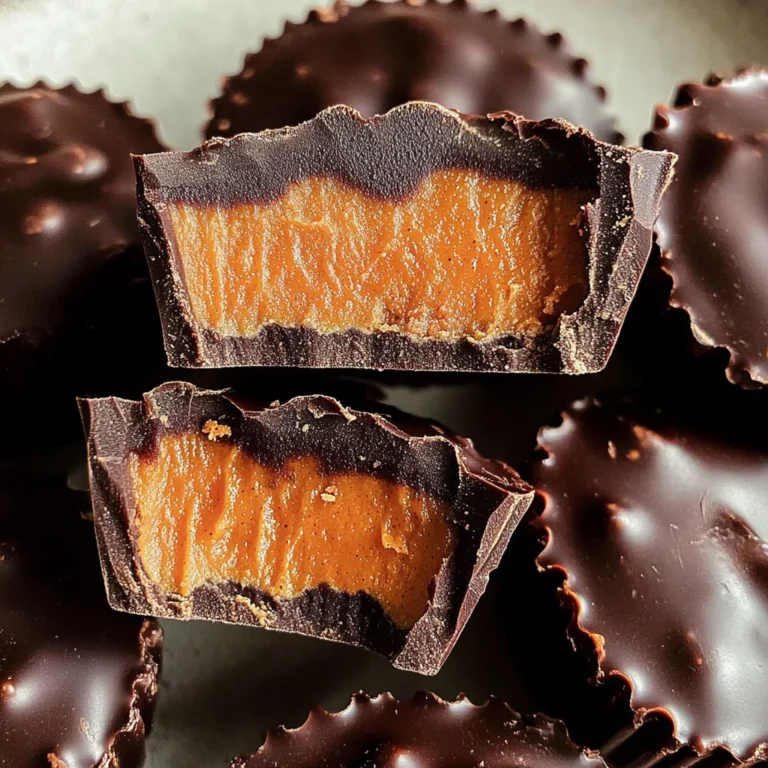
There’s something undeniably magical about the act of creating food—it’s more than just combining ingredients; it’s about weaving together memories, flavors, and emotions. When I think of my childhood, I often find myself transported back to the kitchen, where the intoxicating smell of desserts would fill the air. One recipe that stands out, a true testament to both simplicity and depth, is my No-Bake Pecan Pie Bites. Each bite encapsulates a symphony of textures and flavors that evoke warmth and nostalgia, making it not just a treat but an experience. Imagine sinking your teeth into a chewy, slightly sweet morsel studded with crunchy pecans and enveloped in rich chocolate—it’s pure bliss. These bites are not only easy to make but also a delightful way to bring friends and family together around the table.
The beauty of these No-Bake Pecan Pie Bites lies in their roots—they’re inspired by the classic pecan pie, a staple that has graced many dinner tables during holidays and gatherings. Yet, here we create something new and exciting without the need for baking—a perfect solution for those days when you want something sweet without the fuss. These little gems are packed with wholesome ingredients: dates provide natural sweetness while pecans lend that beloved nutty crunch. And let’s not forget the chocolate! It adds an indulgent touch that makes everything feel special. Whether you’re looking for a quick snack or a dessert to impress your guests, these bites fit seamlessly into any occasion.
No-Bake Pecan Pie Bites: A Sweet Escape into Indulgence
Oh, friends, let me take you on this delightful journey! Making these No-Bake Pecan Pie Bites is like wrapping yourself in a warm blanket on a chilly evening—comforting and utterly satisfying. With just a handful of whole-food ingredients, you’re about to embark on crafting something profoundly delicious and entirely guilt-free. The best part? There’s no oven required! Just your trusty food processor and a bit of love will lead you to these heavenly treats.

Ingredients:
As we dive into this culinary adventure together, let’s gather our ingredients thoughtfully. Each component brings its own unique charm to our No-Bake Pecan Pie Bites, so understanding their roles will elevate our creation even further.
- 1 cup pecans: These beauties are the star of our show! Pecans have a buttery richness that complements the sweetness of our other ingredients with such grace. They add delightful crunchiness when bitten into while also providing healthy fats that are good for your heart and brain. Be sure to opt for fresh pecans; they should be fragrant with no off smells. If you can find them raw rather than roasted, that’s ideal—this keeps their natural flavor intact without any added oils or seasonings.
- 1 cup pitted dates (soaked): Dates are nature’s candy! Their natural sweetness is truly unparalleled; they bring moisture and chewiness to our bites that make them utterly irresistible. Soaking them not only softens their texture but also enhances their ability to blend seamlessly into our dough mixture—it’s all about achieving that sticky consistency! Look for Medjool dates if possible; they are plump and have the most luscious flavor profile.
- 2 tbsp coconut sugar or monk fruit: This ingredient adds an extra layer of sweetness without overwhelming the palate. Coconut sugar has a lovely caramel undertone that beautifully mirrors traditional brown sugar used in pecan pie recipes, whereas monk fruit offers a zero-calorie alternative if you’re watching your sugar intake. Both options help balance out the natural sugars from the dates while keeping everything wholesome.
- Pinch sea salt: Ahh—the magic of salt! Just as it does in savory dishes, salt plays a crucial role here by enhancing all those sweet flavors swirling around in our bites. A small pinch helps bring out the richness of the pecans and balances out the sweetness from both dates and sugars.
- 1 tsp vanilla: Vanilla extract is like liquid gold in baking—its fragrant aroma elevates every dish it graces! Here it imparts warmth and depth to our bites, creating an inviting flavor profile reminiscent of baking sweets from scratch even though we’re skipping that step entirely.
- 1 tsp cinnamon (optional): Cinnamon is optional but oh-so-welcome if you enjoy its cozy warmth as much as I do! It adds an earthy spice note that complements both the vanilla and sweetness beautifully, turning each bite into something truly extraordinary.
- 1 1/4 cup chocolate chips: And finally—the pièce de résistance! Chocolate chips (dairy-free if needed) serve as both an outer layer coating our bites in rich decadence and as another delightful texture contrast within each piece itself. Melting chocolate over low heat ensures it becomes silky smooth before dipping; trust me when I say this step is non-negotiable!

Equipment You’ll Need:
As we set off on this wonderful journey together creating No-Bake Pecan Pie Bites, having the right tools at hand will ensure everything flows smoothly—like butter on warm toast! While these items may not be edible themselves, they are essential partners in crafting something truly exceptional.
- Food processor: This handy kitchen gadget will be your best friend throughout this process! It’s crucial for blending our ingredients into that sticky dough consistency we’re aiming for. A high-powered processor can handle tougher nuts like pecans efficiently while allowing us to achieve uniformity without any lumps or uneven bits left behind.
- Cookie sheet lined with parchment paper: A lined cookie sheet is vital here because it prevents sticking while also making cleanup afterward far easier—who wants to deal with scrubbing sticky mixtures from pans? Parchment paper provides just enough give so we can easily lift off each bite once they’re ready!
- Spatula or scraper: This tool comes in handy when transferring our sticky dough from bowl to sheet; it helps ensure we don’t waste any precious morsels clinging stubbornly inside containers!
Now that we’ve gathered everything we need let’s roll up our sleeves and get started on preparing those tantalizing No-Bake Pecan Pie Bites!
Step 1: Transforming Nuts Into Magic
Begin by adding your beautiful pecans along with soaked dates into your trusty food processor. This step is critical because blending them together releases their oils which creates an incredibly sticky mixture that’s going to hold these bites together beautifully. You might find yourself needing patience here—don’t rush this step! It may take several minutes for everything to break down fully into what looks like dough; occasionally pause to scrape down any stray bits clinging stubbornly against the sides of your processor bowl. The longer you blend without overdoing it means ensuring even distribution throughout!
Step 2: Sweetening with Nature’s Candy
Once you’ve achieved that beautifully sticky consistency resembling cookie dough (and taste-tested it—because who wouldn’t?), add your coconut sugar or monk fruit along with sea salt, vanilla extract—and if desired—a sprinkle of cinnamon too! Give everything another whirl until well combined; trust me when I say this amalgamation creates incredible harmony among flavors while maintaining moisture levels throughout each bite!
Step 3: Rolling Into Delightful Shapes
Now comes one of my favorite parts—shaping these bites! Using clean hands or perhaps two spoons (whatever feels comfortable), start rolling portions of dough between palms until perfectly round balls form—think marble-sized pieces rather than large golf balls here so they’ll maintain balance during freezing later on too! Once shaped properly place them onto prepared cookie sheets lined up neatly next door—no need for perfection here; they’re meant to be rustic yet charmingly homemade!
Step 4: Chilling Out Before Dipping
After rolling all those delightful little nuggets out onto parchment paper sheets—it’s time for some patience once again as we pop them into freezer for roughly fifteen minutes max (or until firm). Why chill? Chilling helps solidify each ball making dipping easier plus minimizes melting risk when coating later too—you’ll thank me later when there’s no huge mess involved!
Stay tuned as we dive deeper into melting chocolate goodness next…
Crafting Your Irresistible No-Bake Pecan Pie Bites
I’m so excited to dive into the next steps of our No-Bake Pecan Pie Bites! Trust me, these little gems are not just treats; they’re a celebration of flavor and texture, combining the rich nuttiness of pecans with the delightful sweetness of dates and a velvety chocolate coating. As we journey through each step, I promise you’ll feel that rush of joy as these bites come together in your kitchen.
Step 5: Forming the Perfect Little Bites
Now comes one of my favorite parts: shaping our sticky mixture into delightful little balls! After blending your ingredients in the food processor until they form a sticky dough—think of it as a charmingly messy concoction—it’s crucial to give it a moment. You want to ensure everything is well incorporated, so don’t be shy about scraping down the sides periodically. This step is essential because it allows all those flavors to mingle beautifully, resulting in a cohesive taste that will make your taste buds sing.
Once you have that sticky goodness ready, take a spoonful (about a tablespoon) and roll it between your palms to create small balls. You’ll want them to be about an inch in diameter; this size is perfect for popping into your mouth without any fuss! Place each ball onto a lined cookie sheet, and don’t forget to flatten them slightly with your palm—this helps them hold their shape while adding a delightful bite-sized aesthetic. As you work through this process, let yourself revel in the textures; that sticky dough feels wonderfully satisfying in your hands!
Step 6: The Chilling Game
After rolling out all your bites, it’s time for some patience—yes, I know it’s hard sometimes! Place those formed bites in the freezer for about 15 minutes. This chilling phase is absolutely paramount for two reasons: first, it helps firm up those delightful morsels so they retain their shape when you dip them in chocolate later on. Second, it allows the flavors to deepen and meld together beautifully. While you wait, take a moment to breathe in the nutty aroma wafting from your kitchen—it’s intoxicating!
Keep an eye on them as they chill; you’re looking for them to become firm but not frozen solid. A good rule of thumb is that they should easily hold their shape when pressed gently but still have a slight give when you poke them. This subtle balance is what will ensure each bite is both satisfyingly chewy and perfectly textured.
Step 7: The Chocolate Meltdown
Next up is one of the most rewarding steps: melting that luscious chocolate! Choose high-quality chocolate chips for an utterly decadent experience; they should melt into something smooth and silky that resembles liquid gold. You can use either a microwave or a double boiler for this task—whichever method suits you best! If you opt for the microwave, heat the chocolate on medium power in short bursts of 20-30 seconds, stirring in between until fully melted. This gentle approach prevents overheating and ensures you don’t end up with that grainy texture we want to avoid at all costs.
If you’re going with the double boiler method, fill a saucepan with water and bring it to a simmer; then place a heatproof bowl over the top without letting it touch the water. Stir gently as it melts—it’s almost meditative watching those chips transform into silky smoothness. The key here is patience; rushing this step can lead to burnt chocolate which is simply devastating because it alters both flavor and texture dramatically.
Step 8: Dipping Delightfully
With your chocolate now melt-in-your-mouth smooth, it’s time for the pièce de résistance: dipping those chilled pecan bites! Using two forks or even skewers can make this process easier—dunk each bite into that warm chocolate bath ensuring it’s fully coated before lifting it out. Allow any excess chocolate to drip off back into the bowl; nobody likes too much coating that can overwhelm those lovely pecan flavors! This step not only adds an elegant finish but also creates an irresistible contrast between creamy chocolate and chewy date-nut filling.
As you carefully place each dipped bite back onto your lined cookie sheet, don’t forget to add half a pecan on top while the chocolate is still wet—this gives each bite its signature look and enhances that nutty flavor profile we’re aiming for. Once they’re all dipped and adorned with pecans, return them to the freezer again until set—about another 20 minutes should do the trick! This chilling time allows everything to firm up beautifully so when you take that first glorious bite later on, everything holds together perfectly.
Final Touches: Enjoying Your Creation!
With all these steps complete, I hope you’re feeling as excited as I am right now because what you’ve created are truly extraordinary No-Bake Pecan Pie Bites! Once they’ve set firmly in their glorious chocolate coats, it’s time for the best part—enjoying them! Serve them straight from the freezer for an extra refreshing treat or let them sit at room temperature for a few moments if you prefer a softer bite.
These little delights are perfect for any occasion—from casual snacking while lounging around at home to impressing guests at gatherings or parties. They’re naturally sweetened by dates and packed with wholesome ingredients making them not just delicious but also nourishing—a win-win if there ever was one!
So go ahead, indulge yourself with these bites bursting with flavor and warmth; I promise they will become a staple in your recipe repertoire just like they have in mine. And once you’ve tried making them yourself, share your creations with friends or family—you may just inspire someone else’s culinary adventure! Enjoy every last crumb—they’re meant to be savored!
Storage and Enjoyment Tips for Your No-Bake Pecan Pie Bites
Now that you’ve created these delightful No-Bake Pecan Pie Bites, it’s time to revel in the joy of sharing them—or maybe just indulging a little yourself! These little morsels are not only a treat for your taste buds but also incredibly convenient for storage, ensuring they remain fresh and delicious for days to come. Just imagine reaching into your fridge or freezer and pulling out these perfectly sweet bites whenever the craving hits!
Storing Leftover No-Bake Pecan Pie Bites
To keep your No-Bake Pecan Pie Bites in tip-top shape, I recommend using an airtight container. Glass containers are particularly fantastic because they help maintain the freshness and flavor without any worry about unwanted odors seeping in. Storing them in the refrigerator will keep these treats delightful for up to a week—though I promise they’ll probably vanish much quicker than that! To ensure they retain their texture and flavor, consider placing a slice of bread in the container; it works wonders at keeping everything moist and fresh. And believe me, after a few days in the fridge, these bites become an even more profound delight—the flavors meld together beautifully, making each bite richer and more satisfying. When you’re ready to enjoy them again, simply pull one out and savor it cold or let it sit at room temperature for a few minutes to soften slightly—the choice is yours!
Freezing No-Bake Pecan Pie Bites for Later
If you want to extend their life even further—and trust me, you’ll want to—freezing is an excellent option! Simply lay your prepared bites on a baking sheet lined with parchment paper and pop them into the freezer until they’re solid. Once frozen, transfer them into a freezer-safe bag or container (don’t forget to label them so you can easily find this treasure later!). They will stay deliciously intact for up to three months. When it’s time to enjoy them again, just take out as many as you need and let them thaw at room temperature for about 10-15 minutes. This convenience is absolutely paramount in my busy kitchen; having these delectable bites ready at a moment’s notice feels like having a secret stash of happiness waiting just for me!
No-Bake Pecan Pie Bites

Indulge in easy No-Bake Pecan Pie Bites made from wholesome ingredients. Perfectly sweet treats await—try making them today!
- Prep Time: 20 minutes
- Cook Time: None
- Total Time: 0 hours
- Yield: Approximately 12 bites 1x
- Category: Dessert
- Method: No-Bake
- Cuisine: American
Ingredients
- 1 cup pecans
- 1 cup pitted dates (soaked)
- 2 tbsp coconut sugar or monk fruit
- Pinch sea salt
- 1 tsp vanilla extract
- 1 tsp cinnamon (optional)
- 1 1/4 cup chocolate chips (dairy-free if needed)
Instructions
- In a food processor, blend the pecans and soaked dates until a sticky dough forms.
- Add coconut sugar or monk fruit, sea salt, vanilla extract, and cinnamon. Blend until fully combined.
- Roll the mixture into small balls (about 1 inch) and place on a lined cookie sheet.
- Chill in the freezer for about 15 minutes to firm up.
- Melt chocolate chips using a microwave or double boiler until smooth.
- Dip each chilled ball into the melted chocolate and return to the lined cookie sheet.
- Freeze again until the chocolate sets, about 20 minutes.
Nutrition
- Serving Size: 1 serving
- Calories: 130
- Sugar: 8g
- Sodium: 35mg
- Fat: 8g
- Saturated Fat: 3g
- Unsaturated Fat: 5g
- Trans Fat: 0g
- Carbohydrates: 12g
- Fiber: 2g
- Protein: 2g
- Cholesterol: 0mg