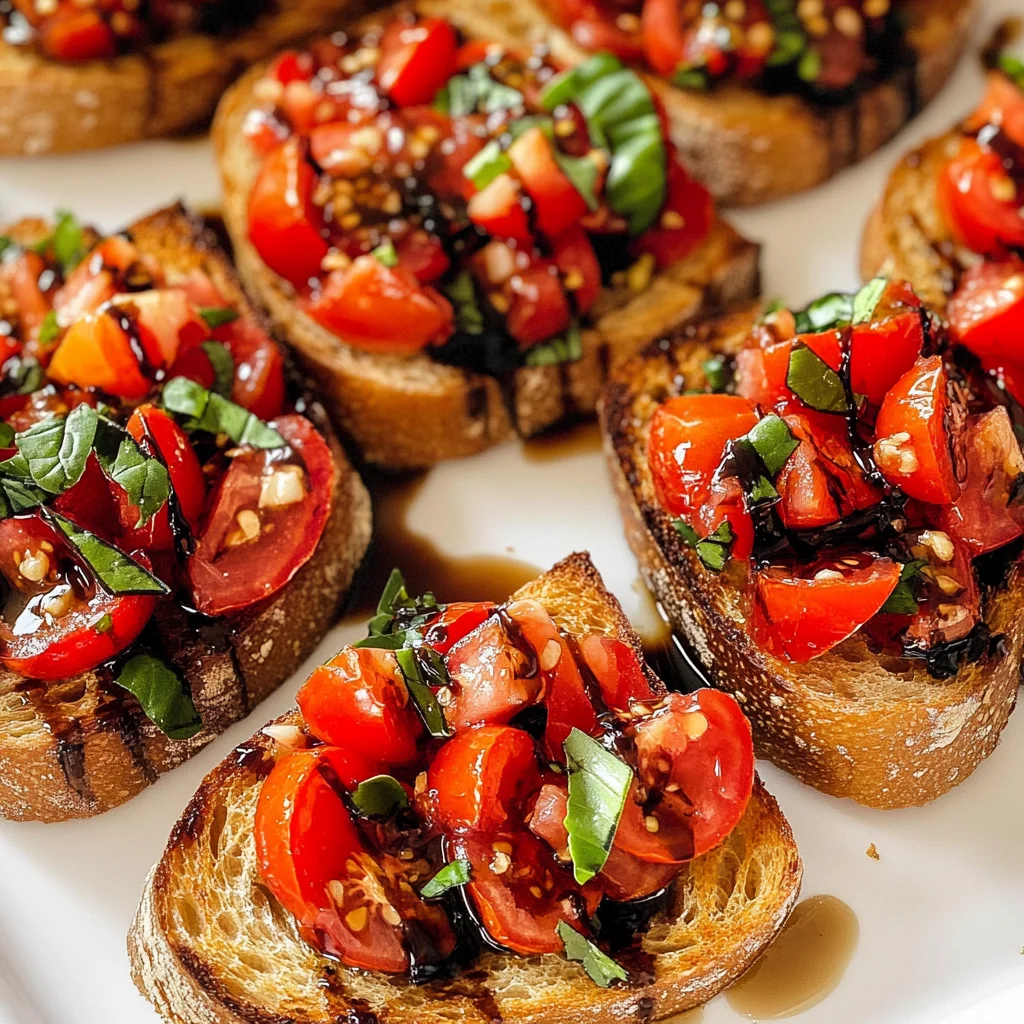
Tomato and Basil Bruschetta
There’s something undeniably magical about gathering around a table filled with vibrant, aromatic dishes that tell stories. When I think of my favorite moments spent with family and friends, I often find myself reminiscing about simple pleasures like enjoying a plate of Tomato and Basil Bruschetta. This isn’t just a recipe; it’s an experience waiting to unfold, a delightful bridge between tradition and innovation. Imagine biting into toasted bread topped with a medley of juicy tomatoes, fragrant basil, and a drizzle of rich balsamic vinegar—the flavors dance on your palate, each one playing its part in this symphony of tastes. When I prepare this dish, it’s not just about satisfying hunger but creating memories filled with laughter and connection.
This Tomato and Basil Bruschetta is the epitome of fresh Italian cuisine—effortlessly elegant yet refreshingly simple. It’s perfect for any occasion: an intimate dinner party, a summer picnic, or even as a pre-dinner snack while you sip on your favorite drink. I can promise you that the irresistible combination of the sweet acidity from the tomatoes and the peppery essence of fresh basil will transport you straight to an Italian sun-soaked terrace. Trust me when I say that once you serve this delectable appetizer, it will become an instant crowd-pleaser! Each bite encapsulates what it means to celebrate life’s little moments, making it all the more special.
Tomato and Basil Bruschetta: A Taste of Italy
Welcome to one of my all-time favorite recipes! The beauty of this Tomato and Basil Bruschetta lies in its simplicity and freshness. Not only is it incredibly easy to make—taking just 20 minutes from start to finish—but it also showcases some of nature’s finest ingredients. Gather your friends and family because they will be begging for seconds when they taste this delightful dish!

Ingredients:
As we embark on this culinary journey together, let’s take a moment to appreciate each ingredient that will help us create this masterpiece. Each component is thoughtfully selected to ensure our bruschetta shines bright with flavor.
- 2 cups cherry (or grape tomatoes, sliced). These little gems are the stars of our show! Their natural sweetness adds an incredible burst of flavor that standard tomatoes simply can’t match. When selecting them, look for vibrant colors—deep reds or golden yellows—and give them a gentle squeeze; they should feel firm yet slightly yielding. Avoid any that appear shriveled or blemished; fresh is key here! If you’re feeling adventurous, try mixing different varieties for added depth in both flavor and color.
- 2 cloves garlic (minced). Garlic is like that friend who brings energy into every room; it elevates our bruschetta from delicious to extraordinary! Minced garlic infuses the mix with its aromatic essence, creating layers of flavor that linger pleasingly. Opt for fresh garlic rather than powdered or jarred versions; nothing beats that pungent aroma released when you chop into a clove! And don’t worry if you’re not a fan of raw garlic’s intensity; as it mingles with the tomatoes during marination, its sharpness mellows beautifully.
- 1 tablespoon olive oil. Ahh, liquid gold! Olive oil serves not only as an ingredient but as a flavorful enhancer in our bruschetta mixture. It brings everything together while adding richness without overpowering the other ingredients’ freshness. For this recipe, select high-quality extra virgin olive oil—it should taste fruity and slightly peppery on your palate. This little touch makes all the difference in achieving that restaurant-quality vibe at home!
- 1 tablespoon balsamic vinegar. This tangy-sweet elixir contributes depth and complexity to our bruschetta mixture—a splash goes a long way! Balsamic vinegar brings balance by cutting through the sweetness of the tomatoes while enhancing their natural flavors with its rich acidity. Look for aged balsamic vinegar if possible; it tends to be thicker and sweeter than regular varieties due to longer fermentation processes.
- 1/3 cup basil (chopped (or more if desired)). Fresh basil is truly the heart of our bruschetta—its bright green leaves impart an unmistakable fragrance reminiscent of sunny Mediterranean gardens! When chopping basil, remember that bruising releases essential oils responsible for its signature taste; so treat it gently as you slice away! You may feel free to use more than suggested if you’re as obsessed with basil as I am—it complements everything beautifully!
- Salt and pepper (to taste). These humble seasonings are non-negotiable in elevating flavors in any dish—including our bruschetta! Salt enhances sweetness while balancing acidity in the tomatoes; meanwhile, freshly ground black pepper adds warmth without being overwhelming. Always season gradually—taste as you go—to ensure perfection!
- Balsamic glaze (optional). Drizzling balsamic glaze over your completed bruschetta adds both visual appeal and an extra layer of flavor that’s simply irresistible! The glaze is thicker than traditional balsamic vinegar and has a concentrated sweetness that ties everything together beautifully.
- 1 large whole wheat baguette (sliced into 1/2-inch slices). The foundation upon which our delicious toppings will rest! Whole wheat baguettes lend a nutty flavor along with added fiber compared to white bread varieties. Toasting these slices creates crispy surfaces perfect for holding onto all those juicy toppings without becoming soggy—nobody wants that!
- 2 tablespoons olive oil (for brushing). Just like we did earlier in our mixture, brushing olive oil onto each slice before toasting ensures they achieve that beautiful golden brown crust we all crave! It adds flavor while allowing easy release from your baking sheet.
- 1 clove garlic (sliced in half). Rubbing cut garlic onto warm toasted bread is an old Italian trick—this step infuses every bite with subtle garlicky goodness without overwhelming flavors! Trust me on this—it’s absolutely essential for authentic bruschetta!
Equipment You’ll Need:
Having the right tools makes creating culinary magic so much easier—and trust me when I say you’ll want these kitchen essentials close at hand!
- Cutting board – A sturdy cutting board provides stability while slicing your ingredients precisely—especially important when working with those delicate cherry tomatoes or fragrant basil leaves! Opt for one made from wood or bamboo; they’re gentler on knife blades than plastic alternatives.
- Sharp chef’s knife – A well-sharpened chef’s knife is non-negotiable here; it allows for clean cuts through both vegetables and bread alike without crushing them under pressure! Keep yours honed regularly—you’ll notice how effortless chopping becomes.
- Mixing bowl – Choose a medium-sized mixing bowl where you can combine all your tomato mixture ingredients comfortably without fear of overflow or spillage happening mid-stirring!
- Sheet pan – A flat sheet pan creates ample space for roasting all those beautiful slices evenly while ensuring they toast uniformly—no soggy bottoms allowed here!
- Pastry brush – While not mandatory by any means, having a pastry brush handy makes applying olive oil effortlessly smooth rather than messy!
Preparing the Tomato and Basil Bruschetta
Step 1: Preheat Your Oven
Let’s set ourselves up for success by preheating our oven to 400 degrees F (200 degrees C). This step is crucial because cooking at high heat allows us to achieve perfectly toasted bread—the kind that’s crispy on the outside yet tender inside—all within mere minutes! Once heated adequately, we’ll know exactly what temperature we need when ready to toast those baguette slices later on.
Step 2: Create Your Flavorful Mixture
Now comes one of my favorite parts: assembling our burst-of-flavor tomato topping! Start by slicing those gorgeous cherry tomatoes into halves—they should yield around two cups once cut up nicely—and toss them into your mixing bowl alongside minced garlic cloves, olive oil drizzled generously over top along with balsamic vinegar next followed by chopped fresh basil sprinkled throughout! Don’t forget salt & pepper—they’re essential players here too!
Give everything a gentle stir until combined well but take care not mashing anything too much—that would diminish texture we want present later when spooning atop toasted baguette slices! Set aside now letting flavors marry together whilst we prepare bread base next—we want maximum deliciousness after all!
Step 3: Toast Your Bread
With oven preheated perfectly now let’s turn attention toward preparing baguette slices—we aim for approximately sixteen pieces cut at half-inch thickness depending upon how big yours was originally shaped prior cutting up into smaller sections first beforehand if necessary too—toasting transforms these carb-laden beauties from soft loaves into crunchy canvases ready for topping later-onwards hopefully bringing smiles guaranteed every time served warm straight out oven hot as can be possibly imagined!
Take those sliced pieces then lightly brush each side using remaining two tablespoons olive oil spread across surface evenly before laying flat oiled-side down upon sheet pan awaiting transformation ahead… Place pan inside oven allowing bread slices toast anywhere between eight-ten minutes visually checking every few moments until golden brown achieved otherwise timing may vary slightly based upon individual ovens & preferences alike so keep close watch here please folks!
Step 4: Infuse Garlicky Goodness
Once toasted perfectly golden brown remove from oven carefully using hot pads… Now let’s embrace another Italian technique: rubbing halved garlic clove against warm surface area atop each piece gently releasing fragrant oils infused within crusts creating heavenly aromas wafting throughout kitchen space instantly bringing mouthwatering anticipation building even higher towards ultimate enjoyment soon coming forth ahead folks—trust me—I promise nothing compares feeling savoring first bites afterward once everything assembled together harmoniously culminating fulfilling moment shared amongst loved ones gathered round table enjoying one another’s company wholeheartedly celebrating life through food like no other experience possible truly exists elsewhere today beyond kitchen walls surrounding us right now either way…
Stay tuned for further steps where we’ll finish assembling everything into pure blissful perfection soon arriving onto plates ready devour soon thereafter taking everyone involved right back home sweet home memories cherished forever onward moving forward always till next time planning ahead again perhaps even sooner whenever possible again inevitably returning back again shortly afterwards rejoicing together sharing laughter amidst joyful moments created anew every single occasion shared openly freely amongst good friends family alike ultimately celebrating life fully alive feeling vibrant energies coursing through veins once again forging connections stronger built upon love laughter harmony shared through simple acts kindness displayed daily bringing joy wherever journey leads us onward through infinity beyond time itself endlessly forevermore till eternity ceases exist altogether eventually someday far off approaching distant horizons eventually beckoning forth await arrival patiently yearning anticipate arrival come soon enough following trails left behind guiding paths forward leading ever onward towards exciting adventures yet unfold ahead surely awaiting discovery eagerly anticipating rewards gained through travels undertaken bravely exploring world around us living life fullest best way imaginable possible always welcoming warmly anyone willing join journey alongside us forevermore…
Step 5: Marinating the Tomato Mixture for Flavor Infusion
Now that you have your vibrant tomatoes and aromatic garlic ready, it’s time to bring them together in a flavorful embrace. In a mixing bowl, combine the sliced cherry or grape tomatoes with the minced garlic, olive oil, balsamic vinegar, and the freshly chopped basil. This step is absolutely paramount because marinating not only allows the tomatoes to release their natural juices but also encourages the flavors to meld beautifully. I promise you, this is where the magic happens! As the ingredients mingle, you’ll notice how the bright acidity of the balsamic vinegar complements the sweetness of the tomatoes while the garlic adds a punch of depth. Don’t rush this step—let it sit for about 10 to 15 minutes at room temperature. This brief period is essential; it gives your dish an utterly intoxicating flavor profile that transforms simple ingredients into something truly extraordinary.
While your tomato mixture marinates, you might catch a whiff of those inviting aromas wafting through your kitchen—a delightful preview of what’s to come! Keep an eye on it, and if you feel inspired, give it a gentle stir halfway through to ensure everything gets evenly coated. Remember, this is about coaxing out those flavors; you’re not just throwing things together. It’s like letting an orchestra tune before performing a symphony—the result will be so much more harmonious!
Step 6: Toasting Your Baguette Slices
With your tomato mixture beautifully marinated and bursting with flavor, it’s time to focus on that baguette. Preheat your oven to 400 degrees Fahrenheit—this temperature is crucial because it allows for even browning without burning. Grab your whole wheat baguette and slice it into approximately 16 pieces, aiming for about half an inch thick. The thickness is important because you want each slice to provide a sturdy base for all those luscious toppings without becoming soggy. Next, lightly brush one side of each slice with olive oil; this not only enhances flavor but also creates that coveted crispy texture when toasted.
Place each oiled-side down on your sheet pan and pop them into the oven for about 8 to 10 minutes. Keep a close watch during this time—you’re looking for a lovely golden brown color and just enough crispness that they can hold up under all that delicious tomato mixture without falling apart. If your kitchen starts to fill with the warm aroma of bread baking—ohhhh!—you know you’re on the right track! Once they achieve that perfect toastiness, remove them from the oven and let them cool slightly. This cooling phase is essential as it prevents any steam from making them soggy once topped.
Step 7: Infusing Garlic Flavor into Your Toasts
Now comes one of my favorite parts—infusing those toasted slices with an irresistible garlic flavor! Take a clove of garlic and slice it in half lengthwise; this technique exposes more surface area for maximum aroma release. Gently rub each toasted slice with the cut side of garlic; trust me on this one—it may seem simple, but this step adds an incredible depth of flavor that’s absolutely non-negotiable for a classic bruschetta experience. As you do this, you’ll see little bits of garlic cling onto the toasted bread like tiny flavor bombs waiting to explode!
This process serves two purposes: first, it imparts a subtle garlic essence without overpowering any other flavors; second, it’s an age-old technique used in Italian cooking that elevates even humble ingredients into something sophisticatedly delicious. Just imagine biting into that crunchy toast as bursts of garlicky goodness mingle with fresh tomatoes—a truly delightful sensation!
Step 8: The Grand Assembly – Bringing It All Together
At last! We’ve arrived at what feels like a grand finale: assembling your Tomato and Basil Bruschetta! With your toasted baguette slices ready and your marinated tomato mixture bursting with flavor, it’s time to generously spoon that vibrant medley onto each piece of toast. Aim for around a tablespoon or so per slice—don’t skimp here! Each bite should be filled with juicy tomatoes and fragrant basil, creating a symphony of flavors that dances on your palate.
Once you’ve topped all your toast slices with that glorious mix, take a moment to pause and admire your handiwork—the colors alone are so inviting! If you’re feeling fancy (and who wouldn’t?), drizzle some balsamic glaze over each bruschetta just before serving; this sweet-tart finishing touch adds another layer of complexity that’s simply divine. It’s these small details that can transform something good into something outstanding, enhancing both visual appeal and taste dramatically.
When serving these beauties at gatherings or cozy dinners at home, make sure they are consumed soon after assembly—ideally within 30 minutes—to enjoy them at their best texture and flavor peak before they soften too much from those juicy toppings.
Final Touches – Enjoying Your Creation!
As we wrap up this delightful journey into making Tomato and Basil Bruschetta together, I hope you’re as excited as I am to share these vibrant bites with friends or family—or even just savor them solo! Serving these bruschettas as appetizers will undoubtedly impress anyone lucky enough to taste them; they are truly crowd-pleasers! And remember: any leftover tomato-basil mixture can be stored in an airtight container in the fridge for up to two days—perfect atop grilled chicken or mixed into salads later!
So go ahead—relax and indulge in every bite knowing you’ve created something magical from scratch! Enjoy every moment spent enjoying good food—it’s what life is all about!
Storage and Enjoyment Tips for Your Tomato and Basil Bruschetta
Now that your Tomato and Basil Bruschetta is beautifully assembled, it’s time to dive into the blissful experience of enjoying it with friends or family. The vibrant colors of the fresh tomatoes juxtaposed with the lush green basil create a dish that not only pleases the palate but also captivates the eyes. As you take that first bite, the crunch of the toasted baguette coupled with the juicy, fragrant topping will have you swooning! But what if you find yourself with leftovers? Don’t worry; I’ve got you covered with some wonderful storage tips to keep this deliciousness at its peak.
Storing Leftover Tomato and Basil Bruschetta
To preserve any leftover Tomato and Basil Bruschetta, place it in an airtight container—this is crucial to lock in all those glorious flavors without letting them mingle too much. I recommend storing it in the refrigerator where it will stay fresh for about two days. However, here’s a little pro tip from my kitchen: if you’ve made more than you can consume right away, consider keeping the tomato mixture separate from the toasted bread. This strategy prevents the bread from becoming soggy while still allowing you to enjoy that wonderful crunch when you’re ready to dig back in. Trust me on this, as no one wants a limp bruschetta! When you’re ready to enjoy it again, simply spoon your tomato mixture atop freshly toasted slices of baguette for a delightful revived experience.
Freezing Components for Later
If you’re thinking about freezing components for later use—great idea! You can freeze the tomato mixture easily by placing it in a freezer-safe container or bag. Just ensure it’s well-sealed to keep out air and moisture, which can lead to freezer burn. This delightful mix will keep well for up to three months in your freezer, making it super convenient for quick appetizers down the road. When you’re ready to use it, simply thaw it overnight in the fridge before serving; this way, your tomatoes will retain their vibrant freshness. This option not only saves time but also allows you to whip up a stunning appetizer at a moment’s notice, impressing anyone who pops by unexpectedly!
Tomato and Basil Bruschetta

Tomato and Basil Bruschetta is a delightful Italian appetizer that brings fresh flavors and vibrant colors to your table. This easy-to-make dish features toasted whole wheat baguette slices topped with a medley of juicy cherry tomatoes, aromatic garlic, and fragrant basil, all drizzled with rich balsamic vinegar. Perfect for any occasion—whether as a pre-dinner snack or a crowd-pleasing starter at gatherings—this bruschetta captures the essence of summer in every bite. The combination of textures and tastes not only satisfies your palate but also creates cherished moments shared with family and friends. Enjoy the simplicity and elegance of this classic dish as you savor each mouthful!
- Prep Time: 10 minutes
- Cook Time: 10 minutes
- Total Time: 20 minutes
- Yield: Serves approximately 4
- Category: Appetizer
- Method: Baking
- Cuisine: Italian
Ingredients
- 2 cups cherry or grape tomatoes, sliced
- 2 cloves garlic, minced
- 1 tablespoon olive oil
- 1 tablespoon balsamic vinegar
- 1/3 cup fresh basil, chopped
- Salt and pepper to taste
- 1 large whole wheat baguette, sliced
- 2 tablespoons olive oil (for brushing)
Instructions
- Preheat your oven to 400°F (200°C).
- In a mixing bowl, combine sliced tomatoes, minced garlic, olive oil, balsamic vinegar, chopped basil, salt, and pepper. Gently stir and let sit for 10 to 15 minutes.
- Slice the baguette into half-inch pieces and brush one side with olive oil. Place them on a sheet pan oiled-side down and toast in the oven for about 8 to 10 minutes until golden brown.
- Remove from the oven and rub the toasted sides with halved garlic cloves.
- Spoon the marinated tomato mixture generously onto each toast just before serving.
Nutrition
- Serving Size: 2 pieces (80g)
- Calories: 140
- Sugar: 3g
- Sodium: 100mg
- Fat: 6g
- Saturated Fat: 1g
- Unsaturated Fat: 5g
- Trans Fat: 0g
- Carbohydrates: 20g
- Fiber: 2g
- Protein: 4g
- Cholesterol: 0mg