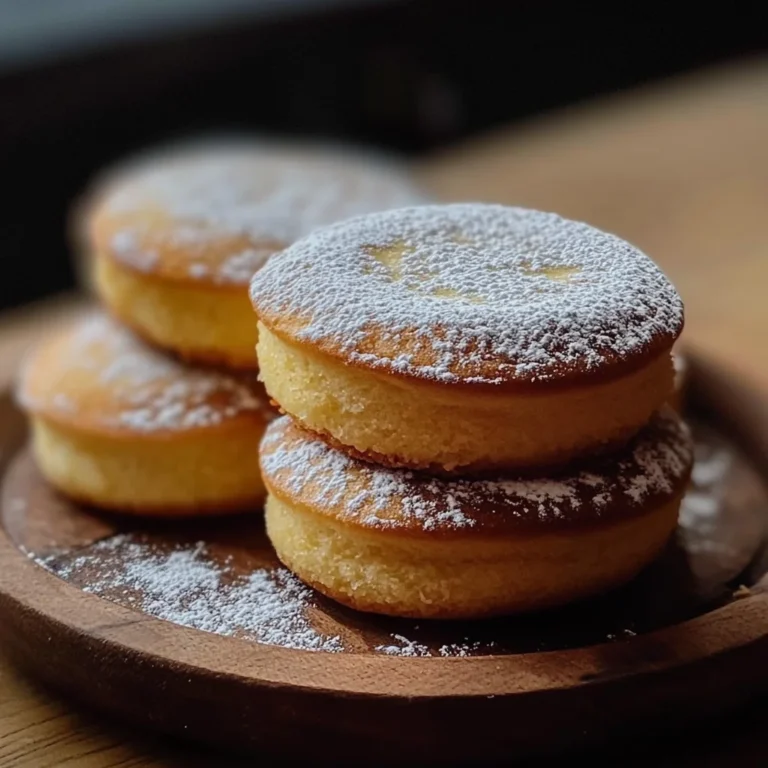
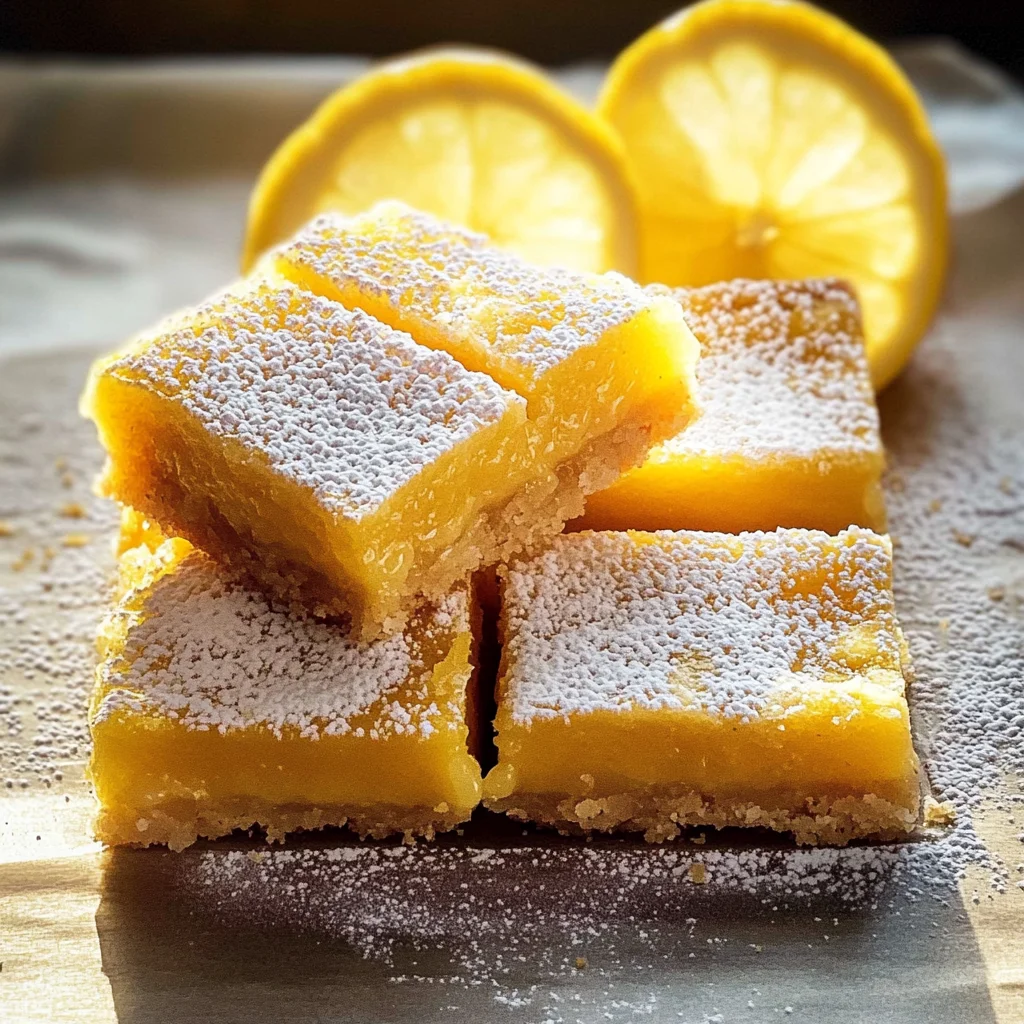
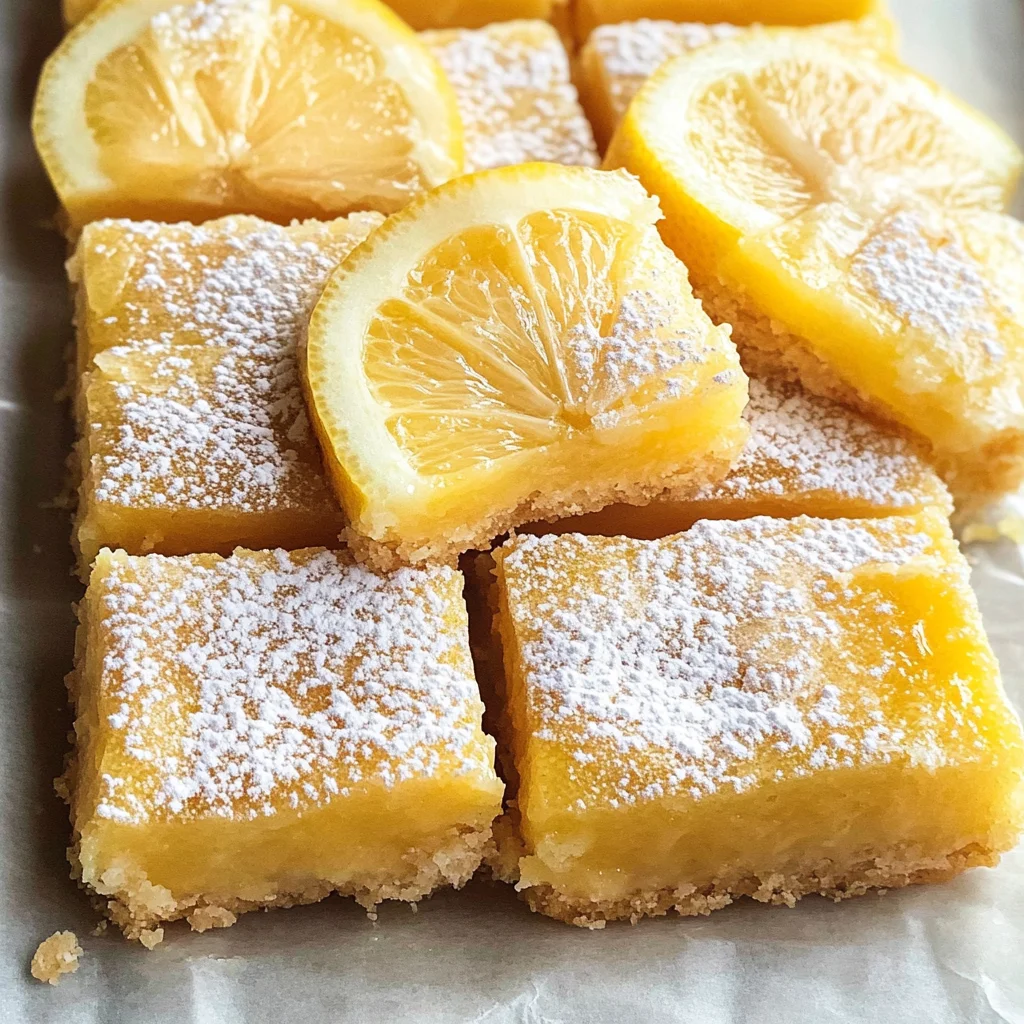
Super Easy Lemon Bars
There’s something undeniably magical about the first bite of a perfectly made lemon bar. It’s a moment where sweet and tart collide, creating a symphony of flavors that dances on your palate and instantly lifts your spirits. The Super Easy Lemon Bars recipe is not just about the ingredients or the process; it’s an experience that brings joy, nostalgia, and a burst of sunshine into your day. Imagine biting into that delicate, buttery shortbread crust, only to be met with a luscious layer of creamy lemon curd that tastes like liquid sunshine. I promise you, it’s profoundly satisfying and utterly intoxicating.
For me, these Super Easy Lemon Bars evoke memories of sunny afternoons spent in my grandmother’s kitchen, where she taught me the art of balancing flavors. We would squeeze fresh lemons, their bright yellow juice glistening like liquid gold, while laughter filled the air. As I whisked together eggs and sugar, the aroma of citrus wafted through the house, an invitation for family and friends to gather around the table. This recipe is more than just dessert; it’s a bridge between tradition and innovation. Whether you’re celebrating a special occasion or simply indulging in a midweek treat, these bars are the perfect way to share love, laughter, and a little bit of sweetness.
Super Easy Lemon Bars: A Citrusy Delight You Can’t Resist
Let’s dive into this delightful recipe together! Making these Super Easy Lemon Bars is as enjoyable as eating them. With just a few simple ingredients and some love, you’ll create a treat that everyone will rave about. Trust me when I say that once you make these bars, they will quickly become your go-to dessert for gatherings or cozy nights at home.
Ingredients:
As we embark on this culinary journey together, let’s take a moment to appreciate each ingredient that contributes to our Super Easy Lemon Bars. Each one plays an essential role in achieving that perfect balance of flavor and texture.
- 1/2 cup (113g) unsalted butter, softened to room temperature. Butter is absolutely paramount in creating that rich flavor and tender texture we’re after in our lemon bars. It acts as a base for our buttery shortbread crust while also enriching the filling with its creamy goodness. Be sure to let it soften at room temperature; this allows it to cream properly with sugar later on for that light and airy texture we crave.
- 1 cup (120g) all-purpose flour. This ingredient serves as the backbone of our crust—providing structure while still allowing for that melt-in-your-mouth quality we all adore. When selecting flour, look for all-purpose varieties with moderate protein content; too much protein can lead to a tough texture rather than the delicate crumb we’re aiming for here.
- 1/4 cup (30g) powdered sugar. This soft sugar adds sweetness without overshadowing our key ingredient: lemon! It blends effortlessly into the butter during the creaming process, ensuring our crust remains tender and flaky rather than gritty or dense.
- 1/2 cup (120ml) fresh lemon juice (about 2-3 lemons). Freshly squeezed lemon juice is what makes these bars sing! The vibrant acidity not only provides that characteristic tang but also brightens up all other flavors in this recipe. While bottled lemon juice may be convenient, nothing compares to the freshness of squeezing those juicy lemons yourself; you’ll notice an astounding difference in flavor.
- 1 tbsp (6g) finely grated lemon zest. Don’t skip this step! The zest contains essential oils from the peel that pack an intense punch of citrus flavor without adding any bitterness like juicing can sometimes do if overdone. It enhances both our crust and filling—bringing complexity to what could otherwise be just another sweet treat.
- 3 large eggs, at room temperature. Eggs are crucial for binding everything together while providing richness to both the crust and filling! Room temperature eggs blend more seamlessly into batter than cold ones straight from the fridge—ensuring even incorporation throughout your mixture.
- 1 1/2 cups (300g) granulated sugar. This might seem like quite a bit but trust me; it’s necessary! The sugar not only sweetens but also balances out the tartness from our fresh lemons—creating that irresistible harmony we’re after in every bite.
- 1/2 cup (60g) all-purpose flour, sifted. Using sifted flour here helps avoid lumps in your filling while ensuring even distribution within your mixture—it’s all about achieving that silky smooth consistency!
- Powdered sugar for dusting upon serving offers a beautiful finishing touch—an elegant snowy dusting atop those golden bars makes them feel extra special!
Equipment You’ll Need:
Having the right tools makes all the difference in transforming simple ingredients into something truly wonderful! While they may not be ingredients per se, these essential partners ensure your baking experience runs smoothly—from start to finish!
- 8 x 8 baking pan – This size is perfect for creating thick yet manageable bars; it allows adequate space for rising without spilling over while giving us those lovely edges we love so much! If you’re in need of alternatives, consider using a 9 square pan but adjust cooking time slightly as they may bake faster due to increased surface area.
- Mixing bowls – Having multiple sizes on hand helps immensely when separating dry ingredients from wet ones—as well as making sure everything remains organized throughout each step!
- Whisk – A sturdy whisk is essential for blending eggs into sugar smoothly without creating clumps or over-mixing which could lead to denser results than desired!
- Rubber spatula – Perfectly suited for scraping down sides of bowls ensuring no ingredient goes unincorporated! They also come in handy when smoothing out batters or fillings evenly across pans—don’t underestimate their value!
Preparing the Super Easy Lemon Bars
Step 1: Preheat Your Oven & Prepare Your Pan
First things first: preheat your oven to 350°F (175°C). This step is crucial as an adequately heated oven ensures proper baking from start to finish—a vital element when making any kind of baked good! While waiting for it to warm up—grab your trusty 8” x 8” baking pan and line it with parchment paper along both sides so you can easily lift out those gorgeous bars later on without leaving behind any sticky messes! Lightly grease it with non-stick spray or butter first; this guarantees nothing will stick once baked—a small but non-negotiable detail!
Step 2: Make the Shortbread Crust
Now let’s dive into creating our buttery shortbread crust! In one mixing bowl combine 1/2 cup unsalted butter with 1/4 cup powdered sugar using either an electric mixer or by hand if preferred—cream them until lightened in color and fluffy (around 2 minutes). This process known as creaming introduces air bubbles into dough which contribute delightfully tender texture later on! Next add 1 cup all-purpose flour gradually while mixing until combined—it should resemble coarse crumbs at this stage (don’t fret if there are tiny lumps!). Press this mixture evenly across bottom of prepared pan—making sure every corner is covered nicely before placing it directly into preheated oven where it can bake away until lightly golden brown around edges (approximately 15 minutes)—keep an eye on it because browning too much could lead us down an undesirable path!
Step 3: Whisk Together Your Filling
While waiting patiently for crust perfection—let’s focus on crafting our sensational lemon filling! In another mixing bowl crack open those three large eggs then add them alongside freshly squeezed lemon juice along with granulated sugar—using either whisk or fork beat vigorously until fully incorporated (you want no visible eggy streaks!). Now’s when we incorporate our grated zest—folding gently yet thoroughly ensures every bite bursts forth with zesty brightness! Finally sprinkle sifted half-cup flour over mixture before folding again until just combined; remember not too stir excessively here since over-mixing could lead us astray resulting dense fillings instead silky smooth deliciousness once baked up!
Step 4: Pour & Bake
Once crust has achieved its golden glory remove from oven carefully then pour filling directly atop hot layer—this contrast creates such inviting visual appeal once cooled down too—notably important factor during presentation time later ahead!. Return back into oven allowing everything set firmly whilst infusing delightful aromas throughout kitchen space…(bake approximately another 25–30 minutes or until edges appear firm yet center jiggles slightly). During final moments keep close watch—you want slight puffiness without browning overly so…trust me here timing plays vital role here ensuring perfect outcome every single time!.
I’m truly excited for you to try these Super Easy Lemon Bars—they encapsulate love in every bite! Stay tuned as we continue crafting further steps together…
Step 5: Whipping Up the Lemon Curd Filling
Now, let’s transition to crafting that luscious lemon curd filling that will steal the show in our Super Easy Lemon Bars. In a separate mixing bowl, you’ll want to whisk together those three large eggs until they’re light and frothy – this is crucial because incorporating air will give your bars that delightful, airy texture we’re all dreaming about. As you whisk, slowly add in the granulated sugar, allowing it to dissolve completely into the eggs. You want this mixture to become a velvety blend that’s a little thicker than when you started. Trust me on this; it’s all about building a strong base for your lemony goodness.
Once your eggs and sugar are perfectly combined, it’s time to introduce that zesty duo of freshly squeezed lemon juice and finely grated lemon zest. The juice from about two to three lemons should yield approximately half a cup; I recommend using fresh lemons whenever possible because the flavor is utterly intoxicating compared to bottled varieties. The zest is where the magic truly happens—don’t skip it! The tiny flecks of zest will infuse your filling with aromatic oils that elevate every bite, creating a symphony of flavors that dances on your palate. Gently fold these ingredients into your egg mixture until it’s smooth and inviting. This step not only brings together the flavors but also prepares us for the next critical phase of baking our Super Easy Lemon Bars.
Step 6: Sifting and Combining for Perfection
Now comes an essential technique: sifting! You might wonder why we sift that second half-cup of all-purpose flour into our lemon mixture instead of just dumping it in willy-nilly. Sifting helps break up any lumps and aerates the flour, ensuring our filling has a silky-smooth consistency without any pesky clumps. It’s simple yet highly effective—and I promise you, this small act can make all the difference between good and extraordinary! With your flour sifted over the lemon-egg concoction, gently fold it in with a spatula or wooden spoon. Be patient here and use slow strokes; you want to incorporate it without over-mixing, which could deflate all that lovely air we’ve worked so hard to create.
As you fold, keep an eye out for streaks of flour disappearing into the rich yellow mixture—this visual cue tells you you’re on the right track. The science behind folding versus stirring hinges on preserving air bubbles; those bubbles contribute to the filling’s lightness as it bakes. Once fully combined, your lemon curd should have a beautiful glossy finish—like liquid gold waiting to be poured onto its buttery shortbread throne!
Step 7: Pouring Over Your Shortbread Crust
With both components ready, it’s time for our favorite moment—pouring that vibrant lemon curd over your crust! Carefully remove the baked shortbread from the oven (it should have taken on a light golden hue after about 20 minutes), allowing it to cool slightly before adding the filling. This step is important because pouring hot filling directly onto a hot crust can cause them to meld into one soggy mess rather than creating distinct layers. Instead, let your crust cool for about five minutes—just enough time for those tantalizing aromas from both layers to mingle gently.
Once cooled just enough, pour your silky lemon curd directly over that golden crust, spreading it evenly with a spatula if necessary. The contrast between the bright yellow filling and golden crust is visually stunning—it’s like sunshine captured in dessert form! Now here’s where patience pays off: before we pop this beauty back in the oven for its final bake (which will take around 25-30 minutes), ensure everything is set up just right. You want your oven preheated at 350°F (175°C) so that when you slide it in, everything bakes uniformly—a crucial step for achieving that perfect texture!
Step 8: Baking Your Perfect Super Easy Lemon Bars
As your Super Easy Lemon Bars bake away in their warm cocoon, let me emphasize how vital this step is! During these precious moments in the oven, chemistry is at work—the heat transforms that luscious curd into a set filling while allowing flavors to deepen and meld together beautifully. You’ll know they are done when you see the edges slightly puffed and just beginning to pull away from the sides of your pan—this visual cue means you’re almost there! The center should still have a slight jiggle; think of it like gently shaking hands with destiny—don’t let uncertainty rule you here!
Now comes my favorite part: once baked, allow those bars some cooling time at room temperature before transferring them to chill in the refrigerator for at least two hours (but preferably overnight). Why chill? Well, my friends, chilling not only helps set up their structure perfectly but also enhances those vibrant flavors! When they come out cold and firm after their rest period, each bite becomes profoundly satisfying as every layer reveals its delicious secrets—like unwrapping gifts on special occasions!
Conclusion:
As we wrap up our delightful journey through this recipe, I can’t help but feel a surge of excitement as I think about all the joy these Super Easy Lemon Bars will bring into your home. Each layer—from the buttery shortbread crust that crumbles perfectly beneath your fingers to the bright lemon curd filling that dances on your palate—creates an unforgettable experience that’s both comforting and refreshingly vibrant. The balance of sweetness and tartness is nothing short of remarkable, elevating these bars from mere dessert status to something truly extraordinary.
This recipe is absolutely a must-try—not just because of its astonishing taste but also because of the sheer happiness it brings when making it! Imagine pulling these golden squares from your oven, their tops slightly puffed and fragrant with citrusy zest. Whether you’re hosting friends for brunch or treating yourself after a long day, these lemon bars are versatile enough to shine any time of year. They’re perfect for summer picnics or cozy winter evenings when you need that bright burst of sunshine on your table.
For an afternoon pick-me-up, imagine savoring one alongside a steaming cup of herbal tea—each bite pairs beautifully with the calming notes of chamomile or mint. Or perhaps you’re hosting a gathering; picture serving these alongside fresh berries and whipped coconut cream! For those who wish for something more indulgent, try drizzling a bit of dark chocolate over the top—oh my goodness, it adds another layer of decadence that’s utterly intoxicating!
Feeling adventurous? This recipe is wonderfully adaptable! You could experiment by adding different citrus zest like lime or orange for unique flavor twists; each variation brings its own charm while keeping that classic lemon essence alive. You might even consider swirling in some fresh blueberries or raspberries into the lemon curd before baking—the color contrast alone would be stunning! So why not give it a try? I’d love for you to share your adventures with this recipe; let’s connect over our love for baking and create some wonderful memories together!
Super Easy Lemon Bars
Super Easy Lemon Bars are the perfect blend of sweet and tangy, bringing a burst of sunshine to any occasion. These delightful treats feature a buttery shortbread crust topped with a creamy lemon curd filling that melts in your mouth. Whether enjoyed on a warm summer day or served at a cozy gathering, these lemon bars are sure to impress friends and family alike. With simple ingredients and straightforward instructions, this recipe is ideal for both novice bakers and seasoned chefs looking for a quick, refreshing dessert.
- Prep Time: 15 minutes
- Cook Time: 45 minutes
- Total Time: 1 hour
- Yield: Approximately 16 servings 1x
- Category: Dessert
- Method: Baking
- Cuisine: American
Ingredients
- 1/2 cup unsalted butter (113g), softened
- 1 cup all-purpose flour (120g)
- 1/4 cup powdered sugar (30g)
- 1/2 cup fresh lemon juice (120ml)
- 1 tbsp finely grated lemon zest
- 3 large eggs
- 1 1/2 cups granulated sugar (300g)
- 1/2 cup all-purpose flour (60g), sifted
- Powdered sugar for dusting
Instructions
- Preheat your oven to 350°F (175°C) and prepare an 8" x 8" baking pan with parchment paper.
- In a mixing bowl, cream together softened butter and powdered sugar until light and fluffy. Gradually add in the first cup of flour until combined.
- Press this mixture into the bottom of the prepared pan and bake for about 15 minutes, or until lightly golden.
- In another bowl, whisk the eggs and then mix in granulated sugar, lemon juice, zest, and sifted flour until smooth.
- Pour this lemon filling over the warm crust and return it to the oven for an additional 25–30 minutes until set.
- Allow to cool at room temperature before refrigerating for at least two hours. Dust with powdered sugar before serving.
Nutrition
- Serving Size: 1 square (40g)
- Calories: 150
- Sugar: 18g
- Sodium: 50mg
- Fat: 7g
- Saturated Fat: 4g
- Unsaturated Fat: 3g
- Trans Fat: 0g
- Carbohydrates: 20g
- Fiber: 0g
- Protein: 2g
- Cholesterol: 40mg