Chocolate Hazelnut Thumbprint Cookies Recipe
There’s something undeniably magical about the act of baking, isn’t there? The aroma of warm butter and sugar wafting through the kitchen, the anticipation of a delicious treat emerging from the oven—it’s an experience that transcends mere nourishment. Today, I’m thrilled to share with you my cherished recipe for Chocolate Hazelnut Thumbprint Cookies. These delightful morsels are not just cookies; they are little bites of joy that bring comfort and happiness to every gathering. Imagine biting into a soft, chocolatey cookie with a rich, gooey center of chocolate hazelnut spread—it’s like a warm hug for your taste buds! Trust me when I say that this Chocolate Hazelnut Thumbprint Cookies Recipe is bound to become a staple in your home, creating memories that linger far beyond the last crumb.
As we embark on this culinary adventure together, let’s take a moment to appreciate what makes thumbprint cookies so special. This classic treat has roots that stretch back through generations, often made during festive occasions or family gatherings. What’s particularly enchanting about thumbprints is their versatility; you can fill them with anything from jam to chocolate ganache. In this version, we’re elevating the traditional cookie by incorporating rich cocoa powder and luscious chocolate hazelnut spread—a combination that’s simply irresistible! Whether you’re celebrating a special occasion or just indulging in a quiet evening at home, these cookies are perfect for sharing (or savouring all to yourself). So grab your apron and let’s get started on making some truly extraordinary treats!
Chocolate Hazelnut Thumbprint Cookies Recipe: A Sweet Symphony of Flavors
With each bite of these delightful cookies, you’ll find yourself mesmerized by the harmonious blend of textures and flavors. The soft cookie base provides the perfect canvas for the rich chocolate hazelnut filling that awaits inside. Are you ready to create something magical? Let’s gather our ingredients and prepare for a delicious journey!

Ingredients:
Before we dive in, it’s essential to understand how each ingredient plays its part in crafting these divine cookies. Every single one contributes to the overall flavor and texture, making this Chocolate Hazelnut Thumbprint Cookies Recipe truly special.
1 cup (2 sticks or 226g) unsalted butter, softened. This is crucial for creaming properly and creating that light, airy texture we’re aiming for in our cookies. When butter is softened correctly—not too melted and not too cold—it allows the sugar to incorporate perfectly, leading to beautifully tender cookies. I recommend using high-quality unsalted butter because it gives you control over the salt content in your baking; besides, nothing beats the richness it brings to this recipe.
2/3 cup granulated sugar. Sugar does more than sweeten; it also plays a significant role in achieving that perfect cookie structure. The granulated sugar helps create a lovely crispy edge while maintaining tenderness within. I always suggest using pure cane sugar for its clean sweetness—avoid anything with additives if possible, as they can affect both flavor and texture.
2 teaspoons vanilla extract. Ahh, vanilla—the unsung hero of many baked goods! Its warm, aromatic qualities elevate flavors beautifully and add that comforting essence we all adore. Opt for pure vanilla extract over imitation for an authentic flavor experience; trust me on this—it makes all the difference!
2 cups all-purpose flour. This is your foundation! The flour provides structure while allowing those delectable cookies to hold their shape during baking. When measuring flour, I recommend spooning it into your measuring cup instead of scooping it directly from the bag—this prevents packing and ensures accurate measurements. If you want to experiment with gluten-free options later on, almond flour works wonderfully here too!
1/2 cup cocoa powder. Here comes the magic! Cocoa powder gives our cookies their deep chocolate flavor without adding any extra fat or sweetness. Make sure you’re using high-quality unsweetened cocoa powder; Dutch-processed cocoa adds an even richer color and flavor profile if you’re feeling adventurous.
1/2 teaspoon salt. Salt is non-negotiable in baking; it balances sweetness and enhances flavors across all ingredients used in this recipe. A pinch of salt can transform ordinary sweets into something truly extraordinary by amplifying their natural flavors.
1/2 cup hazelnuts, finely chopped (for rolling). These crunchy nuggets bring an irresistible nuttiness while complementing the chocolate beautifully! Coating your dough balls with chopped hazelnuts not only adds texture but also creates visual appeal—who wouldn’t want to bite into one of these beauties?
1/2 cup chocolate hazelnut spread (such as Nutella). This luscious filling is what makes these thumbprint cookies shine! It brings creaminess and decadence that pairs perfectly with our cocoa-infused cookie base—it’s like tasting pure bliss in every bite! If you have dietary preferences or restrictions regarding specific brands, look for alternative spreads made from roasted nuts without additives.
Extra whole hazelnuts for garnish (optional). Using whole hazelnuts as a decorative touch isn’t just about aesthetics; they also add an extra crunch factor when you take that first bite! Plus, who doesn’t love garnishing their creations?
Equipment You’ll Need:
Having the right tools at your disposal truly transforms your baking experience from daunting to delightful! These essentials will help ensure your Chocolate Hazelnut Thumbprint Cookies come out perfectly every time:
- Electric mixer – A must-have for creaming butter and sugar together efficiently! It takes away much of the elbow grease required compared to mixing by hand—plus it ensures an airy texture that’s key for tender cookies.
- Mixing bowls – You’ll need at least two bowls: one for combining dry ingredients like flour and cocoa powder while another handles wet ingredients like butter and sugar mixtures. I love having glass bowls because they’re easy to see through when checking consistency!
- Measuring cups and spoons – Precision matters in baking! Accurate measurements ensure consistent results each time you make these delectable treats—no guesswork involved!
- Baking sheets – A good quality non-stick baking sheet will help prevent any sticking mishaps while ensuring even cooking throughout.
- Parchment paper – Lining your baking sheets makes cleanup effortless while also preventing sticking; plus, it adds an extra layer between heat sources which can lead to better-baked goods overall.
Now that we’ve assembled everything we need let’s dive into preparing our heavenly Chocolate Hazelnut Thumbprint Cookies!
Step 1: Preheat Your Oven and Prepare Baking Sheets
The first step is incredibly straightforward but essential: preheating your oven not only sets up optimal conditions for baking but also ensures even heat distribution throughout our cookies as they bake! Aim for 350°F (175°C) because this temperature allows sugars within our batter appropriately caramelize without burning before they achieve perfect golden edges—a delightful combination indeed! While waiting patiently—and trust me here—you can line two baking sheets with parchment paper—the perfect partner for easy removal post-baking!
Step 2: Cream Together Butter & Sugar
Now onto one of my favorite parts—creaming butter mixed with granulated sugar until light & fluffy! This process involves air getting whipped into softened butter which creates tiny bubbles forming pockets within our mixture resulting in delightful lift during baking time making those cookies soft & tender inside once cooled down later on. Take an electric mixer fitted with paddle attachments (or whisk vigorously by hand) working together until fluffy—about three minutes should suffice here—but don’t rush through this step—it matters immensely!
Step 3: Whisk Together Dry Ingredients
While waiting eagerly beside your mixer watching magic unfold—you can multitask by whisking dry ingredients separately: combining all-purpose flour alongside both cocoa powder & salt within another bowl until thoroughly blended together—this simple action helps avoid clumps appearing later when combined altogether yielding smoother dough whilst ensuring uniform distribution throughout batch prior mixing stages.
Step 4: Combine Everything Together
Gradually add those carefully measured dry components into creamy buttery goodness gradually folding them together gently using spatula rather than aggressive mixing motions since dough requires gentle handling at this stage preventing excess gluten formation leading tough biscuits not desired outcome here—we want delicate treats after all right? Maintain patience as everything melded nicely resulting pliable yet firm dough ready next shaping stage ahead…
Now take a moment—you’ve done brilliantly so far! With each step behind us leading closer towards those decadent bites awaiting soon… Let’s continue on through shaping those wonderful thumbprints next!
Step 5: Rolling Into Bliss
Now that you have your beautifully mixed dough, it’s time to shape these little nuggets of joy. Begin by taking a generous tablespoon of the dough and rolling it gently between your palms to form a ball that’s about one inch in diameter. I always find this step to be incredibly meditative; as you roll, feel the smoothness of the butter and cocoa melding together to create a rich, velvety texture. It’s almost like creating tiny edible ornaments! Once you’ve rolled all the balls, prepare for the next delicious transformation—an indulgent coat of finely chopped hazelnuts. This step is not just for decoration; it adds an irresistible crunch and depth of flavor that perfectly complements the soft, chocolatey center. Don’t rush this step; take your time to ensure each cookie is well-coated because those bits will toast in the oven, giving them an even more robust nutty flavor.
As you roll each ball into the chopped hazelnuts, make sure they are evenly coated all around. You want that beautiful golden hue to shine through after baking. The oils in the hazelnuts will release as they cook, infusing the cookies with an utterly intoxicating aroma that will fill your kitchen and beckon everyone nearby. Place these lovely little balls on your prepared baking sheets, spaced about two inches apart—this allows them to spread without merging into one another during baking. It’s crucial to give them room to breathe!
Step 6: Creating Indentations with Love
Now comes the fun part! Use your thumb or the back of a small spoon—whatever feels comfortable—to gently press down into the center of each cookie ball, creating a small indentation. Don’t worry if it seems too deep at first; these cookies puff up slightly while they bake, so a good thumbprint will ensure there’s enough room for that luscious chocolate hazelnut spread later on. This step is absolutely paramount because it gives our cookies their character while also ensuring that every bite is filled with creamy goodness.
I want you to embrace this moment! Think about how satisfying it is to create something so delightful from scratch. Imagine those warm cookies fresh out of the oven with rich chocolate filling waiting just for you! As you make each indentation, remember that this simple action transforms what could be just another cookie into an extraordinary treat full of surprises. Patience here pays off because those small wells hold all the gooey goodness that makes these cookies special!
Step 7: Baking Your Perfect Cookies
Now we’re ready for one of my favorite moments—the baking! Preheat your oven to 350°F (175°C) if you haven’t already done so; let it warm up while we get everything ready. Slide those beautiful trays into the hot oven and set your timer for about 12-14 minutes. As they bake, keep an eye on them; you’ll notice them puffing up slightly but should still look soft in the center when they are done—this is exactly what you want! Remember, we’re aiming for perfectly baked cookies that are tender yet set; if they start looking hard or overly browned, you’ve gone too far.
The aroma wafting through your home during this time will be nothing short of magical—a symphony of chocolate and toasted hazelnuts enveloping every corner of your kitchen. It’s essential not to rush this step; those few minutes can make or break the texture of our cookies. When they’re done, remove them from the oven and allow them to rest on the sheet for about five minutes before transferring them to a wire rack. This resting period allows them to firm up slightly while retaining their soft centers.
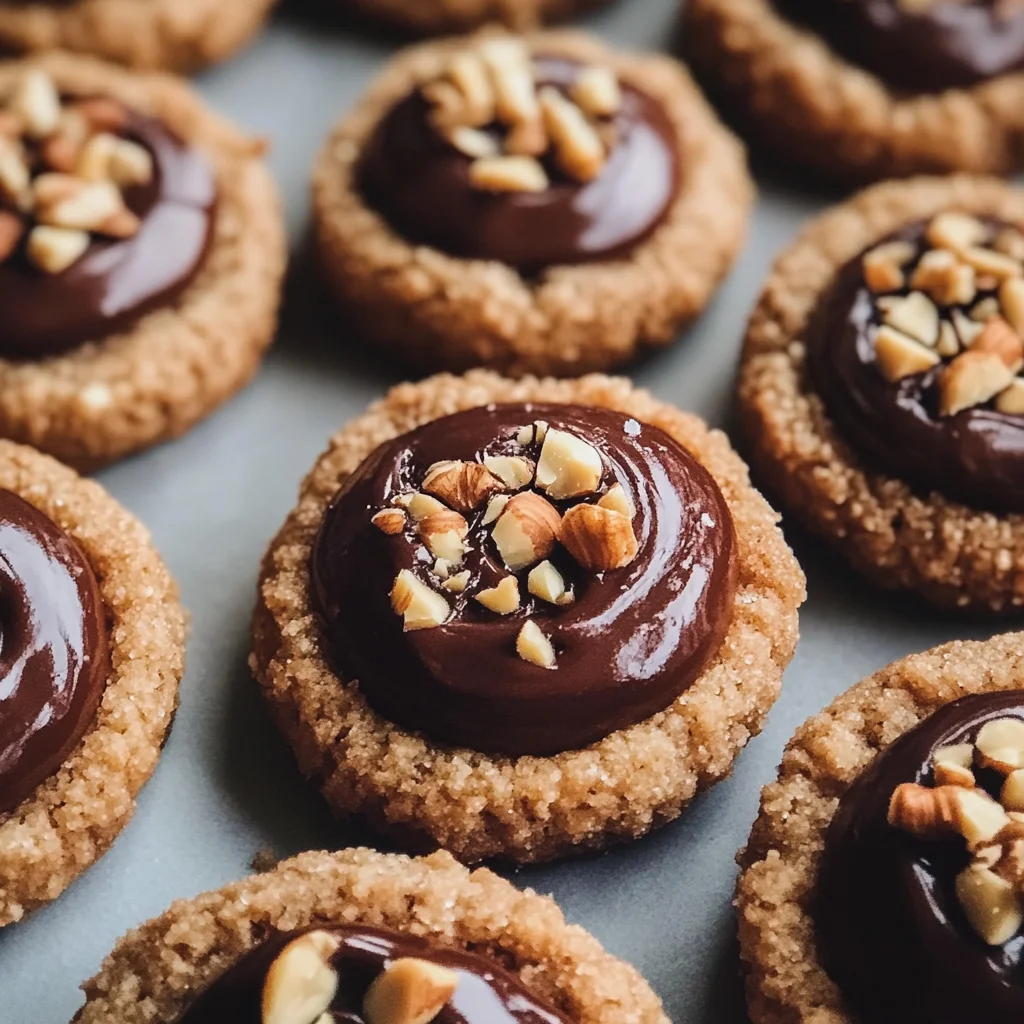
Step 8: The Heavenly Chocolate Filling
Once you’ve successfully pulled those gorgeous cookies out of the oven and allowed them a moment to settle into their new form, it’s time for one last transformation—the addition of our creamy chocolate hazelnut spread! While they’re still warm, check those indentations—if they’ve puffed up during baking (which often happens), simply re-press them gently with your thumb or spoon to make sure there’s ample space for that glorious filling.
With a teaspoon in hand, scoop about a teaspoon of your chosen chocolate hazelnut spread and let it cascade into each well—don’t skimp on this part because trust me when I say that every dollop matters! If you’re feeling extra fancy (and why wouldn’t you!), take a whole hazelnut and press it gently into each dollop as a decorative touch and added crunch factor. This finishing touch isn’t just pretty—it elevates each cookie into something truly extraordinary with layers of flavor and texture.
As they cool down completely on a wire rack after this indulgent addition, I promise you’ll be greeted by an utterly satisfying experience once you take that first bite! The contrast between the soft cookie base and rich chocolate filling creates an explosion of textures and flavors that dance across your palate.
Final Touches: Enjoying Your Creation
Once cooled completely—if you can resist—I encourage you to take a moment before diving in. Plating these beauties can elevate their presentation even further; arrange them on a nice platter or serve them alongside a steaming cup of coffee or tea for an afternoon treat that’s simply divine! These Chocolate Hazelnut Thumbprint Cookies not only satisfy sweet cravings but also serve as heartfelt gifts when shared with loved ones.
As we conclude this journey together in making these delightful treats, remember that baking is as much about joy as it is about technique. Every cookie tells a story—your story filled with love and creativity—and I can’t wait for you to share yours with friends and family alike! So go ahead, indulge yourself in these decadent delights—they’re made with love just for you!
Storage and Enjoyment Tips for Your Chocolate Hazelnut Thumbprint Cookies Recipe
Now that you’ve crafted these delightful Chocolate Hazelnut Thumbprint Cookies, I can almost hear the sounds of joy as you and your loved ones take that first bite! These cookies are not just a treat; they’re an experience, and I promise you, the satisfaction doesn’t end once they cool on the rack. In fact, knowing how to store these little treasures will ensure that their deliciousness lasts for days—if they last that long in your home! Let’s dive into how to keep them fresh and perfect for savoring at any time.
Storing Leftover Chocolate Hazelnut Thumbprint Cookies Recipe
To keep your cookies as fresh as possible, store them in an airtight container—this is absolutely paramount to maintain their delightful texture and that intoxicating flavor. A simple plastic or glass container works beautifully; just make sure it seals tightly. Once stored properly, your cookies will stay delicious for up to one week at room temperature. If you’re looking for a little pro tip, consider placing a slice of bread in the container alongside your cookies. This ingenious trick helps maintain moisture and prevents them from becoming too dry or hard. Trust me on this: it’s a game-changer! Even after a few days, when you break into one of these beauties, you’ll be greeted with that same rich chocolatey aroma and the wonderfully nutty crunch of hazelnuts—a testament to their quality even after storage. For the ultimate indulgence, why not warm them slightly in the microwave for about 10 seconds before enjoying? The chocolate hazelnut spread will become gloriously gooey again!
Freezing Chocolate Hazelnut Thumbprint Cookies for Later
If you find yourself with extra cookies (or if you want to prepare ahead), freezing them is a fantastic option! To do this properly, simply place the cooled cookies in a single layer on a baking sheet first to flash freeze them; this way they won’t stick together. After about an hour in the freezer, move them into an airtight freezer bag or container, where they will stay good for up to three months. When you’re ready to enjoy some frozen cookies, there’s no need to thaw them out; just pop them straight into the oven at 350°F (175°C) for about 10-12 minutes. This method ensures that when they come out of the oven, they’ll be warm and inviting—perfectly crisp on the outside yet delightfully soft inside. Plus, having homemade cookies ready at a moment’s notice is such a convenience; it feels like having a little treasure trove of happiness stashed away!
Chocolate Hazelnut Thumbprint Cookies

Indulge in the delightful world of baking with my Chocolate Hazelnut Thumbprint Cookies Recipe! These beautifully soft cookies are filled with rich chocolate hazelnut spread, offering a luxurious combination of textures and flavors. The moment you take a bite, you’ll be enveloped in the warm embrace of chocolatey goodness and the satisfying crunch of hazelnuts. Perfect for any occasion, whether it’s a festive gathering or a cozy night in, these cookies are sure to become a favorite among family and friends. So, roll up your sleeves and prepare for an enchanting baking adventure that promises to create lasting memories!
- Prep Time: 25 minutes
- Cook Time: 14 minutes
- Total Time: 39 minutes
- Yield: Approximately 24 cookies 1x
- Category: Dessert
- Method: Baking
- Cuisine: American
Ingredients
- 1 cup unsalted butter, softened
- 2/3 cup granulated sugar
- 2 teaspoons vanilla extract
- 2 cups all-purpose flour
- 1/2 cup cocoa powder
- 1/2 teaspoon salt
- 1/2 cup finely chopped hazelnuts (for rolling)
- 1/2 cup chocolate hazelnut spread (like Nutella)
- Extra whole hazelnuts for garnish (optional)
Instructions
- Preheat your oven to 350°F (175°C) and line two baking sheets with parchment paper.
- In a mixing bowl, cream together the softened butter and granulated sugar until light and fluffy.
- Gradually add in the vanilla extract, flour, cocoa powder, and salt; mix until combined.
- Roll tablespoon-sized dough into balls and coat them in chopped hazelnuts.
- Place them on the prepared baking sheets, spacing them about 2 inches apart.
- Make indentations in the center of each cookie using your thumb or a spoon.
- Bake for 12-14 minutes until slightly puffed but still soft in the center.
- After removing from the oven, gently re-press the indentations if needed and fill each with chocolate hazelnut spread.
- Allow cookies to cool on wire racks before serving.
Nutrition
- Serving Size: 1 cookie (30g)
- Calories: 150
- Sugar: 9g
- Sodium: 70mg
- Fat: 9g
- Saturated Fat: 5g
- Unsaturated Fat: 4g
- Trans Fat: 0g
- Carbohydrates: 17g
- Fiber: 2g
- Protein: 2g
- Cholesterol: 20mg