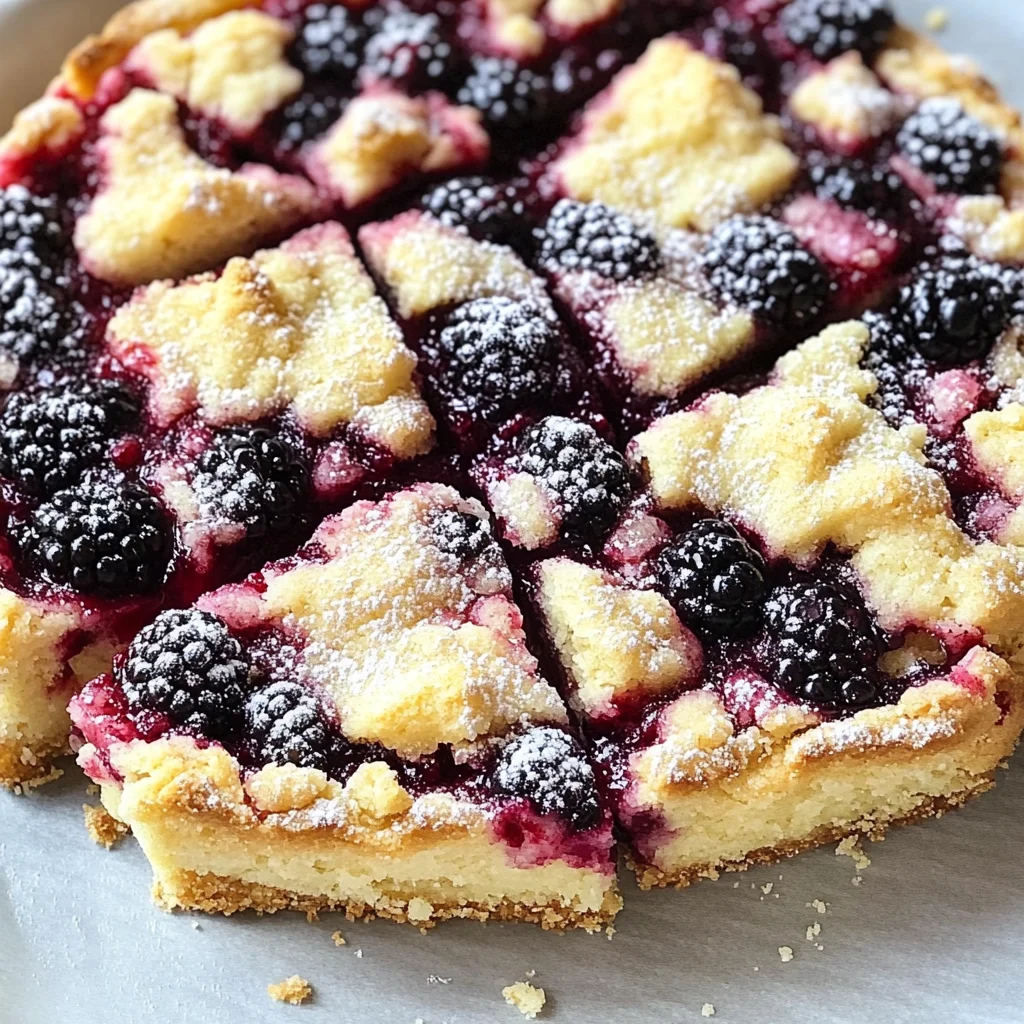
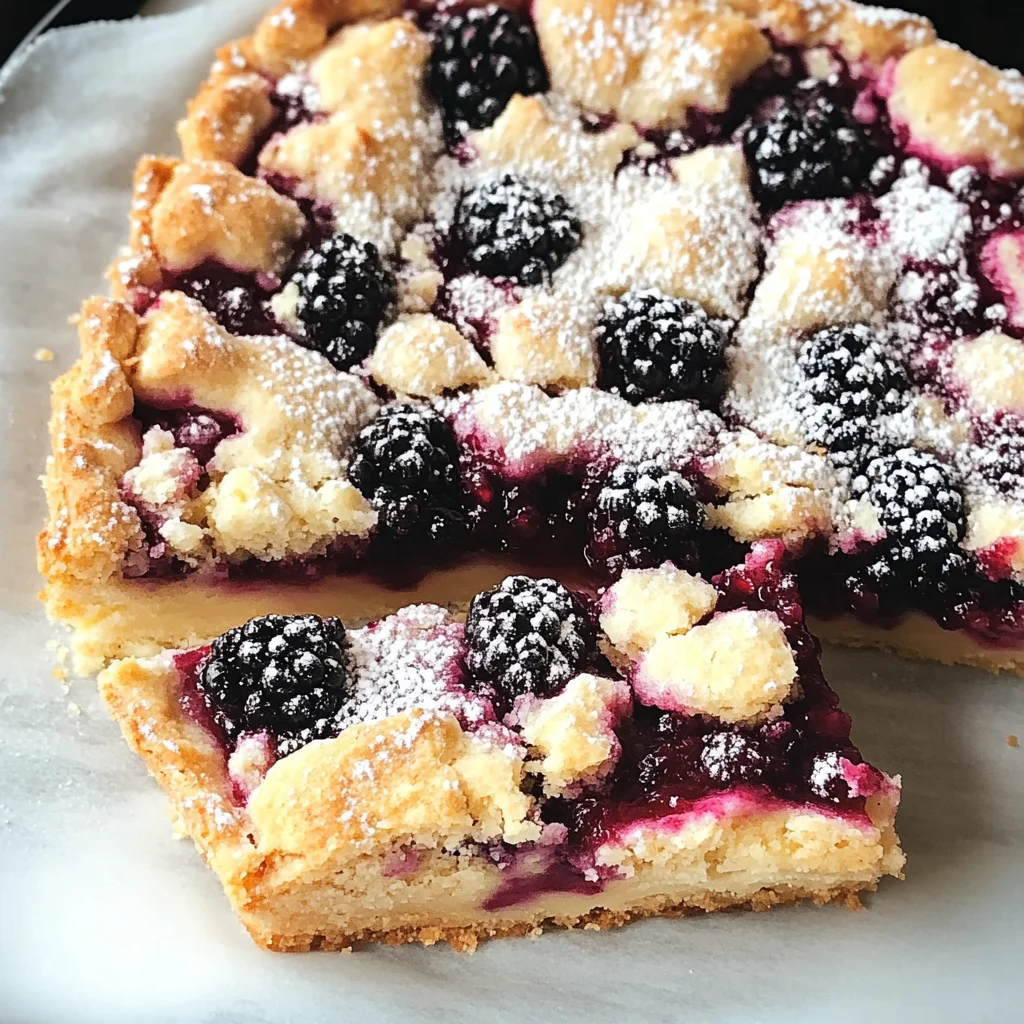
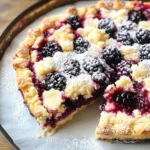
Blackberry Shortbread Wedges
There’s something about the sweet embrace of summer that evokes a sense of nostalgia, isn’t there? The warmth of the sun on your skin, laughter in the air, and those vibrant berries bursting with flavor—it’s a season that invites us to celebrate with friends and family. One recipe that embodies these feelings for me is the Blackberry Shortbread Wedges. These delightful wedges are more than just a dessert; they’re a bridge between cherished memories and the simple joys of life. Imagine sinking your teeth into a buttery shortbread crust, only to be greeted by the tartness of fresh blackberries and a hint of zesty lime—it’s nothing short of a revelation!
As I prepare these Blackberry Shortbread Wedges, I can’t help but remember summer picnics in my grandmother’s backyard. She always had an endless supply of freshly picked blackberries, and her love for baking was palpable in every dish she created. This recipe is inspired by those moments, bringing together tradition and innovation in a way that feels both familiar and exciting. Whether you choose to serve them warm with a dollop of whipped cream or alongside creamy vanilla ice cream, I promise you—this dessert will become a cherished favorite in your home as well.
Blackberry Shortbread Wedges: A Taste of Summer Bliss
Are you ready to embark on this delicious journey? Trust me; once you make these Blackberry Shortbread Wedges, you’ll find yourself reaching for this recipe time and again. They are perfect for any occasion—be it a weekend brunch, an afternoon tea with friends, or simply as an indulgent treat for yourself after a long day. So gather your ingredients, roll up your sleeves, and let’s get started!
Ingredients:
Let’s dive into the ingredients that will bring our Blackberry Shortbread Wedges to life! Each component plays an essential role in creating the perfect balance of flavors and textures.
- 3 cups fresh blackberries. The star of our show! Fresh blackberries add not only vibrant color but also an irresistible sweetness that perfectly contrasts with the buttery shortbread. When selecting blackberries, look for ones that are plump and glossy—these indicate ripeness and juiciness. Avoid any that appear dull or overly soft; we want berries that are bursting with flavor! If blackberries aren’t available, feel free to experiment with raspberries or blueberries—the beauty of this recipe lies in its versatility.
- Juice of ½ lime. This zesty addition elevates our dessert by introducing brightness and acidity, balancing out the sweetness from both the sugar and the blackberries. Lime juice is crucial here—it enhances other flavors and brings them forward in every bite. If you don’t have lime on hand, lemon juice works beautifully as well! Just remember to adjust based on your taste preference; citrus can be potent, so start small if you’re uncertain.
- 1 cup granulated sugar (divided). Sugar does more than just sweeten; it helps create that delightful melt-in-your-mouth texture we crave in shortbread cookies. We’ll divide this sugar into two portions: one for tossing with the berries to draw out their juices—a vital step—and another for mixing into our shortbread dough. Using fine granulated sugar is key since it dissolves better into batters compared to coarse sugars.
- 2 cups all-purpose flour. The backbone of our shortbread dough! All-purpose flour provides structure while allowing our wedges to hold their shape perfectly during baking. For best results, measure it correctly—spoon it into your measuring cup without packing it down to avoid dense results. If you want to experiment with gluten-free options, consider using almond flour or a gluten-free blend designed for baking.
- 1 cup (2 sticks) cold unsalted butter. Butter is where the magic happens! Using cold unsalted butter is non-negotiable here because it creates flakiness that’s essential for our wedge texture. Cold butter helps trap air during mixing—resulting in airy crumbly layers when baked. I highly recommend opting for high-quality butter as it makes all the difference; European-style butter has higher fat content which adds richness you’ll truly appreciate!
Now that we have gathered our ingredients, you can feel the excitement build as we prepare to turn these simple components into something extraordinary!
Equipment You’ll Need:
Before we jump into making our Blackberry Shortbread Wedges, let’s take a moment to ensure we have all the right tools at hand. Having the right equipment not only makes our cooking experience smoother but also helps us achieve those bakery-worthy results we’re aiming for!
- 8-inch round cake pan – This pan is perfect for our wedges because its sides provide support while allowing even baking throughout each piece. If you don’t have one handy or prefer a different shape, feel free to use a square or rectangular pan instead; just adjust baking times accordingly.
- Mixing bowls (various sizes) – You’ll need at least two mixing bowls: one for combining our blackberry filling and another for preparing our shortbread crust mixture. Having multiple bowls helps keep everything organized while making cleanup easier!
- Whisk – A trusty whisk is essential for combining dry ingredients thoroughly and ensuring everything blends smoothly without clumps—particularly when mixing flour with sugar.
- Pastry cutter or fork – This tool is crucial when cutting cold butter into flour; it allows us to create those delightful crumbs without melting the butter too soon—which would lead us away from achieving that flaky texture we desire in our shortbread base.
- Rubber spatula – A rubber spatula will be your best friend when folding ingredients gently together or scraping down sides of mixing bowls without leaving anything behind—I can’t stress how important this little tool is!
With all our ingredients prepped and tools ready, let’s move on to crafting these delightful Blackberry Shortbread Wedges!
Step 1: Preheat & Prepare Your Pan
First things first: preheat your oven to 375°F (190°C). This step ensures even cooking from start to finish—a crucial element often overlooked! While your oven warms up, take an 8-inch round cake pan and grease it generously with some butter or non-stick spray; this prevents any sticky situations later on when it’s time to unveil your masterpiece.
Step 2: Macerate the Blackberries
In a large bowl, toss together those luscious fresh blackberries with lime juice and half of your granulated sugar (that’s ½ cup). This process is called maceration—it allows natural juices from the berries to mingle beautifully with lime’s bright acidity while drawing out their delightful essence over time! Let them sit aside while we prepare our crust mixture – trust me on this step; you want those flavors dancing together before they hit the oven!
Step 3: Prepare Your Shortbread Crust
Now let’s focus on creating that heavenly shortbread crust! In another mixing bowl (the larger one works great here), combine two cups of all-purpose flour along with remaining sugar (the other ½ cup) plus half a teaspoon salt—this balances out flavors beautifully! Then take cold unsalted butter straight from your fridge (don’t let it soften!) Cut it into cubes before adding it directly into dry ingredients; use either a pastry cutter or fork here until everything starts resembling coarse crumbs—a little like wet sand consistency!
Step 4: Assemble Your Wedges
Once you’ve achieved those lovely crumbs from cutting in cold butter evenly throughout dry mix—that’s when magic happens! Press half this crumbly mixture firmly into greased bottom layer within prepared pan (this acts as foundation); then carefully pour blackberry mixture atop crumb layer before crumbling remaining shortcake over fruit filling gently yet evenly across surface area—don’t worry if some berries peek through—that’s part charm!
Baking time awaits us now! Pop this beauty into preheated oven where tantalizing aromas will fill kitchen space around 30-35 minutes until golden brown emerges—a sign perfection awaits ahead…
Remember folks: patience pays off here! Allow cooling completely before slicing each wedge into desired portions—trust me; they’ll taste even better once cooled down slightly after coming out hot… Enjoy every blissful bite—you’ve earned it!
And there you have it—the ultimate way to celebrate summer’s bounty through these enchanting Blackberry Shortbread Wedges!
Step 5: Pressing the Base – The Foundation of Flavor
Now that you have your buttery crumb mixture ready, it’s time to create the base for our wonderful Blackberry Shortbread Wedges. This step is crucial because it lays the groundwork for the entire dessert, ensuring that each bite is a harmonious blend of flavors and textures. Take half of that crumbly mixture—about 2 cups—and carefully press it into the bottom of your greased 8-inch round cake pan. I like to use my fingers to really get in there, pressing down firmly but gently; you want to create a solid layer without compacting it too much. A gentle touch here is key, as overworking the dough can lead to a dense texture instead of that light, melt-in-your-mouth experience we’re after.
As you press, think about how this shortbread will act as the anchor for all those juicy blackberries. The butter in the shortbread not only adds richness but also helps bind everything together while providing that essential flaky texture when baked properly. Make sure to spread the mixture evenly across the bottom, covering every inch; this ensures that each bite is consistently delicious. Once it’s evenly pressed down, take a moment to breathe in that comforting aroma of butter and sugar—it’s like a warm hug already! Trust me on this: laying down a solid foundation makes all the difference in achieving the perfect slice later on.
Step 6: Layering on the Blackberry Goodness
Next comes one of my favorite parts—the blackberry layer! It’s where we bring all those vibrant flavors together for an utterly intoxicating experience. Gently pour your prepared blackberry mixture over the pressed shortbread base, making sure to distribute it evenly across the surface. As you do this, let yourself revel in those luscious blackberries glistening with sugar and lime juice; they’re just waiting to burst with flavor during baking! This combination not only adds sweetness but also introduces a delightful tanginess from the lime juice, which perfectly balances out the richness of our buttery shortbread.
Once your blackberries are nestled atop their buttery bed, it’s time to add that remaining crumb mixture on top. You want to sprinkle it lightly over the berries—think of it as creating a cozy blanket for them rather than completely covering them up. This step is essential because it allows some berries to peek through when baked, giving us those beautiful bursts of color and flavor in each wedge. Remember: don’t rush this part! Take your time ensuring even distribution so that every slice has its share of both berry goodness and crumbly shortbread topping. As you finish up this layer, feel free to admire how gorgeous your pan looks—trust me, you’ll be excited at what’s coming next!
Step 7: Baking – The Magic Happens
Alright, now we are ready for one of my favorite steps—baking! Preheat your oven to 375°F (190°C) if you haven’t already done so; getting your oven nice and hot creates that golden crust we all crave while keeping that berry filling perfectly juicy inside. Gently place your cake pan in the oven and set a timer for 30-35 minutes. Here’s where patience truly pays off! During baking, you’ll notice how wonderful aromas begin wafting through your kitchen—this is when everyone will start gathering around with curiosity and excitement.
Keep an eye on your creation as it bakes; you’ll want to look for that delightful golden-brown hue forming on top as well as bubbling juice around the edges. It’s like watching magic unfold right before your eyes! To test for doneness, gently jiggle the pan; if there’s minimal movement in the center and everything looks beautifully set with a slight crunch on top, you’re good to go! If not quite there yet, pop it back in for another minute or two—trust me, it’s worth waiting just a bit longer for perfection.
Step 8: Cooling – The Crucial Waiting Game
Once you’ve pulled your Blackberry Shortbread Wedges out of the oven, resist that urge to dive right in! Allowing them to cool completely in their pan is absolutely non-negotiable—it gives them time to set properly and makes slicing infinitely easier later on. I know it’s tough because they smell so divine right now! However, if you cut into them too soon while they’re still warm and tender, you’ll end up with crumbly pieces instead of neat wedges.
Let them cool at room temperature for about an hour before slicing into those delectable pieces. While you’re waiting (which I promise will be worth every second), take a moment to take pride in what you’ve created—those vibrant colors peeking out from beneath that crisp topping are simply beautiful! Once cooled completely, run a knife around the edges of your pan before gently lifting out those tempting wedges onto a cutting board or serving platter. They’ll be warm yet firm enough now—a perfect balance that’s just waiting for someone (maybe you?) to enjoy every delicious bite.
Conclusion:
As we wrap up this journey through crafting your very own Blackberry Shortbread Wedges, I genuinely hope you’re feeling as excited as I am about this recipe! There’s something profoundly satisfying about merging simple ingredients into an extraordinary dessert that sings summer on every plate. The luscious blackberries burst with juiciness against the backdrop of buttery shortbread, creating a symphony of flavors that’s both comforting and refreshing. Each bite transports you to sun-kissed afternoons spent picnicking with loved ones or cozy evenings enjoying tea with friends.
This recipe is truly a must-try because it embodies not just exquisite taste but also the joy of making something special from scratch. The ease with which you can whip these up makes them ideal for any occasion—be it casual gatherings or more festive celebrations. Picture yourself pulling these golden-brown wedges from the oven; they’ll emit an irresistible aroma that beckons everyone to gather around. The anticipation builds as you cut into them, revealing those beautiful streaks of blackberry nestled within—the perfect moment captured in time.
Imagine savoring one alongside your morning coffee; the sweetness pairs beautifully with a rich brew, making for an indulgent breakfast treat. For those lazy afternoons spent lounging on the patio, a wedge accompanied by lightly whipped cream provides a decadent pick-me-up that’ll brighten your day. And if you’re feeling extra adventurous? Drizzle some warm chocolate sauce over a wedge for an utterly intoxicating experience! You could also serve it alongside fresh berries or a scoop of vanilla ice cream—a classic combination that elevates this dessert into something truly unforgettable.
Feeling adventurous? This recipe is wonderfully adaptable—you can swap blackberries for other berries like raspberries or blueberries depending on what tickles your fancy! Each variation brings its own unique twist while still maintaining that familiar comfort we love so much about shortbread. You could even infuse some lemon zest into the dough for an added zing! So I encourage you to dive in and experiment; embrace your creativity in the kitchen! Share your experiences with me; I would absolutely love to hear how your Blackberry Shortbread Wedges turn out!
Blackberry Shortbread Wedges
Delight in these easy-to-make Blackberry Shortbread Wedges, perfect for any gathering! Try this scrumptious recipe today!
- Prep Time: 20 minutes
- Cook Time: 35 minutes
- Total Time: 55 minutes
- Yield: Approximately 12 servings 1x
- Category: Dessert
- Method: Baking
- Cuisine: American
Ingredients
- 3 cups fresh blackberries
- Juice of ½ lime
- 1 cup granulated sugar (divided)
- 2 cups all-purpose flour
- 1 cup cold unsalted butter (2 sticks)
Instructions
- Preheat your oven to 375°F (190°C) and grease an 8-inch round cake pan.
- In a large bowl, toss blackberries with lime juice and half the sugar; let sit to macerate.
- In another bowl, combine flour, remaining sugar, and salt. Cut in cold butter until crumbly.
- Press half the crumb mixture into the bottom of the prepared pan; layer macerated blackberries on top, followed by remaining crumb mixture.
- Bake for 30-35 minutes until golden brown; allow cooling before slicing into wedges.
Nutrition
- Serving Size: 1 serving
- Calories: 220
- Sugar: 12g
- Sodium: 160mg
- Fat: 10g
- Saturated Fat: 6g
- Unsaturated Fat: 4g
- Trans Fat: 0g
- Carbohydrates: 31g
- Fiber: 2g
- Protein: 2g
- Cholesterol: 30mg