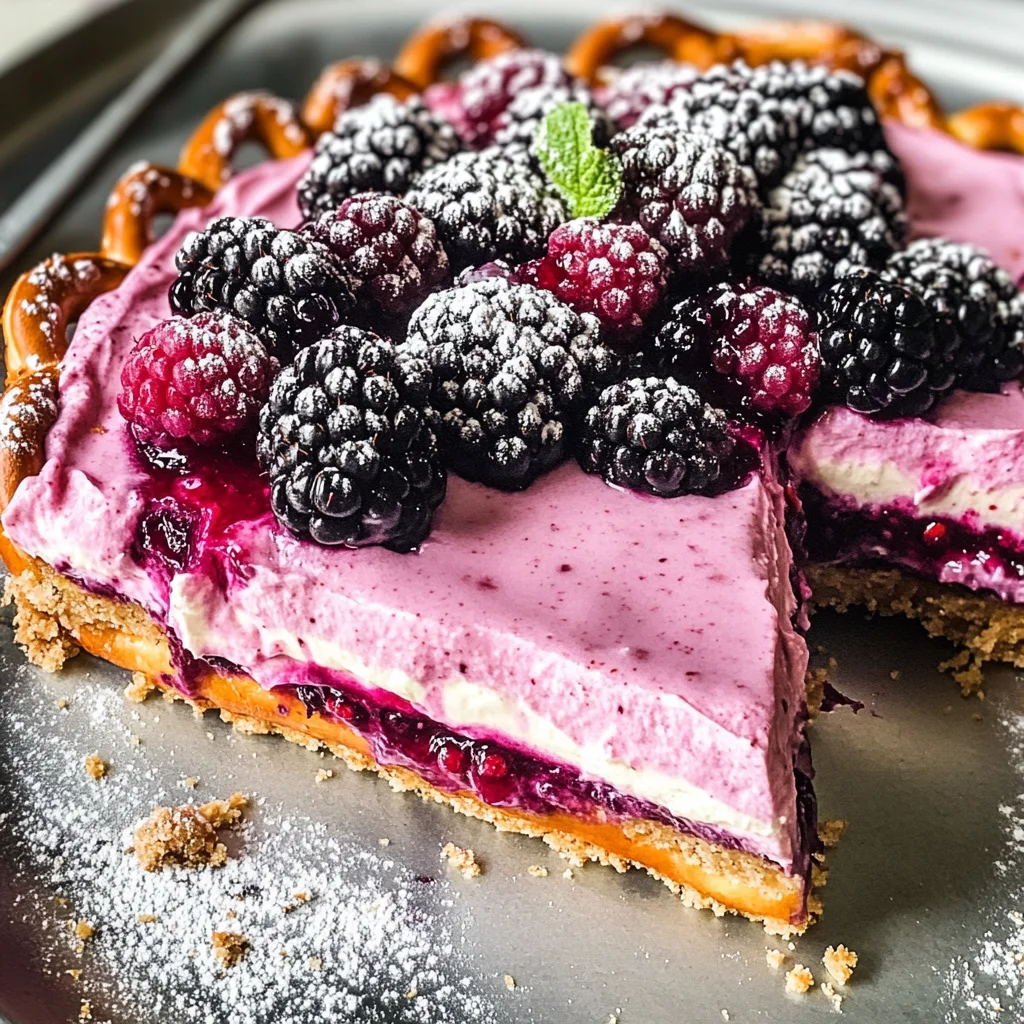
Blackberry Pretzel Dessert
There’s something truly magical about desserts that marry sweet and salty flavors, isn’t there? It’s a delightful dance on the palate where the crunch of salt meets the sweetness of sugary bliss, creating an experience that transcends mere food. This Blackberry Pretzel Dessert is not just a recipe; it’s an invitation to gather around the table with loved ones, to share laughter, and to create memories that linger long after the last bite. The moment you take your first forkful, you’ll be enveloped by the layered textures and flavors—each element harmonizing beautifully. The creamy richness of the filling complements the crunch of the pretzel crust, while the vibrant blackberry topping adds a refreshing burst that is simply unforgettable. I promise you, this dessert will not only satisfy your sweet tooth but also leave you craving more.
The beauty of this dessert lies in its contrasts—the salinity of the pretzels balances out the sweetness of the cream cheese layer and the tartness of fresh blackberries. It’s like a symphony of flavors that celebrates both tradition and innovation; it pays homage to classic American desserts while introducing a playful twist that keeps everyone coming back for seconds (or thirds!). Whether you’re hosting a summer barbecue or simply looking for a way to brighten up a weeknight dinner, this Blackberry Pretzel Dessert is perfect for any occasion. Trust me, once you serve this at your next gathering, it will quickly become a beloved staple among family and friends.
Blackberry Pretzel Dessert: A Sweet Symphony of Flavor
Let’s embark on this delicious journey together! This Blackberry Pretzel Dessert is not only easy to make but also brings joy with every bite. With its crunchy pretzel crust, luscious cream cheese mixture, and juicy blackberry topping, it’s bound to become one of your go-to recipes for satisfying those dessert cravings. So grab your apron and let’s dive into these delightful layers!
Ingredients:
As we prepare our wonderful Blackberry Pretzel Dessert, let’s take a moment to appreciate each ingredient we’re about to use. Each one plays an essential role in crafting this extraordinary dish.
- 2 ½ cups coarsely crushed pretzels. The star of our crust! These little crunchy nuggets provide not just texture but also that irresistible salty contrast which makes every bite utterly divine. When crushing the pretzels, aim for a coarse crumb rather than fine powder; this variation ensures that you still get those lovely crunchy bits throughout your crust. Opt for unsalted pretzels if you’re particularly sensitive to salt levels or if you’re using other salty components in your meal.
- ⅔ cup brown sugar. This ingredient isn’t just for sweetness; it adds depth and moisture thanks to its molasses content. Brown sugar helps bind our crust together while infusing it with caramel-like flavors during baking. When measuring brown sugar, press it firmly into your measuring cup so it’s packed well; this ensures you’re getting just the right amount to create that perfect texture.
- 2 tablespoons all-purpose flour. This is crucial for stabilizing our crust by providing structure while keeping everything held together. Flour absorbs moisture during baking, helping our crust maintain its form without becoming overly soggy from toppings later on. If you’re looking for alternatives due to dietary restrictions or preferences, feel free to experiment with gluten-free all-purpose blends.
- 2 teaspoons vanilla extract. Ahh, vanilla—the fragrant elixir that elevates almost any dessert! In our case, it adds warmth and complexity to both the cream cheese layer and enhances the overall flavor profile of the dessert. Always choose pure vanilla extract over imitation when possible; it makes all the difference in achieving that homemade goodness.
- ¾ cup butter (melted). Melting butter before adding it helps combine ingredients seamlessly and gives our crust that perfectly rich flavor we crave in desserts like this one. It’s essential for creating a delightful texture as well; when mixed with crushed pretzels and sugars, melted butter binds everything beautifully while providing richness that’s simply irresistible.
- 3 cups fresh blackberries. Fresh fruits are where we find our bright bursts of flavor! Blackberries are not only deliciously tart but also packed with antioxidants and nutrients—making them a wonderfully wholesome addition to our dessert. When selecting blackberries at the store or market, look for plump berries with deep color; they should be firm yet slightly yielding when pressed gently.
- ¼ cup granulated sugar. This sugar works wonders in our topping mixture! It helps draw out moisture from the blackberries and creates a syrupy glaze as they cook down slightly—a sweet addition without overpowering their natural tartness.
- 1 tablespoon lemon juice. A splash of acidity brightens up our blackberry topping beautifully! Lemon juice enhances both flavor and freshness while balancing out sweetness—it’s like adding sunshine into every bite! Freshly squeezed lemon juice is always best; bottled varieties can sometimes have a metallic taste due to preservatives.
- 1 tablespoon cornstarch. This ingredient acts as our thickening agent in making sure that our blackberry topping doesn’t turn runny as it cooks down in all those lovely juices! Cornstarch works best when mixed with dry ingredients first before combining with liquids; doing so prevents clumping—a little trick I’ve learned after many attempts!
- 8 ounces cream cheese (room temperature). Bringing cream cheese to room temperature before mixing is absolutely paramount because it allows for smooth blending without lumps—a creamy texture is what we’re aiming for here! Be sure to choose full-fat varieties if possible; they yield richer results compared to lower-fat options.
- 8 ounces extra creamy cool whip. This will add lightness and volume to our cream cheese mixture while keeping everything fluffy and airy—creating that indulgent layer we’ve all come to love! If you’d prefer homemade whipped cream instead, I encourage you to use heavy whipping cream whipped until stiff peaks form as an excellent substitute!
- 1 cup powdered sugar. Finally, powdered sugar sweetens up our cream cheese layer without any gritty texture—it’s finely milled which dissolves easily into mixtures! Use it sparingly at first; taste testing as you go is always encouraged because sweetness levels vary based on personal preference!
Equipment You’ll Need:
Having the right tools can make any cooking experience smoother—and trust me when I say it can elevate your confidence in preparing dishes like this one! While they may not be ingredients, these essential partners will help ensure success in creating your Blackberry Pretzel Dessert.
- 9×13-inch baking dish: The size matters here since we’re layering ingredients beautifully within! A glass or ceramic dish retains heat well during baking which helps achieve even cooking throughout each layer—not something you’d want if using metal pans which can lead uneven browning or cooking results!
- Mixing bowls: You’ll need various sizes—one large bowl for mixing together dry ingredients like crushed pretzels & sugars along with another medium bowl specifically designed just right for blending those creamy fillings together smoothly without any lumps!
- Electric mixer (handheld or stand): Using an electric mixer makes incorporating cream cheese so much easier than trying by hand—it provides consistent results much faster too! If you don’t own one already consider investing as they’re definitely worth their weight in gold when baking regularly.
- Measuring cups & spoons: Precision is key when following recipes closely so having accurate measuring tools handy will keep everything balanced correctly ensuring flavors meld perfectly harmoniously together!
With these fantastic tools gathered around us alongside quality ingredients prepped beforehand—we’re ready now dive into preparing this delectable treat!
Preparing the Blackberry Pretzel Dessert
Step 1: Preheat Your Oven & Prepare Your Dish
First things first—let’s set ourselves up for success by preheating that oven to 375°F (190°C). This step might seem simple but trust me—it’s crucial since starting at an appropriate temperature ensures even cooking right from the very beginning! While that’s happening, lightly spray your 9×13-inch baking dish with non-stick cooking spray so nothing sticks later on—this guarantees easy removal once it’s time serve up slices filled with layers upon layers of goodness!
Step 2: Create Your Savory Crust
Now comes my favorite part: crafting that marvelous pretzel crust! In a large mixing bowl combine 2 ½ cups coarsely crushed pretzels along with ⅔ cup brown sugar and 2 tablespoons all-purpose flour—give them a good stir until they’re fully incorporated throughout each piece evenly coated too! Then pour in melted butter (¾ cup) followed by two teaspoons vanilla extract—the aroma wafting through your kitchen at this moment will be utterly intoxicating! Mix everything until combined thoroughly into moist crumbs resembling wet sand—a great test here is whether you can squeeze some between fingertips forming clumps easily without crumbling apart completely afterward too!
Step 3: Pressing Down That Crust
With your mixture ready now comes time honorably pressing down firmly inside prepared baking dish evenly covering bottom surface area entirely—as well as slightly up sides if desired creating slight edge around perimeter which captures filling later on preventing any overflow mishaps occurring during bake time too—don’t rush through this step though because achieving uniform thickness plays vital role ensuring proper browning occurs uniformly across entire base yielding optimal crunchiness desired from each bite taken afterward once baked nicely golden brown atop edges too!
Step 4: Bake Your Crust Until Golden Brown
Bake your beautiful crust masterpiece in preheated oven set at 375°F until golden brown about ten minutes max—keep watchful eye throughout process since ovens vary greatly causing slight differences timing-wise sometimes depending upon model used too—you’re looking for crisp outer edges contrasting soft center yielding deliciously satisfying textures altogether afterwards instead fluffiness achieved elsewhere could diminish overall enjoyment factor enjoyed once cooled off completely later on before layering something special above ahead next step within recipe journey unfolding further ahead here shortly joining incredible flavors harmoniously blended altogether soon thereafter enticing everyone gathered around table instantly drawn towards slice awaiting arrival served forth eagerly embraced joyfully shared among family friends alike forevermore cherished memories made lingering beyond evening event itself too!
Are you excited yet? Because I know I am—and trust me when I say these steps ahead culminate gratifying moments shared making lasting impressions leaving hearts filled warmth happiness surrounding tables filled laughter joy shared amongst loved ones gathered close sharing delicious creations forged lovingly crafted together through preparation process leading towards ultimate reward awaited eagerly ahead now shortly unfolding forth right here surprise delights await everyone involved pleasantly encouraging culinary adventure embarked upon previously begun earlier together eventually culminating wondrous experiences sure inspire future gatherings joyous occasions arise evermore coming times ahead anticipated fondly remembered cherished moments forever treasured captured beautifully within hearts minds souls bonds formed strengthened forevermore reinforced unbreakable ties created through food connecting people celebrating life boldly richly flavorful diverse tapestry woven effortlessly forming community united through love treasured meals savored worth sharing widely enjoyed collectively delighted inspiring others discover joys cooking bringing everyone closer together amidst simplicity found within home kitchens everywhere bringing smiles faces shining brightly radiantly glowing hearts filled warmth towards life itself experienced vibrantly fully lived shared generously lovingly nurtured deeply rooted traditions passed down generations cherished lovingly honored carrying forward unbroken threads weaving commonalities linking us all eternally intertwined forevermore aspiring fulfill destiny illuminating paths leading onward onward exploring new horizons embracing beauty found midst culinary arts discovering pleasures hidden waiting patiently revealed slowly gradually blossoming forth deep connections forged timelessly resonating profoundly enjoyable enriching lives touched forever changed uplifted inspired lifted higher soaring gracefully toward skies above daring dream big hoping reaching heights unimaginable igniting passions flame burning brightly illuminating journeys traversed endlessly seeking discovery existence purpose meaning fulfillment uncovering treasures hidden deep senses awakened alive vibrant thriving dynamic flows ever-growing continuously feeding souls nurturing spirits uplifting humanity reminding us why we gather celebrating sharing loving living fully alive here now today tomorrow always hopeful wondering what next culinary adventure awaits beyond horizon beckoning inviting exploring tasting savoring embracing joyous experiences unfolding continually weaving stories shared connected forever intertwined infinite possibilities encountered endlessly…
(And there’s still more magic ahead!)
Crafting the Creamy Layer: The Heart of Your Blackberry Pretzel Dessert
Step 5: Whipping Up the Cream Cheese Mixture
Now that you’ve embraced the warm, inviting aroma of your pretzel crust, it’s time to create the luscious cream cheese layer that will elevate this dessert to pure bliss! Begin by taking your softened cream cheese—this is absolutely paramount for achieving that smooth, velvety texture—and place it into a mixing bowl. Using an electric mixer on medium speed, beat the cream cheese until it’s fluffy and creamy, which should take about 2-3 minutes. You want to break down any lumps so that every bite will be an unctuous symphony of flavors. Trust me on this step; a well-whipped cream cheese sets the foundation for a light and airy filling that beautifully contrasts with the crunchy pretzel crust.
Once your cream cheese has reached its creamy peak, gradually add in the powdered sugar. This addition brings sweetness to balance out the salty pretzel crust while also enhancing that creamy texture. Continue mixing at a low speed until everything is well combined. Next, fold in the extra creamy Cool Whip gently with a spatula; this is where patience pays off as you want to preserve as much air as possible in the mixture. The Cool Whip not only adds lightness but also gives that delightful creaminess we all crave in desserts. Remember, folding is key here—don’t rush this step! You want a beautifully blended mixture without losing that airy volume that makes each bite feel like a cloud of bliss.
Step 6: Spreading Joy with Cream Cheese Layer
Now comes one of my favorite parts—spreading this dreamy cream cheese mixture over your cooled pretzel crust! With a spatula in hand, scoop out your creamy concoction and gently spread it across the surface of your crust. Take your time here; you want to create an even layer that lovingly hugs every inch of that salty goodness below. As you do this, you might notice how the contrasting textures begin to play together: crunchy from the crust meets smooth from the cream cheese—a match made in dessert heaven!
This layer not only provides richness but also acts as a barrier for our fruit topping later on. Yes, my friends, it’s more than just delicious—it’s science! By creating this protective layer, you prevent any moisture from seeping into your pretzel base, ensuring it stays perfectly crispy when served. Once spread evenly, cover it gently with plastic wrap and let it chill in the refrigerator for about 30 minutes. This chilling period is crucial; it allows all those flavors to meld together while setting up nicely so that each slice maintains its structure when served.
Step 7: Transforming Blackberries into Liquid Gold
While your dessert is chilling away and firming up beautifully, let’s dive into creating that utterly intoxicating blackberry topping! Start by rinsing your fresh blackberries under cool water—this simple act refreshes their vibrant color and enhances their natural sweetness. In a medium saucepan over medium heat, combine those gorgeous blackberries along with granulated sugar and lemon juice. The sugar will draw out their juices while lemon juice brightens up their flavor profile—trust me when I say this combination creates a tart yet sweet topping that complements our rich layers perfectly!
As this mixture heats up, gently mash the blackberries with a fork or potato masher just enough to release their juices without turning them into complete mush—it’s about finding that perfect balance! You’re looking for them to break down slightly but still maintain some whole berries for texture. After about 5-7 minutes on the stove, sprinkle in cornstarch mixed with a tablespoon of water (this is called slurry), stirring continuously until everything thickens beautifully into a luscious sauce—about another minute or two should do it. Keep an eye out for bubbling; once you see those lovely bubbles forming around the edges, it’s time to remove it from heat and let it cool slightly before pouring over your chilled cream cheese layer.
Step 8: Bringing It All Together
Now we reach one of my favorite moments—the grand assembly of our beautiful blackberry pretzel dessert! Carefully take out your dish from the refrigerator; I can almost hear it whispering I’m ready! Gently pour your cooled blackberry mixture over the top of the cream cheese layer. Use a spatula if needed to spread it evenly across without disturbing all those heavenly layers beneath. Oh my goodness, can you imagine? The sight alone is captivating as vibrant purple-blackberries cascade over creamy white perfection!
After spreading out those luscious blackberries evenly, pop this masterpiece back into the refrigerator for at least another hour—though if you can resist waiting longer (say around 2-3 hours or even overnight), do so! Chilling allows all those flavors to meld beautifully together; think about how wonderful they’ll taste after soaking into each layer and enriching every bite with sweetness and tartness alike! This patience transforms what could have been just another dessert into something truly extraordinary—a dish worthy of celebrations or quiet evenings spent reminiscing about life’s little joys.
Finishing Touches: Your Blackberry Pretzel Dessert Awaits!
Step 9: The Final Reveal
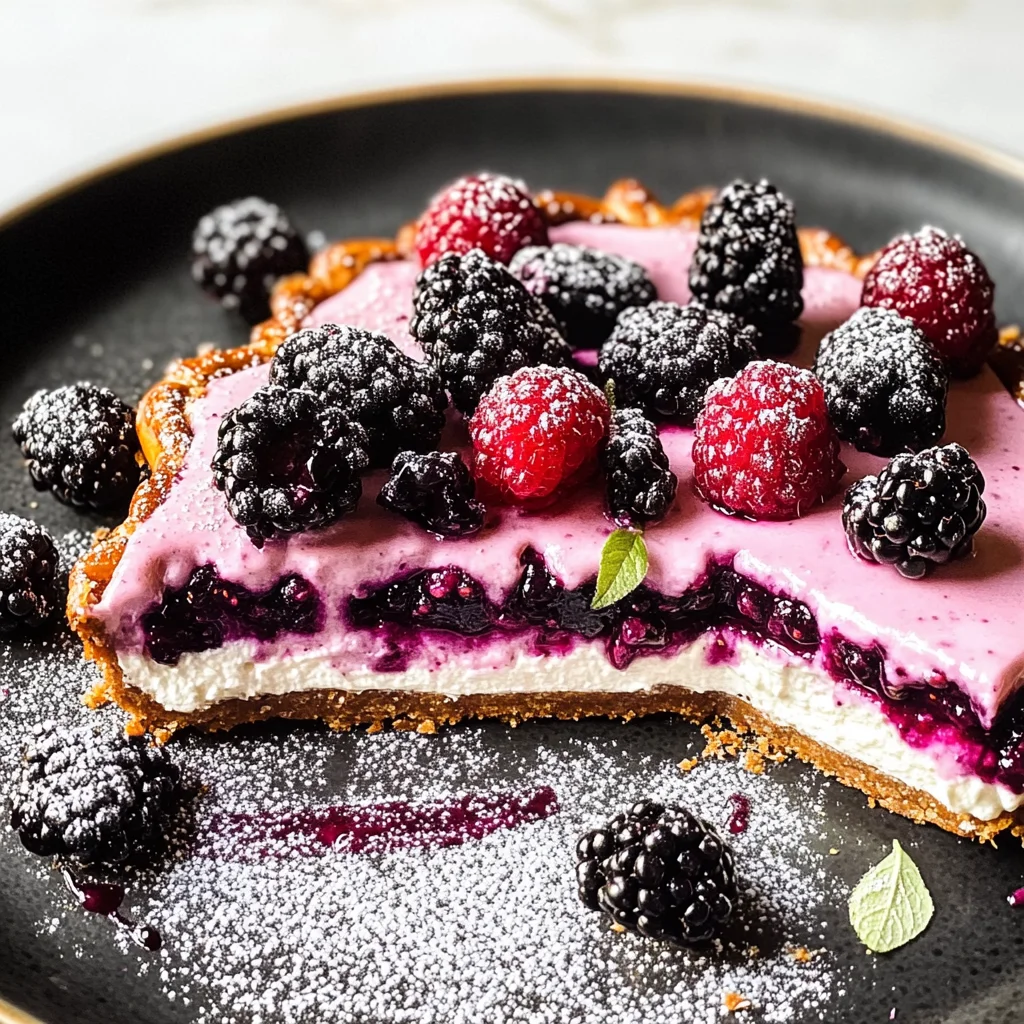
Finally, after what feels like an eternity (but oh-so-worth-it!), it’s time for the big reveal! Gently slice through those beautifully layered components—you’ll see how everything has set perfectly together—and serve each piece onto plates where they can shine like stars at dinner parties or family gatherings alike. As you cut through that glorious dessert and watch each slice come apart effortlessly, I promise you’ll feel a surge of pride knowing you’ve created something so delightful.
Before serving, consider garnishing with additional fresh blackberries or perhaps even a light dusting of powdered sugar for an elegant touch—these small additions elevate not only presentation but also enhance flavor harmony across every single bite! And there you have it—a blackberry pretzel dessert that’s both sweet and salty with layers full of joy encapsulated within each forkful. Whether enjoyed solo or shared amongst friends and family gathered around laughter-filled conversations, this dessert promises smiles all around—and isn’t that what cooking is ultimately about? Enjoy every moment of making and savoring it—you deserve nothing less than extraordinary!
Storage and Enjoyment Tips for Your Blackberry Pretzel Dessert
Now that you’ve poured your heart into creating this delightful Blackberry Pretzel Dessert, it’s time to bask in the joy of sharing it with family and friends—or perhaps just indulging all on your own! The symphony of sweet and salty flavors, coupled with that creamy layer and tart blackberry topping, is truly something special. But what happens if you have some leftovers? Fear not! I’ve got all the details you need to store it perfectly so you can enjoy every last bite.
Storing Leftover Blackberry Pretzel Dessert
To keep your delectable Blackberry Pretzel Dessert fresh, transfer any leftovers to an airtight container; this is absolutely paramount for maintaining its incredible texture and flavor. You can store it in the refrigerator where it will stay delicious for up to 4-5 days. If you’re concerned about the pretzel crust becoming a bit soggy over time (which can happen because of that luscious cream cheese mixture), consider placing a slice of bread in the container to help absorb moisture—this little trick works wonders! Trust me, this dessert tastes just as good after storage; the flavors meld beautifully, making each bite even more satisfying than the last. When you’re ready to serve it again, simply pull it out of the fridge and enjoy it cold—it’s like a refreshing hug on a plate!
Freezing Blackberry Pretzel Dessert for Later
If you find yourself with more of this delightful treat than you can devour right away, freezing it is a fantastic option! Just make sure to cut it into squares before wrapping each piece tightly in plastic wrap or aluminum foil, then place them in a freezer-safe container. This way, they’ll stay fresh for up to 2 months in the freezer. The convenience factor here is truly exciting; just imagine being able to pull out a delicious dessert whenever that craving hits! To enjoy from frozen, simply let a piece thaw in the refrigerator overnight or at room temperature for about an hour—this allows those flavors to come back to life beautifully without losing any of that signature taste. It’s like having a secret stash of happiness waiting for you!
Blackberry Pretzel Dessert
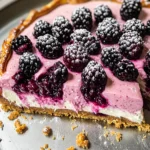
Indulge in the delightful Blackberry Pretzel Dessert, a perfect blend of sweet and salty that’s sure to impress. This no-bake treat features a crunchy pretzel crust layered with a creamy filling made from cream cheese and whipped topping, all crowned with juicy, tart blackberries. The harmony of flavors and textures makes this dessert not just a dish but a memorable experience. Whether you’re hosting a summer barbecue or enjoying a quiet evening at home, this dessert is easy to prepare and serves as an ideal sweet ending to any meal. Gather your loved ones and savor each delicious bite—this Blackberry Pretzel Dessert will quickly become a family favorite!
- Prep Time: 30 minutes
- Cook Time: 10 minutes
- Total Time: 40 minutes
- Yield: Serves approximately 12 slices 1x
- Category: Dessert
- Method: Baking
- Cuisine: American
Ingredients
- 2 ½ cups coarsely crushed pretzels
- ⅔ cup brown sugar
- 2 tablespoons all-purpose flour
- 2 teaspoons vanilla extract
- ¾ cup butter (melted)
- 3 cups fresh blackberries
- ¼ cup granulated sugar
- 1 tablespoon lemon juice
- 1 tablespoon cornstarch
- 8 ounces cream cheese (room temperature)
- 8 ounces extra creamy cool whip
- 1 cup powdered sugar
Instructions
- Preheat your oven to 375°F (190°C) and lightly spray a 9×13-inch baking dish.
- In a large mixing bowl, combine crushed pretzels, brown sugar, and flour. Add melted butter and vanilla extract; mix until crumbly.
- Press the pretzel mixture firmly into the bottom of the prepared baking dish to form an even crust. Bake for about 10 minutes or until golden brown.
- Allow the crust to cool completely before spreading the cream cheese mixture on top.
- In another bowl, beat softened cream cheese until fluffy, then gradually add powdered sugar and fold in Cool Whip.
- Spread the cream cheese layer evenly over the cooled crust and refrigerate for at least 30 minutes.
- Meanwhile, prepare the blackberry topping by cooking blackberries with granulated sugar, lemon juice, and cornstarch until thickened.
- Once cooled, pour the blackberry mixture over the cream cheese layer and refrigerate for an additional hour before serving.
Nutrition
- Serving Size: 1 serving
- Calories: 290
- Sugar: 17g
- Sodium: 200mg
- Fat: 16g
- Saturated Fat: 9g
- Unsaturated Fat: 5g
- Trans Fat: 0g
- Carbohydrates: 32g
- Fiber: 2g
- Protein: 3g
- Cholesterol: 30mg