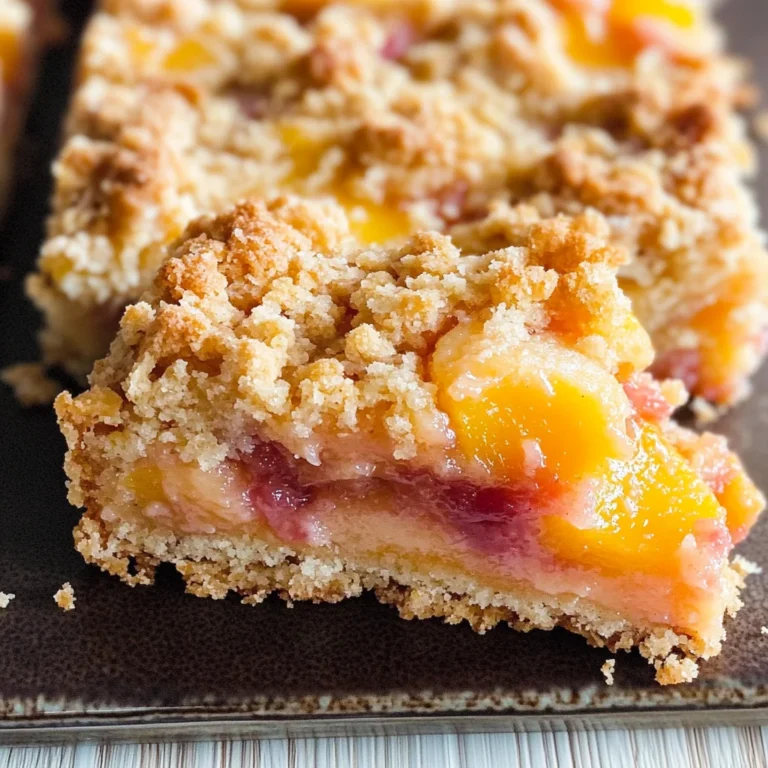
Apricot Oatmeal Bars
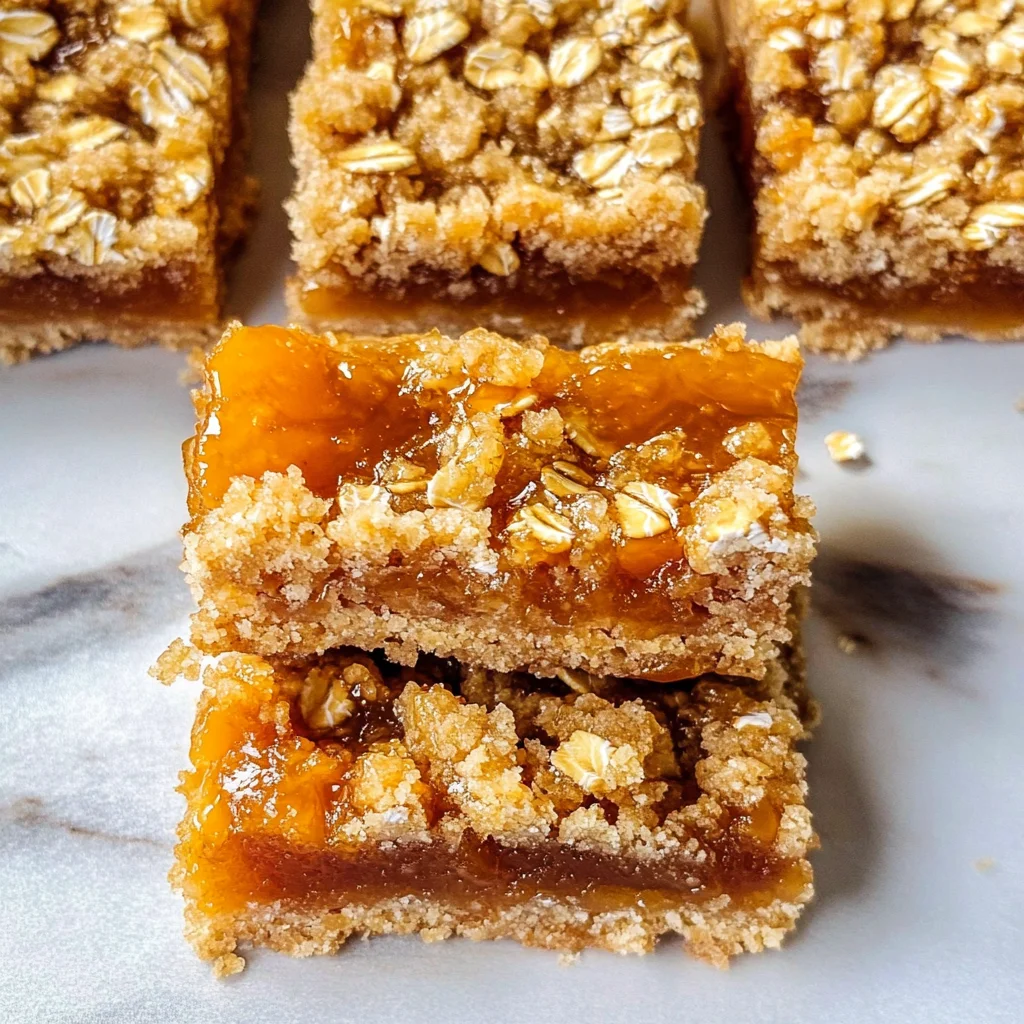
I’m thrilled to share one of my absolute favorite recipes with you today—Apricot Oatmeal Bars. These delightful treats are more than just a sweet indulgence; they embody a warmth and comfort that can transform any moment into something special. Imagine sitting down with a warm, freshly baked bar in hand, the sweet aroma of apricot mingling with the nutty scent of rolled oats wafting through your kitchen. Each bite reveals a symphony of textures; the crumbly oat topping gives way to a luscious layer of apricot preserves that is simply intoxicating. This is not just food; it’s an experience, a little piece of joy crafted with care and love.
What makes these Apricot Oatmeal Bars so extraordinary is their perfect balance between sweet and savory. The sweetness of the apricot preserves dances harmoniously with the hearty oats, making each bite an adventure for your taste buds. These bars are perfect for any occasion, whether you’re hosting a cozy gathering or simply want to treat yourself after a long day. I promise you, once you make these bars, they will quickly become your go-to dessert for sharing with friends and family or enjoying in quiet moments at home.
Apricot Oatmeal Bars: A Sweet Embrace from the Oven
Let’s dive into this delicious journey together! Making Apricot Oatmeal Bars is not only simple but incredibly satisfying. You’ll soon find yourself enveloped in delightful aromas as they bake to golden perfection in your oven. Let’s explore the ingredients that go into this delectable treat!
Ingredients:
Embarking on this culinary adventure requires just a handful of quality ingredients, each playing its part beautifully in creating our Apricot Oatmeal Bars.
- 1/2 cup (1 stick or 113g) unsalted butter, softened to room temperature. This ingredient is absolutely paramount for achieving that wonderfully crumbly texture we’re aiming for in our oatmeal bars. Softened butter allows us to cream it smoothly with brown sugar, which contributes to both flavor and structure. If your butter is too cold, it won’t blend well; if it’s melted, your bars may turn out too greasy and lose their shape. I always recommend high-quality butter here; European-style butter with its higher fat content will enrich the flavor immensely.
- 1/2 cup packed brown sugar. Brown sugar adds depth and moisture to our bars thanks to its natural molasses content. It brings a delightful caramel note that pairs beautifully with the fruity apricot preserves. When measuring brown sugar, packing it tightly into your measuring cup is essential—it ensures you have enough sweetness without overwhelming the other flavors.
- 1/4 teaspoon baking soda. This little leavening agent works wonders by helping our bars rise slightly as they bake while also contributing a subtle crispness to the crust. Baking soda also reacts with any acidity present (like that from our apricot preserves) to create an ideal texture.
- 1 1/4 cups rolled oats. Rolled oats are the heart and soul of our Apricot Oatmeal Bars! They provide that wonderful chewy texture we all love and contribute fiber for added health benefits—making these bars feel like more than just dessert! Look for whole rolled oats rather than instant oats; they hold up better during baking and give us that lovely oat flavor.
- 3/4 cup all-purpose flour. Flour binds all our ingredients together while providing structure to our bars. It’s essential for achieving that perfect crumble topping we desire, so be sure to measure it correctly—using too much flour can lead to dry bars! If you’re looking for gluten-free options, almond flour works surprisingly well here as a substitute.
- 1 cup apricot preserves. Ah, the star of our show! Apricot preserves bring both sweetness and vibrancy to each bite of our bars. They should be smooth yet thick enough to spread easily without running off the edges—a lovely layer of liquid gold! If you prefer making your own preserves or want to try different flavors like peach or raspberry, feel free—just keep an eye on how those flavors interact with the oats.
Equipment You’ll Need:
Now that we’ve gathered all our lovely ingredients, let’s talk about some essential tools that will make this baking experience smoother and more enjoyable!
- Mixing bowl: A sturdy mixing bowl is vital for combining all your ingredients properly without any spillage or mess—a mixing bowl that’s wide enough allows you ample space when blending everything together.
- Fork & knife or pastry cutter: This tool helps combine the butter and dry ingredients seamlessly, leading us toward that crumbly topping we’re after in these oatmeal bars! If you don’t have a pastry cutter handy, using two forks works beautifully too; trust me on this!
- 8×8 or 9×9 baking dish: Choosing the right size dish ensures even cooking; if it’s larger than recommended, your bars may turn out too thin and overcooked around the edges before the center sets properly.
- Non-stick cooking spray: A quick spray before adding your crust mixture keeps everything from sticking—this step is non-negotiable if you want perfectly intact bars when cutting them into squares!
Now that we have everything ready—the ingredients measured and tools lined up—we can start preparing these divine Apricot Oatmeal Bars!
Step 1: Preheat Your Oven
First things first: preheating your oven to 350 degrees Fahrenheit is crucial as it ensures even baking throughout. An oven that’s already hot means no waiting around for those heavenly aromas while avoiding any uneven cooking once we pop those bars in! Meanwhile, grab your baking dish; spraying it generously with non-stick cooking spray creates a barrier between our delicious creation and potential sticking issues later down the line—trust me on this one!
Step 2: Combine Your Ingredients
In a large mixing bowl, combine your softened butter with packed brown sugar using either your fork & knife or pastry cutter until it’s well blended—this process known as creaming introduces air into the mixture making it lighter while also enhancing flavor! You’ll know it’s ready when it looks fluffy rather than grainy; you’ll see tiny bubbles forming! Next up: gently fold in those rolled oats along with flour and baking soda until everything has come together nicely—don’t rush this step as it’s integral to achieving that crumbly texture later on.
Step 3: Create Your Crust
Now comes one of my favorite parts—creating that gorgeous crust! Measure out about 2 cups from this oat mixture (trust me on eyeballing this part) then gently press it into the bottom of your prepared baking dish using clean hands or even a flat measuring cup if needed—make sure it’s evenly spread across every corner! It’s important here not to pack it down excessively; we want just enough pressure applied so there are air pockets left behind which will help achieve tenderness as they bake—perfection lies within those details!
Step 4: Layer on Apricot Preserves
Here comes my favorite moment—the layering process! Carefully spread those beautiful apricot preserves over our crust but remember not to go all the way out to edge—that little gap allows us some room for expansion as things bake away harmoniously together! Use an offset spatula or spoon if preferred so everything stays nice and neat without disrupting what we’ve created thus far—it should look like sunshine shining through clouds once finished!
I can hardly wait for you to try these delicious Apricot Oatmeal Bars—they truly capture warmth from every angle while promising satisfaction beyond measure! As they bake away in your oven filling up every crevice within reach with fragrant blissful scents—it feels almost magical doesn’t it? Stay tuned as we’ll continue crafting each step together toward ultimate blissful enjoyment in no time at all!
Step 5: Spread the Liquid Gold
Now that you have your crust beautifully pressed into the baking dish, it’s time to introduce the real star of this show: the apricot preserves. Measure out 1 cup of those luscious, vibrant preserves—and trust me when I say, this is where the magic begins! Using a spatula or the back of a spoon, gently spread the apricot preserves over the crust. Now, here’s a little tip: be sure to stop about 1/4 inch from the edge of the crust. This small detail is absolutely paramount because it prevents the preserves from bubbling over and creating a sticky mess during baking. Instead, you want that gorgeous layer of fruitiness to sit nestled comfortably atop your oat base, enhancing both flavor and texture in every bite.
As you spread, take a moment to appreciate the intoxicating aroma wafting up from your dish. The sweet and slightly tart scent of apricot mingling with buttery oats is simply heavenly. The preserves will act as a sort of glue, binding together all those beautiful flavors while ensuring that each bite is an explosion of fruity goodness. You’ll want to aim for an even layer—this helps ensure that every bar has just the right amount of sweetness without overwhelming your palate. So go ahead and take your time with this step; you’re creating something truly extraordinary!
Step 6: The Finishing Touch – Sprinkle on That Crumble!
Once you’ve lovingly spread the apricot preserves, it’s time to finish off these bars with that remaining crumble topping we set aside earlier. Gently sprinkle this oat mixture over the apricot layer like confetti at a joyous celebration! This is where your bars get that delightful textural contrast—the crunchy oat topping pairs perfectly with the gooeyness of the apricots beneath. As you sprinkle, make sure to cover as much area as possible; any gaps might leave you with some bites lacking that satisfying crunch.
This step not only enhances texture but also creates an appealing visual contrast between the golden-brown oats and the bright orange preserves. As they bake together in harmony, they’ll transform into what I can only describe as a symphony of flavors—a comforting combination that’s perfect for sharing (or keeping all to yourself if you’re feeling indulgent). Remember, don’t rush this step; take a moment to enjoy how beautiful your creation looks before sliding it into the oven!
Step 7: Bake for Perfection
Now comes one of my favorite parts—baking! Preheat your oven to 350 degrees Fahrenheit if you haven’t done so already; this temperature is crucial because it allows for even cooking throughout your bars. Carefully place your baking dish in the center rack of your preheated oven. As they bake for 30-35 minutes, keep an eye on them; you’re looking for that perfect golden hue on top and slight bubbling around the edges from those rich apricot preserves.
Why is this time so important? Well, during these precious minutes in the oven, something magical happens: Maillard reactions occur! This fancy term basically means that sugars and proteins are reacting under heat, creating complex flavors and enticing aromas that will fill your kitchen (and home!) with warmth and comfort. You want to pull them out when they’re golden brown but before they start browning too much—nobody wants burnt edges on their delicious treats! An excellent test for doneness is gently pressing down on them; if they spring back slightly, they’re ready to come out!
Step 8: Cooling Down – Patience is Key
Once those lovely bars are baked to perfection, you’ll need to let them cool down before cutting into them—a step I know can be tough because they smell utterly intoxicating! Allow them to cool in their baking dish for about 10-15 minutes on a wire rack. This cooling period is non-negotiable; it gives everything a chance to set properly so that when you cut into them later, each bar holds its shape beautifully instead of crumbling apart like a house of cards.
During this cooling time, try not to sneak too many bites (I know it’s hard!). The reason we let them rest is simple yet crucial: allowing residual heat helps solidify everything and meld those flavors together even more profoundly than when they were freshly out of the oven. Trust me on this; patience will reward you with bars that cut beautifully while still being soft enough to melt in your mouth.
Next Major Phase – Slicing Up Your Sweet Creation
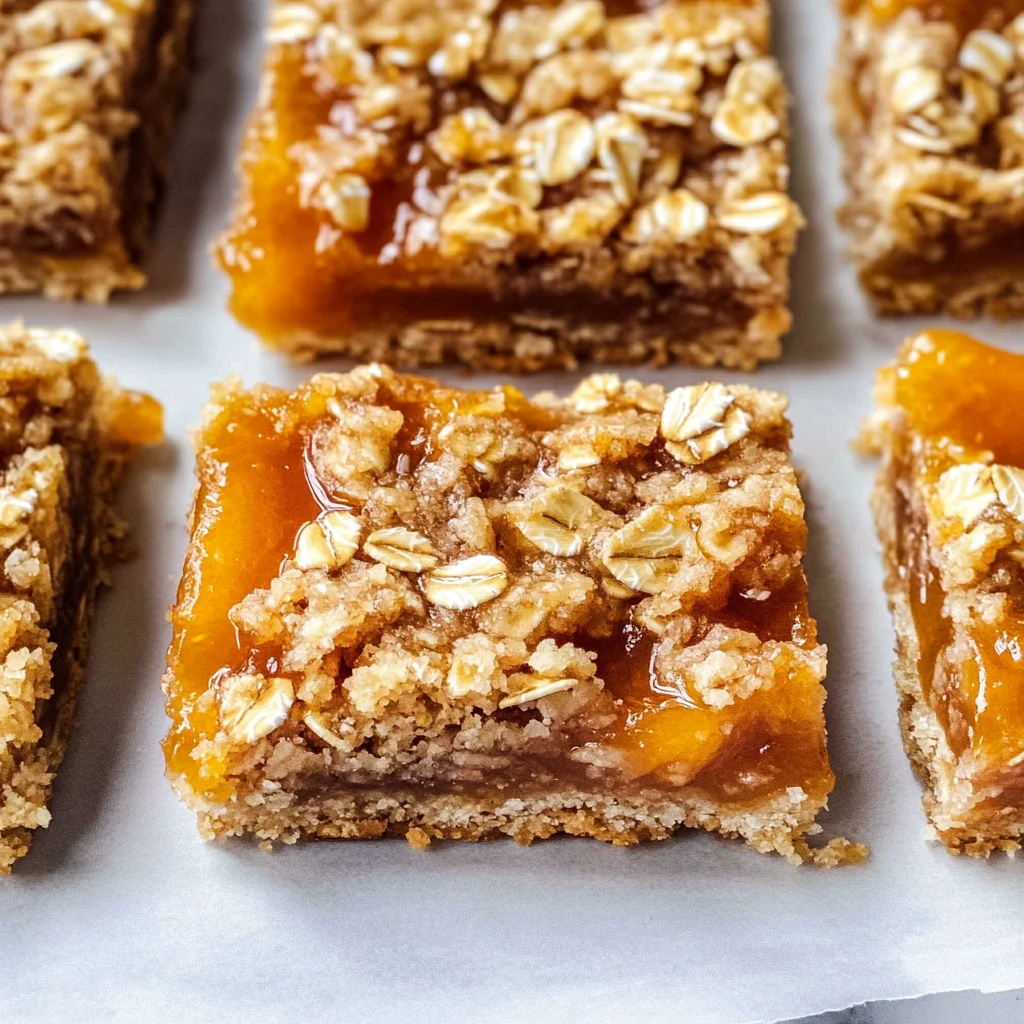
After letting those gorgeous Apricot Oatmeal Bars cool just enough to handle, it’s finally time for my favorite part—slicing them up! With a sharp knife or pizza cutter (which works wonders!), carefully cut them into squares or rectangles—whatever shape speaks to you today! You should see distinct layers forming between that crumbly top and gooey apricot filling underneath. Isn’t it just beautiful?
As you cut through each bar, feel free to take a moment and revel in what you’ve created—each piece holds within it not just ingredients but love and care infused through every step you’ve taken. Place them on a platter and get ready for some serious compliments from friends or family—or simply enjoy savoring one (or two) yourself! These Apricot Oatmeal Bars are not just another dessert; they’re comfort food at its finest and perfect for sharing at gatherings or enjoying alone with a steaming cup of tea or coffee. I promise you will be amazed at how quickly they’ll disappear!
Storage and Enjoyment Tips for Your Apricot Oatmeal Bars
Now that you’ve pulled your glorious Apricot Oatmeal Bars from the oven, filling your kitchen with an utterly intoxicating aroma, it’s time to talk about how to store and enjoy these delightful treats! There’s something so satisfying about knowing that you can savor this sweet symphony of flavors not just today but for several days to come. Trust me, whether you’re indulging in one fresh out of the oven or enjoying a slightly chilled bar days later, each bite will remind you why this recipe has made its way into your heart.
Storing Leftover Apricot Oatmeal Bars
To keep your Apricot Oatmeal Bars as delicious as the day they were baked, start by placing them in an airtight container. This is crucial because exposure to air can dry them out, and we definitely don’t want that! If stored properly at room temperature, they’ll stay fresh for up to a week. And here’s a little pro tip: place a slice of bread in the container with them; this helps maintain moisture and keeps your bars perfectly chewy. After a few days, the flavors meld together beautifully, enhancing that sweet apricot goodness even more. When you’re ready to enjoy, you can savor them at room temperature or pop them in the microwave for about 10-15 seconds for that warm, gooey experience reminiscent of when they first came out of the oven.
Freezing Apricot Oatmeal Bars for Later
If you find yourself with leftovers (or if you’re simply looking to plan ahead), freezing these bars is an excellent option! To freeze, simply wrap each bar tightly in plastic wrap and then place them in a freezer-safe bag or container. When sealed properly, they can be stored in the freezer for up to three months without losing their delightful texture and flavor. The convenience factor here is astounding—imagine pulling one out on a busy morning or during an afternoon slump when you need a quick pick-me-up! Just let them thaw at room temperature or microwave them for about 20-30 seconds if you’re too impatient to wait. It’s like having your own secret stash of joy waiting for you!
Apricot Oatmeal Bars
Indulge in the warm, comforting flavors of homemade Apricot Oatmeal Bars. These delightful treats feature a chewy oat base perfectly complemented by a luscious layer of apricot preserves. Each bite offers a satisfying crunch from the crumbly topping and a burst of fruity sweetness that makes them irresistible. Whether enjoyed as a cozy dessert or a sweet snack, these bars are easy to prepare and sure to become a favorite in your household. Bake a batch today and fill your home with the inviting aroma of fresh-baked goodness!
- Prep Time: 15 minutes
- Cook Time: 35 minutes
- Total Time: 50 minutes
- Yield: Approximately 12 servings 1x
- Category: Dessert
- Method: Baking
- Cuisine: American
Ingredients
- 1/2 cup unsalted butter, softened
- 1/2 cup packed brown sugar
- 1/4 teaspoon baking soda
- 1 1/4 cups rolled oats
- 3/4 cup all-purpose flour (or almond flour for gluten-free)
- 1 cup apricot preserves
Instructions
- Preheat your oven to 350°F (175°C) and grease an 8×8 or 9×9 baking dish with non-stick spray.
- In a mixing bowl, cream together softened butter and brown sugar until fluffy.
- Fold in rolled oats, flour, and baking soda until combined.
- Press about two-thirds of the oat mixture into the bottom of the prepared baking dish to form the crust.
- Spread apricot preserves evenly over the crust, leaving a small gap from the edges.
- Sprinkle the remaining oat mixture over the top.
- Bake for 30-35 minutes or until golden brown.
- Allow to cool before slicing into bars.
Nutrition
- Serving Size: 1 serving
- Calories: 180
- Sugar: 10g
- Sodium: 50mg
- Fat: 7g
- Saturated Fat: 4g
- Unsaturated Fat: 3g
- Trans Fat: 0g
- Carbohydrates: 28g
- Fiber: 2g
- Protein: 2g
- Cholesterol: 15mg