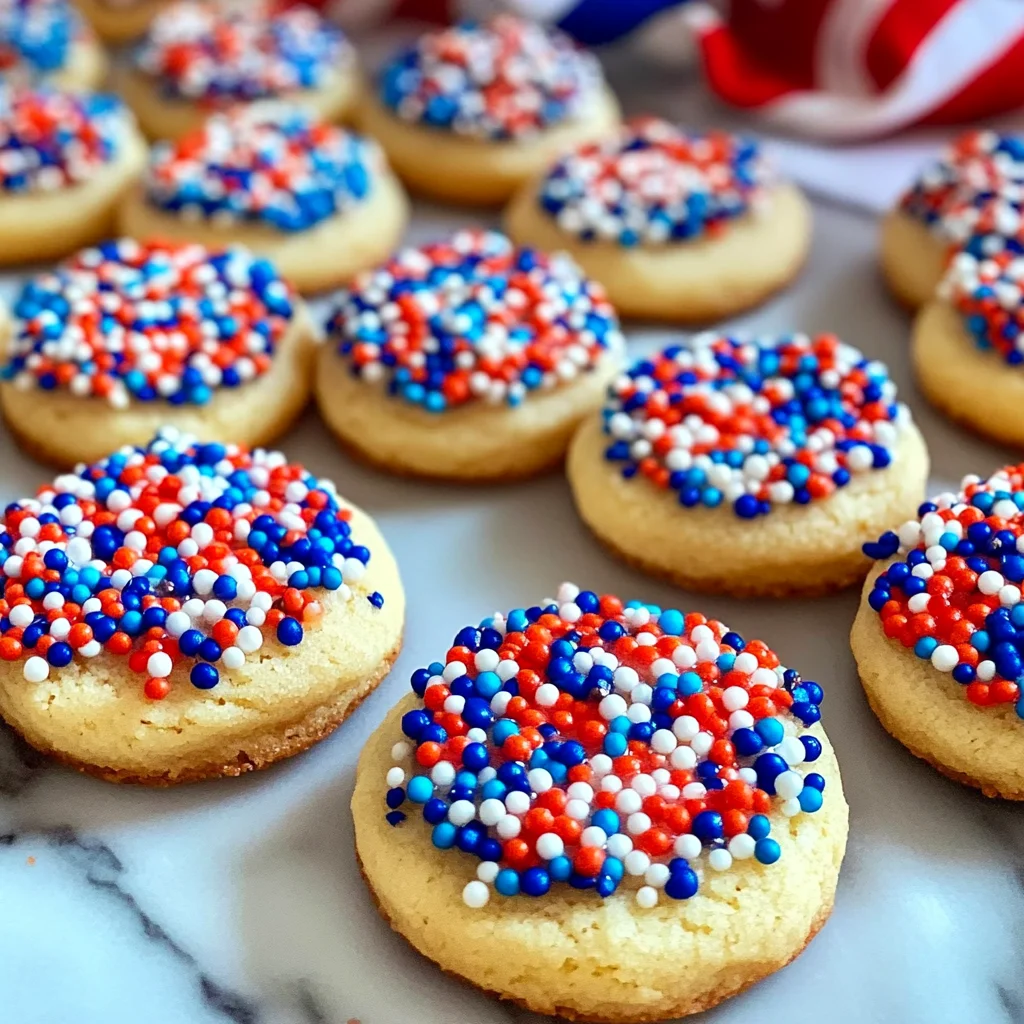
Patriotic Red, White & Blue Thumbprint Cookies
There’s something truly magical about cookies, don’t you think? They’re not just sweet treats; they’re vessels of love and nostalgia that carry us back to warm kitchens filled with laughter and the intoxicating aroma of freshly baked goods. I vividly remember the first time I made these Patriotic Red, White & Blue Thumbprint Cookies. It was a sun-drenched July afternoon, and as I rolled the dough into little balls, my heart danced with excitement at the thought of sharing them with friends at our Fourth of July gathering. The vibrant colors of red, white, and blue weren’t just visually captivating; they were a joyous celebration of togetherness and freedom. Each bite is a buttery delight that melts in your mouth, while the colorful sprinkles add a playful crunch and sweetness that makes each cookie feel like a mini party in your hand.
As we embark on this culinary adventure together, I want you to know that these cookies are more than just dessert—they’re an experience, a way to show love during celebrations or quiet moments alike. Trust me when I say that biting into one of these cookies is like taking a stroll through a summer garden bursting with flavor and cheer. The process itself is almost meditative; from creaming the butter to rolling the dough in sprinkles, every step brings you closer to those sweet rewards. So grab your apron and let’s dive into creating these delightful Patriotic Red, White & Blue Thumbprint Cookies together!
Patriotic Red, White & Blue Thumbprint Cookies: Celebrate with Every Bite
These charming cookies are perfect for any festive occasion but shine especially bright during holidays like Independence Day. With their buttery texture complemented by stunning red, white, and blue hues, they are sure to be the star of your dessert table.
Ingredients:
Let’s gather our ingredients for this delightful journey! Each one plays a vital role in crafting these irresistible cookies that are destined to become favorites among family and friends.
- ½ cup (1 stick or 113g) unsalted butter, softened. This is crucial for creaming properly and creating that light, airy texture we’re aiming for in our Patriotic Red, White & Blue Thumbprint Cookies. Softened butter will blend beautifully with sugar to create a creamy mixture that’s rich in flavor. When choosing butter, look for high-quality brands—European-style butter has a higher fat content which can elevate your cookie game significantly!
- ¼ cup granulated sugar. This ingredient not only sweetens our cookies but also contributes to their texture by helping them spread slightly as they bake. Sugar interacts with butter during the creaming process to create tiny air pockets which help achieve a light structure—absolutely paramount! Make sure you’re using granulated sugar here; it’s perfect for achieving that classic cookie sweetness without any added moisture.
- 1 egg yolk. The yolk is where all the richness lies! It adds moisture and fat which results in tender cookies while also helping bind the ingredients together. Using just the yolk rather than whole eggs prevents excess liquid which could lead to overly soft dough. If you’re looking for an egg substitute due to dietary preferences, consider using aquafaba—a fabulous alternative derived from chickpeas!
- 1½ teaspoon pure vanilla extract. Ahh, vanilla—the secret weapon in so many baked goods! This liquid gold enhances all other flavors in your cookies without overpowering them. Always opt for pure vanilla extract over imitation; it makes a world of difference in taste! When you pour it into your batter, notice how its fragrant aroma wraps around you like a warm hug.
- 1 cup all-purpose flour. Flour is what gives our cookies structure—without it, we’d just have gooey blobs! All-purpose flour is versatile enough to create beautifully textured cookies without being too dense or crumbly. For best results, spoon it into your measuring cup rather than scooping directly from the bag; this helps prevent packing too much flour.
- ¼ teaspoon salt. Don’t overlook this humble ingredient! Salt acts as an enhancer for sweetness and balances flavors remarkably well—trust me on this one! It elevates every morsel from good to extraordinary by bringing out those sweeter notes that might otherwise remain hidden.
- 5 ounces red, white, and blue sprinkles. Let’s talk about fun! These colorful sprinkles aren’t just decorative; they add bursts of joy both visually and texturally with their delightful crunch against the buttery cookie base. Choose high-quality sprinkles that won’t bleed color when baked so your festive theme stays intact!
- 2 cups powdered sugar. Used here primarily for icing purposes after baking—this ingredient lends itself well to achieving that silky-smooth finish we want on our thumbprints while ensuring they stay delightfully sweet without overwhelming the palate.
- 2 tablespoons milk. A small amount goes a long way here! Milk adds moisture back into our icing while also helping it reach that perfect drizzling consistency we desire—it’s all about achieving balance!
- 1 tablespoon light corn syrup. This ingredient is non-negotiable if you want shiny icing! It helps prevent crystallization in your frosting while giving it an appealing gloss that screams eat me! Just be cautious not to use too much as it can make things overly sticky.
- Red gel food color & blue gel food coloring: These vibrant hues bring life to our icing! Gel food coloring is preferred over liquid because it offers more intense color without altering the consistency of your icing—a must if you want those bold patriotic shades!
Equipment You’ll Need:
Before we dive headfirst into mixing up these delightful cookies, let’s ensure we have all our essential tools ready at hand! Having the right equipment can transform this experience from chaotic to smooth sailing.
- Mixing bowl – A sturdy mixing bowl is fundamental for combining ingredients effectively; choose one that’s large enough so you have plenty of room when creaming the butter and sugar together without fear of overflow!
- Electric mixer or whisk – While an electric mixer will save time and energy when creaming ingredients together (plus it ensures even mixing), don’t hesitate if you prefer using a whisk instead—it can be quite therapeutic stirring everything by hand!
- Baking sheet lined with parchment paper – Lining your baking sheet prevents sticking while also allowing easy cleanup afterward—a win-win situation! Parchment paper creates a non-stick surface essential for even baking.
- Cookie scoop or tablespoon – To ensure uniformity in size when portioning out dough balls—this tool helps guarantee even baking times so some don’t end up overcooked while others remain underdone!
- Cooling rack – Once you’ve pulled those beautiful golden-brown cookies from the oven—it’s crucial they cool on a wire rack so air circulates evenly around them preventing sogginess on their bottoms!
Now that we’ve gathered everything we need—including our vibrant ingredients—we’re ready to transform simple components into something utterly extraordinary: delicious Patriotic Red, White & Blue Thumbprint Cookies! Let’s jump into making these delectable treats!
Step 1: Creaming Butter and Sugar
First things first—let’s create that delicious base for our cookies by creaming together our softened butter and granulated sugar until it’s light and fluffy! This process is known as creaming; it’s not just about combining ingredients but incorporating air into them as well—which helps give our cookies rise during baking resulting in that perfect tender crumb we crave so much! As you beat them together using either an electric mixer or whisk (your choice!), take note of how they transform from solid mass into creamy bliss—it should take about 2-3 minutes on medium speed until everything looks well combined with no visible lumps remaining.
Why do we focus on this step? Because if you rush through it or skip it entirely—you risk ending up with dense cookies rather than light ones! So take your time here—enjoy watching how those textures blend harmoniously together as if they’re dancing toward cookie perfection.
Step 2: Incorporating Egg Yolk and Vanilla
Now let’s introduce some richness into our mixture by adding in one egg yolk along with 1½ teaspoons of pure vanilla extract—oh my goodness—the aroma alone will be heavenly! Beat these elements gently until fully combined—this should only take another minute or so—and don’t forget to scrape down the sides of your bowl occasionally so every bit gets attention!
This addition brings moisture alongside flavor depth which makes each bite taste more decadent than before—I promise you’ll be amazed at how much difference such simple additions can make! Once incorporated smoothly—you’re ready for the next step towards assembling dough magic.
Step 3: Mixing Dry Ingredients
In another bowl (yes—we need two!), whisk together 1 cup all-purpose flour along with ¼ teaspoon salt until uniformly mixed—this ensures even distribution throughout later stages when folding everything together later on down this delicious path ahead! Make sure there are no clumps left behind as this could lead to uneven textures later when baked…we want every cookie sensationally scrumptious after all!
Once combined nicely—you’ll gently fold these dry ingredients right into those creamy mixtures prepared earlier; do this gradually using either spatula or wooden spoon by pushing down through layers without over-mixing—the goal here is simply blending until no visible flour remains peeking out amongst creamy goodness already present inside bowl…
Step 4: Forming Dough Balls
Now comes one of my favorite parts: forming those adorable little dough balls ready for rolling within colorful sprinkles once baked up perfectly golden brown later on down line…so scoop out portions using either tablespoon measure or cookie scoop depending upon preference size desired—and roll between palms gently shaping small balls placing onto prepared baking sheet lined previously with parchment paper keeping spacing ample between each piece allowing freedom spread during baking time ahead…
This step allows us control over final product shape ensuring symmetry across batch instead haphazardly plopping dollops everywhere leaving behind irregular forms…it really does make difference trust me here folks!!
Each ball should ideally measure about one inch round yielding roughly twenty-two servings overall once completed allowing everyone enjoy tasty treat without feeling guilty indulging every now then…
With each stage building upon previous ones—we’re nearing completion already—it truly doesn’t get better than this folks!! Get excited because deliciousness awaits…
Stay tuned as we continue preparing more magical moments ahead filled flavors bursting forth inviting everyone join celebration whether big small alike—all brought together through warmth love shared around tables filled goodies made hand heart alongside loved ones nearby spreading smiles everywhere possible… let’s keep going strong till finish line reached shall we?!
Step 5: Chilling the Dough – A Crucial Step for Perfection
Now that we’ve mixed our dough into a beautiful, cohesive ball, it’s time for a crucial step: chilling! Trust me on this one; allowing your dough to rest in the refrigerator for at least 30 minutes is absolutely paramount. This isn’t just a suggestion but rather a transformative process that helps the flavors meld beautifully and allows the butter to firm up, resulting in cookies that hold their shape while baking. If you skip this step, you might end up with flat, sad cookies instead of the delightful puffy morsels we’re aiming for. As the dough chills, the flour will hydrate fully, ensuring every bite is tender and satisfying.
Once your dough has been nestled in the refrigerator for about half an hour, it should feel slightly firmer to the touch. This is your cue that it’s ready to be shaped! While you’re waiting, take a moment to preheat your oven to 350°F (175°C). This is also an excellent opportunity to prepare your baking sheets by lining them with parchment paper—this simple act not only prevents sticking but also promotes even baking. So grab your favorite cookie scoop or two teaspoons; we want to create perfectly uniform balls of dough that will bake evenly.
Step 6: Shaping the Cookies – The Fun Part!
With our chilled dough ready, it’s time for one of my favorite parts—the shaping! Using a cookie scoop or two spoons, take generous amounts of that buttery dough and roll them into balls about 1 inch in diameter. Picture those soft spheres of goodness; they’re going to transform into lovely little thumbprint cookies! Place each ball on your prepared baking sheet, leaving about 2 inches of space between them because they’ll spread just a little as they bake—better safe than sorry!
Once all the dough has been rolled out and placed on the baking sheet, here comes the fun twist: using your thumb (or the back of a teaspoon if you prefer) gently press down in the center of each ball to create an indention. This is where all that colorful icing magic will go later! Don’t worry if it doesn’t look perfect; think of each thumbprint as a unique little canvas waiting for its splash of color. Aim for a deep enough indent without piercing through—think of it as making a tiny well for holding all that delicious frosting later on.
Step 7: Baking Your Cookies – Time to Get Cozy with Your Oven
Now we’re entering one of the most exciting phases—the baking! Slide those trays into your preheated oven and set your timer for about 10-12 minutes. Keep a watchful eye on them; this is where patience truly pays off! You’re looking for edges that are lightly golden while keeping that center slightly soft—it’ll firm up as it cools outside the oven. The aroma wafting through your kitchen during this time is nothing short of intoxicating; I promise you’ll be counting down those seconds with joy!
When those cookies come out looking like golden clouds, let them sit on the baking sheet for around 5 minutes before transferring them to wire racks. This brief resting period allows them to set just enough so they won’t crumble when you move them—trust me; no one wants crumbled cookies when there’s frosting involved! After they’ve cooled completely on those racks, they’ll be ready for their colorful embellishments.
Step 8: Crafting Your Patriotic Icing – Adding That Special Touch
While those delightful cookies are cooling, let’s channel our inner artist and whip up some vibrant icing! In a medium bowl, combine 2 cups powdered sugar, 2 tablespoons milk, and 1 tablespoon light corn syrup. The corn syrup adds both shine and elasticity to your icing—a non-negotiable element if you want that perfect glossy finish that makes these cookies look utterly extraordinary. Mix everything together until smooth; you want it thick enough to hold its shape but still pourable—think liquid gold consistency!
Here’s where things get fun—you can divide this icing into three bowls to create our red, white, and blue masterpiece! Add several drops of red gel food coloring to one bowl and mix until you achieve that vibrant hue reminiscent of fresh strawberries on a summer day. Then repeat with blue gel food coloring in another bowl. For the white icing—well, we’re already there with our base! Once you have your colors ready, it’s time to bring those lovely thumbprints back into play.
Final Touches: Decorating Your Patriotic Red, White & Blue Thumbprint Cookies
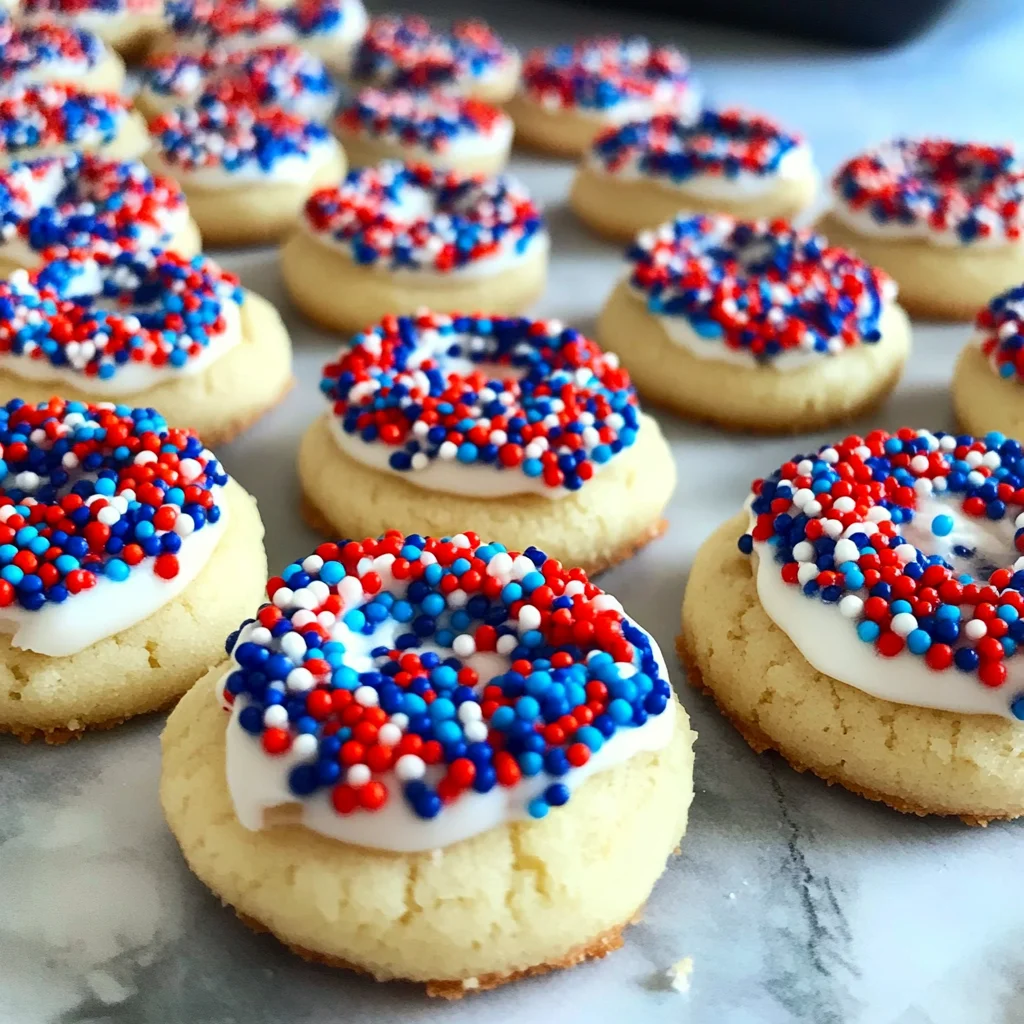
Step 9: Icing Your Cookie Canvas – A Celebration in Every Bite
Now comes arguably my favorite part—the decorating! Grab your cooled cookies and start by filling each thumbprint with a generous dollop of red icing in half and blue icing in the other half—feel free to get creative here! Swirl them together gently if you’d like or keep them distinct—it’s entirely up to you how patriotic you want these beauties to look. As you’re doing this, sprinkle over some festive red, white & blue sprinkles while the icing is still wet; this ensures they stick beautifully without falling off later.
Let these gorgeous creations set at room temperature until the icing hardens slightly—a process that’s both thrilling and rewarding because you’ll soon see how all those colors come together like fireworks on display. You can expect about 30 minutes or so before they’re good to go!
To wrap things up beautifully—and I mean who doesn’t love sharing?—pack these cookies into clear gift bags tied with cheerful ribbons or arrange them on platters for your upcoming gatherings. Just imagine how proud you’ll feel presenting these dazzling Patriotic Red, White & Blue Thumbprint Cookies at any celebration—they’re not just treats but rather symbols of joy and togetherness! Enjoy every moment spent crafting these delightful bites; I promise they’ll bring smiles all around!
Storage and Enjoyment Tips for Your Patriotic Red, White & Blue Thumbprint Cookies
Now that you’ve crafted these delightful Patriotic Red, White & Blue Thumbprint Cookies, it’s time to dive into the joy of enjoying them! I can just imagine the smiles they’ll bring to your friends and family as you gather together to celebrate. But what if you have a few cookies left over? Fear not, because preserving their deliciousness is easier than you think! Let me share some tips to keep those vibrant treats fresh and delectable for days to come.
Storing Leftover Patriotic Red, White & Blue Thumbprint Cookies
To keep your cookies at their peak freshness, it’s essential to store them properly. I recommend placing them in an airtight container lined with parchment paper; this helps absorb any excess moisture while also preventing them from sticking together. Store them in a cool, dry place away from direct sunlight, and they’ll stay delightful for about a week. If you want to ensure they maintain that melt-in-your-mouth butteriness, consider popping a slice of bread into the container with them—this little trick is absolutely paramount for keeping baked goods soft! After a few days, they still taste fantastic; however, the delicate sprinkles might lose some vibrancy but worry not—the flavor remains utterly intoxicating. When you’re ready to indulge again, simply serve them at room temperature or give them a quick 5-second zap in the microwave for that fresh-from-the-oven warmth.
Freezing Cookies for Later
If you find yourself with an abundance of these festive cookies or simply want to plan ahead for a future gathering (trust me, you’ll be the star of any event), freezing is a fantastic option! To freeze your thumbprint cookies properly, lay them out on a baking sheet in a single layer until they’re firm. Once frozen solid—which usually takes about an hour—transfer them into a freezer-safe bag or container. They can be stored this way for up to three months without losing their charm! The convenience of pulling out these gorgeous cookies whenever the craving strikes is truly wonderful; just let them thaw at room temperature or pop one in the microwave for about fifteen seconds if you’re feeling impatient. The best part? They’ll taste as fresh as the day you made them!
Patriotic Red, White & Blue Thumbprint Cookies

There’s a special joy in crafting Patriotic Red, White & Blue Thumbprint Cookies that go beyond just baking. These vibrant cookies are a delightful combination of buttery goodness and playful colors, making them the perfect treat for summer celebrations like Independence Day. Each cookie is lovingly decorated with rich icing and colorful sprinkles, creating a festive atmosphere at any gathering. As you bite into these melt-in-your-mouth delights, you’ll experience a burst of sweetness and nostalgia, transporting you back to sunny days filled with laughter and togetherness. Easy to make and visually captivating, this recipe invites bakers of all skill levels to create joyful moments in the kitchen.
- Prep Time: 30 minutes
- Cook Time: 12 minutes
- Total Time: 42 minutes
- Yield: Approximately 22 cookies 1x
- Category: Dessert
- Method: Baking
- Cuisine: American
Ingredients
- ½ cup unsalted butter (softened)
- ¼ cup granulated sugar
- 1 egg yolk
- 1½ teaspoons pure vanilla extract
- 1 cup all-purpose flour
- ¼ teaspoon salt
- 5 ounces red, white, and blue sprinkles
- 2 cups powdered sugar
- 2 tablespoons milk
- 1 tablespoon light corn syrup
- Red gel food coloring
- Blue gel food coloring
Instructions
- Preheat your oven to 350°F (175°C) and line baking sheets with parchment paper.
- In a mixing bowl, cream together softened butter and granulated sugar until light and fluffy.
- Mix in the egg yolk and vanilla extract until well combined.
- In a separate bowl, whisk together flour and salt; gradually fold this into the wet mixture until no visible flour remains.
- Chill the dough in the refrigerator for at least 30 minutes.
- Scoop out rounded balls of dough (about 1 inch) and place them on prepared baking sheets with space between each cookie.
- Press down gently in the center of each ball to create an indention for icing.
- Bake for 10-12 minutes until edges are lightly golden; let cool on wire racks.
- Mix powdered sugar, milk, and corn syrup for icing; divide into three bowls and color with red and blue food coloring.
- Fill thumbprints with icing, add sprinkles, and let set before serving.
Nutrition
- Serving Size: 1 cookie (24g)
- Calories: 95
- Sugar: 9g
- Sodium: 45mg
- Fat: 4g
- Saturated Fat: 2g
- Unsaturated Fat: 2g
- Trans Fat: 0g
- Carbohydrates: 13g
- Fiber: <1g
- Protein: <1g
- Cholesterol: <5mg