Pepper Jelly
There’s something deeply magical about creating your own Pepper Jelly, a recipe that transcends mere cooking to become a heartfelt expression of creativity and sharing. Picture this: the vibrant hues of bell peppers, from sunny yellows to fiery reds and greens, dancing together in a pot, emitting an intoxicating aroma that fills your kitchen with warmth and nostalgia. This jelly is not just a condiment; it’s a celebration of flavors—sweetness mingling joyfully with just the right punch of heat, creating an experience that’s both exhilarating and comforting. Whether you’re hosting guests or simply treating yourself, this homemade Pepper Jelly is sure to bring smiles and spark conversations.
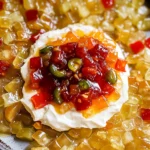
I remember the first time I tasted Pepper Jelly at a friend’s gathering, casually spread over a block of cream cheese and served with crisp crackers. It was love at first bite! The sweet-spicy combination felt like an explosion of flavor that lingered long after the last cracker was gone. Ever since then, I’ve been captivated by how versatile this jelly can be—it’s not only perfect for appetizers but also adds an unexpected kick to sandwiches, grilled meats, or even as a glaze for those mouthwatering hot wings. Trust me when I say that once you make your own batch of Pepper Jelly, it will become one of those cherished recipes you return to time and again.
Pepper Jelly: A Sweet and Spicy Delight
Welcome to the world of homemade Pepper Jelly! This delightful concoction is so easy to make, yet it carries an air of sophistication that will impress anyone who tries it. With its perfect balance between sweetness and spice, this jelly is destined to become your go-to appetizer for gatherings or just a special treat for yourself during the week. Let’s embark on this culinary journey together!
Ingredients:
As we dive into making our delicious Pepper Jelly, each ingredient plays a vital role in crafting that perfect balance of flavors that makes this recipe truly special.
- 1 ½ cups finely diced bell pepper. It’s essential to use a mix of colorful bell peppers—not only do they add visual appeal, but they also contribute unique flavors. The sweetness from these peppers balances out the heat from the jalapeños perfectly. When selecting bell peppers, look for ones that are firm with smooth skin; avoid any that show signs of wrinkling or blemishes. Remember to chop them finely so they blend beautifully into the jelly!
- 1 lb jalapeños (about 10). These little green gems pack quite a punch! If you desire a milder flavor, remove the seeds and veins from half before dicing; however, if you’re ready for some serious heat, keep them all intact! When handling jalapeños, I highly recommend wearing gloves—trust me on this one! You’ll thank me later when you’re not left with burning fingers. The freshness of these peppers is key; choose ones that are bright green without any soft spots.
- 5 cups granulated sugar. Now here’s where things get interesting—the sugar is what transforms the fresh peppers into that luscious jelly texture we all adore! It acts as both a preservative and sweetener while helping achieve that beautiful gel-like consistency when combined with pectin. I recommend using standard granulated sugar for best results as specialty sugars might alter the final taste.
- 1 ¼ cups white or apple cider vinegar. Vinegar brings acidity to our jelly, balancing out all that sweetness while enhancing flavors in ways you wouldn’t believe! White vinegar will give you a cleaner taste while apple cider vinegar offers subtle fruity notes; both are excellent choices depending on your preference.
- ¼ cup lime juice. This ingredient adds brightness and freshness to our jelly—think of it as sunshine in jar form! Lime juice helps cut through the sweetness and rounds out the overall flavor profile beautifully. Make sure to use fresh lime juice whenever possible; bottled versions can lack that vibrant zing we crave.
- 1 teaspoon salt. A pinch of salt may seem small but it’s absolutely paramount in enhancing all those lovely flavors we’ve incorporated thus far. It works wonders in rounding out sweetness while elevating the overall taste experience!
- 3 ounces Certo liquid fruit pectin. Pectin is what helps our jelly set properly—it’s crucial for achieving that desired spreadable consistency! Certo is my go-to brand because it dissolves easily without any clumps forming—a common issue with less quality pectins.
Equipment You’ll Need:
Having the right tools makes any cooking adventure smoother—and trust me—this journey into making Pepper Jelly will be no different! Here’s what you’ll need:
- Large deep pot – A sturdy pot ensures even heating throughout your mixture as it cooks down into jelly form without risking burning on the bottom edges—nobody likes burnt flavors sneaking into their sweet treats!
- Sharp knife or food processor – For dicing those colorful bell peppers and fiery jalapeños! A sharp knife makes quick work of chopping while keeping your fingers safe from mishaps; alternatively, if you’re up against time constraints or just want ease with minimal messiness, a food processor can speed things along wonderfully.
- Measuring cups & spoons – Precision is key in any recipe; having accurate measurements means predictable outcomes every time you whip up this delectable dish!
- Sterilized jars & lids – If you’re planning on canning your delicious pepper jelly (which I highly encourage!), ensure you have clean jars ready—they need to be sterilized properly beforehand to prevent spoilage later on.
- Water bath canner (optional) – If canning is how you wish to store your jelly long-term (and trust me—you’ll want plenty), investing in a good water bath canner will make life easier by ensuring jars are sealed properly!
Now we’re ready to get cooking!
Step 1: Preparing Your Peppers
Let’s start by dicing our beautiful bell peppers! You can use either a sharp knife or opt for convenience with a food processor here—whichever method fits your style better. If using a knife, take care to slice them finely as this ensures they dissolve beautifully into our pepper jelly later on creating an even texture throughout. Once chopped up nicely, place them onto paper towels and gently squeeze out any excess liquid—this step may seem trivial but I promise you it’s crucial for getting that perfect set we’re aiming for with our jelly!
Step 2: Dicing Jalapeños
Next up are those jalapeños! Just like before, finely dice them according to how much heat you’d like in your final product—remembering that leaving seeds intact will crank up spiciness considerably so tailor accordingly based on preference levels among friends/family who’ll enjoy this treat alongside you! Again be sure to squeeze out extra moisture using paper towels after chopping—this process aids tremendously during cooking phases later down road too!
Step 3: Cooking Down Our Mixture
Time now for all ingredients come together harmoniously in large deep pot over medium-high heat; add those diced bell peppers along with minced jalapeños followed by sugar/vinegar/lime juice/salt mixture—we’re creating something magical here folks! Stir frequently until bubbling begins then reduce flame slightly allowing consistent boil maintained throughout next ten minutes—this boiling phase helps release natural pectin from peppers alongside dissolving sugars ensuring everything melds beautifully together forming initial stages towards glorious caramelization occurring soon thereafter!
Step 4: Adding Pectin
Once ten minutes fly by happily stirring away at bubbling pot joyously simmering before us—it’s time introduce liquid fruit pectin slowly pouring along edge whilst gently mixing simultaneously until evenly distributed within concoction cooked down thus far… Allow mix continue boil another minute longer helping fully activate setting properties inherent within Certo followed promptly removing from heat source afterward allowing slight cooling period occur before transferring containers prepared earlier—it’s almost done friends!
I hope you’re feeling excited about diving into these steps together because nothing beats homemade goodness packed full flavor like this incredible Pepper Jelly does! Stay tuned as we wrap up these final touches creating perfection within each jar lovingly crafted hand-in-hand today…
Step 5: The Crucial Cooling Process
Once you’ve poured your vibrant mixture of pepper jelly into containers, it’s time for a little patience, which is absolutely crucial to the texture and flavor of your finished product. After allowing the jelly to cool for about 5 minutes in the pot, give it a gentle stir. This step ensures that the diced peppers are evenly distributed throughout, preventing them from all floating to the top of your jars later on. Picture this: as you stir, the colors of the peppers swirl together like a beautiful sunset—this is where the magic truly begins! Trust me when I say that taking this extra moment makes a world of difference in how delightful each spoonful will be when you finally dig in.
Now comes an optional tip that my dear grandmother swore by: flipping the containers upside down for about 30 minutes as they cool. Why flip them? This technique allows gravity to work its charm, gently coaxing those lovely pepper bits into suspension throughout the jelly, rather than letting them settle at the bottom. It’s a small step that yields profoundly satisfying results. As you’re waiting—maybe grab a book or take in the comforting aromas wafting through your kitchen—your patience will be rewarded with a beautifully set jelly that looks as good as it tastes.
Step 6: The Refrigerator Dance
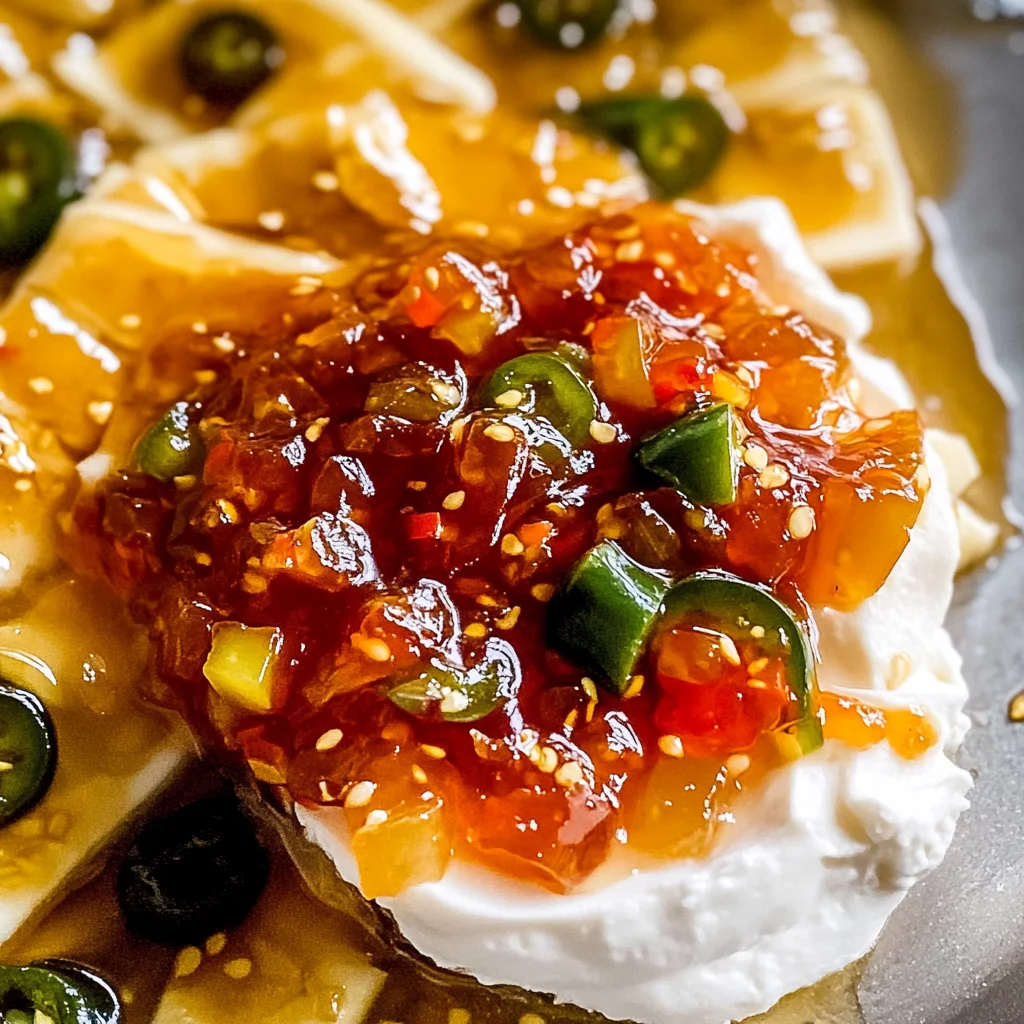
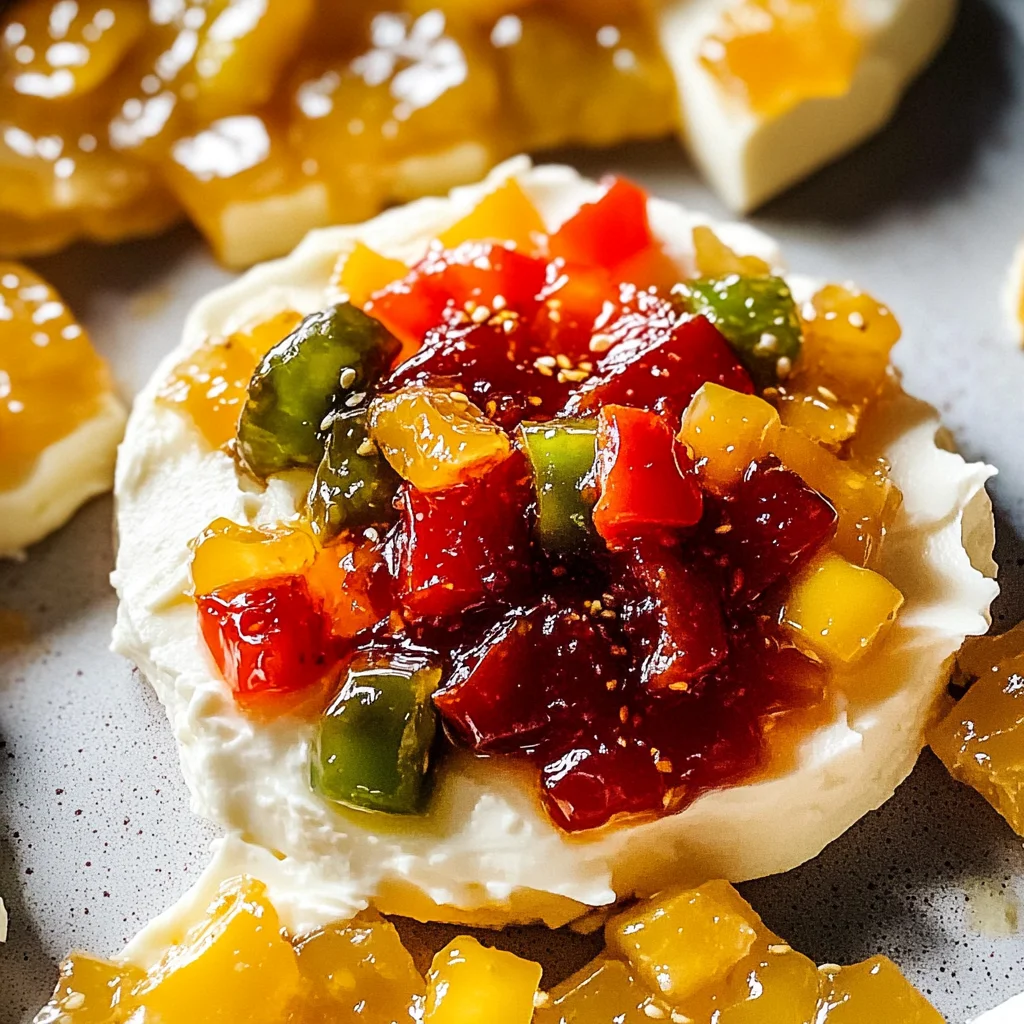
Now that your jelly has cooled and set up beautifully, it’s time to decide its fate—will you indulge right away or save some for later? If you’re reaching for immediate satisfaction (and who wouldn’t?), pop that jar right into the refrigerator. I promise you’ll relish every bite within just 10 days! Imagine spreading this sweet and spicy concoction over cream cheese atop crunchy crackers during a cozy evening with friends; it’s truly extraordinary how this simple appetizer transforms any gathering into a celebration.
If you’re thinking long-term storage options, then freezing is your best friend here! Your jelly can last up to 4 months in the freezer without losing its delightful zing. Just make sure to leave some space at the top of your containers since liquids expand when frozen—a little tip learned from years of trial and error! When you’re ready to enjoy some more of this liquid gold, simply transfer it to the fridge overnight before use. The anticipation makes it even better!
Step 7: Canning for Longevity
For those adventurous souls who want their homemade pepper jelly to grace their shelves for months on end, let’s dive into canning! First things first: we want everything squeaky clean. Sterilize your jars and lids by either placing them in boiling water or running them through a hot cycle in your dishwasher. This step is non-negotiable because any bacteria could ruin all your hard work. Once they’re nice and sanitized, carefully pour your gorgeous jelly into these jars while it’s still warm, filling each jar almost to the brim but leaving about half an inch of headspace at the top.
Next comes an equally important part: wiping down those jar rims with a clean cloth before sealing with lids and rings. This ensures there are no sticky residues that might prevent proper sealing—a tiny detail but one that can make or break your canning success! Now process these jars in a water bath canner for about 10 minutes; if you’re at high altitude, add more time according to guidelines specific for canning at elevation. This gentle boiling bath creates a vacuum seal as they cool down—this science is what keeps your delectable jelly fresh and flavorful for 6-10 months!
Step 8: Serving Suggestions That Dazzle
Now here comes perhaps my favorite part—serving this utterly intoxicating pepper jelly! It’s not just about spreading it over cream cheese (though trust me, that’s divine); think bigger! Picture slathering it on turkey burgers or grilled chicken sandwiches; its sweet heat elevates every bite into something truly gourmet. You could even use it as a glaze on hot wings—imagine biting into that succulent meat coated in vibrant color and flavor; it’s mouthwatering just thinking about it!
Don’t hesitate to experiment with serving ideas! This pepper jelly also shines when paired with cheeses—try it over brie or goat cheese for an elegant touch at parties or family gatherings. And if you’re feeling adventurous, consider mixing it into salad dressings or marinades; it’s incredible what this little jar can do! Remember always to have fun with food; there’s no right or wrong way to enjoy something so deliciously versatile!
Final Touches: Cherishing Every Jar
As you admire those jars filled with homemade pepper jelly resting proudly on your countertop or pantry shelf, take a moment to appreciate what you’ve created—a labor of love infused with flavors from vibrant peppers and sweet sugar harmonizing beautifully together. Each time you reach for one of these jars, you’ll remember not just how easy it was but also how utterly rewarding it feels to create something so delightful from scratch.
So gather around friends and family during those special moments; share stories over cheese platters adorned with this stunning jewel-toned jelly and watch smiles light up faces as flavors dance across taste buds! In culinary adventures like these, it’s not just about feeding our bodies; it’s about nourishing our souls—and there’s nothing quite like sharing homemade creations made from love and joy.
Enjoy every scoop, spread, and drizzle—you’ve earned it!
Storage and Enjoyment Tips for Your Pepper Jelly
Now that you’ve crafted your very own jar of vibrant, sweet-and-spicy Pepper Jelly, it’s time to revel in the excitement of enjoying this delightful creation. Just imagine the joy on your friends’ faces as they dip their crackers into that beautiful jewel-toned spread! But before we dive into all the delicious ways to serve it, let’s discuss how to keep that jammy goodness fresh and ready for another round of tastiness.
Storing Leftover Pepper Jelly
When it comes to storing your leftover Pepper Jelly, the key is choosing proper containers that seal tightly to preserve every drop of flavor. It’s best to use glass jars or BPA-free plastic containers, ensuring they are thoroughly cleaned and dried before filling them with your jelly. Store your jars in a cool, dark place—your pantry or refrigerator will work beautifully. If you’ve opted for refrigeration, expect your delightful jelly to stay fresh for up to 10 days. For those of you who may want to extend its shelf life, canning is a fantastic option that can keep it good for 6-10 months! A little pro tip: if you find yourself with leftover jelly in an open container, placing a slice of bread inside can help absorb excess moisture and maintain that perfect consistency. The flavor after storage remains just as intoxicating—slightly mellower yet still bursting with the vibrant notes of pepper and sweetness. When it’s time to enjoy again, simply scoop out what you need and serve cold or at room temperature over a block of cream cheese for an utterly satisfying appetizer.
Freezing Pepper Jelly for Later
If you’re looking to hold onto that magical flavor beyond the pantry life, freezing is an absolute game-changer! To do this properly, make sure your jelly has cooled completely before transferring it into freezer-safe containers or heavy-duty freezer bags. Leave some space at the top since liquids expand when frozen—trust me, this will save you from a messy situation later! Your homemade Pepper Jelly will stay fresh in the freezer for up to 4 months, which makes it perfect for meal prep or unexpected guests. When craving that sweet-and-spicy goodness, simply take out your jar from the freezer and allow it to thaw overnight in the fridge or on your countertop until soft enough to spread. The convenience factor here is off-the-charts; you’ll always have a delicious treat on hand, ready to impress family and friends without any fuss!
Pepper Jelly
Indulge in the vibrant flavors of homemade Pepper Jelly, a delightful blend of sweet and spicy that transforms any gathering into a celebration. This easy-to-make condiment features colorful bell peppers and zesty jalapeños, creating an enticing spread perfect for cheese platters, sandwiches, or as a glaze for grilled meats. With its vivid hues and intoxicating aroma, this jelly not only elevates your appetizers but also brings smiles to family and friends alike. Whether you’re hosting a summer barbecue or enjoying a cozy evening at home, Pepper Jelly is sure to become your go-to recipe.
- Prep Time: 20 minutes
- Cook Time: 25 minutes
- Total Time: 45 minutes
- Yield: Approximately 30 servings 1x
- Category: Condiment
- Method: Mixing
- Cuisine: American
Ingredients
- 1 ½ cups finely diced colorful bell peppers
- 1 lb jalapeños (diced)
- 5 cups granulated sugar
- 1 ¼ cups white or apple cider vinegar
- ¼ cup fresh lime juice
- 1 teaspoon salt
- 3 ounces liquid fruit pectin
Instructions
- Prepare the Peppers: Finely dice the bell peppers and jalapeños. For milder heat, remove seeds from some jalapeños.
- Combine Ingredients: In a large pot, mix diced peppers with sugar, vinegar, lime juice, and salt.
- Cook Mixture: Over medium-high heat, stir frequently until boiling. Maintain boil for about 10 minutes.
- Add Pectin: Gradually stir in liquid fruit pectin and boil for an additional minute before removing from heat.
- Cool & Store: Allow cooling briefly before pouring into sterilized jars. Optionally flip jars upside down for even distribution of peppers.
Nutrition
- Serving Size: 2 tablespoons (30g)
- Calories: 40
- Sugar: 10g
- Sodium: 35mg
- Fat: 0g
- Saturated Fat: 0g
- Unsaturated Fat: 0g
- Trans Fat: 0g
- Carbohydrates: 10g
- Fiber: 0g
- Protein: 0g
- Cholesterol: 0mg