Refrigerator Kosher Dill Pickles (Claussen Copycat)
The joy of making pickles is something that transcends mere cooking; it’s a vibrant dance of flavors and aromas that brings together tradition and innovation, all while creating something utterly delightful. With my Refrigerator Kosher Dill Pickles (Claussen Copycat) recipe, you’re not just crafting a condiment; you’re embarking on a sensory adventure that fills your kitchen with the intoxicating scents of dill and garlic, promising to awaken your taste buds with each crisp bite. These pickles are more than a side dish; they are a testament to patience and love, embodying the spirit of summer garden harvests and family gatherings around the table. So, let’s dive into this culinary endeavor together—I promise it will be rewarding in ways you never expected!
Picture this: a hot summer day, the sun shining bright, and you reach for a jar of these homemade kosher dill pickles. Just as you twist off the lid, a rush of cool air escapes, releasing the tangy aroma that instantly transports you back to your grandmother’s kitchen. The crunch of each pickle slice is satisfying; every bite is bursting with flavor that makes your heart skip a beat. What makes these pickles so extraordinary lies in their simplicity—no fancy canning techniques required! Just fresh ingredients and a little patience result in deliciously crispy refrigerator pickles that can elevate any meal. Trust me when I say this recipe will become one of your go-to staples!
Refrigerator Kosher Dill Pickles (Claussen Copycat): The Perfect Crunch in Every Jar
Welcome to the world of homemade pickling! This recipe is an ode to those iconic Claussen pickles we all know and love, but with a personal touch that makes it uniquely yours. Here, we celebrate the art of preserving cucumbers without any fuss—just fresh produce steeped in a flavorful brine that’s sure to impress family and friends alike.
Ingredients:
As we embark on this delightful culinary journey together, let’s take a moment to appreciate each ingredient that plays an essential role in crafting these Refrigerator Kosher Dill Pickles. Each component has its own story to tell and contributes uniquely to the final product.
- 6 cups water. Water is often taken for granted in cooking, but it serves as the foundation for our brine—the liquid gold that infuses our cucumbers with flavor. Using filtered or spring water can make a difference since impurities from tap water can alter the taste of your pickles. As we combine it with vinegar later on, think about how this blend creates an environment where flavors can meld beautifully.
- 2 cups apple cider vinegar. This tangy component is what gives our pickles their signature kick! Apple cider vinegar not only adds acidity but also brings depth with its subtle sweetness and fruity notes. When selecting vinegar for your brine, opt for high-quality brands without additives—this will ensure you’re getting the best flavor possible.
- ⅓ cup dried minced onion. These little bits do wonders for adding layers of flavor to our pickle brine! As they rehydrate in the liquid, they release sweetness and umami that balance out the acidity from the vinegar. If you’re looking for an alternative, fresh onion can be used—but remember that you’ll want to chop it finely so it integrates well into the brine.
- 6 garlic cloves (finely minced). Garlic lovers rejoice! Freshly minced garlic adds an aromatic punch that’s absolutely non-negotiable here. It’s crucial for creating those robust flavors you’re seeking in these delicious refrigerator dill pickles. If you’re feeling adventurous, try roasting some garlic first—it’ll give your brine an entirely different dimension!
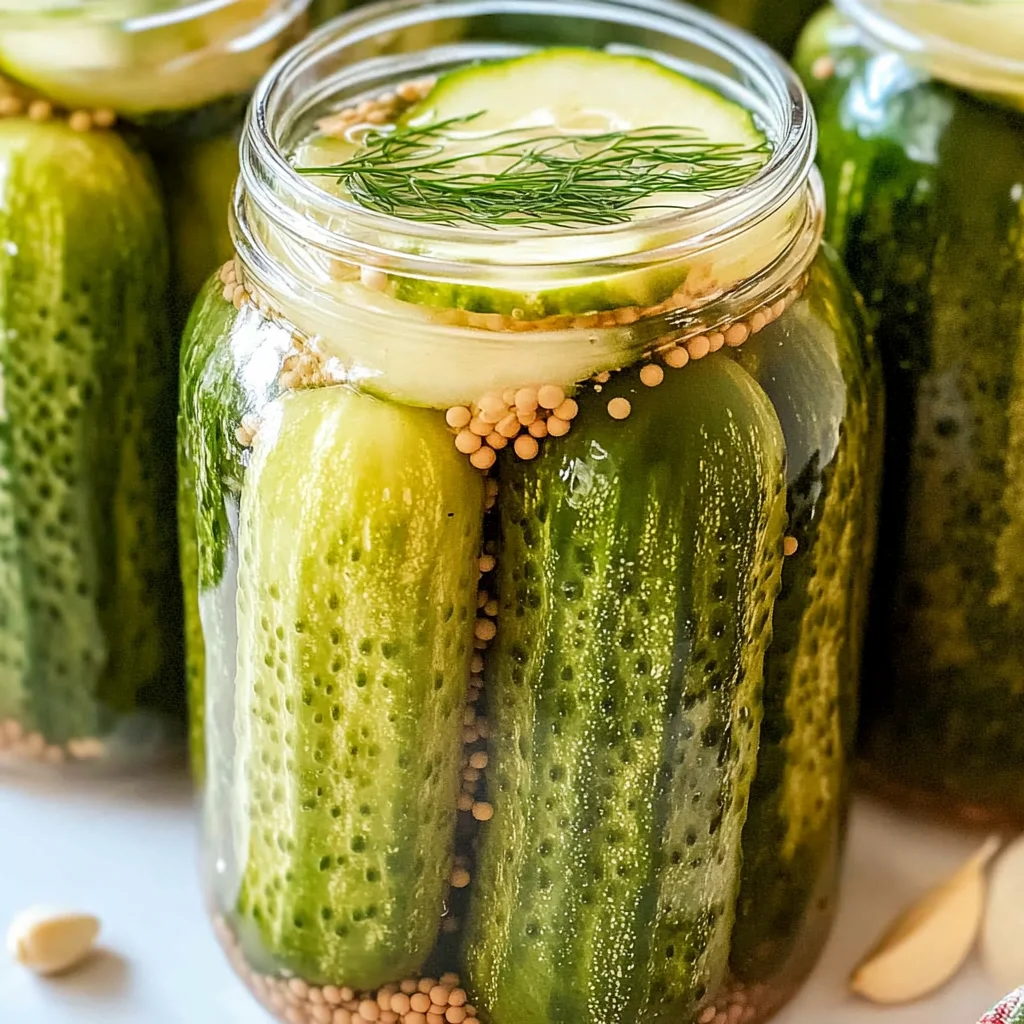
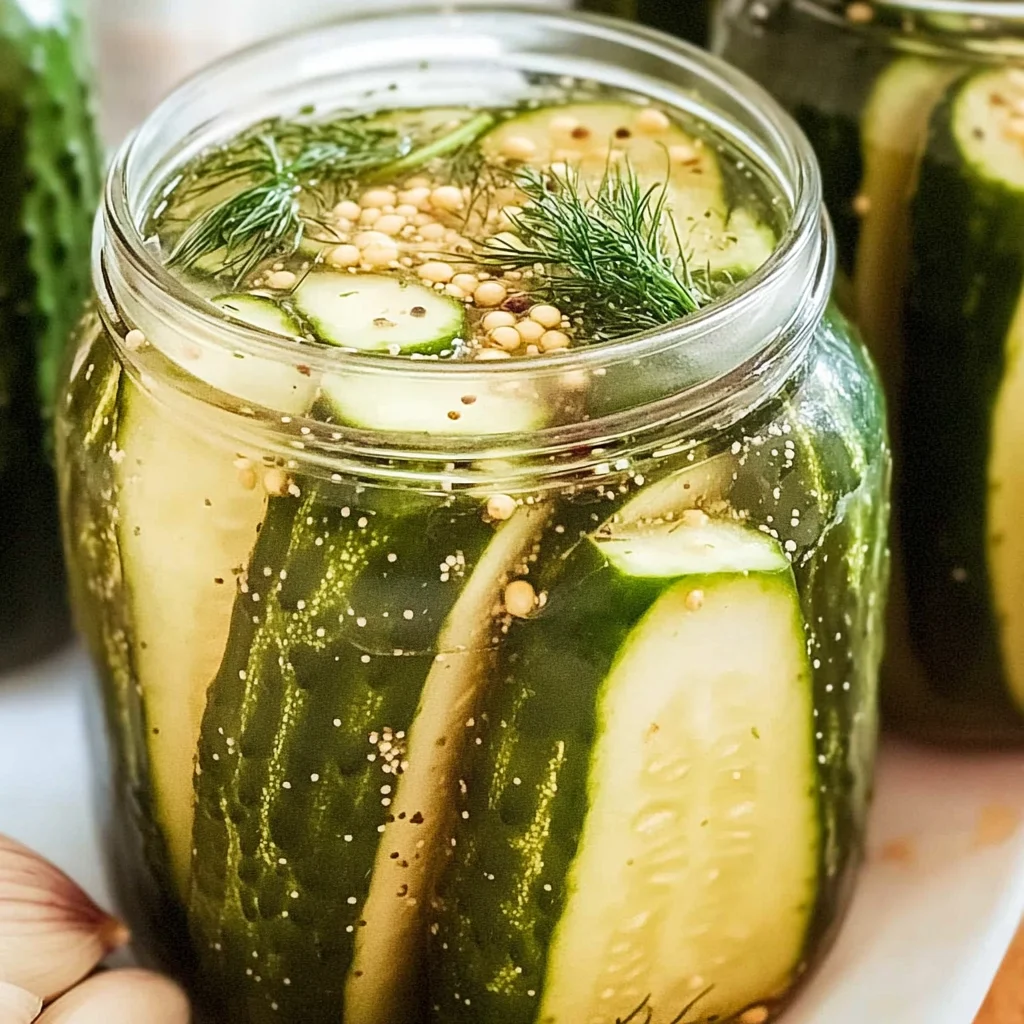
- 1 ½ teaspoons yellow mustard seed. This small yet mighty seed packs a punch! Mustard seeds bring warmth and complexity to your pickles with their subtle spiciness when infused in the brine. They also contribute visual appeal as they float among the cucumbers—a charming reminder of what’s inside.
- ⅓ cup canning salt. We’re using canning salt here because it dissolves easily without leaving any residue like regular table salt might do. This step is crucial to ensure our brine remains crystal clear rather than cloudy—a visual cue that signals freshness! If canning salt isn’t available, kosher salt works too; just be sure it’s pure without additives.
- 6 heads fresh dill (or 4 ½ teaspoons dried dill seed). Fresh dill gives our pickles that quintessential taste we associate with classic kosher dills! While fresh is always best for flavor intensity, dried dill works fine if you can’t find fresh—just keep in mind that its potency differs slightly due to drying processes.
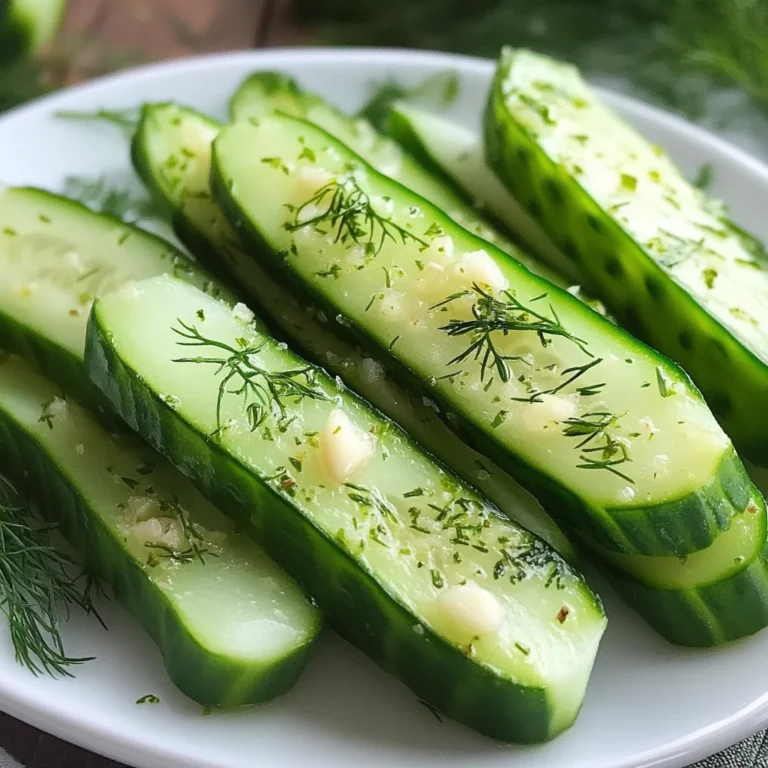
- About 18 pickling cucumbers. Choose small cucumbers—those perfect specimens known as Kirby or Persian cucumbers are particularly ideal because they maintain their crunch even after sitting in brine! Look for cucumbers free from blemishes or soft spots; they should feel firm to the touch. Remember, well-chosen cucumbers lay the groundwork for creating those satisfying bites!
Equipment You’ll Need:
Now let’s talk about our trusty equipment—the unsung heroes behind every successful pickle-making session! Having the right tools at hand not only makes this process easier but also ensures consistent results each time you embark on this culinary adventure.
- Wide-mouth quart canning jars – These jars are essential partners in preserving our delicious creations! Their wide mouth allows easy packing of cucumber slices and makes cleaning up afterward a breeze. Plus, being able to see those vibrant green spears through glass adds an aesthetic charm while they marinate away.
- Canning jar lifter – Trust me on this: having one of these tools will save you from potential burns when removing hot jars from boiling water during sterilization! It offers stability and grip as you maneuver them safely without risking spills or splashes.
- Large saucepan – For boiling our brine ingredients together efficiently before cooling them down—this pot should be big enough so everything fits comfortably without boiling over!
- Kitchen towel – A simple yet indispensable item when sterilizing jars; laying them upside down helps absorb excess moisture while allowing air circulation around them as they cool down.
Now that we’ve gathered all our ingredients and equipment, let’s move on to preparing these delightful Refrigerator Kosher Dill Pickles!
Step 1: Crafting Your Flavorful Brine
In a large saucepan over medium-high heat, combine 6 cups of water with 2 cups of apple cider vinegar along with dried minced onion, minced garlic cloves, mustard seed, canning salt, and dill seed if you’re using dried ones instead of fresh heads—creating what will soon become your magical elixir! Bring this mixture to a rapid boil while stirring occasionally until all salts have dissolved entirely—this step is essential because undissolved salt could lead to uneven seasoning later on. Once bubbling vigorously for about five minutes or so (you want it hot enough), remove from heat and allow cooling at room temperature before moving forward—it needs time to develop those wonderful flavors!
Step 2: Sterilizing Your Jars
While waiting for your fragrant brine concoction’s temperature drop down into “cool” territory (trust me—it’ll smell divine!), prepare six wide-mouth quart canning jars by washing them thoroughly under hot soapy water along with their lids/rings too—cleanliness is vital here since any bacteria left behind could compromise shelf life later down road! After rinsing well under warm running water till no suds are left behind—you’ll need sterilization next: place washed jars upright inside another large pot filled just enough water covering them completely before bringing everything back up onto stove heat until boiling point reached once again—let boil away happily for approximately ten minutes ensuring proper sanitation happens before gently lifting hot jars out using handy lifter tool onto clean kitchen towel laid flat nearby upside down letting cool off completely before proceeding onward—you want all moisture gone before adding delicious contents inside!
Step 3: Prepping Your Cucumbers
Now comes one of my favorite parts—the cucumbers themselves! Grab those lovely fresh specimens straight from market or garden bounty; rinse each one gently under cool running water while paying close attention removing any dirt clinging stubbornly onto skin surfaces—you want bright green beauties shining brightly when placed within jars later on! Next up? Carefully cut off about 1/16 inch slice from blossom end (the end opposite where stem attaches)—this helps preserve crispness during marination process preventing potential mushiness caused by enzymes lurking there otherwise—and finally slice them lengthwise either into halves or quarters based upon size preference ensuring uniformity amongst pieces which contributes overall texture experience enjoyed once opened & served alongside sandwiches at summertime picnics!
Step 4: Packing Those Flavors In!
Here comes where things start coming alive visually: grab those sterile jars now standing tall & proud awaiting their glorious contents—we’ll begin by adding one headful each freshly picked dill (if using) per jar followed immediately by packing cucumber slices tightly inside next layer-wise till filled almost completely full leaving just enough room at top remaining empty awaiting arrival flavorful cooled brine mixture poured over everything ensuring every corner gets coated evenly throughout—that’s key here folks ‘cause who wants bland bites? Gently press down lightly whilst filling up making sure no air pockets remain trapped below surface level either which could affect taste profile negatively later too—once done wipe rims clean dampened paper towel ensuring nothing obstructs proper sealing afterwards when lids applied tightly shut…
And there we have it—a magical journey into creating Refrigerator Kosher Dill Pickles (Claussen Copycat)! Stay tuned as we continue exploring more steps together towards achieving perfection through careful preservation methods designed specifically enhance every bite enjoyed long after initial creation takes place…
Step 5: The Perfect Packing of Flavors
Now that your jars are sterilized and ready for action, it’s time to turn our attention to the cucumbers—those crunchy, delightful vessels of flavor that will become the stars of your Refrigerator Kosher Dill Pickles. Begin by taking a moment to wash your pickling cucumbers in cool water, ensuring that any stubborn bits of dirt are removed from their skin. This step may seem trivial, but trust me, cleanliness is absolutely paramount when it comes to preserving. Any remnants can lead to unwanted flavors or even spoilage. After giving them a good rinse, carefully slice off a thin (about 1/16 inch) piece from the blossom end of each cucumber. This is crucial because it helps prevent bitterness and allows the brine to penetrate more easily.
Next, you’ll want to slice those cucumbers into halves or quarters. The choice here is yours—thicker spears will have a delightful crunch while thinner slices may be perfect for sandwiches and burgers. As you pack the cucumber pieces into each sterilized jar, don’t rush; think of this as an art form! Gently place one head of dill into each jar before packing them tightly with the cucumber wedges. The aim is to create a beautiful arrangement while ensuring there’s enough room for the brine to flow freely around every piece. By doing this, you’re allowing all those intoxicating flavors from the garlic and spices to envelop every bite, creating that symphony of flavors we long for in a perfect pickle!
Step 6: The Brine Bath – A Soothing Transformation
With your jars packed beautifully with cucumbers and dill, it’s time for the grand entrance of our cooled brine mixture! This brine isn’t just any liquid—it’s a mixture of apple cider vinegar and spices that will work its magic on those crunchy cucumbers. Carefully pour the cooled brine over the packed cucumbers in each jar until they are completely submerged; this ensures that every last piece soaks up all those delicious flavors. You want the cucumbers to be fully covered because anything sticking out might not pickle properly, leading to uneven flavor profiles—and we certainly don’t want that!
As you pour, keep an eye on how the brine settles around the cucumbers. If you notice any air bubbles trapped between them, give each jar a gentle tap on your countertop; this helps release those pesky bubbles and ensures an even distribution throughout your jars. Once you’re satisfied that all cucumbers are nestled comfortably under their flavorful bath, it’s time for an essential finishing touch: wiping down the rims of each jar with a dampened paper towel. This step might seem small but trust me—it’s vital! It clears any residue that could interfere with sealing later on.
Step 7: Sealing in Freshness
Now comes one of my favorite parts—sealing these jars up like little treasure chests! With your jars filled and rims cleaned, it’s time to apply those two-piece canning lids you’ve set aside earlier. Place each lid gently onto the jars without forcing them down too tightly; instead, turn them just until you feel slight resistance. This isn’t just about securing the lid; it’s about allowing enough space for any gases produced during fermentation to escape—a crucial aspect of creating perfectly preserved pickles!
Once you’ve sealed all your jars snugly yet gently, it’s time for patience—yes, I said it! Allow these beauties to sit at room temperature for three glorious days. Yes, three days may feel like an eternity when you’re excited about what’s coming next (believe me—I’ve been there!), but here’s why this step is non-negotiable: during these days at room temperature, magic happens! The flavors meld together beautifully as they infuse into those crisp cucumber spears while developing that tangy goodness we’re all craving.
Step 8: The Chilling Final Touch
After three days filled with anticipation and perhaps even a bit of shaking or turning every now and then (which helps distribute all those lovely seasonings), it’s time for what I call “the chilling phase.” This is where we take our refrigerator kosher dill pickles from tasty to utterly extraordinary! Carefully transfer your jars into the fridge; this cool environment halts any further fermentation while helping develop even more complex flavors during storage.
The chilling process typically lasts at least overnight but ideally should be given at least 48 hours before diving in; yes, I know waiting can be tough! However, trust me on this—the transformation that occurs during this time is absolutely worth it! The cold environment allows every ingredient—the garlic’s aromatic pungency, the brightness from dill—to harmonize beautifully with each crunchy bite you take later on. When you’re finally ready to enjoy these delightful treats after they’ve had their proper rest in the fridge, you’ll be greeted with crispness paired with a balance of tartness and spice that’s simply irresistible.
Next Major Phase – Enjoying Your Refrigerator Kosher Dill Pickles (Claussen Copycat)
Now that you’ve completed all these steps with love and care—what comes next? It’s time to relish every bite of your homemade refrigerator kosher dill pickles! Whether you’re enjoying them straight out of the jar as a snack or pairing them up with sandwiches or salads at dinner parties or family gatherings—you’ve created something truly special here.
Step 9: Savoring Every Last Crunch
When you’re ready to dig in (and trust me—you will be!), simply open one of those gleaming jars and prepare yourself for a taste sensation unlike anything store-bought can offer! As you take your first crunchy bite, close your eyes for just a moment—let those flavors dance across your palate! Each pickle promises not only satisfaction but also memories made in your kitchen while preparing them.
And here’s my little insider tip: don’t forget about using leftover brine! It’s an absolutely delicious addition to dressings or marinades—it truly embodies everything we love about pickling without wasting anything! So go ahead; enjoy sharing these delightful Refrigerator Kosher Dill Pickles (Claussen Copycat) with friends and family—they’ll appreciate both your culinary skills and dedication to creating something so profoundly satisfying right from home!
Storage and Enjoyment Tips for Your Refrigerator Kosher Dill Pickles (Claussen Copycat)
Now that you’ve crafted these delicious, crispy Refrigerator Kosher Dill Pickles that rival the famous Claussen brand, it’s time to dive into the exciting world of enjoying and preserving your newfound treasure! Picture this: a jar brimming with vibrant pickles, each one a little crisp beacon of flavor just waiting to be unleashed. Trust me when I say, the moment you pop that lid open and hear the satisfying “pop,” you’re welcoming a cascade of memories—summer picnics, backyard barbecues, or cozy family gatherings. So let’s ensure those delightful pickles stay fresh and crunchy for as long as possible!
Storing Leftover Refrigerator Kosher Dill Pickles (Claussen Copycat)
When it comes to storing your leftover Refrigerator Kosher Dill Pickles, choose a glass jar with a tight-sealing lid—this helps lock in that incredible flavor while keeping air out. You can keep them in the refrigerator for up to six months, which is absolutely fantastic considering how quickly they’ll disappear at your next gathering! To maintain their crispness, I recommend placing a slice of bread in the jar; this non-negotiable tip helps absorb any excess moisture that could make your pickles soggy over time. After a few days in the fridge, you’ll find these pickles tasting even better as they soak up all those aromatic brine flavors—each bite becomes a symphony of garlic, dill, and tangy goodness! When ready to serve them again, simply pull them straight from the fridge; they’re perfect alongside sandwiches or on their own as a refreshing snack.
Freezing Components for Later
Although it’s not common to freeze pickles due to their high water content—which can lead to mushiness—I want to share an awesome trick! If you find yourself with an excess of cucumbers before preparing your pickling brine, consider slicing them into spears or rounds and freezing them in airtight containers or freezer bags. They can last up to three months in the freezer! The beauty here is that when you’re ready to whip up another batch of pickles or add them into salads or stir-fries, you can simply thaw them out without any fuss. This handy method ensures you never waste fresh cucumbers while giving you the convenience of having ingredients ready at your fingertips whenever inspiration strikes.
So whether you’re savoring those pickles right away or tucking some away for future delights, I promise you’ll find joy in every crispy bite!
Refrigerator Kosher Dill Pickles (Claussen Copycat)
Experience the delightful crunch of homemade Refrigerator Kosher Dill Pickles that capture the essence of summer in every jar. This easy recipe is a tribute to the beloved Claussen pickles, combining fresh cucumbers with a zesty brine made from apple cider vinegar, garlic, and aromatic dill. Ideal for snacking, adding to sandwiches, or complementing your favorite dishes, these pickles promise to elevate any meal with their vibrant flavor and satisfying texture. With no complicated canning required, you can enjoy this refreshing treat straight from your fridge in just a few days. Let’s embark on this flavorful journey together!
- Prep Time: 20 minutes
- Cook Time: 10 minutes
- Total Time: 30 minutes
- Yield: Approximately 18 servings 1x
- Category: Side Dish
- Method: Pickling
- Cuisine: American
Ingredients
- 6 cups water
- 2 cups apple cider vinegar
- ⅓ cup dried minced onion
- 6 garlic cloves (finely minced)
- 1 ½ teaspoons yellow mustard seed
- ⅓ cup canning salt
- 6 heads fresh dill (or 4 ½ teaspoons dried dill seed)
- About 18 pickling cucumbers
Instructions
- In a large saucepan over medium-high heat, combine water and apple cider vinegar with dried minced onion, minced garlic, mustard seed, canning salt, and dill seed. Bring to a boil while stirring until salt dissolves.
- Remove from heat and let cool to room temperature.
- Sterilize wide-mouth quart jars by boiling them in water for about ten minutes.
- Rinse cucumbers under cool water; slice off ends and cut into halves or quarters.
- Pack jars with one head of dill each and tightly fill with cucumber slices.
- Pour cooled brine over cucumbers until fully submerged. Wipe jar rims clean before sealing with lids.
- Allow jars to sit at room temperature for three days before transferring to the refrigerator for at least 48 hours before enjoying.
Nutrition
- Serving Size: 1 pickle slice (30g)
- Calories: 9
- Sugar: 0g
- Sodium: 280mg
- Fat: 0g
- Saturated Fat: 0g
- Unsaturated Fat: 0g
- Trans Fat: 0g
- Carbohydrates: 2g
- Fiber: 0g
- Protein: <1g
- Cholesterol: 0mg