Loaded Jalapeño Popper Deviled Eggs with Turkey Bacon
There’s something deeply comforting about deviled eggs, isn’t there? They evoke memories of family gatherings, picnics in the sun, and laughter shared around a table. But when you add a twist—like crispy bacon, zesty jalapeños, and creamy cheese—the experience transforms from nostalgic to utterly sensational. My friends, I present to you my Loaded Jalapeño Popper Deviled Eggs with Bacon—a dish that is not just an appetizer but a celebration on a plate. Imagine biting into a perfectly cooked egg white, filled to the brim with a lush filling that dances between smoky, spicy, and cheesy flavors; it’s truly more than just food—it’s an experience that brings people together.
These deviled eggs are perfect for any occasion—from game days to potlucks, or even just a cozy night in. The combination of crispy bacon and fresh jalapeños infuses each bite with excitement and flavor. And trust me when I say they will vanish faster than you can say “deviled eggs.” So when you’re looking for something that not only satisfies the palate but also sparks joy in the hearts of your loved ones, this recipe is your answer. Let’s dive into this culinary journey together!
Loaded Jalapeño Popper Deviled Eggs with Turkey Bacon: A Spicy Twist on a Classic
I’m so excited to share this recipe with you! It takes the classic deviled egg and elevates it to new heights with bold flavors and textures. Each bite is creamy yet crunchy, savory yet slightly spicy—just downright delicious. The beauty of this dish lies in its simplicity while still making a statement at any gathering. Let’s embark on this culinary adventure together!
Ingredients:
As we gather our ingredients for the Loaded Jalapeño Popper Deviled Eggs with Bacon, think of each component as an essential note in our flavorful symphony. Together, they create magic that will leave your guests singing praises.
- 12 large eggs. The foundation of any deviled egg recipe is undeniably the humble egg. Choosing large eggs ensures that you have enough filling to create those generous portions we all crave. When selecting your eggs, look for ones with clean shells—this often indicates freshness—and consider organic options if possible; they tend to have richer flavor profiles. Remember to bring these beauties to room temperature before boiling them for an even cooking experience.
- Water (for boiling). While it may seem basic, the quality of water impacts your cooking process significantly. Use filtered or clean tap water to boil your eggs; impurities can affect both taste and texture. The amount of water should be enough to submerge the eggs by at least an inch; this ensures even cooking without risk of cracking.
- Ice (for ice bath). An ice bath is absolutely paramount after boiling your eggs! It halts the cooking process immediately, preventing overcooking and ensuring that those bright yellow yolks remain vibrant and creamy rather than grayish-green around the edges—a visual cue for perfectly cooked eggs! Plus, it makes peeling much easier!
- 4 oz cream cheese, softened. This ingredient brings a velvety richness that elevates our filling from good to extraordinary! Softening cream cheese allows it to blend smoothly into our mixture without lumps—trust me; nobody wants a chunky filling here! Look for full-fat versions for maximum creaminess; they’ll give you that luxurious mouthfeel we all adore.
- 1/4 cup mayonnaise. Ahh, mayonnaise—the unsung hero of many creamy dishes! It adds moisture and richness while helping bind our filling together seamlessly. You could opt for homemade mayo if you’re feeling adventurous; however, store-bought works beautifully too! Just ensure it’s high-quality because its flavor will shine through.
- 2 tsp Dijon mustard. This tangy treasure adds depth and complexity that brightens up our filling wonderfully! Dijon mustard has a subtle heat that complements the other ingredients beautifully without overpowering them; it brings everything together like harmony in music.
- 1/2 cup shredded sharp cheddar cheese. Cheese lovers rejoice—sharp cheddar adds not only flavor but also texture! Its boldness stands out against the creaminess of our filling. When picking cheddar cheese, look for aged varieties—they offer more intense flavors compared to their milder counterparts.
- 2–3 tbsp finely diced fresh jalapeño (seeds removed for less heat). Fresh jalapeños inject zestiness and warmth into our deviled eggs without being too overwhelming if seeds are removed beforehand—as we want balance here! Choose firm peppers with shiny skins; dull ones might be past their prime. If you enjoy some extra heat? Feel free to leave some seeds in!
- 1/4 tsp garlic powder. Garlic powder provides subtle umami notes that amplify flavors throughout our dish without introducing raw garlic’s overpowering bite—it’s about finesse here!
- Salt and black pepper to taste (start with 1/4 tsp each). Seasoning is everything! Salt enhances all flavors while black pepper adds warmth; always taste as you go along because every palate differs!
- 6 slices thick-cut bacon, cooked crispy and crumbled. Oh bacon…the ultimate indulgence! Its crunchiness contrasts beautifully against soft yolks while infusing smoky goodness throughout each bite! Thick-cut bacon holds up better during cooking—a must-have here!
- 2 tbsp chopped fresh chives or green onion. Bright green chives provide color and freshness—think of them as little bursts of spring on your plate! Their mild onion flavor complements everything perfectly without dominating.
- Extra diced jalapeño or paprika (optional, for garnish). Garnishes are not just decoration—they elevate presentation dramatically! A sprinkle of paprika adds color contrast; diced jalapeño offers another layer of spice!
Equipment You’ll Need:
Having the right tools at hand makes preparing our Loaded Jalapeño Popper Deviled Eggs with Bacon so much smoother—and believe me when I say it contributes significantly towards achieving culinary bliss! Let’s gather everything we need:
- Large saucepan – This trusty companion is where you’ll boil your eggs to perfection. Ensure it has enough capacity so that all eggs fit comfortably without being cramped—this promotes even cooking throughout.
- Mixing bowl – A medium-sized mixing bowl will serve as the home for mashing those yolks into creamy goodness before adding other ingredients—it’s vital for achieving that smooth consistency we’re after!
- Potato masher or fork – Either tool works wonders in breaking down yolks into fine pieces before mixing them with cream cheese and others—it really helps create a harmonious texture!
- Spoon or piping bag – For transferring your luscious filling back into those egg whites effortlessly—you can use either option depending on how fancy you’re feeling today!
With all these essentials ready at hand alongside our delicious ingredients…let’s move forward into creating these delightful treats together!
Preparing the Loaded Jalapeño Popper Deviled Eggs with Bacon
Step 1: Boiling Our Precious Eggs
First things first: let’s get those eggs boiling! Place them gently in a single layer within your large saucepan—you don’t want overcrowding here as it can lead to uneven cooking or cracks during boiling (not ideal!). Now cover them generously with water until they’re submerged by about an inch; this ensures they cook evenly and thoroughly throughout their journey in hot water. Bring this lovely pot over medium-high heat until it reaches a rolling boil—oh yes, listen closely as those bubbles start dancing across the surface! Once it starts bubbling away vigorously like excitement bubbling inside us all, cover immediately with a lid and remove from heat altogether—this part is crucial because residual heat will continue cooking them perfectly through passive steam action over twelve minutes.
Step 2: Cooling Off
After twelve long minutes filled with anticipation (and maybe some kitchen dancing!), it’s time for an ice bath—a non-negotiable step if you want easy peeling later on! Carefully transfer your boiled beauties straight from their steamy sauna into an ice-water bath using tongs or slotted spoon; let them luxuriate there for at least ten minutes until they’ve completely cooled down—this halts further cooking instantly while allowing their shells to loosen up nicely during peeling time later on.
Step 3: Egg Prep Time
Once cooled off sufficiently (you’ll know they’re ready once they feel cool against your skin), gently tap each egg on counter surfaces using palms—not too hard though—to crack open shells evenly without breaking whites underneath too harshly—that would be tragic indeed! Then peel under running water—the motion helps wash away any stubborn bits adhering onto surfaces giving us nice clean shells ready for slicing in half lengthwise carefully—we want those beautiful yolks intact once popped out!
Step 4: Creating Our Filling Magic
Now comes my favorite part: transforming yolks into something magical! Place all yolks gathered lovingly inside mixing bowl where they’ll be mashed until fine using either fork or potato masher—you want smoothness here folks because nobody likes lumpy fillings ruining their bites later on down road trust me—I’ve been there myself before… Add softened cream cheese next followed closely by mayonnaise then Dijon mustard along sharp cheddar cheese & diced jalapeño pieces along garlic powder salt & pepper seasoning mix well until creamy perfection emerges before tasting again adjusting seasonings accordingly until satisfied fully before moving forward proudly knowing what awaits next awaits us ahead…
Let’s keep going strong together—I promise we’re almost there…
Step 5: Filling Those Egg Whites with Love
Now comes the exciting part where we get to fill those beautiful egg whites with our creamy, dreamy filling. Take a moment to appreciate the gorgeous yolk mixture you’ve just created; it’s a rich, velvety shade of yellow that’s practically begging to be scooped up. You can either use a spoon or, if you’re feeling fancy and want to impress your guests, grab a piping bag. Trust me on this—piping the mixture not only looks stunning but also allows you to control the amount of filling in each egg white beautifully. If you don’t have a piping bag, no worries! Snipping off the corner of a plastic sandwich bag works just as well.
As you fill each egg white, aim for generous portions; after all, these are Loaded Jalapeño Popper Deviled Eggs with Bacon, and they deserve all the love! You want them to be overflowing slightly, creating that mouthwatering visual that will have everyone reaching for one. And here’s an important tip: don’t rush this step. Taking your time allows you to ensure each egg is filled perfectly and uniformly. A little extra care here goes a long way in creating something truly extraordinary.
Step 6: The Art of Garnishing
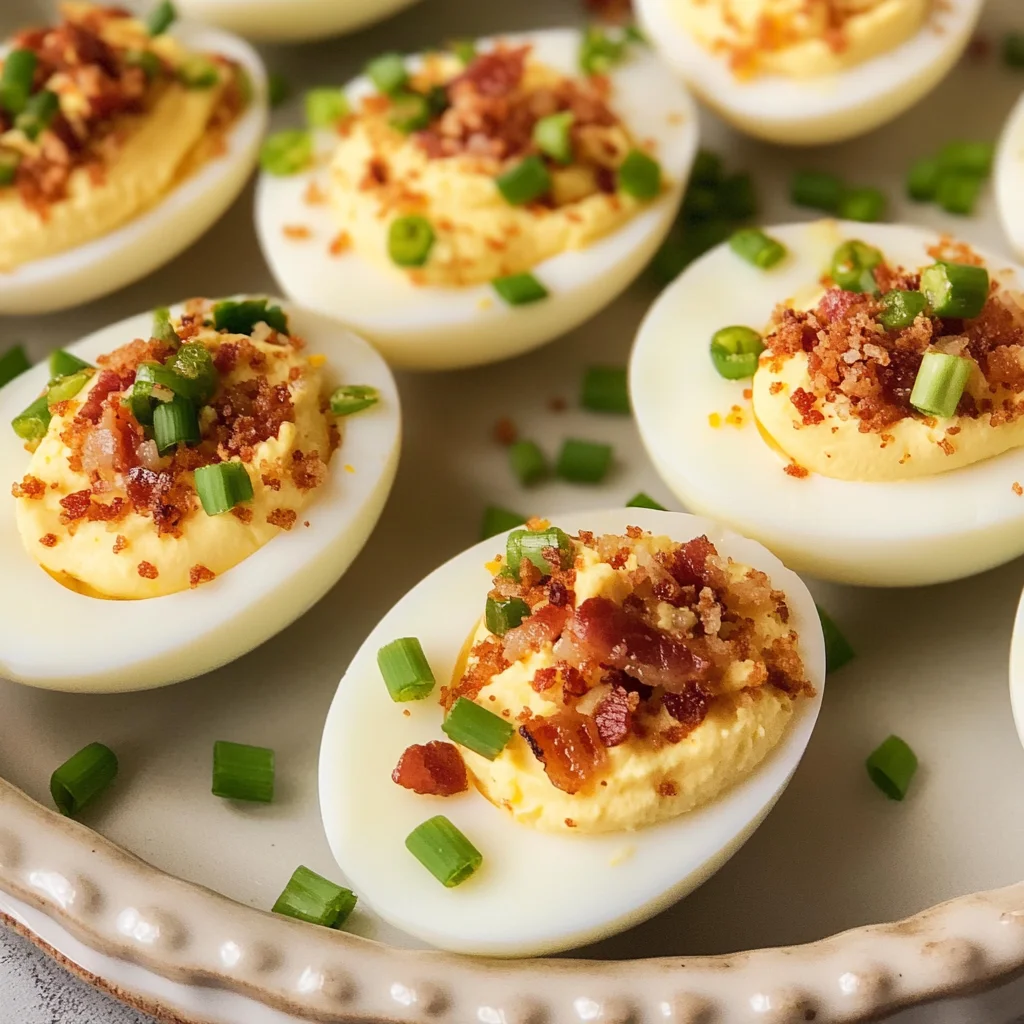
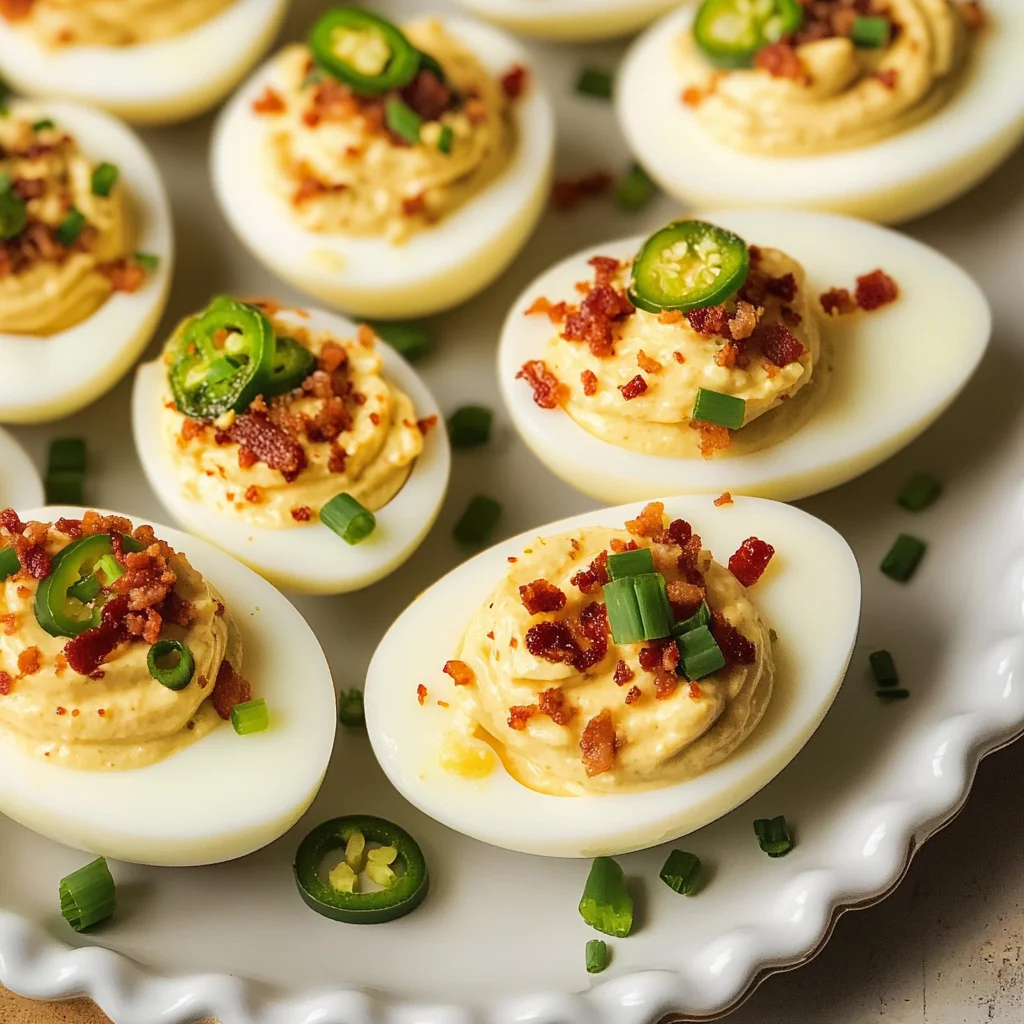
With your eggs beautifully filled, the next step is where creativity flourishes: garnishing! This is your chance to really make these deviled eggs shine and showcase their loaded nature. Start by sprinkling crumbled crispy bacon over each one—it adds not only flavor but also a delightful crunch that contrasts beautifully with the creaminess of the filling. When selecting your bacon, consider thick-cut for that perfect balance of chew and crispiness; I promise you it makes all the difference.
Now let’s elevate those flavors even further with some fresh chives or chopped green onions. This adds a pop of color and an aromatic freshness that cuts through the richness beautifully. If you’re feeling adventurous (and I always encourage a little adventure in cooking!), sprinkle some extra diced jalapeños on top for an added kick or a dash of paprika for a hint of smokiness. Just imagine how all these layers come together visually—a symphony of colors and textures that beckons your guests to dig in!
Step 7: The Essential Chill
This step might seem simple, but let me tell you—it’s absolutely crucial for getting those flavors just right! After you’ve garnished your deviled eggs, it’s time for them to take a little rest in the fridge for at least 30 minutes before serving. This chilling period is not just about making sure they’re nice and cold when enjoyed; it allows all those incredible flavors to meld together into something profoundly satisfying.
During this time in the fridge, think about what’s happening: the cool temperature helps firm up the filling so each bite has just the right amount of creamy texture without being too soft or runny. Additionally, allowing them to sit means every ingredient gets its moment to shine—like friends coming together at a party! You’ll notice that after chilling, the flavors deepen beautifully; trust me on this one—your patience will be rewarded when everyone takes their first bite and sings praises!
Step 8: Serving Your Loaded Jalapeño Popper Deviled Eggs with Bacon
Finally! The moment we’ve been waiting for has arrived—it’s time to serve your stunningly delicious Loaded Jalapeño Popper Deviled Eggs with Bacon. Carefully remove them from the refrigerator and place them on your most beautiful serving platter or board; presentation matters immensely here because we eat with our eyes first! Consider arranging them in a circle or in rows for an eye-catching display that draws guests in like moths to a flame.
Before diving in, take another moment to give everything one final sprinkle—a touch more bacon if you’re feeling indulgent or perhaps another dash of paprika for color contrast. As your guests gather around excitedly anticipating their first taste, remind them (and yourself) about how much love and care went into making these little bites of joy. This isn’t just food; it’s an experience woven into cherished memories shared among family and friends.
Final Thoughts on Your Culinary Creation
And there you have it! You’ve crafted a stellar appetizer that is not only visually appealing but also bursting with flavor—truly everything you could hope for in Loaded Jalapeño Popper Deviled Eggs with Bacon. Whether it’s game day, potluck gatherings, or simply enjoying good company at home, these delectable bites are sure to steal the show every single time.
Remember that cooking is about sharing moments and stories as much as it is about feeding ourselves; so don’t forget to relish every bite alongside your loved ones while basking in compliments galore! Keep this recipe close because I promise you’ll want to make it again—and again—each time sharing just as much joy as the last! Happy cooking!
Storage and Enjoyment Tips for Your Loaded Jalapeño Popper Deviled Eggs with Bacon
Now that you’ve created these delightful Loaded Jalapeño Popper Deviled Eggs with Bacon, I can hardly wait for you to dig in! Picture this: a platter of creamy, cheesy goodness, each bite bursting with sharp cheddar and the perfect kick of jalapeño, topped with crispy bacon. These eggs are not just an appetizer; they’re a celebration of flavors that will have everyone coming back for more. And if by some stroke of luck you have leftovers (though I doubt it!), let’s talk about how to store them so you can enjoy that magic all over again.
Storing Leftover Loaded Jalapeño Popper Deviled Eggs with Bacon
To keep your scrumptious deviled eggs fresh and delicious, it’s important to store them correctly. I recommend using an airtight container – this is crucial for maintaining their creamy texture and vibrant flavors. Simply layer the deviled eggs in the container, separated by parchment paper if needed, to prevent them from sticking together. When stored properly, they’ll last up to 3 days in the refrigerator. Trust me on this: they still taste utterly divine after chilling! If you want to preserve that delightful crunch from the bacon, consider adding a slice of bread into the container; it helps absorb moisture and keeps things crispier for longer. When you’re ready to enjoy them again, simply pull them from the fridge and load up your plate – no reheating necessary so you can savor every chilled bite!
Freezing the Filling for Later
If you find yourself wanting to prepare ahead of time or have a batch ready for spontaneous gatherings, freezing the filling is a fantastic option! To do this, simply prepare your yolk mixture as per the recipe instructions but hold off on filling the egg whites. Transfer the filling into a freezer-safe bag or container, removing as much air as possible to prevent freezer burn. It will keep well in the freezer for about 2 months! When you’re ready to whip up a quick appetizer, thaw it overnight in the refrigerator before piping it back into your egg whites. This method is not only a time-saver but also ensures you always have an impressive dish at hand for any occasion! Imagine pulling out that creamy filling from your freezer on game day—what a convenience!
Loaded Jalapeño Popper Deviled Eggs with Turkey

Indulge in a flavor-packed twist on a classic favorite with these Loaded Jalapeño Popper Deviled Eggs. Perfect for gatherings or cozy nights in, these deviled eggs are creamy and crunchy, featuring a delightful blend of sharp cheddar cheese, zesty jalapeños, and crispy turkey bacon. Each bite bursts with smoky, spicy goodness that will have your guests raving. Not only are they visually appealing, but the combination of textures and flavors creates an unforgettable culinary experience. Elevate your appetizer game with this easy-to-follow recipe that’s sure to become a staple at your table!
- Prep Time: 15 minutes
- Cook Time: 12 minutes
- Total Time: 27 minutes
- Yield: Makes approximately 24 deviled eggs (12 servings) 1x
- Category: Appetizer
- Method: Boiling
- Cuisine: American
Ingredients
- 12 large eggs
- Water (for boiling)
- Ice (for ice bath)
- 4 oz cream cheese, softened
- 1/4 cup mayonnaise
- 2 tsp Dijon mustard
- 1/2 cup shredded sharp cheddar cheese
- 2–3 tbsp finely diced fresh jalapeño (seeds removed)
- 2–3 slices turkey bacon, cooked crispy and crumbled
- 1/4 tsp garlic powder
- Salt and black pepper to taste
- 2 tbsp chopped fresh chives or green onion
- Extra diced jalapeño or paprika (optional, for garnish)
Instructions
- Boil the eggs: Place eggs in a large saucepan, cover with water, and bring to a boil. Once boiling, cover and remove from heat. Let sit for 12 minutes.
- Cool the eggs: Transfer boiled eggs to an ice bath for at least 10 minutes.
- Prepare the filling: Peel the cooled eggs and slice them in half lengthwise. Remove yolks and place them in a mixing bowl. Mash yolks with cream cheese, mayonnaise, Dijon mustard, cheddar cheese, jalapeños, garlic powder, salt, and pepper until smooth.
- Fill the egg whites: Spoon or pipe the yolk mixture back into the egg whites generously.
- Garnish: Top with crumbled turkey bacon and chopped chives for added flavor and presentation.
- Chill before serving: Refrigerate filled eggs for at least 30 minutes to meld flavors.
Nutrition
- Serving Size: 1 deviled egg (approximately 30g)
- Calories: 86
- Sugar: 0g
- Sodium: 125mg
- Fat: 6g
- Saturated Fat: 2g
- Unsaturated Fat: 4g
- Trans Fat: 0g
- Carbohydrates: 1g
- Fiber: <1g
- Protein: 6g
- Cholesterol: 186mg