Chocolate Cherry Upside Down Cake
There’s something utterly enchanting about a Chocolate Cherry Upside Down Cake that transcends the mere act of baking. It’s not just about mixing ingredients or following a recipe; it’s about creating a warm, inviting experience that fills your kitchen with the rich aroma of cocoa and sweet cherries. Picture this: as the cake bakes, the luscious cherries bubble with their juices, caramelizing into a sweet, sticky layer that will eventually crown your masterpiece. This cake isn’t just dessert; it’s a hug on a plate, capable of brightening even the dreariest of weeknights, reminding us how food can be both comforting and joyful. I promise you, when you flip this beauty out of the pan to reveal its vibrant cherry topping, you’ll feel like an artist unveiling a work of art—a true celebration of flavors that intertwine beautifully.
Now, why is this particular cake so special? Beyond its deliciousness lies a beautiful blend of textures and tastes. The luscious cherries provide a burst of tartness that balances perfectly with the deep richness of chocolate. It’s this contrast that makes every bite a profound experience—a delightful harmony between sweet and slightly tangy, soft and chewy. Whether you’re sharing it with friends over coffee or enjoying a quiet slice at home after a long day, this Chocolate Cherry Upside Down Cake is more than just an indulgence; it’s an invitation to pause, savor, and reconnect with the simple pleasures in life. So grab your apron and let’s embark on this delicious adventure together!
Chocolate Cherry Upside Down Cake: A Sweet Symphony of Flavors
This Chocolate Cherry Upside Down Cake is not just quick and easy to prepare; it’s also incredibly satisfying to share. Perfect for Hump Day treats or any casual gathering, its inviting sweetness and delightful textures make it a go-to recipe for anyone looking to impress without spending all day in the kitchen.
 Ingredients:
As we dive into the preparation of this delectable cake, let’s take a moment to appreciate each ingredient—every one plays an essential role in contributing to the overall success of our Chocolate Cherry Upside Down Cake.
- 1 cup sugar: This is where our cake begins to find its sweetness. Sugar not only adds flavor but also helps create moisture within the cake. It interacts with other ingredients during baking to help achieve that tender crumb we all adore. When choosing sugar for baking, opt for granulated sugar unless otherwise specified; it’s perfect for achieving that lovely balance of sweetness without overwhelming other flavors.
- 1 cup all-purpose flour: Flour is our structural hero; it provides the body needed to hold everything together while giving our cake its delightful texture. When measuring flour, be sure to spoon it into your measuring cup rather than scooping straight from the bag—this ensures you don’t end up with too much flour, which can lead to a dense cake instead of the light confection we desire.
- ⅓ cup plus 1 tbsp cocoa powder: Here comes the magic! Cocoa powder infuses our cake with rich chocolate flavor and gives it that beautiful dark hue. It’s important to use high-quality unsweetened cocoa powder for maximum depth in flavor—look for brands that specify “Dutch-process” if you want an even smoother taste profile.
- 1 tsp baking powder: This leavening agent is absolutely crucial in helping our cake rise beautifully as it bakes. Baking powder works by producing carbon dioxide gas when mixed with moisture and heat; this creates those lovely air pockets that give our cake its lightness.
- ½ tsp baking soda: Alongside baking powder, baking soda helps amplify our cake’s rise but also balances acidity in recipes—especially important when working with soured milk later on! Make sure your baking soda is fresh; old leavening agents can lead to disappointing results.
- ¼ tsp salt: Salt might seem minor in desserts but trust me—it brings out all those wonderful flavors! A pinch enhances sweetness while also balancing bitterness from cocoa powder.
- 2 eggs: Eggs are multifunctional beauties! They bind our ingredients together while adding moisture and richness. For best results, use room temperature eggs—they’ll incorporate more easily into your batter than cold ones would!
- ½ cup soured milk: This ingredient adds moisture while also reacting with baking soda to create lift in our cake. You can easily make soured milk at home by combining regular milk with vinegar or lemon juice—just let it sit for about five minutes until it thickens slightly.
- ½ cup brewed black coffee: Coffee doesn’t just bring warmth; it intensifies chocolate flavors significantly! Don’t worry about tasting coffee in your finished product—it enhances chocolate without being overtly present. Use cooled brewed coffee from your morning pot or freshly made espresso for an extra flavor boost.
- ¼ cup vegetable oil: Oil promotes moistness in baked goods because it stays liquid at room temperature—a non-negotiable quality for keeping our cake tender longer than butter would alone.
- ½ tsp vanilla extract: Vanilla extract adds warmth and complexity to sweet dishes like ours! Always opt for pure vanilla extract over imitation for richer flavor—your taste buds will thank you!
- 2 cups fresh or frozen pitted cherries: Cherries are what make this upside-down treat sing! Their juicy tartness contrasts beautifully with rich chocolate while creating that stunning visual appeal once flipped out onto a serving plate. If using frozen cherries, let them thaw before tossing them in sugar so they release less moisture during baking.
- ⅓ cup sugar (for cherries): This additional sugar allows us to create a sweet syrupy base underneath those cherries as they bake—a glorious transformation occurs here as they caramelize beautifully!
- 1 tsp corn starch: Corn starch acts as a thickener when mixed with sugar and tossed with cherries; it helps absorb excess moisture released during cooking while ensuring they’re perfectly coated before hitting the oven!
Equipment You’ll Need:
Before we jump right into making our gorgeous Chocolate Cherry Upside Down Cake, let’s gather some essential tools that will make our baking journey smoother and more enjoyable! While they may not be ingredients themselves, having these partners at your side will ensure success from start to finish.
- 9-inch round pan (or 8×8 square dish): The right pan makes all the difference! A 9-inch round pan (at least 2 inches deep) is perfect for allowing proper rising without spilling over during bake time. If you choose an 8×8 square dish instead, keep an eye on bake time as it may vary slightly due to different surface areas affecting heat distribution.
- Parchment paper: This simple tool will save you from sticky situations (pun intended!). Lining your pan’s bottom ensures easy release after baking—nothing ruins excitement faster than losing half your creation stuck firmly inside!
- Mixing bowl & electric mixer: A sturdy mixing bowl provides ample space for blending ingredients smoothly together while saving energy compared to hand-mixing methods! An electric mixer makes light work of combining batter quickly—you’ll have everything whipped up in no time!
- Rubber spatula: This versatile tool is key when scraping down sides of bowls or folding delicate mixtures together without deflating them—essential when dealing with batters like ours!
Step 1: Preparing Your Pan
The first step towards crafting this delightful Chocolate Cherry Upside Down Cake involves greasing and flouring your chosen pan—a crucial foundation for success! Start by generously greasing either your round or square pan using butter or vegetable oil; then dust lightly with flour until it’s evenly coated throughout—this prevents sticking during release later on! Don’t skip lining the bottom with parchment paper either—it acts like insurance against mishaps down the road by providing an easy lift once baked.
Step 2: Combining Cherries & Sugar
Next up is preparing those juicy cherries—we want them ready for their starring role atop our luscious batter! In one bowl, blend together regular granulated sugar along with cornstarch until well combined; then toss this mixture gently over your pitted cherries ensuring they’re evenly coated throughout each piece (yes…even if they’re frozen!). Allow fresh cherries some time at room temperature if needed before proceeding—trust me here—their natural juices will mingle beautifully once placed atop batter later!
Step 3: Creating Batter Bliss
Now we’re diving into mixing up that beautiful batter! Grab another large mixing bowl where you’ll combine all remaining ingredients—including sugars from earlier alongside eggs—and beat everything together using an electric mixer at medium speed until smooth (about two minutes should do). Pay attention here—mixing too little could leave lumps behind while overdoing it might lead us toward tough texture instead…so strive for optimal balance!
Step 4: Layering Magic
With both components prepared—the cherry layer below waiting patiently—and silky smooth batter ready above—we’re finally ready to pour everything into place! Slowly drizzle this luscious mixture evenly over those charmingly coated cherries nestled below—all aiming toward even coverage across their surface area without much fuss involved here…remember—we want every bite bursting forth joyously come serving time later on!
Stay tuned as we continue exploring further steps leading us closer toward flipping perfection…the anticipation builds deliciously along every stage taken toward completion here today!
Baking Your Perfect Chocolate Cherry Upside Down Cake
Step 5: Pouring the Batter – The Heart of the Cake
Now comes one of my favorite parts that truly brings this Chocolate Cherry Upside Down Cake to life: pouring the batter over those beautifully arranged cherries. Once you’ve combined all your ingredients in a mixing bowl, it’s essential to beat them with an electric mixer for about two minutes. This is not just a matter of blending; it’s a crucial step that aerates the batter, allowing it to rise beautifully during baking. As you whisk away, observe how the mixture transforms into a luscious, glossy chocolate batter—the kind that makes your heart flutter with anticipation.
When you’re ready to pour, take a moment to appreciate the layers you’ve created. Gently pour the batter slowly and evenly over the cherries. Use a spatula to help spread it if necessary, ensuring that every cherry is lovingly cloaked in that rich chocolate goodness. This step is vital because it creates a protective layer around the cherries, allowing them to caramelize and infuse their sweet juices into the cake itself as it bakes. Don’t rush this process; let each drop of batter find its place over those vibrant cherries. You’ll want to see some of those cherry tops peeking through just slightly—that’s where they will sparkle later when you flip your cake out onto a serving plate.
Step 6: Baking – The Magical Transformation
With everything in place, it’s time for our cake to experience the magic of baking! Preheat your oven to 350 degrees Fahrenheit (that’s about 175 degrees Celsius) and place your pan gently on the middle rack—this ensures even heat distribution, which is absolutely paramount for achieving that ideal rise and texture. Bake for 30-35 minutes, but don’t just set a timer and walk away! You want to keep an eye on it towards the end of the baking time.
The telltale sign that your cake is done is when a toothpick inserted into the center comes out clean or with only a few moist crumbs attached—this means your cake is perfectly baked and not too dry. If you see wet batter clinging to your toothpick, give it another minute or two but check back frequently; overbaking can lead to an uncomfortably dry cake, which we absolutely want to avoid! Trust me on this part—it’s such a delicate balance between underbaked and overbaked. When those kitchen aromas start wafting through your home, you’ll know you’re close!
Step 7: Cooling – The Anticipation Builds
Once your cake has finished baking, resist the urge to immediately flip it out! Let it cool in the pan for about five minutes—this is crucial because it allows the structure of your cake to set up just enough so that it won’t fall apart when you turn it out onto your serving plate. During these precious moments, take in that intoxicating aroma wafting through your kitchen; it’s pure bliss!
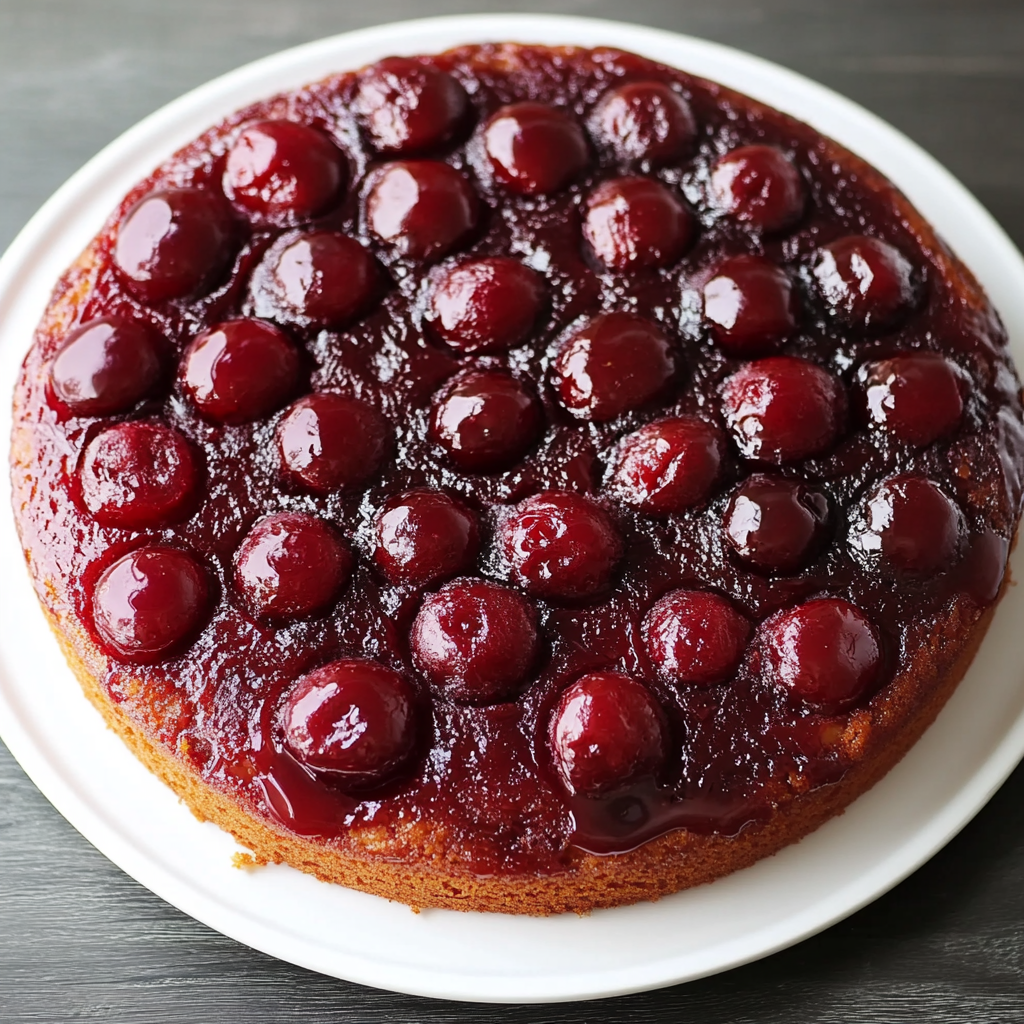
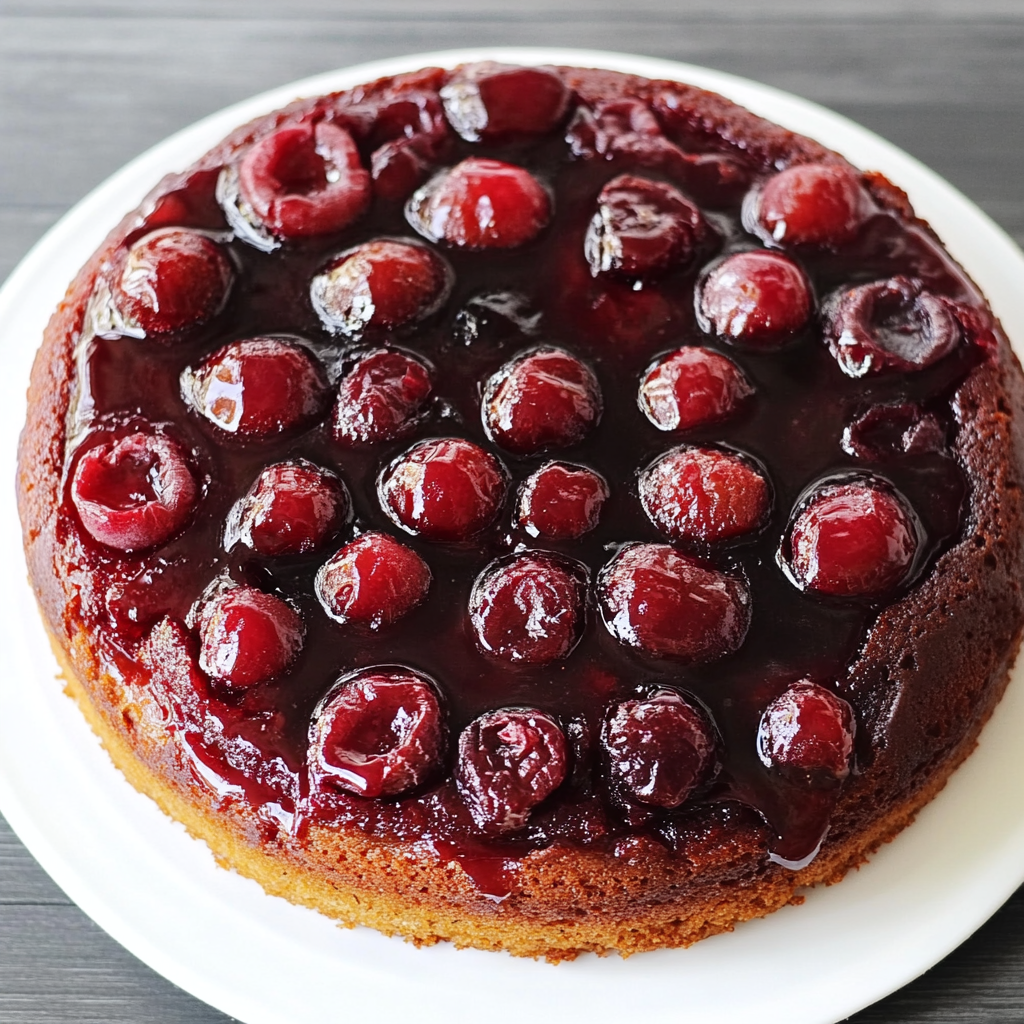
After five minutes have passed, it’s time for the big reveal! Carefully run a knife around the edges of the pan to release any stubborn bits—and believe me, this little detail makes all the difference in ensuring a smooth release. Invert your plate over the top of the pan and confidently flip them both together; then gently lift off the pan. I promise you’ll be rewarded with an utterly gorgeous sight as those cherries glisten like jewels against that rich chocolate backdrop—a true testament to your hard work! If any cherries stick behind (and they might), don’t fret; simply scoop them back onto their rightful place on top of the cake.
Step 8: Serving – The Sweet Finale
Now comes perhaps one of my favorite moments—the taste test! You can serve this Chocolate Cherry Upside Down Cake warm or cold; both options come with their own unique charm. If you’re opting for warm, imagine cutting into that tender cake while steam gently rises from each slice—it’s like wrapping yourself in a cozy hug on a chilly evening. If serving cold fits better with your plans or preferences, allow it ample time in the fridge before serving—at least an hour will do nicely.
Regardless of what temperature you choose to serve this delightful creation at, I highly recommend pairing each slice with either velvety ice cream or a dollop of freshly whipped cream. It adds an amazing creaminess that wonderfully contrasts with both the chocolate and tart cherries—creating what can only be described as an extraordinary symphony of flavors on your palate! Just picture digging into each slice: soft chocolate cake meets bursts of sweet-tart cherry goodness wrapped in creamy delight—utterly divine!
As you dig into this creation and share it with loved ones or friends—or perhaps savor each bite alone—you’ll find yourself enchanted by how simple ingredients can transform into something so profoundly satisfying and special. So go ahead: make this recipe yours today and watch as everyone falls head over heels for this enchanting Chocolate Cherry Upside Down Cake!
Storage and Enjoyment Tips for Your Chocolate Cherry Upside Down Cake
Now that your Chocolate Cherry Upside Down Cake has emerged from the oven, slightly cooled, and is just waiting to be devoured, let’s chat about how to keep this delightful creation at its peak deliciousness! I know you’ll be tempted to dive right in with a fork, but here’s some wisdom on how to preserve those enchanting flavors for later enjoyment. Whether you’re saving a slice for a midnight snack or planning to share it with friends, knowing how to store your cake properly will ensure every bite remains as exquisite as when it first came out of the pan.
Storing Leftover Chocolate Cherry Upside Down Cake
To keep your Chocolate Cherry Upside Down Cake fresh and moist, I recommend choosing an airtight container that can protect this masterpiece from drying out. A glass dish with a tight-fitting lid works wonders, but if you don’t have one handy, wrapping the cake tightly in plastic wrap will do just fine. Store it in a cool place—your pantry or countertop should suffice—where it can sit comfortably for about three days. Trust me when I say that the flavors only deepen over time, making each day’s slice an even more profound experience. If you’re looking for a pro tip, try placing a slice of bread in the container along with the cake; this little trick helps maintain moisture and keeps your dessert fluffy and delectable! When you’re ready to indulge again, serve it at room temperature or pop it in the microwave for just a few seconds—this will awaken all those rich cocoa and cherry notes as if it just came out of the oven.
Freezing Chocolate Cherry Upside Down Cake for Later
If you find yourself with extra slices (or you’re simply planning ahead), freezing your Chocolate Cherry Upside Down Cake is an excellent option that allows you to savor its charm long after baking day! To freeze it properly, allow your cake to cool completely before wrapping individual slices in plastic wrap—this protects them from freezer burn and keeps them tasting fresh. You can then place these wrapped pieces into a freezer-safe bag or container. When stored correctly, your cake will remain delightful for up to three months! The convenience factor here is fantastic; imagine pulling out a slice on a busy weeknight or during unexpected guests’ drop-ins—simply thaw in the refrigerator overnight or let it sit on the counter for an hour before enjoying. There’s something so comforting about knowing you have such a treat waiting for you; trust me, it’s like having a little piece of joy ready to brighten your day!
Chocolate Cherry Upside Down Cake
Indulge in the delightful experience of making a Chocolate Cherry Upside Down Cake, where rich chocolate meets the tart sweetness of cherries. This cake is more than just a dessert; it’s a warm invitation to gather and share joyful moments. As you bake, your kitchen will fill with the intoxicating aroma of cocoa and caramelized cherries, creating an atmosphere of comfort. With its luscious layers and a gorgeous presentation, this cake is perfect for celebrations or simple weeknight treats. It’s easy to prepare and sure to impress both family and friends!
- Prep Time: 20 minutes
- Cook Time: 35 minutes
- Total Time: 55 minutes
- Yield: Approximately 10 servings 1x
- Category: Dessert
- Method: Baking
- Cuisine: Classic
Ingredients
- 1 cup sugar
- 1 cup all-purpose flour
- ⅓ cup plus 1 tbsp cocoa powder
- 1 tsp baking powder
- ½ tsp baking soda
- ¼ tsp salt
- 2 eggs
- ½ cup soured milk (made with vinegar)
- ½ cup brewed black coffee
- ¼ cup vegetable oil
- ½ tsp vanilla extract
- 2 cups fresh or frozen pitted cherries
- ⅓ cup sugar (for cherries)
- 1 tsp corn starch
Instructions
- Preheat your oven to 350°F (175°C) and grease a 9-inch round pan.
- In a bowl, mix the cherries with ⅓ cup sugar and cornstarch.
- In another bowl, combine remaining ingredients until smooth.
- Pour the cherry mixture into the prepared pan, then cover with the chocolate batter.
- Bake for 30–35 minutes or until a toothpick comes out clean.
- Cool for five minutes before flipping onto a serving plate.
Nutrition
- Serving Size: 1 slice (100g)
- Calories: 305
- Sugar: 31g
- Sodium: 180mg
- Fat: 13g
- Saturated Fat: 2g
- Unsaturated Fat: 9g
- Trans Fat: 0g
- Carbohydrates: 43g
- Fiber: 2g
- Protein: 4g
- Cholesterol: 50mg