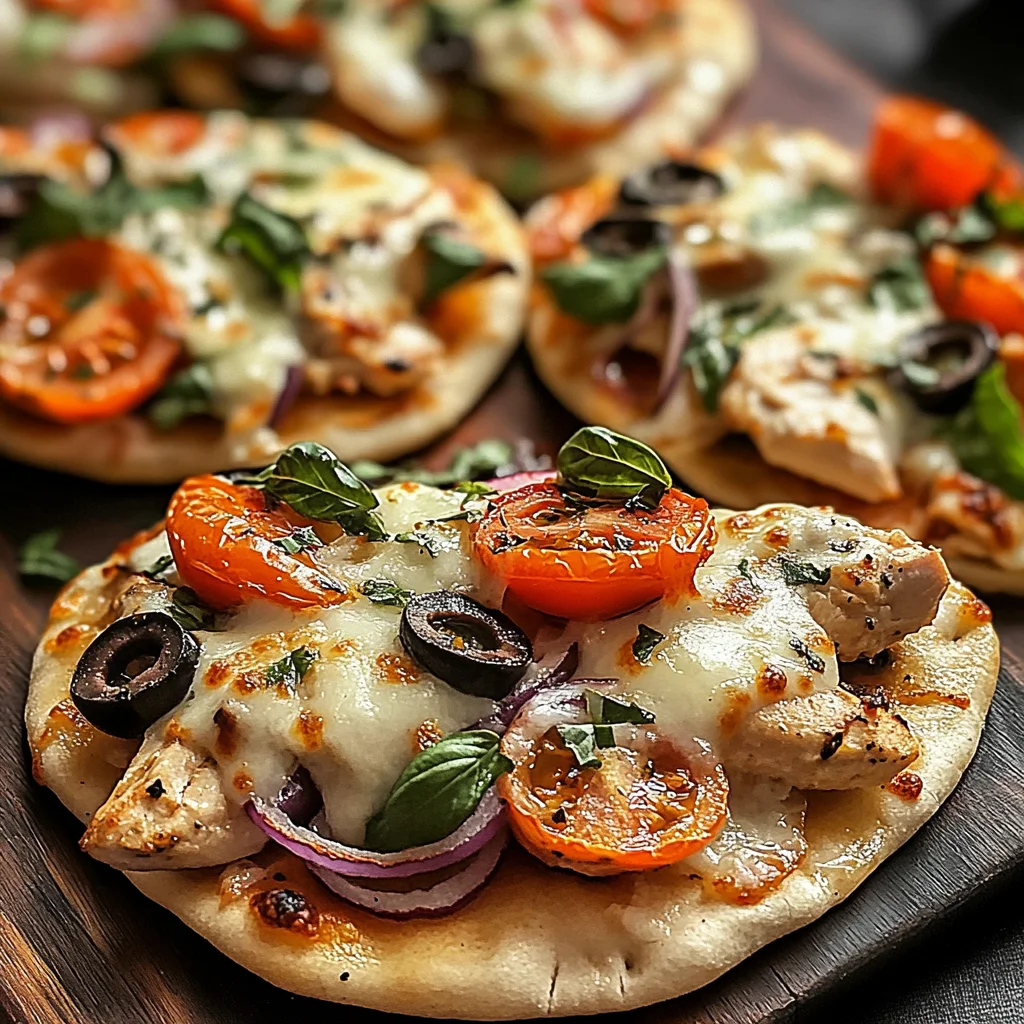
Tuscan Garlic Chicken Pita Pizzas
There’s something profoundly satisfying about creating a meal that embodies the warmth of tradition while embracing a touch of modern flair. When I think of my Tuscan Garlic Chicken Pita Pizzas, I’m reminded of sun-drenched Italian landscapes and the vibrant flavors that seem to dance on the palate. This recipe is more than just a quick dinner idea; it’s a heartfelt embrace of comfort food that brings people together around the table. Imagine the aroma of garlic sizzling in olive oil, mingling with tender chicken, and fresh herbs wafting through your kitchen—it’s an utterly intoxicating experience that invites you to savor every bite. Each ingredient plays its part in this symphony of flavors, creating a delightful harmony that will leave your taste buds singing.
What makes these pita pizzas so special is their ability to transform simple ingredients into something extraordinary, making them perfect for any occasion—from casual weeknight dinners to impromptu gatherings with friends. The crusty yet soft pita serves as a delightful canvas for a medley of toppings, while the garlic-seasoned chicken and vibrant veggies create layers upon layers of flavor. And let’s not forget about the melted cheese—oh, that gooey goodness! It’s truly remarkable how such a quick and easy recipe can evoke feelings of nostalgia and joy, reminding us that cooking is not just about nourishment but also about connection and love.
Tuscan Garlic Chicken Pita Pizzas: A Taste of Italy in Every Bite
These Tuscan Garlic Chicken Pita Pizzas are not just meals; they’re an experience waiting to unfold in your kitchen. With their crispy edges and melty cheese, they come together in under 30 minutes—perfect for busy weeknights when you want something delicious without spending hours in the kitchen. You’ll find yourself reaching for this recipe again and again as it strikes that perfect balance between convenience and flavor.
Ingredients:
As we embark on this culinary journey together, let’s dive into each component that makes up our lovely Tuscan Garlic Chicken Pita Pizzas. Each ingredient brings something unique to the table, contributing not only flavor but also texture and vibrancy.
- 4 whole pita breads. Think of these pitas as our sturdy base—a wonderful choice because they are light yet firm enough to hold all our delicious toppings without becoming soggy. When selecting pita bread, look for those with a nice puff (this indicates freshness) and a soft texture. Whole-wheat options add an extra layer of nuttiness if you’re feeling adventurous! The beauty here is how quickly they heat up in the oven, transforming into crispy canvases ready for our toppings.
- 1 lb boneless, skinless chicken breasts, diced. This lean protein is the heart of our dish, providing substance and satisfaction with every bite. When choosing chicken breasts, look for those that are plump and have a slight sheen—indicating freshness. Dicing them ensures even cooking and helps them absorb all those glorious seasonings we’ll be adding later on. Trust me on this: perfectly cooked chicken should be juicy and tender; overcooked chicken can turn rubbery quickly, so keep an eye on it!
- 3 Tbsp olive oil, divided. Olive oil is like liquid gold in cooking—it adds richness and depth while helping other flavors shine through. Using high-quality extra virgin olive oil is non-negotiable here; it enhances the dish’s overall flavor profile significantly. We’ll use two tablespoons for cooking our chicken to impart that wonderful savory aroma while saving one tablespoon for brushing over our pitas—it’s essential for achieving that beautiful golden crisp during baking.
- 4 cloves garlic, minced. Ahh, garlic—the aromatic superstar! Freshly minced garlic releases oils that give off an enticing fragrance when cooked; it’s absolutely paramount for infusing our chicken with flavor. When mincing garlic at home, aim for small pieces so that they distribute evenly throughout your dish without overwhelming any single bite with too much intensity.
- 1 tsp dried basil. This herb carries a sweet yet slightly peppery flavor reminiscent of summer gardens—a true Italian staple! While fresh basil would be ideal when available (and I highly encourage you to use it when possible), dried basil works wonders here too by adding depth to our chicken mixture.
- 1 tsp dried oregano. Oregano brings warmth and earthiness—a cornerstone herb in Mediterranean cooking! This aromatic addition complements both our chicken filling and the overall flavor profile beautifully.
- 1 tsp dried thyme. Thyme contributes subtle notes reminiscent of lemon and mint alongside earthy undertones—a lovely partner to our other herbs! It pairs beautifully with roasted or sautéed dishes like ours here.
- Salt and pepper, to taste. These two essentials are critical in elevating every aspect of your dish! Salt enhances flavors while pepper adds warmth; don’t shy away from seasoning generously as it transforms ordinary ingredients into something spectacular.
- 1 cup shredded mozzarella cheese. Mozzarella is known for its meltability—creating those gorgeous strings when you take a bite—isn’t it delightful? Opting for whole milk mozzarella will yield creamier results compared to part-skim versions; feel free to shred your own from a block rather than buying pre-shredded if you want maximum freshness!
- 1/2 cup grated Parmesan cheese. Adding grated Parmesan introduces nutty notes along with complexity—we’ll sprinkle this atop right before baking so it becomes beautifully golden brown while enhancing overall flavor.
- 1 cup cherry tomatoes, halved. These little gems burst with sweetness—perfectly balancing out all savory elements we’ve created thus far! Their bright color also adds visual appeal to our pizzas; look for ones with deep color for maximum sweetness!
- 1/2 cup red onion, thinly sliced. Red onions are milder than their yellow counterparts but still provide crunchiness along with subtle sweetness—making them ideal candidates here! Thin slices help them cook faster while ensuring they meld seamlessly into each bite.
- 1/2 cup black olives, sliced. Tangy black olives add another layer of complexity—their briny nature contrasts delightfully against sweet tomatoes! Look for pitted varieties so you can enjoy every mouthful without interruption.
- 1/4 cup fresh basil leaves, chopped (optional). If you have access to fresh basil when serving these pizzas up hot from the oven—it takes them over the top! The fragrant aroma combined with bright green color elevates presentation significantly too!
- Balsamic glaze (optional, for drizzling). While completely optional depending on personal preference; drizzling balsamic glaze adds acidity which balances richness beautifully—it’s an elegant finishing touch worth considering!
Equipment You’ll Need:
Before we get started on creating these culinary delights together, let’s take a moment to gather some essential partners-in-crime—the tools needed make this process smooth sailing! Having the right equipment not only simplifies things but adds joyfulness amid preparations!
- Large skillet – A good quality skillet allows even heat distribution which is crucial when sautéing chicken properly—you want those pieces seared beautifully without uneven patches being left behind during cooking time!
- Baking sheet – A rimmed baking sheet provides ample space where multiple pita pizzas can fit comfortably side-by-side while catching any drippings from melting cheese or juicy tomatoes below—no mess means less cleanup afterward!
- Pasta fork or tongs – Tongs are invaluable tools during this process since they allow easy flipping/mixing while keeping fingers intact—saving us from burns as we handle hot ingredients directly off stove tops!
Now that we’ve gathered everything necessary let’s dive deeper into preparing those scrumptious Tuscan Garlic Chicken Pita Pizzas!
Preparing the Tuscan Garlic Chicken Pita Pizzas
Step 1: Preheat Your Oven
First things first: preheating your oven is essential! Set it to 425°F (220°C) now so it’s fully heated by the time we’re ready to bake our pizzas—a crucial step often overlooked but vital because starting off at proper temperatures ensures even cooking throughout each pizza crust without risking doughy centers or burnt edges later down line!
Step 2: Sauté Your Chicken
Next up comes one of my favorite steps: heating 2 tablespoons olive oil in your skillet over medium heat until shimmering gently—that means it’s ready! Then toss in those diced chicken pieces accompanied by minced garlic along with dried herbs like basil & oregano followed closely by salt & pepper seasoning generously according taste preferences too! Cook everything together until there’s no pink remaining inside each piece (about 5–7 minutes), stirring occasionally so nothing sticks nor burns at bottom—this fragrant combination will fill your kitchen instantly inviting comfort vibes all around! Once finished remove from heat allowing residual warmth continue drawing out flavors further whilst prepping next stages ahead…
Step 3: Prepare Your Pitas
With our delicious filling ready set aside now let’s focus back onto those lovely pitas awaiting transformation—they deserve some love too! Place them flatly upon baking sheets lined neatly side-by-side then brush remaining tablespoon olive oil across surfaces lightly ensuring full coverage prevents drying out during baking process later down line…it also adds crunchiness which makes every bite pure bliss!
Step 4: Assemble Your Masterpiece!
Finally comes assembling magic where creativity shines brightly amidst flavors melding together harmoniously creating mouthwatering masterpieces worth sharing widely amongst loved ones… Begin by dividing sautéed chicken evenly atop brushed pitas followed closely by generous sprinklings mozzarella cheese & grated parmesan ensuring no spot left uncovered next layer cherry tomatoes freshly halved alongside thinly sliced red onions finally finishing touches sliced black olives sprinkled generously all around before sliding them carefully inside preheated oven set timer accordingly (8–10 minutes) until glorious cheese melts bubbling away happily while edges turn golden brown enticing aromas envelop entire space surrounding everyone near enough inhale deeply feeling anticipation building steadily within hearts knowing soon deliciousness imminent arrival awaits…
And just like that—your kitchen has transformed into a haven filled only moments ago began gathering ingredients now bursting forth tantalizing aromas beckoning friends family alike join around tables share stories laughter build memories—all centered around simple act preparing meals together lovingly crafted showcasing heartfelt intentions behind each creation made possible through shared experiences unfolding throughout lives intertwined richly woven bonds strengthen through moments spent breaking bread together… So why wait? Let’s embrace these flavors coming alive inside homes today surely leaving lasting impressions long after last crumbs vanish completely away…
I can’t wait until you try these Tuscan Garlic Chicken Pita Pizzas—they’re truly extraordinary!
Step 5: Layering the Flavors
Now that your chicken is beautifully cooked and infused with the aromatic essence of garlic and herbs, it’s time to bring everything together for our Tuscan Garlic Chicken Pita Pizzas. Start by taking those lovely pita breads and placing them on a baking sheet. This is where the magic truly begins! Make sure to brush each pita generously with the remaining olive oil—this step is absolutely crucial. Why? Well, that golden oil not only enhances the flavor but also helps achieve that delightful crispiness we all crave in a pizza crust. The oil creates a barrier that keeps the pita from getting soggy when topped with all those delectable ingredients.
Once your pitas are prepped, it’s time to get generous with your chicken mixture. Divide the sautéed chicken evenly across each pita, ensuring every bite will be bursting with flavor. Don’t hold back! You want to create an enticing base for your toppings, allowing the warmth of the chicken to meld into the bread. Next, sprinkle a hearty layer of shredded mozzarella cheese over the chicken—this heavenly cheese will melt beautifully as it bakes, creating that gooey texture we adore in pizzas. Follow that with a scattering of grated Parmesan for an extra punch of umami richness; I promise you will taste the difference!
Step 6: Adding Freshness and Color
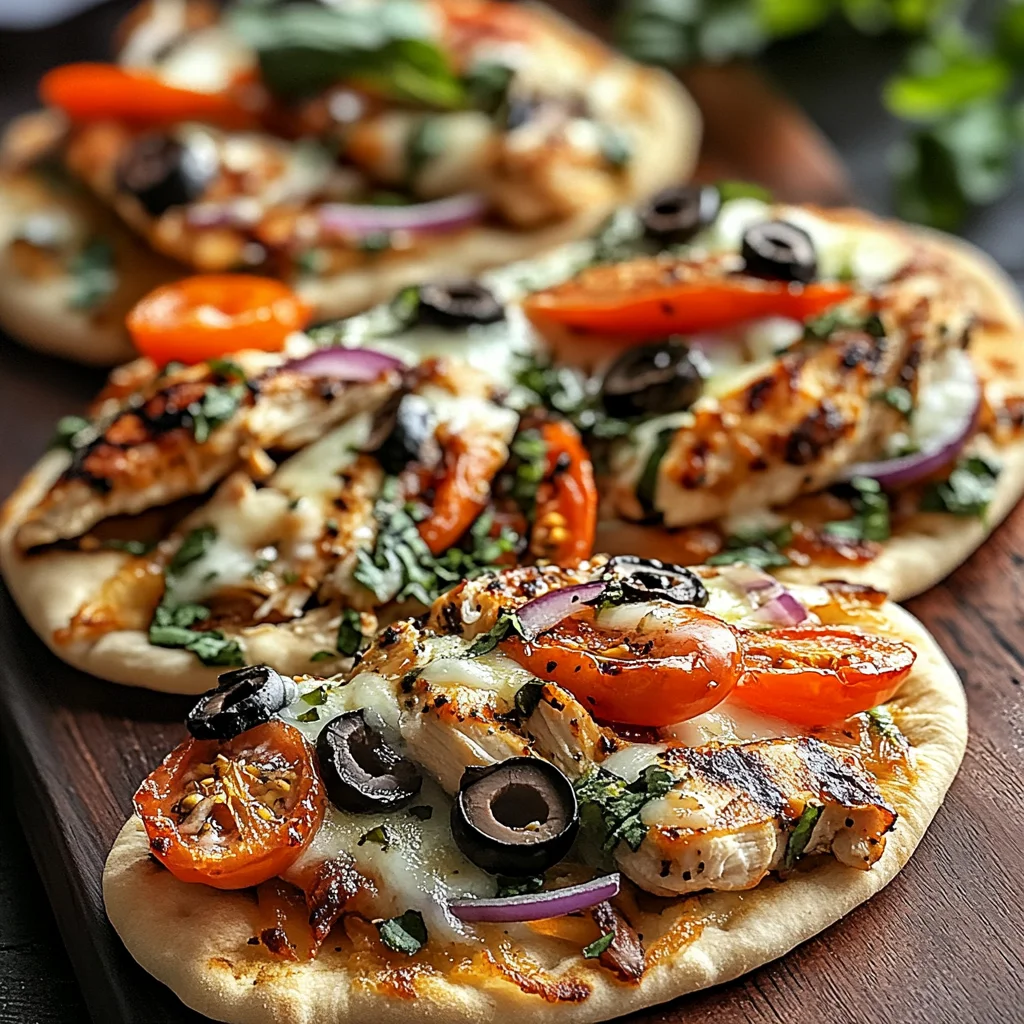
With your pitas now adorned with chicken and cheese, it’s time to elevate our Tuscan Garlic Chicken Pita Pizzas even further by adding some vibrant fresh ingredients. Grab those juicy cherry tomatoes and slice them in half; their sweetness is going to contrast wonderfully against the savory flavors of your dish. Scatter these delightful little gems across each pizza, making sure they are evenly distributed so you get that burst of flavor in every bite! Alongside your tomatoes, add thinly sliced red onions—these add a beautiful crunch and slight sharpness that balances out the richness from the cheese.
And let’s not forget about the black olives! These beauties offer a briny depth that rounds out our flavor profile perfectly. Their dark color against the bright tomatoes adds such visual appeal too; after all, we eat with our eyes first! At this stage, I encourage you to take a moment to appreciate how colorful and inviting these pita pizzas look. It’s almost like painting—a wonderful canvas of flavors waiting to come together in harmony as they bake!
Step 7: Into the Oven – Baking Time!
Now comes one of my favorite moments—the oven dance! Preheat your oven to 425°F (220°C) if you haven’t already (trust me, this temperature is perfect for getting that crispy bottom while melting the cheese just right). When you’re ready, gently slide your baking sheet into the oven and set a timer for about 8-10 minutes. Keep an eye on them during this time—it’s important not to walk away completely because ovens can be unpredictable!
You’ll want to watch for that telltale sign: when your cheese is bubbling and starting to turn golden brown around the edges, it means things are coming together beautifully. The aroma wafting through your kitchen will be utterly intoxicating—it’s one of those scents that wraps around you like a warm hug! If you have any doubts about doneness, feel free to peek at one of them; if it looks crispy and melty, you’re good to go! Remember though: don’t rush this step; allowing enough time for baking ensures all those flavors meld perfectly.
Step 8: The Finishing Touches
When your Tuscan Garlic Chicken Pita Pizzas come out of the oven, they will be nothing short of spectacular! Let them cool for just a minute or two on a wire rack—this prevents them from steaming underneath which could lead to sogginess (and nobody wants that!). While they are cooling, this is also a perfect opportunity to prepare any finishing touches like freshly chopped basil or even a drizzle of balsamic glaze if you’re feeling fancy!
Sprinkle those fresh basil leaves over top before serving; they add not only color but also an aromatic freshness that brightens up every bite—an essential element in Italian cooking! If you choose to drizzle some balsamic glaze on top, it adds both sweetness and acidity which cuts through all those rich flavors beautifully. Trust me on this—it takes these pizzas from deliciously good to extraordinarily memorable!
Next Major Phase – Enjoying Your Masterpiece
Now comes my favorite part—the moment you’ve been waiting for! Slice these gorgeous Tuscan Garlic Chicken Pita Pizzas into manageable wedges and serve them warm. As you gather around with friends or family (or perhaps indulge solo—you deserve it!), take a moment to savor not just the flavors but also the love and effort you’ve put into creating something truly special. Each bite will offer you a symphony of tastes—the succulent chicken paired with tangy tomatoes and creamy cheeses all harmonizing together.
Don’t forget how versatile these pizzas can be; feel free to swap out veggies based on what you have or love best! They’re quick enough for weeknight dinners yet impressive enough for entertaining guests—I promise they’ll become a staple in your culinary repertoire. There’s something profoundly satisfying about sharing food made from scratch—it creates connections and memories that last long after the last bite is gone.
So go ahead—dive in, relish every morsel, and most importantly enjoy this wonderfully easy recipe full of heart and flavor! Happy cooking!
Storage and Enjoyment Tips for Your Tuscan Garlic Chicken Pita Pizzas
Now that your kitchen is filled with the utterly intoxicating aroma of Tuscan Garlic Chicken Pita Pizzas, it’s time to dig in and savor every delightful bite. But wait! If you find yourself with leftovers (which can be hard, I know!), there are some fantastic ways to store them, ensuring that each slice of pizza remains as delightful as the first. The great news is that these beauties can be easily preserved without losing their charm. Just imagine enjoying that same warm, cheesy goodness the next day or even later in the week!
Storing Leftover Tuscan Garlic Chicken Pita Pizzas
To keep your Tuscan Garlic Chicken Pita Pizzas fresh and flavorful, I recommend using an airtight container. This will create a cozy little environment for your pizzas in the refrigerator, where they can safely rest for up to three days. Trust me on this—keeping them sealed is absolutely paramount to locking in that fabulous flavor and texture! If you want an extra layer of protection, consider placing a piece of parchment paper between layers if you stack them; this helps maintain crispness. When it comes time to enjoy your leftovers, you might notice that the bread has softened a bit; don’t fret! A quick pop in the oven will revive that delightful crunch. Just reheat at 350°F (175°C) for about 10 minutes, and you’ll have an almost freshly baked experience!
Freezing for Later
If you’ve made a large batch or simply want to prepare ahead, freezing your Tuscan Garlic Chicken Pita Pizzas is a brilliant option! To do this properly, let the pizzas cool completely before wrapping each one individually in plastic wrap and placing them in a freezer-safe bag or container—this will protect them from freezer burn while keeping all those lovely flavors intact. When stored correctly, they can last up to three months in the freezer! When you’re ready to indulge again, just take one out and pop it directly into a preheated oven at 425°F (220°C) for about 12-15 minutes; no need to thaw beforehand! This convenience factor makes meal planning so much easier while still allowing you to enjoy a homemade touch.
So whether you’re enjoying them fresh out of the oven or savoring leftovers later on, these Tuscan Garlic Chicken Pita Pizzas are sure to bring joy and satisfaction any day of the week!
Conclusion:
As we wrap up our journey through this delicious recipe for Tuscan Garlic Chicken Pita Pizzas, I hope you feel inspired and excited about bringing this dish into your home kitchen. There’s something profoundly satisfying about crafting a meal filled with vibrant flavors and textures—each bite bursting with garlicky chicken, melty cheese, and fresh veggies all nestled within the warm embrace of pita bread. It’s not just food; it’s an experience—a symphony of flavors that dances on your palate while creating cherished memories around the dinner table.
This recipe is truly a must-try because it’s more than just a tasty meal; it’s accessible and adaptable for any occasion! Whether you’re whipping it up on a busy weeknight or serving it at a cozy gathering with friends, these pizzas shine in their versatility. Picture this: pulling them from the oven as they bubble delightfully—your kitchen filled with warmth and laughter—as everyone eagerly gathers around for their share. The excitement is palpable as you serve these delectable creations that are sure to leave everyone asking for seconds!
When it comes to enjoying these pizzas, think beyond just simple sides. Imagine savoring one with a crisp arugula salad drizzled in lemon vinaigrette or alongside roasted vegetables that complement those rich Tuscan flavors splendidly. For an afternoon pick-me-up or snack attack, pair it with a refreshing glass of sparkling water infused with herbs or citrus—it elevates everything! And if you’re feeling adventurous after dinner, why not sweeten things up with some fruit sorbet? Each pairing enhances your culinary adventure!
Feeling adventurous? This recipe is wonderfully adaptable too! Try swapping out chicken for grilled veggies like zucchini or bell peppers if you’re looking for a plant-based spin. Or how about adding some sliced artichokes or sun-dried tomatoes for an extra burst of Italian flair? The possibilities are endless! I encourage you to unleash your creativity and make this recipe your own—please share your experiences with me; I’d love nothing more than hearing how you put your unique twist on these delightful pizzas!
Tuscan Garlic Chicken Pita Pizzas

Tuscan Garlic Chicken Pita Pizzas are a delightful twist on traditional pizza that brings the vibrant flavors of Italy right to your table. With tender, garlic-infused chicken, fresh veggies, and gooey cheese atop a warm pita base, this recipe is perfect for busy weeknights or casual gatherings. In less than 30 minutes, you can whip up these savory pizzas that not only satisfy your cravings but also create lasting memories around the dinner table. Each bite offers a burst of flavor, making it easy to fall in love with this comforting yet modern dish. Whether you’re serving them to family or friends, Tuscan Garlic Chicken Pita Pizzas are sure to impress!
- Prep Time: 10 minutes
- Cook Time: 15 minutes
- Total Time: 25 minutes
- Yield: Makes 4 servings (4 pita pizzas) 1x
- Category: Main
- Method: Baking
- Cuisine: Italian
Ingredients
- 4 whole pita breads
- 1 lb boneless, skinless chicken breasts, diced
- 3 Tbsp olive oil, divided
- 4 cloves garlic, minced
- 1 tsp dried basil
- 1 tsp dried oregano
- 1 tsp dried thyme
- Salt and pepper, to taste
- 1 cup shredded mozzarella cheese
- 1/2 cup grated Parmesan cheese
- 1 cup cherry tomatoes, halved
- 1/2 cup red onion, thinly sliced
- 1/2 cup black olives, sliced
- 1/4 cup fresh basil leaves, chopped (optional)
- Balsamic glaze (optional, for drizzling)
Instructions
- Preheat the oven to 425°F (220°C).
- In a large skillet over medium heat, heat 2 tablespoons of olive oil. Add diced chicken and minced garlic along with dried herbs and seasonings. Cook for 5–7 minutes until no pink remains.
- On a baking sheet, place pita breads and brush each with the remaining olive oil.
- Evenly distribute the sautéed chicken mixture over each pita.
- Top with shredded mozzarella and grated Parmesan cheese, followed by halved cherry tomatoes, sliced red onion, and black olives.
- Bake in the preheated oven for 8–10 minutes until cheese is melted and bubbly.
Nutrition
- Serving Size: 1 pita pizza (150g)
- Calories: 330
- Sugar: 4g
- Sodium: 650mg
- Fat: 15g
- Saturated Fat: 7g
- Unsaturated Fat: 6g
- Trans Fat: 0g
- Carbohydrates: 32g
- Fiber: 3g
- Protein: 22g
- Cholesterol: 65mg