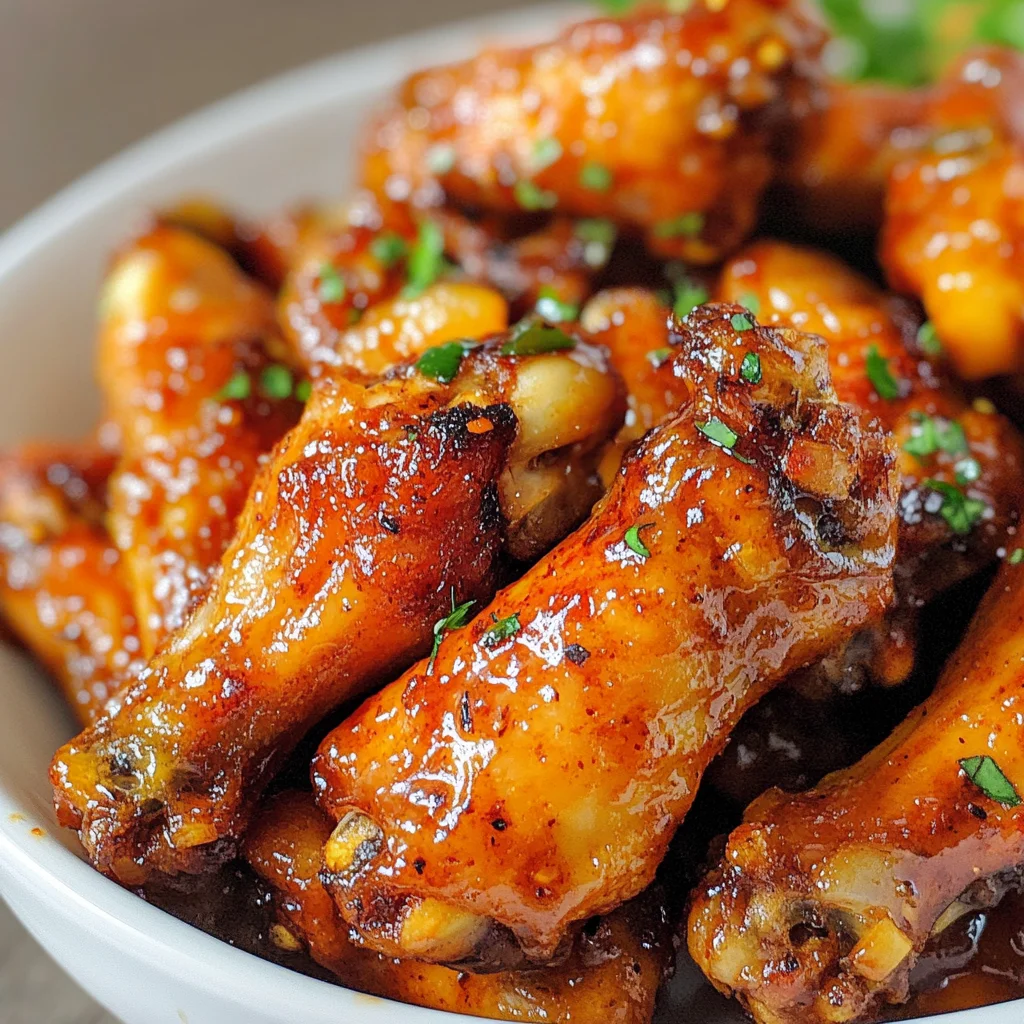
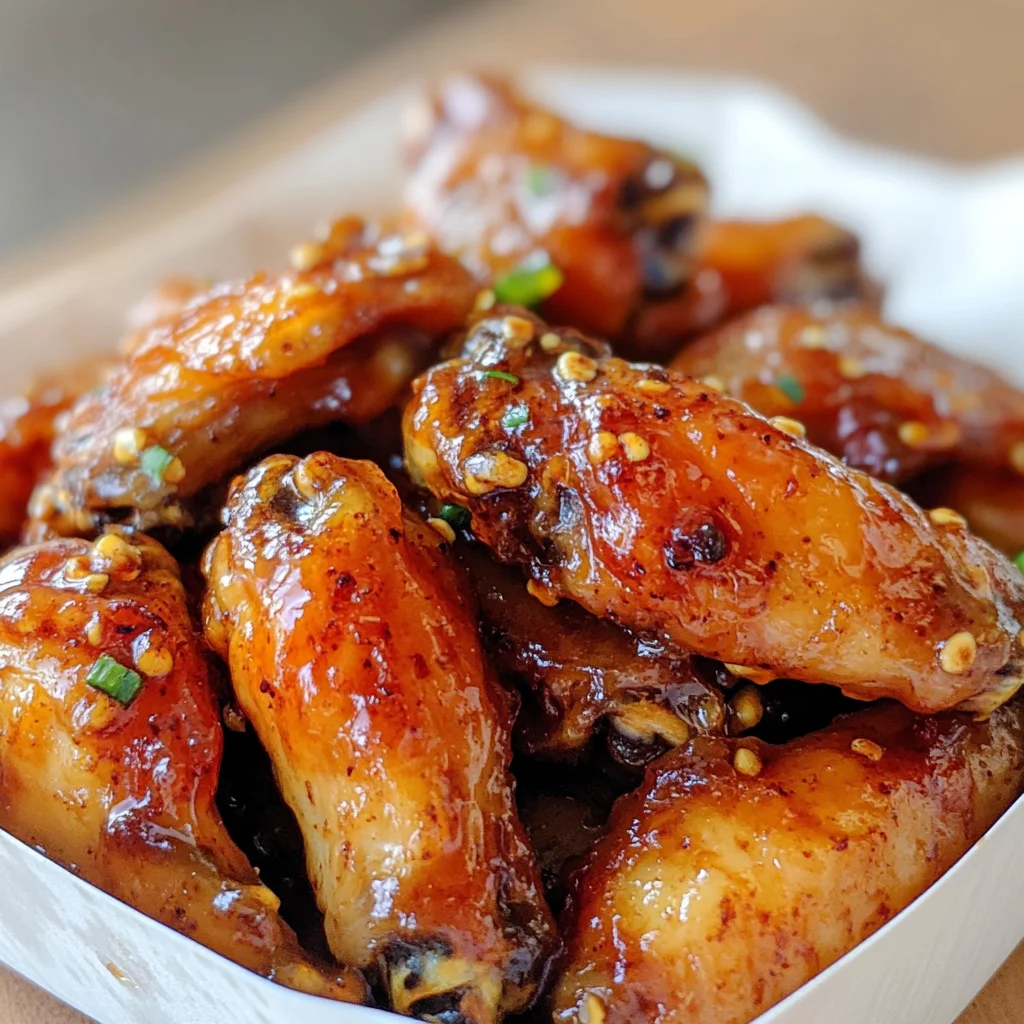
Pineapple Cowboy Candy Chicken Wings
There’s something truly magical about the alchemy of cooking, isn’t there? I find that every recipe tells a story, weaving together memories, flavors, and the joy of sharing. Today, I’m excited to share with you my beloved Pineapple Cowboy Candy Chicken Wings—a dish that’s a delightful dance between sweet and spicy, bringing a burst of sunshine to any gathering. Picture this: tender chicken wings enveloped in a glossy glaze that glistens like liquid gold, bursting with the tropical essence of pineapple and the fiery kick of jalapeños. Each bite is an experience, a celebration of flavors that transports you straight to a backyard barbecue or a cozy game night with friends. Trust me; these wings are not just food—they’re an invitation to gather around the table and create unforgettable moments.
As we dive into this culinary adventure together, you’ll discover how easy it is to elevate your chicken wings from ordinary to extraordinary. This recipe captures the spirit of comfort food while introducing a refreshing twist that will surprise and delight your taste buds. The sweet tanginess of pineapple blends harmoniously with the spiciness of jalapeños, making these wings perfect for any occasion—whether it’s a casual weeknight dinner or a festive party spread. So grab your apron, and let’s embark on this flavorful journey together!
Pineapple Cowboy Candy Chicken Wings: A Sweet and Spicy Delight
These Pineapple Cowboy Candy Chicken Wings are bound to become your new favorite appetizer! With their irresistible glaze and mouthwatering flavor profile, they’re perfect for impressing guests or simply treating yourself after a long day. You’ll love how easily they come together—I promise you’ll be making them again and again!
Ingredients:
Before we start cooking, let’s gather our ingredients! Each one plays an integral role in creating those finger-licking good Pineapple Cowboy Candy Chicken Wings.
- 1.5 lbs chicken wings. When choosing chicken wings, look for plump pieces with bright skin; this indicates freshness. The wings are the canvas for our delicious glaze, absorbing all those vibrant flavors as they cook. I usually prefer fresh wings over frozen because they retain their juicy texture better during baking. If you’re looking for an alternative, feel free to use drumsticks or other cuts—just adjust the cooking time accordingly.
- 1/2 cup pineapple juice. This ingredient is truly the star of our dish! It provides that signature sweetness and tang that pairs so beautifully with the heat from jalapeños. Opt for 100% pure pineapple juice without added sugars or preservatives for the best flavor—it’s like having sunshine in a bottle! The acidity also helps tenderize the chicken as it marinates, resulting in succulent meat.
- 1/2 cup brown sugar. Ahh, brown sugar—the secret ingredient that adds depth and richness to our glaze! Its molasses content not only contributes sweetness but also creates that beautiful caramelization on the wings as they bake. Make sure to pack it firmly into your measuring cup for accurate results; otherwise, you might miss out on its full flavor potential.
- 2 jalapeños, finely chopped. The jalapeños bring just the right amount of heat to balance out the sweetness of the pineapple juice and brown sugar. When selecting jalapeños, choose ones that are firm and shiny—they should feel heavy for their size. If you’re sensitive to spice, you can always remove the seeds and membranes before chopping them up; this will tone down their heat while still providing flavor.
- 1 teaspoon garlic powder. Garlic powder adds an aromatic element that’s essential for layering flavors in our glaze. It’s convenient because it disperses evenly throughout the marinade without needing any chopping! If you have fresh garlic on hand (and want to take it up a notch), feel free to substitute one clove minced garlic instead—it will add even more depth!
- 1 teaspoon onion powder. Similar to garlic powder, onion powder enhances our sauce’s overall profile by adding savory notes without overwhelming it with texture or chunks—the goal is smoothness here! And like its counterpart, if you prefer using fresh onion instead (about 1 tablespoon finely minced), go ahead; just remember it may alter your marinade’s consistency slightly.
- 1 teaspoon smoked paprika. This is where things get exciting! Smoked paprika introduces an earthy smokiness reminiscent of grilled meats without needing an outdoor grill—perfect for when you’re craving those summer barbecues during chillier months! It’s essential not only for flavor but also gives our wings that alluring reddish hue as they bake beautifully in the oven.
- 1/4 cup soy sauce. Soy sauce is another vital component in achieving umami richness in our marinade—it brings everything together beautifully while offering saltiness without overpowering other flavors at play here! Opt for low-sodium soy sauce if you’re watching your sodium intake—it still packs plenty of flavor without being too salty.
- 1/2 teaspoon black pepper. Freshly cracked black pepper adds warmth and subtle complexity to our marinade! It sharpens every other ingredient’s flavor while providing just enough bite to keep things interesting on your palate.
- 1 tablespoon olive oil (for greasing). While we don’t want much oil in our marinade itself (as we’re after thick sticky goodness), greasing our wire rack ensures nothing sticks during baking—keeping cleanup easy afterward while allowing those crispy edges we crave!
Equipment You’ll Need:
Having the right tools at hand can make all the difference when preparing these sumptuous chicken wings! While they may not be ingredients, each piece plays an essential role in ensuring everything runs smoothly.
- Mixing bowls – You’ll need at least two bowls: one for marinating those succulent chicken wings and another for mixing up your glorious glaze! Choose bowls made from glass or stainless steel—they’re non-reactive materials that won’t impart unwanted flavors into your food.
- Whisk – A sturdy whisk is indispensable when blending together liquids like pineapple juice with brown sugar—it helps dissolve granules quickly while incorporating air into mixtures (which improves texture). If you don’t have one handy? A fork works just fine too!
- Baking sheet – A large baking sheet lined with aluminum foil will help catch any drips from our wings while roasting away—and makes cleanup afterward oh-so-easy! Look for sheets made from heavy-gauge aluminum; they conduct heat evenly and prevent warping during high-temperature cooking methods like baking or broiling.
- Wire rack – Elevating our chicken wings on top of this rack allows hot air circulation around them as they bake—ensuring crispness all over instead of soggy bottoms! Using one prevents excess grease from pooling underneath while allowing fat drippings down below so don’t skip this step!
Now that we’ve gathered all we need let’s dive into preparing these Pineapple Cowboy Candy Chicken Wings!
Step 1: Preheat & Prepare
First things first—let’s get that oven preheating at 400°F (200°C). This step is crucial because starting off with hot air ensures even cooking throughout your chicken wings right from the start! While that’s heating up nicely, rinse your lovely chicken wings under cold water—a quick wash removes impurities left behind from processing—and pat them dry using paper towels until they’re moisture-free before placing them into a large mixing bowl where they’ll soon become bathed in delectable flavors.
Step 2: Whisk Together Your Marinade
In another bowl (the second one we set aside earlier!), combine luscious pineapple juice with packed brown sugar along with chopped jalapeños—this combination creates pure magic once whisked together until everything blends seamlessly! Add garlic powder plus onion powder for aromatic goodness followed by smoky paprika which elevates taste dimensions further before drizzling soy sauce over top alongside freshly cracked black pepper seasoning—all key components forming layers upon layers within each bite waiting patiently ahead… Make sure each ingredient melds beautifully; I often give it extra attention by ensuring no granules remain undissolved—that’s where true harmony lies!
Step 3: Marinate Those Wings
Pour this fabulous marinade over those waiting chicken wings nestled snugly within their bowl; toss gently yet thoroughly ensuring even coverage across every single piece—we want them fully enveloped by all those glorious flavors swirling around them now! Once coated properly cover tightly using plastic wrap then move them into refrigeration space allowing at least thirty minutes’ worth (or ideally two hours) soaking up every note present within mixture created beforehand—the longer they marinate means deeper taste absorption leading toward ultimately unforgettable culinary experience later down line!
Step 4: Set Up For Baking
After marinating blissfully away inside fridge check readiness level before proceeding onward towards baking phase—for optimal results line baking sheet mentioned earlier using aluminum foil then position wire rack atop lightly greased surface utilizing olive oil spray or brush even coating across entire frame ensuring no sticking occurs later on during roasting process which would ruin desired crisp finish achieved post-cooking completion… Remove those beautiful marinated wing pieces allowing excess liquid drip back into mixing bowl below then lay them out flat onto prepared wire racks spaced apart so airflow circulates freely around each piece during cook time yielding maximum crispness desired once done!
And there you have it—a fantastic start towards crafting unforgettable Pineapple Cowboy Candy Chicken Wings filled with warmth, excitement & anticipation awaiting culmination point ahead… Stay tuned as we continue exploring next steps leading us ever closer toward serving these delectable treats soon enough!
Step 5: Prepare for Baking – The Art of Arrangement
Now that your wings have marinated beautifully, it’s time to prepare them for their transformation in the oven. This step is crucial because how you arrange your wings can significantly affect their crispiness. Begin by lining a baking sheet with aluminum foil—this not only helps with cleanup but also helps to reflect heat during cooking, ensuring even baking. On top of this, place a wire rack; this allows hot air to circulate around the chicken wings, which is absolutely essential for achieving that perfectly crispy exterior. Trust me on this one; if you skip the rack, your wings might end up sitting in their own juices, resulting in a soggy texture that nobody wants.
Once your setup is ready, it’s time to remove the wings from the marinade. Allow any excess liquid to drip off gently—nobody wants an overly soggy wing! As you lay them out on the wire rack, make sure they are in a single layer without overcrowding. This is vital because overcrowded wings will steam rather than bake, and we want them to reach that golden-brown glory that makes everyone drool at first sight. If you have any leftover marinade after you’ve placed the wings on the rack, don’t discard it just yet! We’ll use that later to brush onto the wings during cooking for an extra boost of flavor.
Step 6: Baking – The Transformation Begins
With everything prepped and ready, it’s finally time to pop those gorgeous wings into your preheated oven set at 400°F (200°C). The key here is patience; as they bake for 25-30 minutes, you’ll witness a delightful transformation. At first glance, they may seem unassuming, but as the minutes tick by, magic happens—the sugars from the brown sugar caramelize and create a glossy glaze while the chicken skin crisps up beautifully. I promise you; this is one of those moments where you’ll be tempted to sneak a peek too often!
Halfway through cooking—around the 15-minute mark—take a moment to brush some of that reserved marinade over each wing. This step not only reintroduces moisture but also deepens that sweet and spicy flavor profile we’re aiming for. The marinade acts like a protective coat as well; it encourages browning without letting the meat dry out. Keep an eye on them during this step; you want them to turn golden brown and slightly charred at edges without burning. It’s fascinating how something so simple can yield such extraordinary results!
Step 7: Broiling for Extra Crispiness – A Final Touch of Heat
As your Pineapple Cowboy Candy Chicken Wings near completion, there’s one last technique we can employ to elevate their texture even further: broiling! If you’re craving that extra crunch—who isn’t?—switch your oven setting to broil for the last 3-5 minutes of cooking time. Broiling exposes food directly to high heat from above, which caramelizes sugars and adds those irresistibly crispy bits that make each bite feel like a party in your mouth.
However, I must emphasize caution here! Stay close and keep an eye on those wings as they broil; things can go from perfectly golden to burnt in seconds due to the intensity of the heat. You want them gloriously browned with crunchy edges while still being juicy inside—a true balancing act! Once they look irresistible and smell intoxicatingly good (trust me; you’ll know), it’s time to pull them out.
Step 8: Resting – The Essential Pause
After all that hard work—and trust me when I say it’s worth every second—it’s crucial to let your wings rest for about five minutes before digging in. While waiting might feel agonizing when your kitchen smells like heaven, allowing these beauties to rest serves several essential purposes. First and foremost, resting gives time for juices within the chicken wings to redistribute throughout the meat instead of spilling onto your plate upon biting into them. This means each bite will be profoundly satisfying rather than just another mouthful of dry protein.
Additionally, during this resting period, residual heat continues cooking them slightly while cooling them down just enough so they won’t burn your tongue—because we definitely don’t want that! When you finally serve these heavenly creations warm and garnished with additional chopped jalapeños for an extra kick (if desired), take a moment before diving in—breathe in that aromatic symphony of flavors and anticipate how utterly extraordinary this experience will be!
Final Touches – Serving Your Masterpiece
With everything done and looking delectable, now it’s time for my absolute favorite moment: serving these Pineapple Cowboy Candy Chicken Wings! Set them on a large platter or individual plates; don’t forget about presentation—it matters! Their glossy finish paired with vibrant colors creates an inviting visual feast that’s almost too beautiful to eat (but let’s be real—you’ll eat them!).
If you’re feeling adventurous or simply want to impress your guests further, consider accompanying these wings with some fresh veggies or a cool dipping sauce like ranch or blue cheese dressing—although honestly? They shine all on their own! As everyone gathers around this mouthwatering centerpiece, share stories about how you crafted these flavors together; after all, food is best enjoyed when shared with loved ones.
I can’t wait for you all to try this recipe out—I promise it’ll become a family favorite! Happy cooking!
Storage and Enjoyment Tips for Your Pineapple Cowboy Candy Chicken Wings
Oh, my friends, the moment has finally arrived! Your Pineapple Cowboy Candy Chicken Wings are golden brown, glistening with that irresistible glaze, and bursting with a symphony of flavors that will make your taste buds dance with joy. Whether you’re serving them at a lively gathering or enjoying them as a special treat just for yourself, these wings are destined to impress. But what happens when you have some leftovers? Worry not! Let’s dive into how to store and savor every last bite of this sweet and spicy delight.
Storing Leftover Pineapple Cowboy Candy Chicken Wings
When it comes to storing your leftover Pineapple Cowboy Candy Chicken Wings, the key is to keep them fresh and flavorful. I recommend using an airtight container; glass containers work beautifully because they don’t absorb odors and keep your wings tasting just as incredible as when they first came out of the oven. Place them in the refrigerator where they can stay happy for about 3-4 days. Now, here’s a little pro tip: if you want to maintain their crispiness, consider placing a slice of bread in the container with the wings—it helps absorb excess moisture! After chilling in the fridge, those wings will still be delectably juicy but may lose some crunch. To bring back that crispy texture, simply pop them back in the oven at 375°F (190°C) for about 10 minutes before serving again—trust me on this one!
Freezing Pineapple Cowboy Candy Chicken Wings for Later
If you’re like me and love to prepare ahead of time, freezing these chicken wings is an absolute game changer! To freeze them properly, make sure they’re completely cooled after baking. Then, arrange them in a single layer on a baking sheet lined with parchment paper and place them in the freezer until solid—this prevents sticking together. Once they’re frozen, transfer them into an airtight freezer bag or container and label it with the date; they’ll keep well for up to 2 months. When you’re ready to enjoy those glorious wings again, simply thaw them overnight in the refrigerator before reheating as mentioned earlier—or even better, toss them straight from frozen into a hot oven until warmed through! This method ensures you’ll always have a delicious meal ready at your fingertips without any fuss.
And there you have it—a complete guide to ensuring your Pineapple Cowboy Candy Chicken Wings remain as delightful as ever! Whether devoured fresh or savored later, these wings are bound to bring joy to your table.
Pineapple Cowboy Candy Chicken Wings

Pineapple Cowboy Candy Chicken Wings are the perfect blend of sweet and spicy, making them an irresistible appetizer for any gathering. Each wing is coated in a luscious glaze that combines the tropical essence of pineapple with the fiery kick of jalapeños, ensuring a burst of flavor in every bite. This recipe transforms simple chicken wings into a culinary delight that will impress your family and friends alike. Whether you’re hosting a backyard barbecue, celebrating game night, or enjoying a cozy dinner at home, these wings promise to be the star of the show. Easy to prepare and packed with flavor, they’re sure to become a favorite in your recipe rotation.
- Prep Time: 30 minutes
- Cook Time: 30 minutes
- Total Time: 1 hour
- Yield: Serves approximately 6 people 1x
- Category: Appetizer
- Method: Baking
- Cuisine: American
Ingredients
- 1.5 lbs chicken wings
- 1/2 cup pineapple juice
- 1/2 cup brown sugar
- 2 jalapeños, finely chopped
- 1 teaspoon garlic powder
- 1 teaspoon onion powder
- 1 teaspoon smoked paprika
- 1/4 cup soy sauce (low-sodium recommended)
- 1/2 teaspoon black pepper
- 1 tablespoon olive oil (for greasing)
Instructions
- Preheat your oven to 400°F (200°C). Rinse the chicken wings under cold water and pat dry.
- In a mixing bowl, whisk together pineapple juice, brown sugar, jalapeños, garlic powder, onion powder, smoked paprika, soy sauce, and black pepper until well combined.
- Pour the marinade over the wings in another bowl and toss to coat evenly. Cover and refrigerate for at least 30 minutes (or up to 2 hours).
- Line a baking sheet with aluminum foil and place a wire rack on top. Lightly grease the rack with olive oil.
- Remove wings from marinade, letting excess drip off, and arrange them in a single layer on the wire rack.
- Bake for 25-30 minutes until golden brown and crispy. Brush with remaining marinade halfway through cooking.
- If desired, broil for an additional 3-5 minutes for extra crispiness.
Nutrition
- Serving Size: Approximately 4 chicken wings (150g)
- Calories: 287
- Sugar: 12g
- Sodium: 494mg
- Fat: 14g
- Saturated Fat: 3g
- Unsaturated Fat: 9g
- Trans Fat: 0g
- Carbohydrates: 22g
- Fiber: 0g
- Protein: 18g
- Cholesterol: 70mg