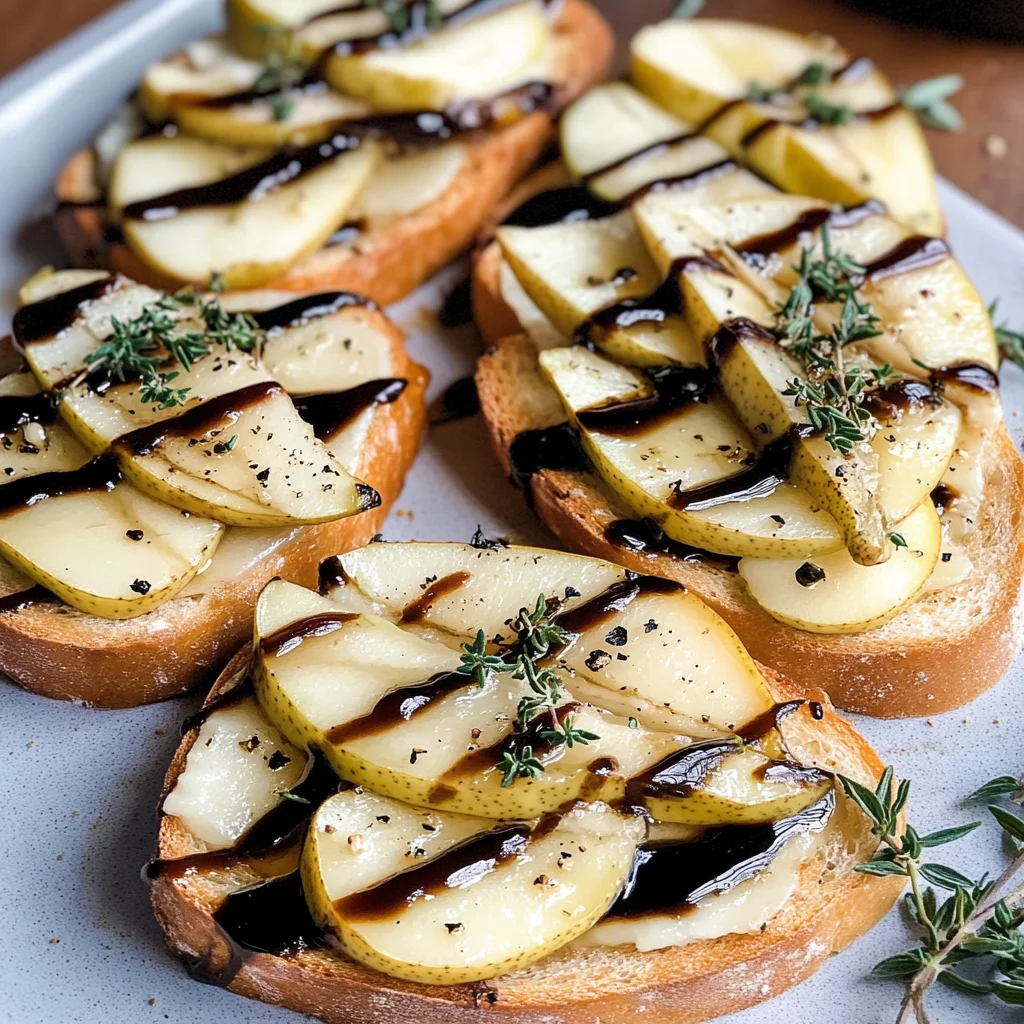
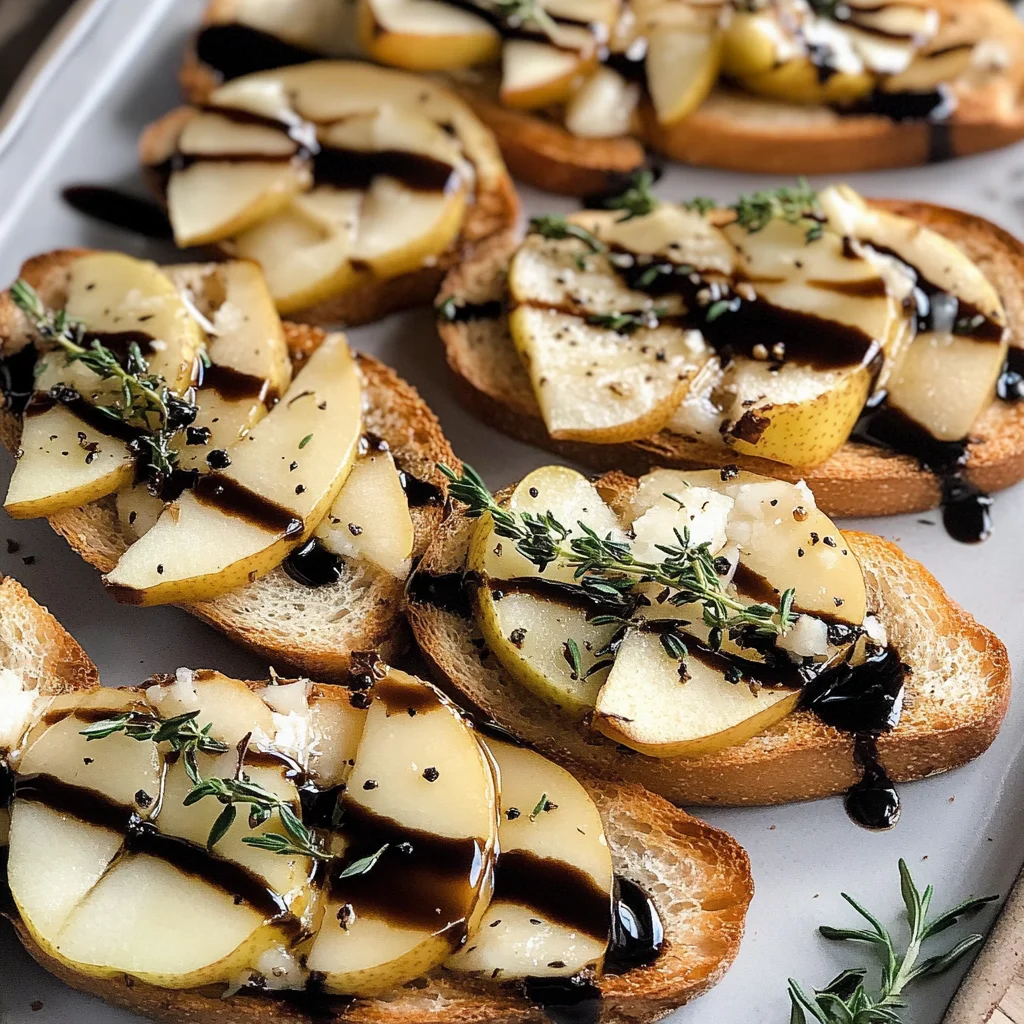
Pear and Brie Crostini
There’s something truly magical about gathering around a table filled with delicious bites, where laughter and stories intertwine seamlessly. When I think about appetizers that not only tantalize the taste buds but also create an atmosphere of warmth and connection, Pear and Brie Crostini comes to mind. This recipe isn’t just about food; it’s an experience that evokes memories of cozy gatherings with friends, the kind where you lose track of time as you savor delightful flavors. The first bite is a revelation—a crispy baguette providing the perfect canvas for rich, creamy brie, perfectly complemented by the sweet juiciness of fresh pears, all tied together with a drizzle of balsamic reduction. Each element sings in harmony, creating what I like to call a symphony of flavors.
Imagine this: You take a bite, and the warm, melted brie envelops your senses like a comforting hug while the pear adds a refreshing crunch. The balsamic reduction introduces an unexpected yet utterly intoxicating tang that dances on your palate. It’s one of those recipes that feels both effortlessly elegant and profoundly satisfying—perfect for casual get-togethers or special occasions alike. Trust me when I say that these crostini will have your guests reaching for more, guaranteed! As we dive into this culinary adventure together, let’s unlock the secrets to crafting these delightful bites in your own kitchen.
Pear and Brie Crostini: A Symphony of Flavor in Every Bite
Welcome to the wonderful world of Pear and Brie Crostini! This recipe is one of those gems that has been loved in my circle for years. It’s easy to prepare but offers such depth in flavor that it feels like you’ve put in hours of effort when really it comes together in just 20 minutes. Whether you’re hosting friends for game night or simply want to pamper yourself on a quiet evening at home, this recipe will elevate any occasion into something truly extraordinary.
Ingredients:
As we embark on this delicious journey together, let’s take a moment to appreciate each ingredient we’ll be using. Each one plays an essential role in crafting those perfect crostini bites that are sure to impress.
- 1 Baguette (about 25 inches long): The baguette serves as the foundation for our crostini. Its crusty exterior gives us that satisfying crunch, while its soft interior provides just the right amount of chewiness. When selecting your baguette, look for one that’s freshly baked—this will ensure optimal flavor and texture. If you can find a sourdough or whole grain variety, those can add even more complexity to our dish! Slice it diagonally for larger surface area; this allows more toppings and enhances presentation.
- 10 oz Brie: Ah, brie—the liquid gold of cheeses! This creamy delight melts beautifully under heat and adds richness that balances perfectly with the crispness of our baguette and the sweetness of pears. Opt for high-quality brie without preservatives if possible; it offers a fresher taste and smooth texture that is absolutely paramount for our crostini. Make sure it’s at room temperature before slicing; this ensures easier handling and maximum creaminess when melted!
- 1 Anjou pear: Fresh pears bring brightness and natural sweetness to our dish, elevating it from good to extraordinary. Anjou pears are particularly wonderful because they hold their shape well when sliced—so you get lovely pieces atop your crostini without them becoming mushy. Look for pears that yield slightly when pressed; this indicates ripeness without being overly soft. And don’t worry if they’re slightly underripe; they’ll continue to soften off the tree!
- 2 Tbsp Olive oil: Good quality olive oil is essential here—not only does it enhance flavor but also aids in achieving that golden crust on our baguettes during baking. Extra virgin olive oil is my go-to because it’s rich in antioxidants and delivers an exquisite taste profile that’s hard to beat! Remember not to skimp on this ingredient; it’s what gives our crostini their deliciously savory character.
- 1 Clove Garlic (crushed): Garlic adds another layer of aromatic depth; it’s like a whispering note in our flavor symphony! Crushing garlic releases its natural oils which intensify its flavor—so don’t be shy about really getting into it here! If you prefer milder notes, feel free to sauté garlic briefly in olive oil before brushing it on the bread; this mellows out its sharpness beautifully.
- 2 Tbsp Fresh rosemary (finely chopped): Rosemary brings earthiness and sophistication to our appetizer with its fragrant aroma—imagine walking through an herb garden after rain! Finely chopping releases its essential oils which disperse beautifully throughout each bite. If rosemary isn’t your favorite herb, feel free to substitute with fresh thyme or even basil for a different twist!
- 2 Tbsp Fresh thyme (finely chopped): Thyme complements rosemary perfectly while adding another layer of freshness. Its petite leaves pack quite a punch so be sure not to rush through chopping—take your time so each piece infuses evenly into our dish! Thyme works wonderfully alongside many ingredients here but definitely shines against creamy textures like brie.
- 2-3 Tbsp balsamic reduction: A drizzle of balsamic reduction brings everything together with its sweet-tart finish—it’s what makes each bite sing! You can easily make your own by reducing balsamic vinegar down until thickened or purchase high-quality store-bought varieties if short on time (just check labels!). Either way, don’t skip this step—it’s non-negotiable!
Equipment You’ll Need:
Now let’s talk about some essential tools you’ll need for creating these delectable Pear and Brie Crostini. Having the right equipment not only makes cooking smoother but also enhances your overall experience in the kitchen. Think of these utensils as your trusted allies on this culinary adventure!
- Baking sheet: A sturdy baking sheet is key here—it helps evenly distribute heat while broiling those lovely crostinis until golden brown perfection is achieved. Lining it with parchment paper can also help reduce sticking and make cleanup easier afterward!
- Sharp knife: A sharp knife is crucial when slicing both the baguette and brie—you want clean cuts so everything layers nicely without squashing delicate ingredients! Choose one with a comfortable grip so you can slice confidently.
- Cutting board: A solid cutting board provides stability while prepping ingredients like pears or herbs before they meet their flavorful destiny atop those toasted baguettes! Opt for one made from wood or bamboo as they’re gentle on knife edges.
- Basting brush: This little tool becomes your best friend when brushing olive oil infused with garlic onto each slice of baguette—allowing even coverage without wasting too much oil!
Preparing the Pear and Brie Crostini / Making Magic Happen
Step 1: Slicing Your Baguette
Let’s kick things off by slicing our beautiful baguette into diagonal pieces about half an inch thick—this technique not only creates larger surfaces for toppings but also enhances presentation by showcasing those lovely crusty edges! Take care as you cut; use long strokes rather than sawing back-and-forth motions which could crumble your bread or create uneven slices. This step is important because even thickness ensures uniform cooking—too thin may burn while too thick won’t toast properly; we want just enough crunch without losing tenderness inside.
Step 2: Preparing Your Cheese & Pear
Next up? It’s time to get intimate with brie and pear! Using a sharp knife (trust me on this), slice off any rind from the brie if desired—I find leaving some adds authenticity plus it’s easier to melt later—but do what feels right for you! Afterward, cut your Anjou pear into thin slices as well—this contrasts beautifully against creamy cheese while enhancing flavors through texture variation! Take care here; aim for consistency since uneven sizes may affect how they cook atop warm bread later.
Step 3: Infusing Olive Oil With Garlic
Now let’s infuse our olive oil with crushed garlic—a step that takes mere moments yet elevates everything exquisitely! Simply crush one clove using either side of your knife blade—it should yield fragrant juices immediately—and mix it into two tablespoons of extra virgin olive oil until well combined (don’t worry about straining out bits; they’ll add flavor). Infusing helps mellow garlic’s pungency while creating an irresistible aroma once baked—your kitchen will smell divine!
Step 4: Toasting Those Perfect Slices
It’s broiler time! Preheat your oven’s broiler function while lightly brushing both sides of each sliced baguette with garlic-infused olive oil—we’re talking generous coverage here folks! Place them onto prepared baking sheets before sliding them under heat for approximately two minutes per side—keep an eye out as they transform from bread into crunchy delights; watch carefully so they don’t burn too quickly—that golden brown hue? That’s exactly what we’re after!
Stay tuned as we continue crafting these delightful bites together—I promise every step brings us closer to perfection!
Step 5: Toasting the Baguette to Perfection
Now, let’s dive into the magical world of toasting. This step is crucial because it transforms simple bread into a canvas that will hold all those delightful toppings. Using your sharp knife, cut the baguette into slices on a slight diagonal, about half an inch thick. This angle not only enhances the visual appeal but also gives each slice more surface area for that glorious crunch! Now, in a small bowl, combine 2 tablespoons of olive oil with the crushed garlic. This mixture is going to impart a subtle flavor that dances on your taste buds. Don’t rush this step; allow the garlic to infuse into the oil for a few minutes while you prep the baguette slices.
Once your baguette is sliced and your garlicky oil is ready, lightly brush each side of the slices with this aromatic concoction. This step is essential because it allows the bread to crisp up beautifully while absorbing those intoxicating garlic notes. Place the oiled baguette slices on a baking sheet and slide them under the broiler. Keep a close eye—broiling can be quick! After about two minutes, flip each slice using tongs (to avoid burning your fingers) and toast them for another two minutes until they turn golden brown. You want that perfect balance of crispy edges and soft centers to provide an irresistible contrast with the creamy brie and juicy pears that are about to crown them!
Step 6: Melting Brie into Creamy Bliss
Oh, here comes one of my favorite parts—the introduction of brie! Once your baguettes are perfectly toasted, it’s time to bring out that luscious cheese. Using a sharp knife, slice your brie into thin pieces; think about 1/4 inch thick so they melt just right without losing their shape completely. The reason we’re adding brie now is that when it gets warm from the oven, it becomes this wonderfully gooey delight that complements our toppings perfectly—trust me on this one!
Take each toasted baguette slice and place a piece of brie on top. It’s almost like laying down clouds atop a golden horizon; you want to ensure each slice has its fair share of this creamy goodness. Then return these cheesy soldiers back under the broiler for about two minutes—watch closely as they begin to melt and bubble just slightly at the edges. This melting process not only enhances flavor but also creates that wonderful texture contrast we’re after in our Pear and Brie Crostini. You’ll know they’re ready when you see just a hint of gooeyness but still retain their shape—this is absolutely paramount!
Step 7: The Sweet Embrace of Pears
Now comes another layer of flavor—our sweet Anjou pear! After removing those golden-brown slices from the oven, it’s time for some assembly magic! Take your perfectly melted brie-covered crostini and add two thin slices of pear atop each one. The beauty of using Anjou pears lies in their slightly sweet flavor and buttery texture which pairs beautifully with rich brie; it’s like finding harmony in every bite. Make sure your pear slices are thin enough so they don’t overpower the other ingredients but thick enough so they can still hold their own.
Sprinkle fresh rosemary and thyme over each crostini now; these herbs add an aromatic freshness that elevates our dish from merely delicious to utterly extraordinary! Why do we sprinkle them now instead of later? Because as these beauties return to the oven for one last time, they’ll release their essential oils, infusing every crostini with herbal goodness as they heat up just enough to coax out all those intricate flavors. It’s like inviting springtime right into your kitchen! Trust me on this—when you open that oven door next, you’ll be enveloped by an intoxicating aroma that will have everyone asking what’s cooking!
Step 8: Infusing Aromatics through Gentle Heating
With everything layered beautifully atop our toasted baguettes, we’re heading for our final heating session—this step is crucial for bringing out all those lovely flavors we’ve carefully assembled! Slide your baking sheet back into the broiler for just another minute or until you can smell those herbs tantalizingly wafting through your kitchen; this gentle heating allows everything to meld together without overcooking any element—even though we love melted cheese!
Keep an eye on them because once those aromas start dancing around your space, you know you’re close! You’re aiming for just enough warmth where everything feels cozy yet retains its individual character—the pears should remain juicy while providing a delightful contrast against that creamy brie and crunchy baguette base. Feel free to experiment here; if you prefer softer herbs or slightly charred edges on your crostini, adjust timing slightly according to your preference.
Final Touches: Drizzling with Balsamic Reduction Magic
And now we arrive at perhaps my favorite finishing touch—the balsamic reduction drizzle! Once you’ve successfully pulled out those heavenly crostini from their final transformation in the oven, let them cool slightly before drizzling with balsamic reduction (2-3 tablespoons should do). This liquid gold brings an intense sweetness balanced with acidity that ties every component together in what I can only describe as an unforgettable symphony of flavors.
As you drizzle over each piece, allow it to cascade down like a gentle rain upon our culinary masterpiece; this visual flourish adds not only beauty but also depth to every bite you take later on—it rounds out any sharp edges while enhancing sweetness from both brie and pears alike! If desired, sprinkle another pinch of fresh herbs before placing these beauties onto a serving platter—a touch that says “I care” without uttering a word. I promise you; when guests take their first bite, they’ll be entranced by how simple ingredients can come together in such profound ways!
Now gather around with friends or family as you serve these Pear and Brie Crostini fresh from the oven—it’s hard not to feel excitement bubbling within as everyone savors every bite together! Enjoy this moment filled with laughter and joy because food truly brings us together in ways nothing else can replicate.
Storage and Enjoyment Tips for Your Pear and Brie Crostini
Now that your Pear and Brie Crostini is a reality, it’s time to dig in and truly savor every bite! The combination of creamy brie, sweet pear, and the irresistible crunch of toasted baguette creates a delightful experience that’s hard to resist. But let’s be real—sometimes we end up with leftovers (if they last that long!). So, how do we preserve this deliciousness without losing its charm?
Storing Leftover Pear and Brie Crostini
To keep your leftover Pear and Brie Crostini fresh and tasty, store them in an airtight container in the refrigerator. This method is key for preserving the delicate flavors and textures. They’ll typically hold up nicely for about 2-3 days, though I must confess: they’re usually devoured long before then! One pro tip I swear by is to separate the crostini from any toppings—keep the bread slices stored away from the brie and pear. This simple step helps maintain that perfect crunchiness of the baguette while the luscious brie stays creamy and the pears retain their fresh essence. Now, I won’t lie; while they’re still delicious after a couple of days, the bread may lose some of its crispness. If you find yourself with leftover crostini, you can pop them back in the oven for a quick reheat at 350°F for about 5 minutes until warmed through—trust me; this little rejuvenation makes all the difference!
Freezing Components for Later
If you want to get ahead of the game or simply have a stash ready for unexpected guests, freezing components of your Pear and Brie Crostini is a fantastic option! You can freeze sliced baguette pieces by placing them in a single layer on a baking sheet until firm, then transfer them into a zip-top freezer bag. They’ll keep well for about 2-3 months in your freezer. When you’re ready to indulge, just take out as many slices as you need (no need to thaw!), brush them with olive oil, toast them up as per the recipe, then add your brie and pear. This way, you’ll have those warm, crispy bites ready to dazzle anyone who walks through your door! Imagine being able to whip up this elegant appetizer on a whim—it’s such a game-changer.
I hope these tips help you enjoy your Pear and Brie Crostini even longer because there’s nothing quite like sharing food that brings joy!
Pear and Brie Crostini

Indulge in these delightful Pear and Brie Crostini—a quick appetizer bursting with flavor! Perfect for any gathering or special occasion. Try it today!
- Prep Time: 10 minutes
- Cook Time: 10 minutes
- Total Time: 20 minutes
- Yield: Approximately 12 servings 1x
- Category: Appetizer
- Method: Baking
- Cuisine: American
Ingredients
- 1 Baguette (about 25 inches long)
- 10 oz Brie
- 1 Anjou pear
- 2 Tbsp Olive oil
- 1 Clove Garlic (crushed)
- 2 Tbsp Fresh rosemary (finely chopped)
- 2 Tbsp Fresh thyme (finely chopped)
- 2–3 Tbsp balsamic reduction
Instructions
- Preheat your broiler.
- Slice the baguette diagonally into half-inch thick pieces.
- In a bowl, mix olive oil with crushed garlic.
- Brush both sides of each baguette slice with garlic-infused olive oil.
- Place slices on a baking sheet and broil for about 2 minutes per side until golden brown.
- Top each slice with a piece of brie cheese and broil for another 2 minutes until melted.
- Add thin pear slices on top of the melted brie, then sprinkle with chopped rosemary and thyme.
- Drizzle with balsamic reduction before serving.
Nutrition
- Serving Size: 1 crostini (30g)
- Calories: 100
- Sugar: 2g
- Sodium: 120mg
- Fat: 6g
- Saturated Fat: 3g
- Unsaturated Fat: 3g
- Trans Fat: 0g
- Carbohydrates: 9g
- Fiber: 0g
- Protein: 3g
- Cholesterol: 10mg