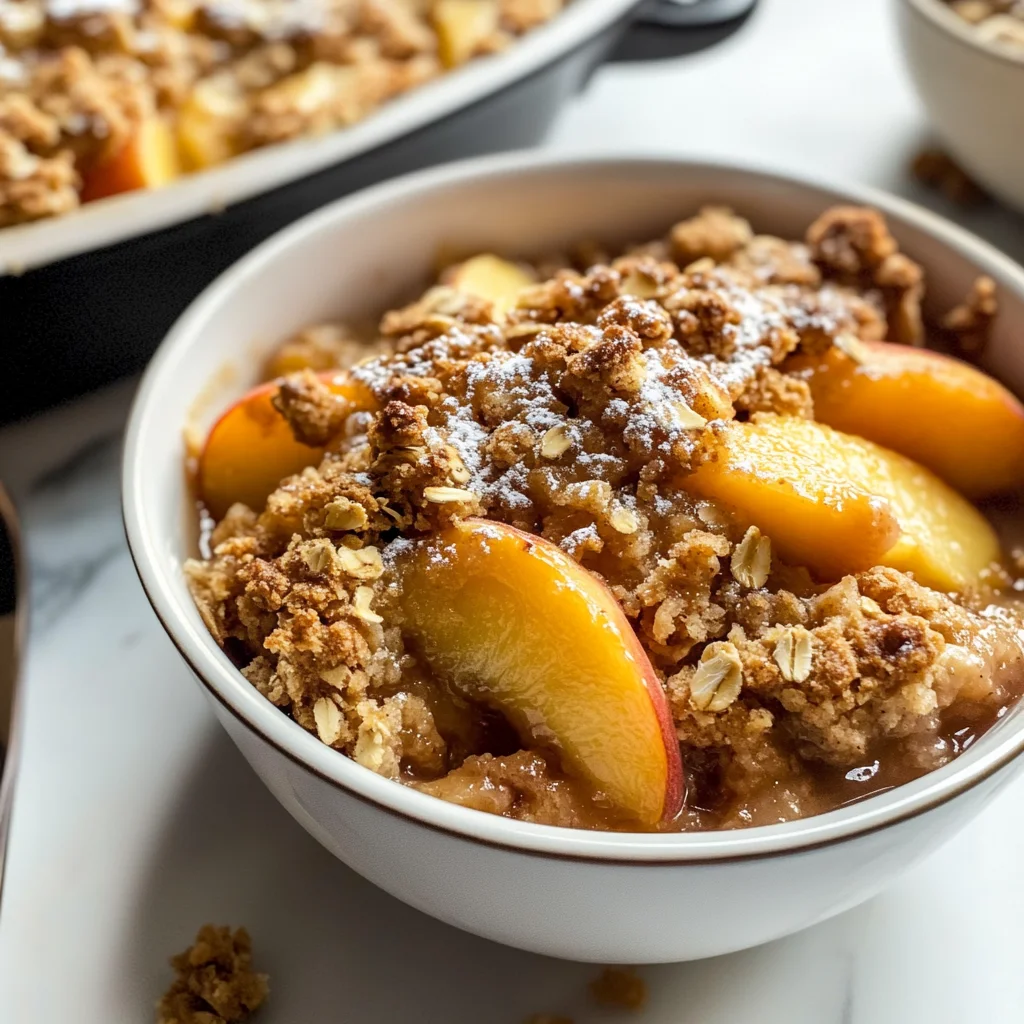
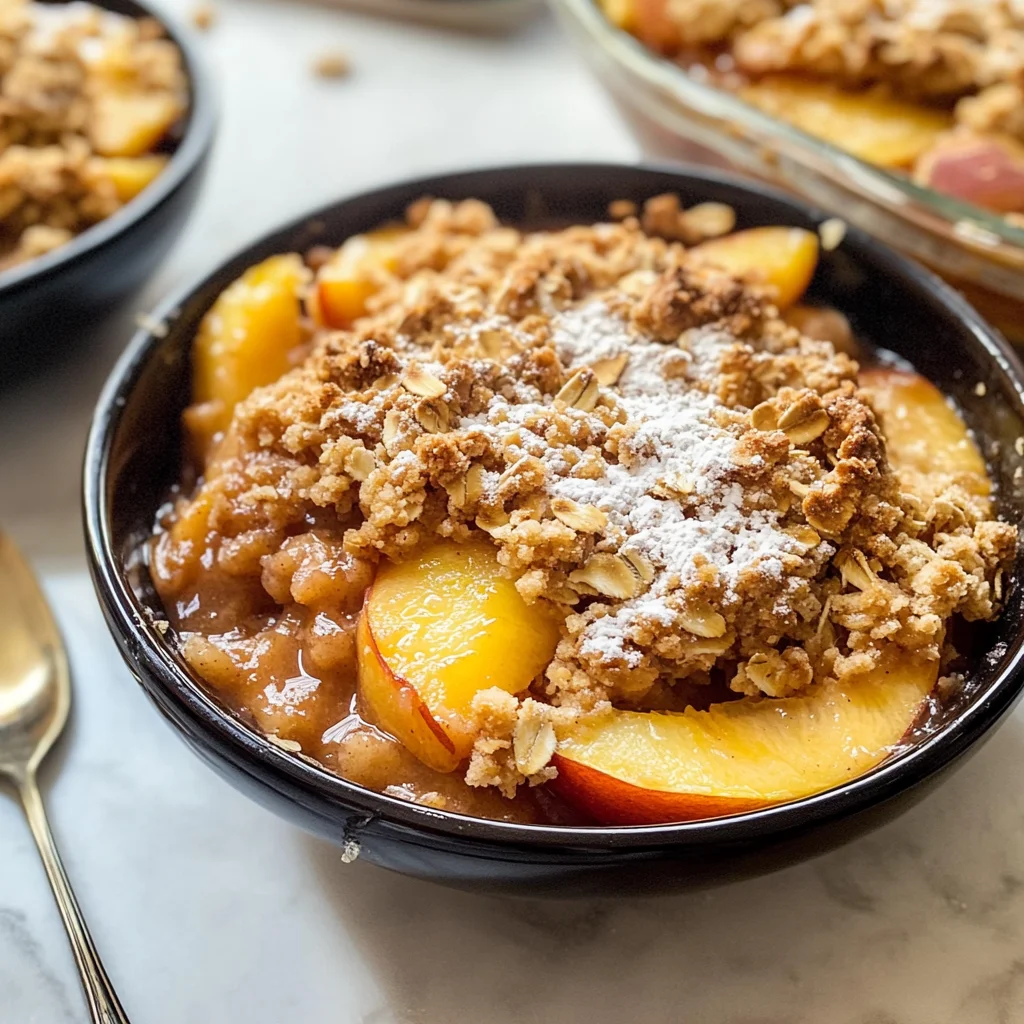
Peach Crisp
When I think of summer, my heart swells with the memory of juicy peaches, their sweet fragrance wafting through the air as they ripen under the sun. Each bite is a burst of sunshine, and when these heavenly fruits are transformed into a warm and comforting Peach Crisp, it becomes an experience that transcends mere dessert. The beauty of this dish lies not just in its simplicity but in the profound connection it fosters between friends and family. Picture this: a golden topping made from oats and brown sugar cradling tender peaches that have been kissed by cinnamon. It’s like a warm hug on a plate! This Peach Crisp isn’t just food; it’s an invitation to gather around the table, to share stories, laughter, and memories over something utterly intoxicating. I promise you, once you take a bite of this delightful creation topped with a scoop of vanilla ice cream, you’ll understand why it has become such a beloved staple in my home.
Now, let me share with you the secrets behind creating this truly extraordinary Peach Crisp. It’s rooted in tradition yet allows for personal touches that make it uniquely yours. The combination of fresh peaches and crunchy oat topping creates a symphony of textures and flavors that dance on your palate. And while it may evoke nostalgia for some—reminding them of grandmas baking in cozy kitchens—it’s also refreshingly modern, perfect for any occasion or just to indulge yourself on a quiet evening at home. So roll up your sleeves and prepare to embark on this culinary journey with me; I assure you, every step is filled with joy!
Peach Crisp: A Cozy Sweet Delight
There’s something so heartwarming about baking a Peach Crisp. It’s as if you’re bringing together all the wonderful elements of summer into one dish—sweetness from ripe peaches, warmth from cinnamon, and that satisfying crunch from the oat topping. Whether you’re celebrating a special occasion or simply enjoying a weeknight treat, this recipe will make your kitchen feel like home.
Ingredients:
As we embark on this delicious adventure together, let’s take a moment to appreciate each ingredient that plays its part in crafting our Peach Crisp.
- 8 cups peeled and thinly sliced fresh peaches. Fresh peaches are undoubtedly the star of this dish! Their juicy sweetness is what makes every bite memorable. When selecting peaches, look for ones that are slightly soft to the touch but still firm enough to hold their shape during baking. Ideally, they should be fragrant and free from blemishes. If fresh peaches aren’t available or out of season, frozen peaches can be used as an alternative—just make sure they are thawed and drained well before mixing them into your filling.
- ½ cup granulated sugar. This ingredient brings out the natural sweetness of the peaches while balancing their tartness beautifully. Granulated sugar also helps create that delightful syrupy filling as it combines with the juices released from the fruit during baking. Feel free to adjust the amount based on how sweet your peaches are; sometimes nature surprises us!
- ½ cup + 2 tablespoons all-purpose flour (divided). Flour serves two crucial roles here: first, it helps thicken the peach filling by absorbing excess juices; second, it’s an essential component of our crisp topping that binds everything together for that irresistible crumbly texture we adore. When measuring flour, it’s important to avoid packing it down too tightly; using the spoon-and-level method ensures accuracy without adding too much density.
- 1 tablespoon cornstarch. Cornstarch is our secret weapon for achieving that perfect consistency in our peach filling! It acts as a thickening agent when combined with fruit juices during baking—ensuring your crisp doesn’t turn out runny but rather luscious and gooey in all the right ways.
- 2 teaspoons ground cinnamon (divided). Cinnamon adds warmth and depth to our dessert—it’s like wrapping everything in cozy spices! Dividing it between the filling and topping means we get layers of flavor throughout every bite. Always opt for freshly ground cinnamon if possible; its fragrance will elevate your crisp to new heights!
- ¼ teaspoon salt. Though salt might seem like an odd addition to dessert recipes, it actually enhances sweetness without making things taste salty! A pinch balances flavors beautifully and rounds out all those sweet notes in our peach crisp.
- ¾ cup packed light brown sugar. Brown sugar brings richness and moisture thanks to its molasses content—it gives our topping that deep caramel-like flavor which pairs perfectly with fruity fillings. Make sure to pack it firmly into your measuring cup for accurate results!
- 1/2 cup (1 stick) salted butter (room temperature). Butter is essential for creating that luxurious crumbly texture we’re aiming for in our topping! Room temperature butter blends smoothly with sugars for optimal creaming—ensuring we achieve fluffy peaks before adding oats into our mix.
- 1 ¾ cup old-fashioned oats. Oats add heartiness while providing texture—think chewy goodness contrasting beautifully against silky-smooth peaches below! Old-fashioned oats work best here since they retain their shape better during baking compared to quick-cooking varieties.
Equipment You’ll Need:
Having the right tools makes all the difference when crafting something lovely in your kitchen! Think of these pieces as your trusty companions guiding you toward success as you create your Peach Crisp masterpiece.
- 9×9-inch baking pan – This size is perfect for achieving even cooking throughout while ensuring there’s enough space for all those delightful layers without overflowing during baking! If you don’t have one handy, consider using another similar-sized dish—just keep an eye on bake time as variations may occur depending on dimensions.
- Mixing bowls – A large mixing bowl is essential for combining ingredients easily without making too much mess—a medium-sized bowl works well too if you prefer separating tasks like mixing dry versus wet components beforehand.
- Measuring cups & spoons – Accurate measurements are non-negotiable when baking; these tools ensure consistency across batches so every crisp turns out perfectly balanced each time!
- Wooden spoon or spatula – A sturdy spoon can handle mixing thicker doughs efficiently while also being gentle enough not to damage delicate fruits like those luscious peaches we’re using today!
Preparing the Peach Crisp
Step 1: Preheat Your Oven
First things first—let’s get our oven ready by preheating it to 400°F (200°C). This step is crucial because starting with hot heat encourages even cooking throughout our dish while allowing sugars caramelize beautifully on top during bake time! While waiting patiently (and maybe daydreaming about how delicious this will turn out), grab your buttered 9×9-inch baking pan—it should be ready when we start layering those heavenly ingredients soon!
Step 2: Prepare The Peaches
Now onto preparing those glorious fresh peaches! In a large bowl, combine 8 cups of peeled and thinly sliced peaches along with ½ cup granulated sugar, 2 tablespoons flour from earlier measured separately (remember we need both!), 1 tablespoon cornstarch for thickening magic later on in oven magic land—and finally sprinkle in 1 teaspoon ground cinnamon plus a dash of salt (¼ teaspoon). Gently toss everything together until evenly coated—this allows every piece of peach goodness access all flavors mingling harmoniously before going into that warm embrace known as “baking”! Once mixed thoroughly pour this luscious mixture into prepared pan spreading evenly across bottom surface so no areas remain bare or neglected!
Step 3: Craft The Topping
In another large bowl—which could be same one if you’re feeling adventurous—cream together remaining brown sugar (¾ cup packed), other half-cup flour left behind earlier plus softened salted butter (½ stick) alongside last teaspoon cinnamon reserved just for this momentous occasion until mixture reaches wet clumps resembling damp sandcastle castles getting ready take flight against ocean waves… ahhhh blissful imagery indeed! Now comes fun part: add old-fashioned oats (1¾ cups) stirring gently till combined forming coarse crumbly topping ready await its destiny atop fruity bed below awaiting savory transformations only ovens can provide under watchful eyes…don’t rush this step—it deserves respect!
Step 4: Assemble & Bake
Once everything feels perfectly mixed together—we’re almost there folks—crumble oat mixture directly onto peach filling making sure each corner gets generous amounts sprinkled lovingly overtop creating beautiful golden crust once baked! Nestle into preheated oven where magic happens fast after around twenty-to-twenty-five minutes check back often watching edges start turning light golden brown while aromas wafting through kitchen tempt taste buds urging patience till cooling period arrives post-baking blissful experience soon awaits!
With these steps completed successfully—you’ve already conquered half journey towards achieving ultimate comfort food heaven known affectionately around here simply as “Peach Crisp.” Stay tuned as we finish up instructions including serving tips next time together exploring joyous world desserts offering heartfelt connections shared over delicious moments enjoyed dearly among friends & family alike…
I can’t wait for you to try making this beautiful dish yourself because trust me—it’ll become one cherished recipe within repertoire worth sharing countless times ahead full hearts happy bellies!
Step 5: Crumble the Oats to Create a Topping That Inspires Joy
Now, let’s talk about that absolutely paramount step of creating the topping. In the same large bowl where you mixed your peach filling, we’re going to create a lovely mixture that will crown our juicy peaches like a soft, cozy blanket. Start by adding the remaining half cup of all-purpose flour and brown sugar to the butter mixture you’ve already creamed together. You want to incorporate these ingredients thoroughly because this is what gives your crisp that delightful texture that balances perfectly with the soft fruit underneath. The warmth of your hands can make this step even more personal; I find that getting in there with my fingers really helps me feel how the ingredients are coming together.
As you mix, be mindful of how it starts to clump together—this is just right! We’re looking for a consistency that is wet yet crumbly, almost like damp sand. This texture is crucial because it allows for those glorious golden clumps to form during baking, which will contrast beautifully with the tender peaches below. The oats will need to be folded in gently until everything is combined into this coarse mixture. Don’t be afraid to get your hands in there! It’s such a tactile experience, and trust me, it’s worth it when you see (and taste) the final product.
Step 6: The Joyous Assembly of Layers
Once your topping is ready, it’s time for the most satisfying part: assembling everything into your baking pan. Carefully crumble that oat mixture over the top of your peach filling, making sure to cover every inch of those beautiful slices. This even layer is non-negotiable because it ensures that every bite of your Peach Crisp has a perfect balance of sweet peaches and crunchy oats. Use your hands or a spatula to spread it out gently; you want a thick layer that provides texture but also allows steam to escape while baking—this will prevent sogginess.
This step is not just about putting things together; it’s about creating harmony between flavors and textures. As each layer melds during baking, they’ll transform into something truly extraordinary—a symphony of flavors that sings with every bite! It may seem simple now, but this thoughtful layering technique ensures that each component shines through and contributes to an overall experience that is profoundly satisfying.
Step 7: Baking Until Golden Perfection
With everything beautifully layered in your baking dish, it’s time for the magic to happen in the oven! Slide your Peach Crisp into that preheated oven set at 400°F and let it bake for about 20 to 25 minutes. Keep an eye on it during those last few minutes; you’re looking for those edges to start turning a light golden color—the sign of crispy perfection! This transformation occurs thanks to the Maillard reaction where sugars caramelize and proteins bond under heat, creating those irresistible flavors and aromas we love so much.
As it bakes, your kitchen will fill with an utterly intoxicating scent—think warm cinnamon mingling with sweet peaches—inviting everyone in the house (or even neighbors!) to come and see what deliciousness you’re cooking up. A good tip here is not only to focus on time but also on visual cues; if you notice bubbling juices around the edges or a slight crisp forming on top before reaching the full bake time, that’s completely normal! Just remember—don’t rush this step! The patience you show during these moments pays off with each delectable bite later on.
Step 8: Resting for Optimal Flavor Development
Once you remove your Peach Crisp from the oven after its glorious transformation into golden goodness, resist the urge to dive right in! I know it’s hard; trust me, I’ve been there—but allowing this dessert to rest for about 10 minutes is essential. During this resting period, flavors meld beautifully as they cool slightly; this brief moment lets juices redistribute throughout the fruit instead of pooling at the bottom when you dig in too soon.
You’ll notice how this little act makes all the difference when serving—it keeps everything intact and ensures every scoop contains just enough peach juice without being overly runny. While you’re waiting (and I promise it’s worth it), take a moment to set out some bowls and perhaps even some vanilla ice cream nearby because we both know this dessert simply begs for a scoop atop its warm surface!
Final Touches: Serving Your Warm Peach Crisp
Step 9: The Sweet Finale
Now comes one of my favorite parts—serving up this heavenly creation! Grab yourself a generous spoonful (or two!) of your warm Peach Crisp and let it cascade into a bowl like liquid gold from nature itself. If you’ve chosen to add vanilla ice cream—a truly wonderful complement—don’t hold back! That creamy richness paired with warm peaches creates an experience that transcends mere dessert; it’s comfort food at its finest.
As you watch everyone savor their first bites—the expressions on their faces as they discover how wonderfully each flavor harmonizes—you’ll understand why I’m so passionate about sharing this recipe. It’s not just food; it’s memories shared around tables filled with laughter and love. So go ahead, bask in those moments as loved ones enjoy every mouthful of your labor—a true testament to how something so simple can bring such profound joy.
Remember, whether enjoyed on a cozy family night or as part of a gathering filled with friends, this Peach Crisp embodies warmth and happiness in every bite. So take pride in what you’ve created here today—it’s not just dessert; it’s a celebration!
Storage and Enjoyment Tips for Your Peach Crisp
Now that your Old-fashioned Peach Crisp is out of the oven, golden and bubbling, it’s time to savor the fruits of your labor! The sweet aroma wafting through your kitchen is simply irresistible, and I can almost guarantee you will struggle to resist diving right in. However, if you find yourself with leftovers (which is rare in my experience!), you’ll want to preserve that delightful goodness for another day. Let’s talk about how to store this divine dessert so it maintains its charm and flavor.
Storing Leftover Peach Crisp
To keep your Peach Crisp fresh for as long as possible, I recommend transferring any leftovers into an airtight container. This not only prevents unwanted moisture from sneaking in but also keeps those lovely crispy oats from becoming soggy. If you’re planning on enjoying it within a few days, simply store it in the refrigerator where it will stay delicious for up to 4-5 days. For optimal freshness, I like to tuck a slice of bread inside the container; it helps absorb excess moisture and keeps the crispiness intact! When you finally get around to enjoying those leftovers, you’ll still find that beautiful blend of juicy peaches and crunchy topping—absolutely heavenly! Just pop it in the microwave for a quick 30 seconds or so, or if you’re feeling fancy, warm it up in a preheated oven at 350°F until heated through.
Freezing Peach Crisp for Later
If you want to take your meal prep to the next level or simply save some of that scrumptiousness for a rainy day, freezing Peach Crisp is a fantastic option! To freeze it properly, let the crisp cool completely after baking, then wrap it tightly with plastic wrap or aluminum foil before placing it in an airtight container. This method prevents freezer burn and locks in all those mouthwatering flavors! You can enjoy frozen Peach Crisp for up to three months without losing its essence. Trust me when I say that when you’re ready to indulge again, just take it straight from the freezer into a preheated oven at 350°F until warmed through. This convenience means you can have an extraordinary homemade dessert waiting just for you whenever that craving hits!
Peach Crisp
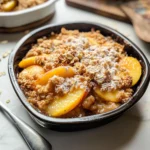
Indulge in the warmth and comfort of this delightful Peach Crisp, a quintessential summer dessert that captures the essence of ripe, juicy peaches nestled beneath a crunchy oat topping. This easy-to-make recipe combines sweetness from the fruit with the rich flavors of brown sugar and cinnamon, creating an irresistible dish that’s perfect for family gatherings or cozy evenings at home. Imagine serving this golden treat warm from the oven, topped with a scoop of creamy vanilla ice cream, as you share laughter and stories with loved ones. With its timeless appeal and simple preparation, this Peach Crisp is sure to become a cherished favorite in your home.
- Prep Time: 15 minutes
- Cook Time: 25 minutes
- Total Time: 40 minutes
- Yield: Serves 8
- Category: Dessert
- Method: Baking
- Cuisine: American
Ingredients
- 8 cups fresh peaches (peeled and sliced)
- ½ cup granulated sugar
- ½ cup + 2 tablespoons all-purpose flour
- 1 tablespoon cornstarch
- 2 teaspoons ground cinnamon (divided)
- ¼ teaspoon salt
- ¾ cup packed light brown sugar
- ½ cup salted butter (room temperature)
- 1¾ cups old-fashioned oats
Instructions
- Preheat your oven to 400°F (200°C). Grease a 9×9-inch baking pan.
- In a large bowl, mix together the sliced peaches, granulated sugar, 2 tablespoons of flour, cornstarch, 1 teaspoon of cinnamon, and salt until well combined. Pour into the prepared baking pan.
- In another bowl, cream together the brown sugar, remaining flour (½ cup), butter, and remaining cinnamon until clumpy. Fold in the oats until mixed.
- Crumble the oat mixture evenly over the peach filling in the baking pan.
- Bake for approximately 20-25 minutes or until the top is golden brown and bubbly.
- Allow to cool for about 10 minutes before serving.
Nutrition
- Serving Size: Approximately 155g
- Calories: 280
- Sugar: 22g
- Sodium: 150mg
- Fat: 12g
- Saturated Fat: 7g
- Unsaturated Fat: 4g
- Trans Fat: 0g
- Carbohydrates: 40g
- Fiber: 3g
- Protein: 3g
- Cholesterol: 30mg