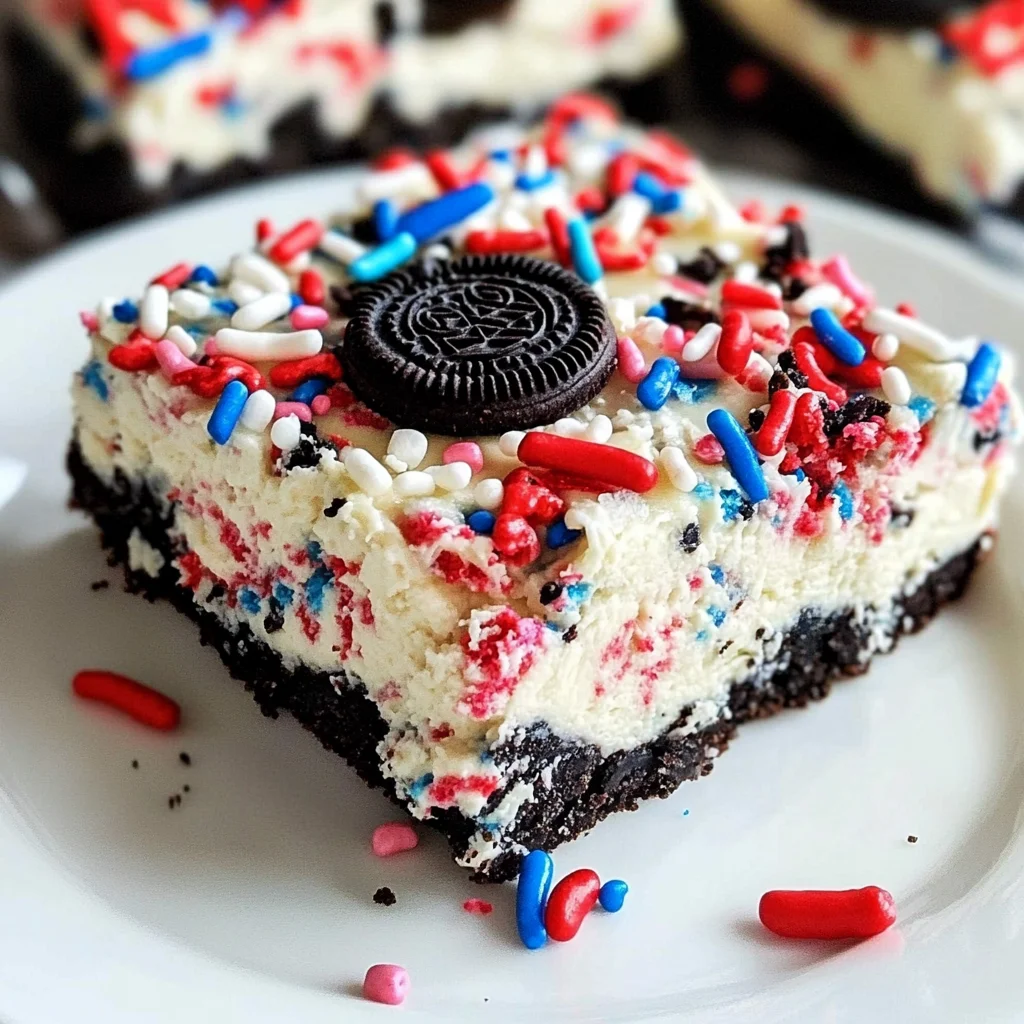
No Bake Fireworks Oreo Cheesecake Bars
There’s something magical about desserts that not only delight the palate but also ignite a sense of joy and celebration. The No Bake Fireworks Oreo Cheesecake Bars are one such treat, transcending mere food to become a cherished experience, especially during festive occasions like the Fourth of July. The luscious creaminess of the cheesecake combined with the crunch and flavor of Oreos creates a symphony of textures and tastes that dance on your taste buds, making it almost impossible to stop at just one bite. As you take your first forkful, you’ll be enveloped in that creamy, dreamy cheesecake filling, punctuated by the delightful crunch of cookies. And just when you think you’ve tasted all there is to offer, those Fireworks Oreos bring a surprise that truly lights up your senses! I promise you, these bars will leave everyone asking for seconds—and possibly thirds!
What makes this dessert even more special is its simplicity—it’s all no-bake! Not only does this save time in the kitchen (which means more time to enjoy with friends and family), but it also opens up countless possibilities for customization. Whether it’s a summer barbecue or a cozy indoor gathering, these cheesecake bars can be tailored to suit any occasion. With bright colors from sprinkles and the playful addition of pop rocks, they don’t just taste great; they look stunning too! Trust me on this: when you serve up these No Bake Fireworks Oreo Cheesecake Bars, you’re not just serving dessert; you’re creating memories filled with laughter and joy.
No Bake Fireworks Oreo Cheesecake Bars: A Celebration in Every Bite
Get ready to embark on a delightful culinary journey as we prepare these No Bake Fireworks Oreo Cheesecake Bars together! I’ll guide you through each step with enthusiasm and warmth because I genuinely want you to experience the sheer joy that comes from creating something truly extraordinary. This recipe is not just about mixing ingredients; it’s about sharing love and happiness through food. So roll up your sleeves, grab your favorite apron, and let’s dive into this delicious adventure!
Ingredients:
As we gather our ingredients for these creamy delights, it’s essential to remember that every component plays a significant role in crafting the perfect cheesecake bars. Let’s explore what we need!
- 25 each Golden Oreos (crushed, about 25 cookies). These golden gems are not only responsible for creating the foundation of our crust but also lend a subtly sweet flavor profile that pairs beautifully with the rich cream cheese filling. If you’re feeling adventurous or can’t find Golden Oreos, feel free to swap them out with regular Oreos or even Red Velvet ones for a fun twist! The key here is to ensure they’re crushed finely enough so they bind well with the butter.
- 6 tablespoons butter (melted). Butter acts as our glue in this recipe—binding our crushed cookies together into a delectable crust that’s both sturdy and flavorful. Melted butter allows for effortless mixing while ensuring every crumb is coated evenly. When selecting butter, go for high-quality unsalted varieties if possible; they really elevate the flavor without overpowering our other ingredients.
- No-taste red gel food coloring (optional). This little splash of color can transform our cheesecake bars into something visually stunning—perfect for festive occasions! A few drops will do wonders if you’re looking to enhance that patriotic theme without altering the flavor profile.
- 32 ounces cream cheese blocks (room temperature, 4 blocks). Cream cheese is essential here—it’s what gives us that luxuriously creamy texture we crave in cheesecake bars. Ensure it’s at room temperature before mixing; this allows it to blend smoothly without lumps. I always recommend using full-fat cream cheese for an utterly intoxicating richness that will leave everyone raving about your dessert!
- 3/4 cup powdered sugar (adjust to taste). Powdered sugar adds sweetness while ensuring a smooth consistency in our cheesecake mixture—no one wants grainy bites in their bars! You can adjust this amount based on how sweet you’d like your filling; I often start with less and add more if needed after tasting.
- 1 teaspoon vanilla extract. Vanilla extract is like liquid gold in baking; it enhances flavors and adds depth to our creamy filling. Look for pure vanilla extract instead of imitation varieties whenever possible—it truly makes all the difference!
- 8 ounces Cool Whip (extra creamy if available). This fluffy topping provides lightness to our cheesecake filling while adding a touch of sweetness as well. If you’re watching your sugar intake or prefer homemade options, feel free to whip some heavy cream until soft peaks form as an alternative.
- 16 cookies Oreo Cookies (roughly chopped—Fireworks Oreos if available). These special Fireworks Oreos are what make this dessert shine! Their surprise popping center adds an unexpected burst of fun—a true party on your plate! If they’re not available near you, don’t worry; regular Oreos will work wonderfully too.
- 1 package red or blue pop rocks or a mixture (optional). For those who want an extra crunch and surprise element in their bars, adding pop rocks is non-negotiable fun! They give you that nostalgic thrill reminiscent of childhood treats while bringing vibrant colors that’ll wow your guests.
- Additional chopped cookies for topping. Use any leftover cookie bits from earlier—we want those crunchy textures layered throughout our dessert!
- Red, White, and Blue Sprinkles or Candies (change color for season or occasion). Sprinkles are like confetti—they bring festivity wherever they go! Feel free to switch them according to seasons—think pastels for spring or warm hues for fall celebrations.
- Additional pop rocks can be added as well for more pop – because who wouldn’t want a little more sparkle in their life?
Now that we’ve gathered all these incredible ingredients together let’s move on to the next step which involves preparing our tools!
Equipment You’ll Need:
Having the right tools at hand makes cooking not just easier but also more enjoyable! It’s like having trusted companions beside you as you create magic in the kitchen.
- Mixing bowls – A good set of mixing bowls is essential; they’ll help keep everything organized while allowing space for thorough mixing without spills.
- Electric mixer – Using an electric mixer will save time and effort when blending together our cream cheese mixture until it’s perfectly smooth and creamy—this process is crucial because lumps can ruin the texture!
- Rubber spatula – A rubber spatula ensures you scrape down sides efficiently so no delicious cream cheese goes unturned—trust me on this!
- 9×13 inch baking dish – The size matters here; this dish provides ample space for layering all those scrumptious components without overcrowding them.
- Plastic wrap or aluminum foil – Covering your dessert properly while it chills prevents unwanted moisture from forming on top—keeping everything fresh until you’re ready to serve!
With all these pieces assembled together alongside our delightful ingredients let’s get started making these unforgettable No Bake Fireworks Oreo Cheesecake Bars!
Step 1: Crafting Our Crust
To begin this beautiful journey toward decadent bliss, let’s focus on crafting our crust first—the foundation upon which all glorious things shall stand! Start by crushing those 25 Golden Oreos into fine crumbs using either a food processor or placing them in a sealed plastic bag and rolling over them with a rolling pin until they’re reduced to dust-like perfection—this process creates an inviting base where each bite reveals mouthwatering textures underneath layers of creamy goodness above it.
Next comes melting 6 tablespoons of butter until it reaches that glorious state where it flows like liquid gold—a visual cue indicating readiness—and then pouring it directly over those crushed cookies in your mixing bowl. Now mix thoroughly until every crumb feels buttery indulgence; this step is crucial because if they aren’t evenly coated, you’ll end up with dry patches rather than cohesive bites later on when everything sets.
Once combined beautifully into what resembles wet sand consistency rather than dry grains scattered around aimlessly—transfer this mixture into your prepared 9×13 inch baking dish pressing firmly down ensuring even coverage across bottom edges alike—that pressure helps solidify things during chilling later while providing stability when serving up slices after completion.
Step 2: Blending Our Creamy Filling
Now onto where true magic happens—the creation of our creamy filling! In another mixing bowl fitted snugly beneath an electric mixer take out those four blocks (32 ounces) room-temperature cream cheese ready awaiting transformation into velvety delightfulness they were born destined towards achieving today! Begin beating them gradually until soft peaks emerge revealing airy lightness within—a process known as creaming which allows air pockets essential for fluffiness through incorporation throughout batter itself instead getting stuck along bottom edges instead creating undesirable lumps later down road ahead if rushed unnecessarily so take care here please don’t rush through this vital step!
Once you’ve achieved that lovely smooth texture introduce 3/4 cup powdered sugar along side 1 teaspoon vanilla extract inviting sweetness alongside aromatic bliss resulting harmonizing flavors perfectly balanced against richness found within creams themselves… Ahh what could be better? Take pause reveling sensations wafting gently inviting smiles across faces nearby before continuing forth adding Cool Whip next giving further lift enhancing overall experience causing hearts skip beats upon tasting results sure bring joy every single moment spent enjoying afterwards too!
Step 3: Adding Those Fun Elements
Now comes perhaps my favorite part—the playful addition of chopped Fireworks Oreos followed by optional pops rock surprises sprinkled throughout filling providing bursts excitement once served chilled forth later creating delightful contrasts between crunchy textures underneath silky layers above…
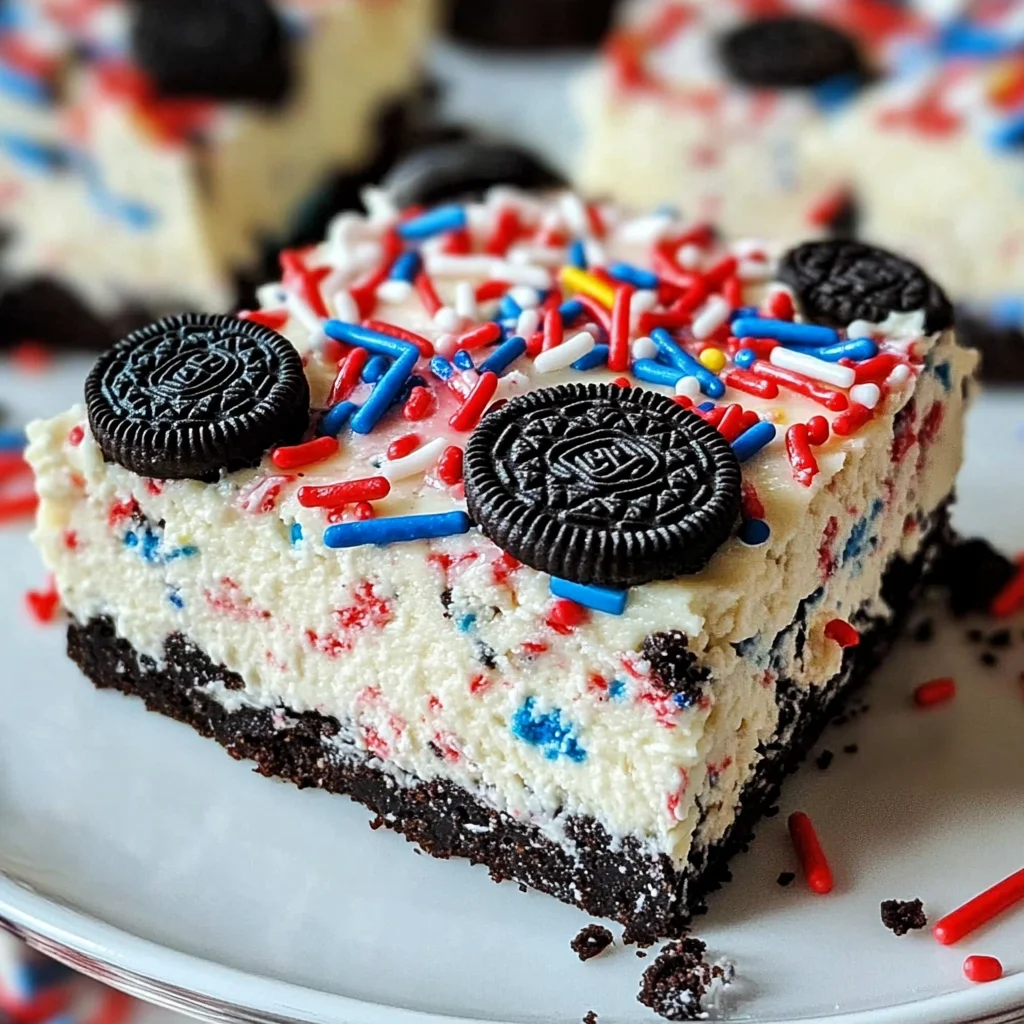
Crafting Your No-Bake Fireworks Oreo Cheesecake Bars
Step 4: Bringing the Creamy Base to Life
Now that your crust is chilling beautifully in the fridge, it’s time to dive into the heart of this dessert—the creamy cheesecake filling that will make your taste buds sing. Begin by placing your room temperature cream cheese blocks into a large mixing bowl. Trust me, using room temperature cream cheese is absolutely paramount; it ensures a smooth and velvety texture without the risk of lumps. Using an electric mixer fitted with a paddle attachment, beat the cream cheese on medium speed until it’s light and fluffy—about 2 to 3 minutes. You’ll know it’s ready when it transforms into a soft, luscious cloud that practically begs to be slathered onto your crust.
Next, add in the powdered sugar and vanilla extract. The powdered sugar not only sweetens but also adds a delicate texture, balancing out the richness of the cream cheese. Don’t rush this step! Mix everything together until fully combined—aim for another minute or so. You want to achieve a consistency that’s wonderfully creamy yet firm enough to hold its shape once set. If you’re feeling adventurous or want to add a festive flair, now’s the time to incorporate those few drops of no-taste red gel food coloring. This optional step will not only enhance visual appeal but also give your cheesecake bars that charming red hue, reminiscent of fireworks lighting up the night sky!
Step 5: Folding in the Cool Whip
Once your filling is blended to perfection, it’s time for one of my favorite steps: folding in the Cool Whip! This technique is essential because it introduces air into your mixture, creating that light and airy texture we all crave in a cheesecake. In a separate bowl, take that glorious eight ounces of cool whip (extra creamy if you can find it) and gently fold it into your cream cheese mixture using a spatula. Remember, being gentle is key here; you want to maintain as much volume as possible without deflating all that lovely air you’ve just incorporated.
As you fold, you should see beautiful swirls of white merging with your vibrant filling—it’s like watching a masterpiece come together! This step not only enhances texture but also adds an element of sweetness that balances out the tanginess of the cream cheese perfectly. Keep folding until there are no visible streaks left; this means you’ve achieved that harmonious blend we’re looking for. I promise you, this filling alone is simply irresistible and could easily stand alone as a decadent dessert!
Step 6: The Exciting Crunch of Oreos and Pop Rocks
Now comes perhaps my favorite part—adding those chopped Fireworks Oreos into your creamy cheesecake mix! Take those roughly chopped cookies and gently fold them into your filling just like you did with the Cool Whip. Each piece will bring an exciting crunch and delightful bursts of flavor that’ll elevate each bite to something truly extraordinary. Why Fireworks Oreos? They not only pack a delicious cookie flavor but also introduce unexpected pops from their special center—a fun surprise that will dazzle everyone at your gathering.
If you’re feeling particularly adventurous (or if you’re serving this at a festive event), sprinkle in some red or blue pop rocks too! These little gems add an exhilarating fizz when they hit your tongue—a true celebration in every bite! Just envision how these flavors will play together: the rich creaminess of cheesecake marrying with crunchy cookies and playful pops—it’s nothing short of magic. Make sure everything is combined well but avoid overmixing; we want each component to shine through without losing its individual charm.
Step 7: Pouring Your Filling with Love
With everything mixed beautifully, it’s time to pour this luscious filling over our chilled crust. Carefully spoon the creamy mixture onto the cooled base while spreading it evenly with a spatula. This step is crucial—taking care to achieve an even layer means every piece will have that satisfying balance between crust and filling when you cut into it later on. As you spread, take a moment to admire how stunningly colorful this concoction looks already; it’s like capturing summer’s joy in dessert form!
Once you’ve smoothed out the top as best as possible (don’t worry if it’s not perfect!), cover it loosely with plastic wrap or aluminum foil—this helps prevent any unpleasant freezer burn while chilling—and place it back in the refrigerator for at least four hours or overnight if you’re planning ahead. I cannot stress enough how important this chilling period is; allowing time for those flavors to meld creates an utterly intoxicating experience when you finally get to enjoy these bars! Patience truly pays off here as they transform from mere ingredients into something spectacularly cohesive and delicious.
And there you have it—the ultimate No Bake Fireworks Oreo Cheesecake Bars ready to dazzle at any celebration! I can assure you, sharing these treats with family and friends will warm your heart as they revel in every pop and crunch along with that luscious cheesecake goodness. Enjoy every moment spent making—and indulging—in this spectacular dessert because cooking truly brings us all together in joyous harmony!
Storage and Enjoyment Tips for Your No Bake Fireworks Oreo Cheesecake Bars
Now that you’ve crafted this heavenly No Bake Fireworks Oreo Cheesecake Bars, it’s time to revel in the deliciousness! But wait—what if there are leftovers? (Though I doubt it!) These bars are not only joyfully creamy and indulgent, but they also lend themselves beautifully to storage, ensuring you can savor the magic a little longer. The key is knowing how to keep them fresh and delightful for your next sweet craving.
Storing Leftover No Bake Fireworks Oreo Cheesecake Bars
To keep your bars tasting as fresh as the day you made them, grab an airtight container—this is absolutely crucial to prevent any moisture or odors from sneaking in. Pop your cheesecake bars into the container and store them in the refrigerator. If you follow this method, they’ll maintain their delectable creaminess for about 5-7 days. What’s more, if you want to go the extra mile for texture preservation, consider placing a slice of bread inside the container; it acts like a sponge, absorbing any excess moisture and keeping your bars perfectly velvety. After a few days in the fridge, they might just become even more flavorful as those irresistible flavors meld together beautifully. When you’re ready to serve them again, simply slice off a piece and enjoy it cold—trust me; this rich cheesecake bar is utterly satisfying straight from the fridge!
Freezing No Bake Fireworks Oreo Cheesecake Bars for Later
If you’re lucky enough to have extra bars (or you want to make a batch ahead of time), freezing them is a fantastic option! Start by cutting the bars into individual squares and wrapping each piece tightly in plastic wrap. Then place them in a freezer-safe container or bag. When stored properly, these delightful treats can last up to 3 months in your freezer without losing their charm! This makes them incredibly convenient for unexpected gatherings or late-night cravings; simply pull out a square from the freezer and let it thaw in the refrigerator for a couple of hours before enjoying. The anticipation builds as you wait for that creamy bliss to return! Plus, having these on hand means you’re always prepared for spontaneous celebrations or sweet moments with loved ones—what could be better than that?
No Bake Fireworks Oreo Cheesecake Bars
Indulge in the delightful experience of making No Bake Fireworks Oreo Cheesecake Bars! These bars combine a luscious cream cheese filling with the exciting crunch of Oreos, creating an irresistible treat perfect for any celebration, from summer barbecues to festive gatherings. With the fun addition of Fireworks Oreos and colorful sprinkles, each bite is a delicious explosion of flavor and nostalgia. Plus, this no-bake recipe is quick and easy to prepare, allowing you to spend more time enjoying with your loved ones. Whether you’re serving them at a party or savoring them on your own, these cheesecake bars are sure to become a favorite!
- Prep Time: 20 minutes
- Cook Time: None
- Total Time: 0 hours
- Yield: Approximately 12 servings 1x
- Category: Dessert
- Method: No-Bake
- Cuisine: American
Ingredients
- 25 Golden Oreos (crushed)
- 6 tablespoons melted butter
- 32 ounces cream cheese (room temperature)
- 3/4 cup powdered sugar
- 1 teaspoon vanilla extract
- 8 ounces Cool Whip
- 16 Fireworks Oreos (chopped)
- Red, white, and blue sprinkles (for topping)
Instructions
- In a mixing bowl, combine crushed Golden Oreos and melted butter. Mix until well combined.
- Press the mixture firmly into the bottom of a 9×13 inch baking dish to form the crust.
- In another bowl, beat room temperature cream cheese until smooth. Add powdered sugar and vanilla; blend until fully combined.
- Gently fold in Cool Whip until smooth and airy.
- Fold in chopped Fireworks Oreos and optional pop rocks for added fun.
- Pour the filling over the crust and spread evenly.
- Cover with plastic wrap and refrigerate for at least four hours or overnight until set.
- Before serving, garnish with additional chopped cookies and sprinkles.
Nutrition
- Serving Size: 1 serving
- Calories: 210
- Sugar: 12g
- Sodium: 150mg
- Fat: 14g
- Saturated Fat: 8g
- Unsaturated Fat: 4g
- Trans Fat: 0g
- Carbohydrates: 22g
- Fiber: 1g
- Protein: 2g
- Cholesterol: 30mg