Lemon Bar Cookies
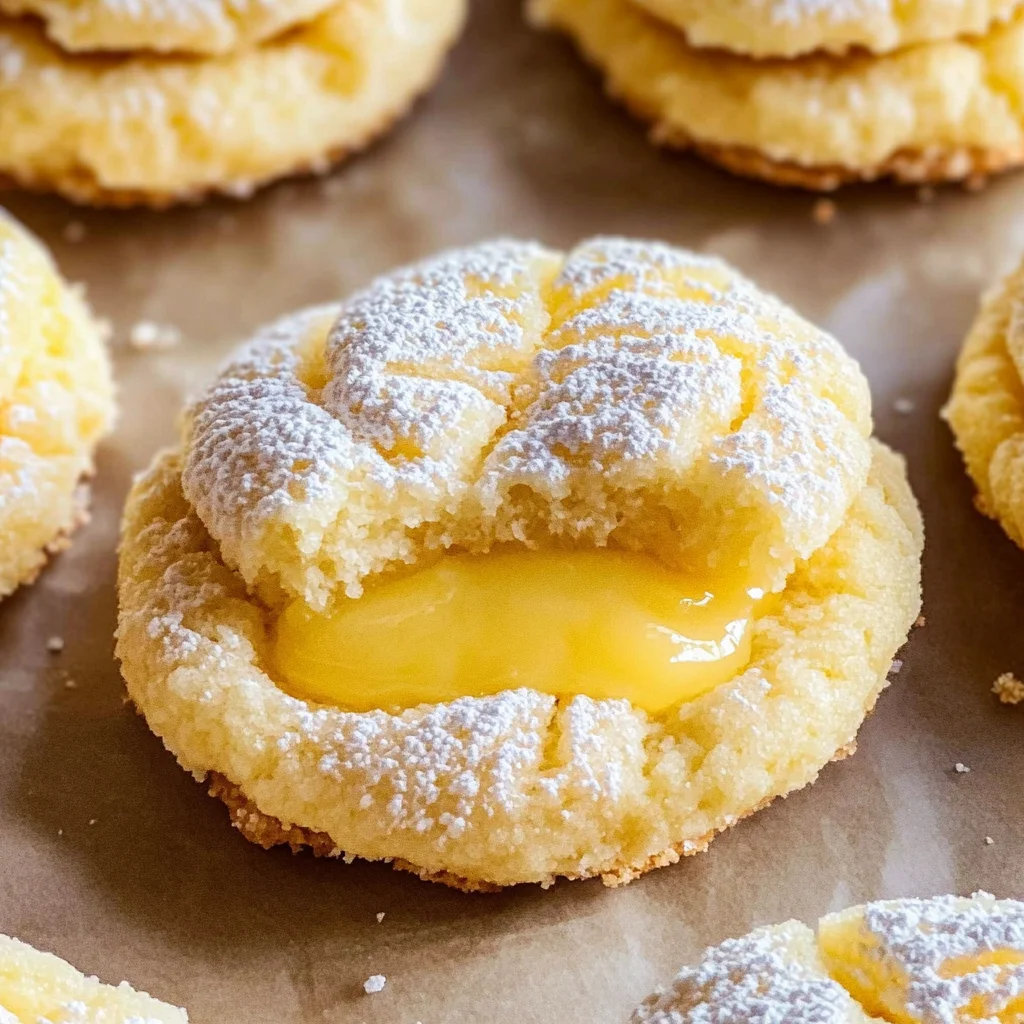
There’s something profoundly satisfying about the act of baking, isn’t there? It’s not just about the end result; it’s the journey—the cozy aromas that fill your kitchen, the gentle clink of mixing bowls, and the anticipation that builds as you await your creation. This recipe for Lemon Bar Cookies is a celebration of those moments. Imagine biting into a soft, melt-in-your-mouth cookie with a luscious lemon curd center that strikes the perfect balance between sweet and tart. It’s like sunshine on a plate! These cookies are more than just a dessert; they’re an experience, transporting you to warm summer days and childhood memories of lemonade stands. I promise you, once you’ve tried these Lemon Bar Cookies, they will become a beloved staple in your home.
What makes these cookies truly special is their delightful combination of textures and flavors. The cream cheese base creates a soft, tender crumb that serves as the perfect canvas for the zesty lemon curd. The addition of fresh lemon juice and zest brings an invigorating brightness that dances on your palate, making each bite utterly intoxicating. And let’s not forget about that dusting of powdered sugar! It adds a whimsical touch and balances out the tangy notes beautifully. Whether you’re hosting a gathering or simply indulging yourself after a long day, these cookies are sure to impress. So grab your apron and let’s dive into this delightful culinary adventure together!
Lemon Bar Cookies: A Zesty Twist on a Classic Treat
These Lemon Bar Cookies are a beautiful fusion of two beloved desserts—classic lemon bars and soft cookies. They encapsulate everything we adore about both: the refreshing zing of lemon paired with that comforting cookie texture we can’t resist.

Ingredients:
As we embark on this culinary journey together, let me walk you through each ingredient in our Lemon Bar Cookies recipe. Each component plays its own vital role in crafting these little gems.
- 1/2 cup granulated sugar. This is the sweet foundation for our lemon curd filling. Granulated sugar not only sweetens but also helps stabilize the curd as it cooks by creating a delightful consistency when combined with egg yolks and lemon juice. Look for fine granulated sugar for the best results—this will dissolve easily during cooking, ensuring a smooth texture.
- 3 egg yolks. These golden jewels are essential for our lemon curd’s richness and creaminess. The fat in the yolks helps create that luxurious mouthfeel we crave in desserts while also providing structure to our filling as it sets during cooking. Make sure to separate them carefully; any bit of egg white can hinder your curd from thickening properly.
- 1/4 cup fresh lemon juice. Freshly squeezed lemon juice is non-negotiable here! It provides that bright acidity which balances perfectly with the sweetness in our cookies. Bottled juice simply cannot compare—fresh juice offers an uplifting aroma and flavor that’s vibrant and alive.
- 1 tbsp lemon zest. Ah, zest—the aromatic skin of citrus fruits holds so much flavor! A tablespoon adds an extra punch of freshness without overwhelming the cookie itself. When zesting, be careful to only take off the bright yellow part; white pith can add bitterness.
- 4 tbsp unsalted butter (room temperature) & 7 tbsp unsalted butter (room temperature). Butter is key to achieving that tender texture we desire in our cookies. Using unsalted butter allows us to control how much salt goes into our recipe while ensuring that all flavors shine through without interference.
- 3.5 ounces full-fat cream cheese (room temperature). Cream cheese adds an unparalleled richness and softness to our dough, creating that melt-in-your-mouth sensation when baked. Be sure it’s at room temperature for easy blending; if it’s too cold, it won’t incorporate smoothly into your mixture.
- 1 cup granulated sugar (for cookies). This ingredient contributes sweetness while also promoting browning during baking—a crucial factor for those golden edges we love so much! Again, using fine granulated sugar ensures it blends seamlessly into our dough.
- 1 whole large egg (room temperature) & 1 large egg yolk (room temperature). The combination of whole egg and additional yolk enriches both flavor and texture while providing moisture—essential for keeping those cookies soft!
- 1 tsp vanilla extract. Vanilla adds depth to our flavor profile; it enhances all other ingredients harmoniously without overpowering them. Use pure vanilla extract if possible—the difference is remarkable!
- 1 3/4 cup all-purpose flour. Flour gives structure to our cookies while allowing them to spread just enough during baking for those beautiful shapes we’re after! Make sure to measure accurately; too much flour can lead to dry cookies.
- 2 tsp baking powder & ¼ tsp salt. Baking powder is our leavening agent here, helping give lift to these beauties while salt heightens flavors throughout—not enough would make them taste flat!
- Powdered sugar (for rolling) serves as the finishing touch: it brings visual appeal and extra sweetness while complementing the tartness of the lemon curd beautifully.
Equipment You’ll Need:
Having the right tools can make all the difference in how enjoyable—and successful—your baking experience turns out! While they may not be “ingredients,” think of these essential pieces as your trusty sidekicks in this delicious endeavor.
- Mixing bowls – A good set of mixing bowls allows you to combine ingredients effectively without worrying about spills or messes! Opt for glass or stainless steel; they’re durable and won’t absorb odors or stains over time.
- Whisk – A sturdy whisk is indispensable for blending ingredients smoothly—especially when emulsifying butter with cream cheese or creating your luscious lemon curd! If you’re serious about baking, consider investing in both balloon whisks for larger tasks and smaller ones for precision work.
- Rubber spatula – This multitasker is perfect for scraping down sides of bowls or folding delicate mixtures together gently without deflating them—a must-have when working with whipped components like cream cheese!
- Standard cookie scoop – This handy tool ensures uniformity among your cookie sizes which means even baking times across all batches—no one wants unevenly baked treats!
- Parchment paper – Line your baking trays with parchment paper to prevent sticking while making cleanup effortless afterward—definitely worth having on hand!
Now that we’ve got everything ready and set up let’s dive into preparing those delightful Lemon Bar Cookies!
Step 1: Creating Luscious Lemon Curd
Begin by taking a small pot over medium-low heat where you’ll combine half a cup of granulated sugar with three egg yolks and one-fourth cup of freshly squeezed lemon juice along with one tablespoon of zest from those vibrant lemons we’ve used earlier—it’s going to enhance every aspect we’re aiming for here! Stir this mixture constantly as it heats up; this process is crucial because it ensures even cooking while preventing any eggs from scrambling unexpectedly—a nightmare no baker wants! After around twelve minutes, you should see it transforming into this gorgeous vibrant yellow color that’s thick enough to coat the back of a spoon—a sign you’ve hit gold here!
Step 2: Incorporating Butter into Your Curds
Once you’ve reached this beautiful consistency, remove your pot from heat and pour that luscious curd mixture into a bowl before stirring in four tablespoons (which equals half stick) of room-temperature unsalted butter until fully melted within—that step infuses richness throughout while also cooling down slightly before we use it further down in our recipe! Take care not to rush this part; letting it cool completely allows flavors time to mingle harmoniously rather than competing against one another later down line when filled into those lovely cookie dough wells waiting patiently on their parchment sheets!
Step 3: Creaming Together Butter And Cream Cheese
While your curd continues cooling off lovingly aside from mischief-making plans ahead (trust me!), turn focus onto combining four tablespoons plus seven tablespoons (that’s 11 total) room-temperature unsalted butter alongside three-and-a-half ounces softened cream cheese inside another large bowl until blended thoroughly—a process known as creaming which creates air pockets resulting in lightness within baked goods later on—the ultimate goal being fluffy yet tender bites when finally served up hot outta oven moments away down line… Exciting stuff right there!
Step 4: Adding Sweetness And Eggs To Create Magic
Next up comes pouring that heavenly cupful worth granulated sugar straight into mixture already created above followed closely by adding one whole large egg plus an additional rich yolk before splashing fragrant vanilla extract right atop all these delicious layers building up inside bowl—it’s beginning feel like magic already isn’t it? Let everything mix until fully combined where fluffiness reigns supreme—this takes roughly two minutes depending upon speed settings chosen so keep close watch as textures transform beautifully together before proceeding forth towards next steps involving folded flour mixtures just waiting eagerly behind scenes…
Stay tuned as I guide you through each remaining step towards assembling these Lemon Bar Cookies—you won’t want miss what’s coming next!
The Joy of Making Lemon Bar Cookies
Step 5: Creaming to Perfection
Now that your luscious lemon curd has cooled and is ready to be incorporated into your cookies, it’s time to bring together the creaminess of butter and cream cheese. In a large mixing bowl, grab your room-temperature butter—this is absolutely crucial because softened butter blends seamlessly, creating that tender texture we all crave in cookies. With an electric mixer or a sturdy wooden spoon, whip the butter and cream cheese until they form a smooth, combined mixture. This process should take about 2-3 minutes, and you’ll want to keep an eye on the consistency; it should resemble a velvety paste with no lumps at all.
Why is this step so important? Well, creaming incorporates air into the fat, which helps create a lighter cookie. It’s like giving your dough a little love and breathing life into it! Once you achieve that lovely blend, it’s time to add in the granulated sugar. Mix until everything is fluffy and well combined—this could take another minute or so. You’ll notice the color becoming paler as you mix; that’s a good sign! Remember, don’t rush this step; patience will reward you with cookies that have just the right bite.
Step 6: The Eggy Embrace
With your buttery mixture now light and airy, it’s time to introduce the eggs—this is where the magic truly begins! Add in one whole large egg and one egg yolk (both at room temperature for optimal blending). The reason we use room-temperature eggs is that they emulsify better with the fats, helping create that beautifully cohesive dough. Blend these ingredients into the mixture until they’re fully integrated; you want to avoid overmixing here because too much agitation can lead to tough cookies.
Next up comes the star of our flavor show: one teaspoon of pure vanilla extract. This ingredient adds depth and warmth to your cookies, elevating them from merely delicious to utterly unforgettable! Stir gently until just combined. You’ll see how everything melds together beautifully—the rich aroma of vanilla fills your kitchen like a cozy hug. Trust me on this: taking these few moments to ensure everything is mixed just right will yield results worth celebrating!
Step 7: Drying Out Isn’t Just for Laundry
Now we embark on integrating our dry ingredients—a vital moment that cannot be overlooked! In this step, you’ll fold in 1¾ cups of all-purpose flour along with 2 teaspoons of baking powder and ¼ teaspoon of salt. Folding means gently incorporating these ingredients without overworking the dough; this technique preserves the airiness we’ve developed in our previous steps. It’s okay if there are still tiny flecks of flour visible; what we’re aiming for is a soft dough that holds together beautifully without becoming dense.
Why do we need baking powder? This leavening agent gives our cookies that delightful rise and fluffiness reminiscent of classic lemon bars but in cookie form! As you’re folding these components together, keep an eye on the texture; it should be slightly sticky but manageable enough to scoop. If you find it too dry or crumbly, it might need a tiny splash of water or lemon juice—just don’t go overboard! Remember, every ingredient plays its role in balancing flavors and textures; don’t shy away from tweaking things based on what you see!
Step 8: Sweet Scoops of Dough
Now comes one of my favorite parts—the fun assembly! Grab a standard cookie scoop (roughly two tablespoons) and start scooping out your cookie dough onto a clean surface or directly into a bowl filled with powdered sugar. Oh yes—this part is where things get exciting! Once you’ve got those perfectly rounded scoops ready to go, toss each ball in powdered sugar until it’s completely coated. This not only adds sweet flavor but also creates an enchanting snowy finish once baked—a glorious visual treat!
After rolling each cookie dough ball in powdered sugar (and trust me when I say you’ll want every nook covered), place them onto a parchment-lined baking tray about 2-3 inches apart. Now comes an essential step: using the bottom of a tablespoon, gently press down each ball just enough to create a small well in the center—this little dip will hold our luscious lemon curd later on! Don’t rush this part either; ensuring even spacing allows for proper baking without spreading into one giant cookie. At this point, you’ll probably catch yourself daydreaming about how incredible these cookies are going to taste—I know I always do!
Baking Your Perfect Lemon Bar Cookies
Step 9: Chill Out!
Before we can indulge in our lemon bar cookies blissfully, we must give them some quality chill time. Pop your prepared tray into the freezer for about 1-2 hours—or until they’re frozen solid. Why freeze? Well, chilling not only helps maintain their shape during baking but also intensifies those exquisite flavors we’ve been building throughout this process! Think about it like letting marinated chicken soak up spices overnight—the longer flavors mingle together, the more profound they become.
While waiting impatiently (trust me—I’ve been there!), take a moment to appreciate how far you’ve come already! When you’re ready to bake, preheat your oven to 350°F (180°C). Keep an eye on those cookies as they bake for about 12-13 minutes; they should look slightly puffed yet still soft in the center when they come out—an alluring golden hue will start developing around their edges too! Watch closely because every oven has its quirks; yours might bake faster or slower than mine. If you’re ever unsure when they’re done baking, remember that it’s better to err on the side of underbaking—they’ll continue cooking slightly as they cool down.
Step 10: The Grand Finale – Dusting Delight
Once you’ve pulled those heavenly lemon bar cookies from the oven and allowed them to cool completely on wire cooling racks (which will take about 10-15 minutes), it’s finally time for that final touch—a delicate dusting of powdered sugar for presentation’s sake! This step isn’t just for looks; it adds an extra layer of sweetness that complements our tart lemon curd filling beautifully.
Using a fine mesh sieve or simply grabbing some powdered sugar with your hands (no judgment here!), sprinkle generously over each cookie until they resemble clouds softly resting atop sunny hillsides. And there you have it—the extraordinary culmination of our efforts transformed into delightful morsels ready for sharing (or keeping all to yourself!). I promise you—each bite will transport you straight back to sunlit summers filled with laughter and joy.
Enjoy exploring these easy lemon bar cookies while savoring every moment spent creating them—it’s not just about eating; it’s about embracing memories made through food shared with loved ones! Happy baking!
Storage and Enjoyment Tips for Your Lemon Bar Cookies
Now that you’ve crafted these delightful Lemon Bar Cookies, it’s time to indulge in their vibrant flavors! But let’s not rush through the enjoyment; I promise you, there’s something truly special about savoring these cookies at their peak freshness and knowing how to preserve them for later. Once you’ve taken that first bite, with the creamy lemon curd mingling with the soft, buttery cookie, you’ll want to make sure they stay as delicious as the moment they came out of the oven. So let’s dive into how to keep these treasures safe and sound!
Storing Leftover Lemon Bar Cookies
To ensure your leftover Lemon Bar Cookies remain just as heavenly as when they were fresh, it’s best to store them in an airtight container at room temperature. This type of container is absolutely paramount for maintaining their delightful softness and preventing them from drying out. If you’ve got a stash that may last longer than a couple of days, consider placing a slice of bread in the container—trust me on this! It sounds quirky, but this little trick will keep your cookies moist and tender. In terms of shelf life, they’ll stay good for about 3-5 days, but I guarantee they won’t last that long once your friends catch a whiff! After storage, these cookies still taste wonderfully bright and zesty, but if you ever find yourself wanting a little warmth, pop them in the microwave for just a few seconds. The lemony aroma will envelop your kitchen like a warm hug!
Freezing Lemon Bar Cookies for Later
If you’re looking to extend the joy of these cookies even further, freezing is an absolutely fantastic option! To freeze your Lemon Bar Cookies properly, place them in a single layer on a baking sheet and pop them in the freezer until they are solid—this usually takes about an hour or so. Once frozen, transfer them into a freezer-safe bag or container; just be sure to remove as much air as possible before sealing. They can keep frozen for up to three months without losing their charm! When you’re ready to enjoy them again, simply take out however many you desire and let them thaw at room temperature or warm them gently in the oven. This is such a convenient way to always have a batch of these extraordinary treats on hand for unexpected guests or those late-night cravings.
With all these tips in mind, getting ready to enjoy your Lemon Bar Cookies has never been easier or more exciting!
Lemon Bar Cookies

Indulge in the delightful experience of baking with these Lemon Bar Cookies, a refreshing twist on a classic treat. Imagine a soft, buttery cookie enveloping a luscious lemon curd center, perfectly balancing sweetness and tartness. Each bite transports you to sun-drenched days filled with childhood memories and lemonade stands. These cookies are not just a dessert; they’re an invitation to create joyful moments with friends and family. With an irresistible cream cheese base and zesty lemon flavor, topped with a dusting of powdered sugar, they promise to impress any guest or satisfy your sweet cravings after a long day. Grab your apron and dive into this vibrant recipe that’s sure to become a beloved staple in your home.
- Prep Time: 30 minutes
- Cook Time: 13 minutes
- Total Time: 43 minutes
- Yield: Approximately 24 servings 1x
- Category: Dessert
- Method: Baking
- Cuisine: American
Ingredients
- 1/2 cup granulated sugar
- 3 egg yolks
- 1/4 cup fresh lemon juice
- 1 tbsp lemon zest
- 11 tbsp unsalted butter (room temperature)
- 3.5 ounces full-fat cream cheese (room temperature)
- 1 cup granulated sugar (for cookies)
- 1 large egg (room temperature)
- 1 tsp vanilla extract
- 1 3/4 cup all-purpose flour
- 2 tsp baking powder
- 1/4 tsp salt
- Powdered sugar (for rolling)
Instructions
- In a small pot over medium-low heat, combine 1/2 cup granulated sugar, egg yolks, lemon juice, and lemon zest. Stir constantly until thickened (about 12 minutes). Remove from heat and mix in 4 tbsp butter until melted. Let cool.
- In a large bowl, cream together the remaining butter and cream cheese until smooth. Add in the remaining cup of sugar and mix until fluffy.
- Beat in the whole egg, egg yolk, and vanilla extract until combined.
- Gradually fold in flour, baking powder, and salt until just mixed.
- Scoop dough into balls and roll in powdered sugar before placing on parchment-lined trays.
- Create wells in the centers using the bottom of a tablespoon.
- Freeze for 1-2 hours before baking at 350°F for about 12-13 minutes.
Nutrition
- Serving Size: 1 cookie (30g)
- Calories: 142
- Sugar: 10g
- Sodium: 85mg
- Fat: 7g
- Saturated Fat: 4g
- Unsaturated Fat: 2g
- Trans Fat: 0g
- Carbohydrates: 18g
- Fiber: <1g
- Protein: <1g
- Cholesterol: 27mg