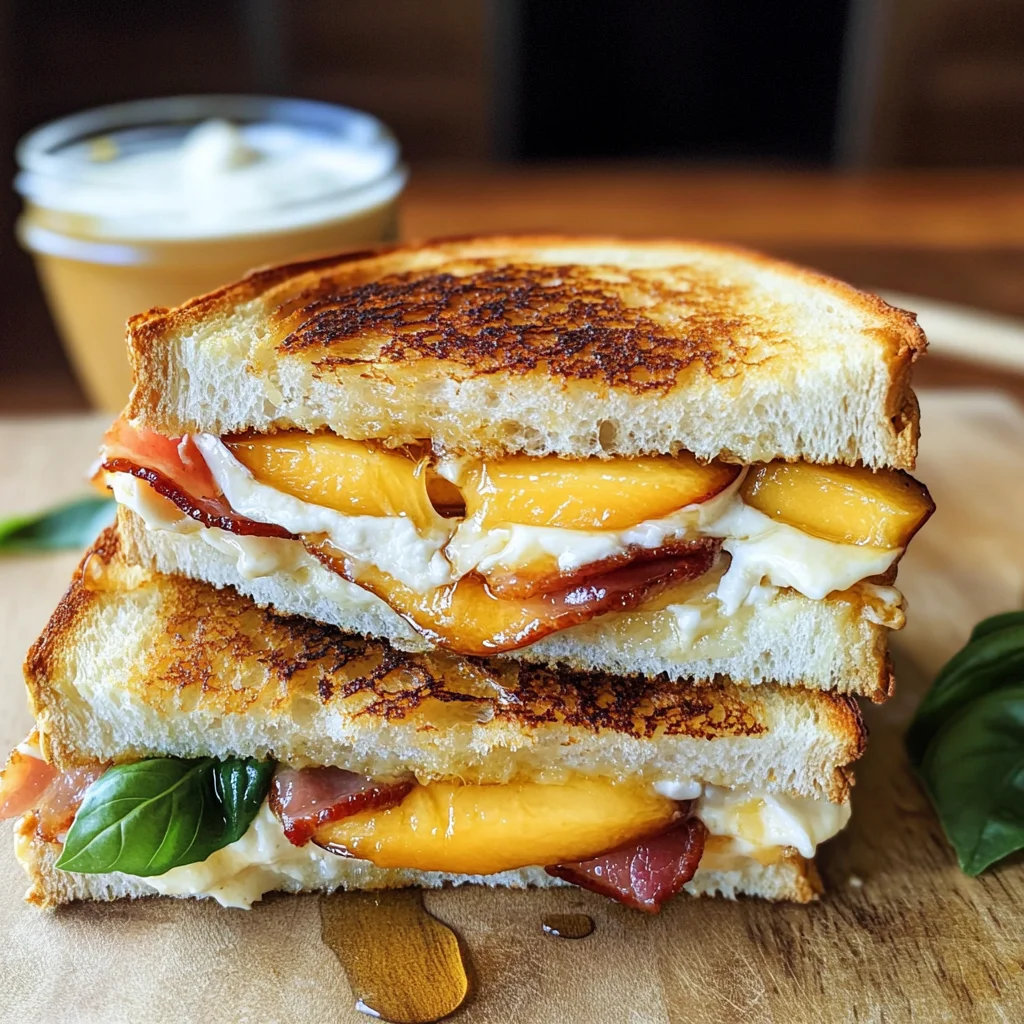
Honey Peach White Cheddar Grilled Cheese Sandwich
There’s something undeniably magical about the combination of sweet, juicy peaches and creamy, indulgent white cheddar cheese. When I first stumbled upon the idea of a Honey Peach White Cheddar Grilled Cheese Sandwich, it felt like a revelation—a delicious dance between tradition and innovation that I simply couldn’t resist sharing. Imagine biting into warm, buttery bread that cradles the sweet essence of ripe peaches, all lovingly melted with rich white cheddar. The honey drizzled on top adds a touch of liquid gold, making every bite an utterly intoxicating experience. This isn’t just lunch; it’s a symphony of flavors that celebrates the joys of summer in every mouthful.
This recipe strikes a beautiful balance between savory and sweet, providing not only comfort but also an adventure for your taste buds. The honey peach grilled cheese sandwich is perfect for those warm afternoons when you crave something light yet satisfying—ideal for a picnic or a cozy lunch at home. As you savor this delightful creation, you’ll find yourself enveloped in its warmth and richness. It’s one of those extraordinary dishes that feels both indulgent and simple, allowing you to connect deeply with the ingredients and the process of cooking itself.
Honey Peach White Cheddar Grilled Cheese Sandwich: A Sweet Twist on a Classic
Let’s dive into this delightful recipe! The Honey Peach White Cheddar Grilled Cheese Sandwich marries the familiar comfort of traditional grilled cheese with unexpected flavors that will transport you straight to summer bliss. With every layer thoughtfully crafted, this dish isn’t just about filling your belly; it’s about creating memories around the table with friends or family. Together, we’ll embark on this culinary journey that promises to delight!
Ingredients:
As we gather our ingredients for this delightful creation, it’s essential to take a moment to appreciate each component that plays a vital role in crafting this masterpiece. Each ingredient brings its unique character to the dish, creating an unforgettable experience.
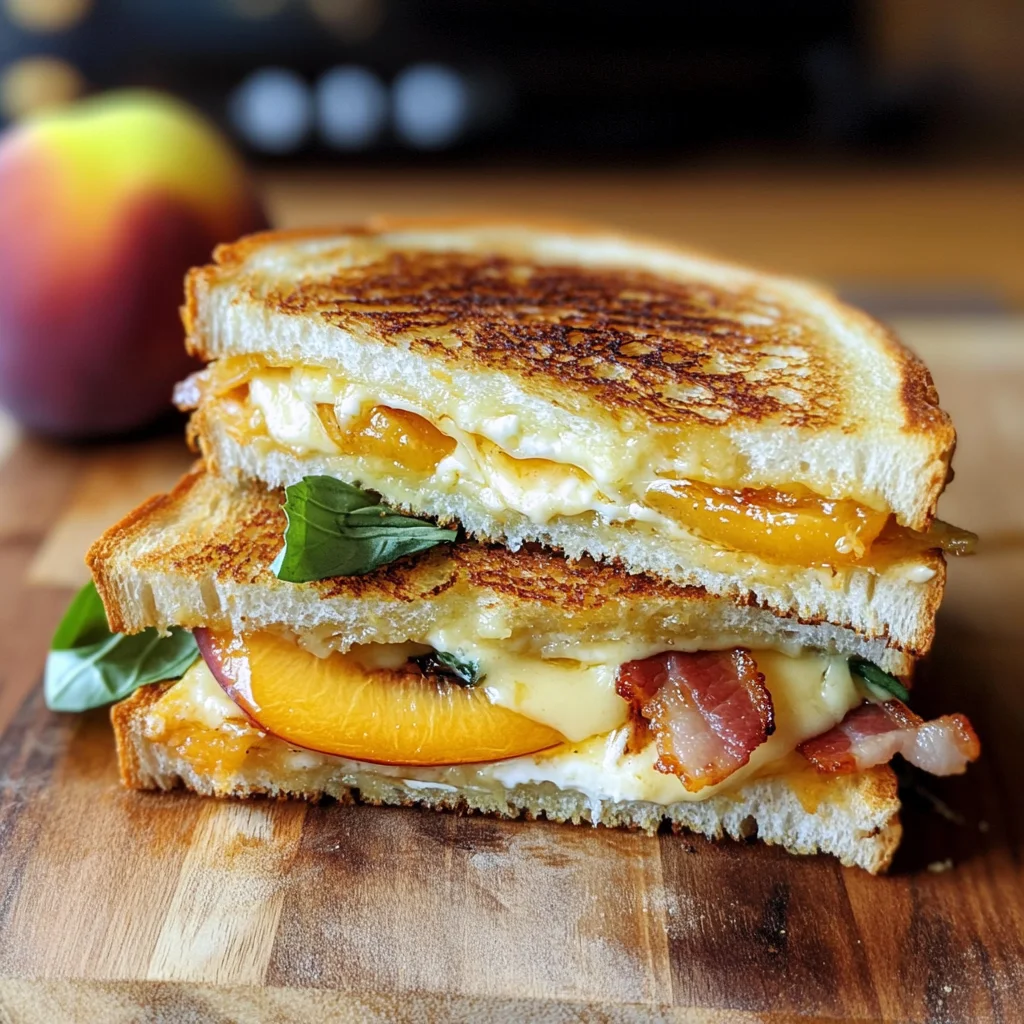
- 2 Peaches (sliced): Sweet and juicy peaches are the star players here! When choosing peaches, look for ones that yield slightly to pressure—this indicates ripeness and sweetness. Their vibrant flavor brings a burst of freshness that perfectly complements the rich creaminess of the cheeses. Trust me; there’s nothing quite like sinking your teeth into tender, sun-kissed peach slices warmed by heat, releasing their natural juices to mingle with every other element in your sandwich.
- 4 Slices Sourdough Bread (or Challah, Multigrain, or thick white): The choice of bread can truly elevate your grilled cheese experience! Sourdough’s tangy notes add depth and contrast brilliantly with the sweetness of the peaches and honey. Look for breads with a sturdy crust that’s still soft inside—this will create an ideal balance when toasted. If you prefer something sweeter or softer, challah or thick white bread would be delightful alternatives as well! Remember: quality bread is non-negotiable when crafting something so special.
- 2-4 Tablespoons Ricotta Cheese (optional): Ahh…ricotta! This optional ingredient adds an extra layer of creaminess that’s simply divine. Its mild flavor allows other ingredients to shine while enhancing your sandwich’s texture dramatically. If you’re feeling adventurous (and I often do!), I encourage you to spread ricotta on one side of your bread before layering on those luscious peaches—it creates an irresistible barrier against sogginess while adding richness.
- 1 Tablespoon Honey: Honey is nature’s liquid gold—sweetness encapsulated! Not only does it add depth and complexity to our sandwich’s flavor profile, but it also enhances everything else on your plate. The honey drizzled over peaches brings out their essence beautifully while creating a stunning contrast with the sharpness of white cheddar cheese. Don’t skimp on this; it’s absolutely paramount!
- 4 Slices White Cheddar Cheese: Ahhh…white cheddar—the hero in our savory realm! Its sharpness offers a delightful counterpoint to the sweetness present in our other ingredients. Opt for high-quality cheese when possible; artisanal varieties carry intense flavors that melt beautifully. Depending on how cheesy you like it (and who doesn’t love extra cheese?), feel free to pile it high!
- 2 Tablespoons Butter: Butter is crucial here; it ensures our bread crisps up beautifully while delivering rich flavor as it browns during cooking. Use unsalted butter at room temperature for easy spreading—this will give us that golden-brown crust we crave without burning! Don’t rush this step; let each sandwich bask in melted butter goodness!
- 4 Slices Crispy Bacon: While entirely optional for our vegetarian friends out there, crispy bacon adds another layer of texture and smokiness that elevates this dish from ordinary to extraordinary! If you choose to include bacon (and why wouldn’t you?), cook it until perfectly crisp beforehand—no one likes limp bacon stealing their thunder!
- Fresh Basil: Fresh basil adds an aromatic brightness that harmonizes wonderfully with our peaches’ sweetness while cutting through richness beautifully! Just imagine those fragrant leaves peeking out from between layers—trust me; they’re more than just garnish—they’re part of what makes this dish sing.
- Balsamic Glaze: Finally, we finish off with balsamic glaze—a drizzle here transforms our already fantastic sandwich into something truly spectacular! Its sweet-tart flavor enhances everything else while providing visual appeal—your guests won’t be able to resist snapping photos before diving in!
Equipment You’ll Need:
Ahh…the right tools! Cooking becomes such a joy when equipped with trusted companions that make everything smoother and more enjoyable. While these tools might not be ingredients themselves, they play critical roles in bringing your culinary vision to life.
- Panini Press or Skillet: A panini press is fantastic if you have one because it evenly distributes heat while pressing down on sandwiches for perfect grilling! However, if you don’t have one handy (I understand; life happens), don’t fret—a good old skillet works just fine too! Just remember to flip carefully halfway through cooking so both sides achieve golden perfection.
- Sharp Knife: You’ll need a good sharp knife for slicing those lovely ripe peaches effortlessly while ensuring even cuts across all other ingredients as well! A dull knife can lead to frustration—not ideal when you’re trying to create magic in your kitchen.
- Spatula: A sturdy spatula will help lift those sandwiches without tearing apart any precious ingredients within them as they sizzle away under heat! Choose one wide enough for easy flipping but gentle enough not to disturb delicate layers—you want everything intact for maximum presentation!
Now that we have gathered our delightful ingredients and trusty equipment let’s dive deeper into preparing this iconic dish together!
Preparing the Honey Peach White Cheddar Grilled Cheese Sandwich
Step 1: Slice Those Juicy Peaches
First things first—you’ll want those gorgeous peaches ready for their moment in the spotlight! Start by peeling them gently; I find using a sharp paring knife gives me full control as I glide through their tender skin without wasting any precious fruit underneath. Once peeled, slice them into thin wedges—aiming for about ¼ inch thick gives us pieces substantial enough so they don’t fall apart once layered onto our sandwich but still soft enough after cooking that they’ll meld seamlessly into every other component we’ve chosen thoughtfully.
Take care during this step—there’s nothing worse than biting into an unevenly sliced peach mid-bite! As you set aside your peach slices after achieving perfection here (pat yourself on the back!), take time appreciating their aroma—the fragrance wafting through your kitchen is simply divine!
Step 2: Assemble Your Flavor Layers
With those luscious peach slices waiting eagerly offstage now comes my favorite part – assembling all these wonderful layers together into something magical! Start by taking two slices of your chosen bread—I’m using sourdough today because its tangy flavor profile complements everything beautifully—but remember any variety mentioned earlier will work just as well!
Spread ricotta cheese generously onto one slice before layering freshly sliced peaches atop it—don’t skimp here because every bite should highlight their juicy goodness alongside creamy richness from ricotta below them like a lovely embrace! Drizzle honey over these peach slices liberally…we want sweetness infused throughout each layer harmoniously combined rather than concentrated just at surface level.
On another slice? Lay down generous amounts of white cheddar cheese—I suggest four slices minimum—but feel free if you’re craving extra cheesy goodness today! By placing cheese here rather than directly against fruit allows us better melting capabilities later…after all nobody wants cold globs ruining such deliciousness we’ve worked hard creating thus far!
Step 3: Butter Up For Success
Now comes perhaps my favorite secret weapon—the buttering process—and trust me it’s essential for achieving perfect grilled glory later on when we toast things up nice and golden brown outside whilst keeping interiors melty beyond compare too!
Grab some softened unsalted butter from earlier preparation stage; take time spreading evenly across both outer faces each assembled sandwich like painting artfully onto canvas—you want complete coverage here since any dry spots could lead us astray during cooking resulting ultimately less-than-perfect results overall which isn’t what we’re aiming toward at all now is it?
Once fully buttered up? Carefully place sandwiches within either preheated panini press or skillet set over medium-low heat (if using skillet ensure it’s heated adequately prior!) Cook time varies depending upon chosen method but aim approximately 3–5 minutes per side until golden-brown crust develops whilst ensuring contents within warm thoroughly without burning outside edges ridiculous fast causing problems later down line…
Step 4: Optional Additions & Serving Time
If you’ve decided upon adding crispy bacon or fresh basil now’s time reveal hidden treasures inside by lifting tops gently off each sandwich revealing melted cheesy paradise hiding beneath…feel free sprinkle bits crispy bacon atop along fresh basil leaves make everything even brighter visually too whilst adding additional savory notes enriching overall experience immensely further still enhancing enjoyment levels across board tremendously throughout entire meal itself!
Once plated alongside drizzle balsamic glaze over top finishes presentation splendidly well doesn’t hurt either—it’ll make guests swoon delightedly before even tasting bites themselves…serve immediately while hot letting everyone dig right into such deliciousness awaiting discovery soon after preparation wraps up smoothly at last!
And voila—we’ve successfully created scrumptious Honey Peach White Cheddar Grilled Cheese Sandwiches together today filled bursting flavors elevating traditional comfort food classic bringing unbridled joy every single bite enjoyed wholeheartedly alongside great company laughing happily together bonding moments shared during meals made memorable forevermore…trust me—I promise you won’t regret making these beauties again soon either!
Step 5: The Art of Assembling Your Masterpiece
Now that we have those luscious peaches waiting in the wings, let’s turn our attention to constructing this Honey Peach White Cheddar Grilled Cheese Sandwich. This step is where the magic really begins, and trust me, it’s all about balance and layering flavors. First, take your slices of sourdough bread—this sturdy yet tender canvas is going to hold all those beautiful ingredients together. If you choose to use ricotta cheese—and I highly encourage it—spread a generous layer over one side of each slice of bread. This creamy layer not only adds that wonderful richness but also acts as a glue for the peaches and cheese, ensuring everything stays in place while we grill it. Remember, a good spread is key; we want a nice thick layer so that every bite is an indulgent experience.
Next up, let’s talk about those sweet peach slices. Arrange them artfully on top of the ricotta—you want to create a visual feast here! Drizzle each peach-laden slice with honey; this is where the sweetness will bloom and mingle with the tangy notes of the ricotta and the sharpness of the cheddar. Trust me on this: letting those flavors dance together before they hit the heat will elevate your grilled cheese from delightful to utterly intoxicating! Then, on the other slice of bread, lay down your white cheddar cheese slices. And here’s a little secret: if you’re feeling particularly cheesy (who wouldn’t be?), feel free to add an extra slice or two! The goal here is to achieve that glorious gooeyness when you bite into it later.
Step 6: Buttering Up for Success
Once your sandwiches are beautifully assembled, it’s time to give them that golden-brown crust we all crave. This is where butter comes into play—yes, that magical ingredient that transforms everything into something divine! Take your softened butter and spread a generous amount over the top side of each sandwich. Not only does this create a rich flavor base, but it also ensures that your bread crisps up beautifully during cooking. You see, butter contains milk solids that caramelize when exposed to heat, creating that irresistible brown color and depth of flavor we associate with perfectly grilled sandwiches.
Now let’s heat things up! If you’re using a panini press, preheat it according to its instructions until it’s nice and hot—this usually takes just a few minutes. If you’re opting for a skillet instead (which I absolutely love for its versatility), set it over medium-low heat. Here’s where patience becomes paramount: too high of heat can lead to burnt bread while leaving the cheese stubbornly unmelted inside. Once everything is warmed through—around 2-3 minutes should do—you can carefully place your sandwiches butter-side down onto the heated surface. Listen closely; you want to hear that satisfying sizzle as they hit the pan. It’s music to any cook’s ears!
Step 7: The Melting Magic
Now comes arguably my favorite part—the moment when everything starts transforming under heat! As your sandwiches cook, keep an eye on them so they don’t brown too quickly; this can happen surprisingly fast due to our friend butter! After about 3-4 minutes (depending on your stove), gently lift one side to peek at its progress—the bread should have turned a lovely golden hue by now. If you find it’s browning too rapidly but your cheese isn’t melting yet, simply reduce the heat further; this adjustment is crucial for allowing those delightful layers inside time to meld together perfectly.
As you wait for this transformation to occur, let me remind you why patience is essential here: melting cheese requires just enough time for its proteins and fats to relax and blend harmoniously with other ingredients without burning or seizing up unexpectedly. So don’t rush this step! Your reward will be a sandwich bursting with flavor and texture—a heavenly combination of crispy exterior and gooey interior.
Step 8: The Reveal – Final Flips and Flavor Enhancements
After around 4-5 minutes on one side (or until golden brown), it’s time for the grand flip! Using a spatula with confidence—because you’ve got this—gently turn each sandwich over and allow it to cook on the other side for another 3-4 minutes until it’s equally golden brown and heaven-sent aromas begin wafting through your kitchen. During this time, keep an eye out for signs of doneness; you’ll know they’re ready when they’re nicely browned on both sides and when you can smell that delicious melding aroma of melting cheddar mingling with sweet peaches.
If you’ve decided to add any optional ingredients like crispy bacon or fresh basil (and I wholeheartedly advocate for both!), now’s the moment! Carefully remove the top slice after flipping so you can place these extras directly onto that melted cheese while it’s still warm—this will help infuse even more flavor throughout your sandwich without losing any precious heat in the process.
Next Major Phase – Final Touches
Step 9: Plating Perfection
The final step in our culinary journey is perhaps one of my favorites because presentation matters just as much as taste! Once both sides are beautifully toasted and oozing cheesy goodness, remove them from the skillet or panini press carefully onto a cutting board. Give them just a minute or two to rest—this brief pause allows any excess steam from within to escape, which means less sogginess later on and more satisfying crunch in every bite.
To elevate your Honey Peach White Cheddar Grilled Cheese Sandwich even further—because why not?—I recommend drizzling each warm sandwich with balsamic glaze before slicing them diagonally into halves or quarters for easy sharing (or hoarding!). The tangy sweetness from balsamic complements every element within wonderfully while adding an elegant touch visually as well.
So there you have it—a truly extraordinary sandwich bursting with flavors reminiscent of summer days combined into one perfect bite! Enjoying this masterpiece should be savored slowly; after all those steps we’ve taken together—from selecting ripe peaches at their peak freshness right down until now—it deserves nothing less than complete appreciation! Take a moment before diving in—the aroma alone may transport you straight into pure bliss—and once you do take that first bite? Well… let me know how fabulous it was because I promise you’ll want more!
Storage and Enjoyment Tips for Your Honey Peach White Cheddar Grilled Cheese Sandwich
Oh, my friends, the moment you take that first bite of your Honey Peach White Cheddar Grilled Cheese Sandwich is truly something special! The way the flavors dance together, the crunch of the crispy bread, and the gooeyness of that melted white cheddar—it’s a masterpiece. But what about when you have leftovers? I promise you, this sandwich is just as delightful the next day! To preserve its magic, let me share some tips for storing it properly.
Storing Leftover Honey Peach White Cheddar Grilled Cheese Sandwich
To keep your Honey Peach White Cheddar Grilled Cheese Sandwich fresh and delicious, I recommend placing it in an airtight container. You can use a glass or plastic container—whatever you have on hand works beautifully. Just make sure to allow the sandwich to cool slightly before sealing it up; this prevents any steam from making your lovely bread soggy. Stored correctly in the refrigerator, your sandwich will stay tasty for up to three days. Now, here’s a little trick: if you’re worried about the bread losing its crispiness, you can place a piece of parchment paper between slices to absorb moisture. When you’re ready to enjoy it again, simply reheat it on a skillet over low heat until warmed through and crispy—trust me; it tastes just like freshly made!
Freezing Components for Later
If you’re anything like me and love meal prep, freezing components of this delightful sandwich is a brilliant idea! To freeze, start by preparing your peaches and ricotta cheese but then layer them in separate freezer-safe containers. Make sure to slice your peaches before freezing so they can easily be thawed when you’re craving that grilled cheese goodness. Properly stored in the freezer, they’ll keep for about three months—how convenient is that? When you’re ready to whip up your sandwich from frozen ingredients, simply thaw them in the fridge overnight or give them a quick microwave blast (just be careful not to overdo it!). This option is fabulous because it allows you to enjoy this extraordinary flavor combination whenever the mood strikes without having to prepare everything from scratch each time.
Now that we’ve covered storage options, I hope you’re as excited as I am about savoring every last bite of this heavenly grilled cheese!
Honey Peach White Cheddar Grilled Cheese Sandwich

Savor the deliciousness of our Honey Peach White Cheddar Grilled Cheese Sandwich—a delightful blend of flavors waiting for you to try today!
- Prep Time: 15 minutes
- Cook Time: 10 minutes
- Total Time: 25 minutes
- Yield: Serves 2
- Category: Lunch
- Method: Grilling
- Cuisine: American
Ingredients
- 2 ripe peaches (sliced)
- 4 slices sourdough bread (or challah, multigrain, thick white)
- 2–4 tablespoons ricotta cheese (optional)
- 1 tablespoon honey
- 4 slices white cheddar cheese
- 2 tablespoons butter
- Fresh basil (optional)
- Balsamic glaze (optional)
Instructions
- Peel and slice the peaches into thin wedges.
- Spread ricotta on one side of two slices of bread; layer peach slices on top and drizzle with honey.
- On the other two slices, place white cheddar cheese.
- Assemble sandwiches by placing peach slices on ricotta and topping with cheddar-covered slices.
- Butter the outer sides of each sandwich.
- Heat a skillet over medium-low heat and grill sandwiches for 3-5 minutes per side or until golden brown and cheese is melted.
- Optionally, add crispy turkey or fresh basil before serving; drizzle with balsamic glaze if desired.
Nutrition
- Serving Size: 1 sandwich (200g)
- Calories: 450
- Sugar: 18g
- Sodium: 670mg
- Fat: 24g
- Saturated Fat: 12g
- Unsaturated Fat: 10g
- Trans Fat: 0g
- Carbohydrates: 49g
- Fiber: 3g
- Protein: 14g
- Cholesterol: 50mg