Coconut Scones with Coconut Glaze
There’s something profoundly special about the warm, inviting aroma of freshly baked goods wafting through your kitchen. It’s as if each note sings a nostalgic melody, beckoning memories of lazy Sunday mornings and cherished gatherings with loved ones. Today, I’m excited to share with you a recipe that captures this essence beautifully: Coconut Scones with Coconut Glaze. These delightful scones are not just a treat; they embody the joy of cooking and sharing. Their fluffy texture and sweet coconut glaze create a symphony of flavors that will transport you to a tropical paradise with every bite. Trust me, whether you’re enjoying them at breakfast, brunch, or as a cozy afternoon snack alongside your favorite cup of coffee, these scones will become a highlight in your culinary repertoire.
What makes these Coconut Scones truly extraordinary is their versatility. They marry traditional scone-making techniques with the enchanting flavor of coconut, leading to an experience that feels both familiar and excitingly new. The combination of sweetened shredded coconut blended into the dough creates tender scones that are almost ethereal in texture—light yet satisfying. And let’s not forget about that luscious glaze! Drizzled atop each warm scone, it transforms these already delightful treats into something spectacular, making them perfect for any occasion—from leisurely weekend brunches to festive celebrations. I promise you, once you make these Coconut Scones with Coconut Glaze, they will hold a cherished spot in your heart and kitchen.
Coconut Scones with Coconut Glaze: A Tropical Morning Delight
Welcome to the world of coconut bliss! Baking these Coconut Scones is like stepping into a sunny day on a beautiful beach—each bite envelops you in warmth and happiness. With simple ingredients and straightforward steps, you’ll discover how easy it is to create something truly special right in your own kitchen.
Ingredients:
Now that we’ve set the stage for our delicious adventure, let’s embark on this culinary journey together by gathering our ingredients. Each one plays a crucial role in crafting those perfectly fluffy scones topped with a sweet coconut glaze.
- 2½ cups all-purpose flour. This is the foundation of our scones. All-purpose flour provides the necessary structure while allowing for that delightful tenderness we’re aiming for. When measuring flour, be sure not to pack it down; instead, spoon it into your measuring cup and level it off for accuracy—this ensures we don’t end up with dense scones.
- 1 cup sweetened shredded coconut (pulsed into crumbs). This ingredient is where the magic happens! By pulsing sweetened shredded coconut into finer crumbs, we’ll distribute its rich flavor throughout the dough without overwhelming the texture. It adds both sweetness and that unmistakable tropical aroma that makes these scones so special.
- ¼ cup granulated sugar. Sugar isn’t just for sweetness; it also helps in browning our scones as they bake, giving them that golden crust we adore. Plus, it balances out the flavors beautifully with the coconut’s natural sweetness.
- 1 tbsp baking powder. This leavening agent is absolutely paramount for getting those scones to rise beautifully! It creates little air pockets in our dough as they bake, ensuring we achieve that light and fluffy texture rather than dense little rocks.
- ½ tsp salt. Salt is essential for enhancing all the flavors in your scones—it brightens everything up! Despite being such a small amount compared to other ingredients, salt works wonders by balancing sweetness and bringing out the best in our coconut flavor.
- ½ cup unsalted butter (cold and cut into pieces). Using cold butter is key here; it ensures flakiness by creating steam pockets during baking as it melts away. I recommend European-style butter for its higher fat content which contributes to an even richer flavor profile—just heavenly!
- ¾ cup coconut milk. This ingredient not only deepens the coconut flavor but also keeps our scones moist and tender without adding animal products or dairy cream! Be sure to shake it well before using since coconut milk can separate in its can.
- 1 large egg (room temperature). Eggs provide structure and moisture but also help bind everything together wonderfully while contributing richness to our scone dough.
- 1 tbsp water. This little splash helps combine ingredients when mixing but also adds slight moisture if needed during dough formation—sometimes flexibility is key!
- 1¼ cups powdered sugar (sifted). For our glaze, powdered sugar gives us that silky smooth finish that’s utterly irresistible on top of warm scones! Sifting helps avoid clumps so you get a lovely even glaze.
- 1 tsp pure vanilla extract. Vanilla elevates flavors beautifully—it’s like adding a gentle hug of warmth amidst all those vibrant coconut notes; trust me on this!
- 2-3 tbsp coconut milk (for glazing). We’ll use just enough to create a pourable consistency for drizzling over our cooled scones; again reinforcing that lovely coconut flavor!
- Toasted shredded coconut (as needed for garnish). Toasting shredded coconut brings out its natural oils and enhances its nutty flavor—this beautiful touch on top not only looks stunning but adds fantastic crunch!
Equipment You’ll Need:
Before we dive into crafting our delightful Coconut Scones with Coconut Glaze, let’s gather some essential tools that will make this baking experience smooth and enjoyable! Having the right equipment at hand feels like having trusted friends by your side—they’ll help ensure everything comes together beautifully.
- Large mixing bowl – A sturdy bowl allows you ample space to mix your dry ingredients thoroughly before adding wet ones without worrying about spills or messes—a must-have when working with flour!
- Pastry cutter or two forks – These handy tools are perfect for cutting in cold butter until you reach those desired coarse crumbs; using them ensures even distribution throughout the flour mixture which leads us toward perfection!
- Bench scraper or sharp knife – For cutting out those lovely triangles from your dough disk after shaping it: this tool offers precision while keeping things neat—plus it’s super satisfying!
- Parchment paper – When lining your baking sheet with parchment paper prevents sticking while allowing easy cleanup afterward—it’s like giving yourself an extra pat on the back!
- Wire rack – Essential for cooling baked goods properly ensuring even airflow around each piece so they don’t get soggy underneath—nobody wants sad scones!
With all our ingredients prepped and tools gathered like loyal companions waiting to embark on this tasty adventure, let’s jump into preparing those glorious Coconut Scones with Coconut Glaze!
Preparing the Coconut Scones with Coconut Glaze
Step 1: Whisk Together Dry Ingredients
The first step toward creating those ethereal Coconut Scones begins by whisking together all our dry ingredients: flour, sugar, salt, baking powder—and don’t forget about those luscious pulsed coconut crumbs! In a large mixing bowl, take your time here; it’s crucial because this initial blending ensures even distribution of each ingredient throughout your dough later on—a key factor in achieving consistent texture across all scone pieces! Imagine how wonderful it’ll be when each bite bursts forth full-flavored surprises instead of bland patches—that’s what we’re after!
Step 2: Cut in Cold Butter
Next comes one of my favorite parts: cutting in the cold butter! Using either a pastry cutter or two forks (or even your fingertips if you’re feeling adventurous), incorporate those cold cubes until they resemble coarse crumbs—a process known as cutting-in. This crucial step creates tiny pockets within our dough where steam will build up during baking resulting in flaky layers later on—the hallmark trait of any good scone! Don’t rush through this part; take care not to fully melt or cream your butter—as tempting as it may be—to maintain optimal flakiness throughout each piece later on!
Step 3: Add Wet Ingredients
Once you’ve achieved that lovely crumbly texture from incorporating butter successfully (you should feel proud!), it’s time for some wet love! Create a well within your flour mixture—a little pool inviting everything else inside—and gently pour half of your measured coconut milk first before mixing ever so lightly until combined completely before adding remaining liquid subsequently mixing gently till just combined—you want everything wet but don’t overdo it here! Overmixing can lead us down an undesirable path toward toughened results instead of tender bliss—we’re going for soft pillowy bites after all!
Step 4: Shape Dough Into Circle
After successfully combining wet ingredients into dry ones without overmixing—yay teamwork—you’ll see your dough starting to come together nicely! At this point transfer it onto lightly floured surface where you’ll need gentle hands again—turning once or twice until cohesive—but remember: no kneading allowed here either folks! Once shaped into roughly seven-inch wide circle approximately three-fourths inch tall (think thick pizza!), grab a sharp knife or bench scraper—you’re ready now—to slice through triangle shapes effortlessly letting each piece fall gently onto parchment-lined baking sheet awaiting their cool resting period next…
Stay tuned as we continue crafting these delightful treats together—I can’t wait for you to taste them fresh from oven soon!
Step 5: Chilling the Dough – The Secret to Fluffy Scones
Now that you’ve cut your dough into those lovely triangles, it’s time to give them a little chill. This step is crucial—and I can’t stress this enough—because it allows the butter to firm up again after being worked into the dough. When you bake these scones, that cold butter will melt and create pockets of steam, which leads to those beautifully flaky layers that we all adore. Trust me on this: don’t rush this step! You’ll want to place your baking tray in the refrigerator for at least 30 minutes, but if you can swing it, an hour is even better.
During this chilling period, the gluten in the flour relaxes, which means your scones will be tender rather than tough. As you wait, take a moment to breathe in the calming scent of coconut lingering in your kitchen; it’s utterly intoxicating! While they’re chilling, you might want to use this time to prepare your baking area and gather all your tools for the next steps—having everything ready will make your cooking experience even smoother and more enjoyable. So go ahead and pour yourself a cup of tea while those triangles rest; you deserve it!
Step 6: Baking Your Perfect Coconut Scones
Once your scones have chilled beautifully, it’s time for what I consider the most exhilarating part: baking! Preheat your oven to 400°F (204°C). This high temperature is absolutely paramount because it helps achieve that golden-brown crust while keeping the inside soft and fluffy. While waiting for the oven to heat up, brush the tops of each triangle with either an egg wash or coconut milk. This simple action not only adds a lovely sheen but also contributes to that enticingly crispy top layer that contrasts beautifully with the tender interior.
Now carefully place your scones onto a parchment-lined baking sheet, ensuring there’s some space between each piece so they can rise without crowding one another. As they bake for about 20-25 minutes, keep an eye on them; you’ll want to see them puff up like little clouds and turn a delightful golden brown. The aroma wafting through your home during these moments is nothing short of heavenly—it’s like being enveloped in a warm hug from a beloved friend. To test for doneness, lightly tap one with your finger; if it sounds hollow and feels firm yet springy, they’re ready! Remove them from the oven and allow them to cool on a wire rack—this is essential because it prevents them from becoming soggy underneath.
Step 7: Crafting Your Coconut Glaze
While those gorgeous scones are cooling down, let’s talk about how we’re going to take them from delicious to extraordinary with our luscious coconut glaze! In a medium bowl, whisk together 1¼ cups of sifted powdered sugar with a couple of tablespoons of coconut milk and a teaspoon of pure vanilla extract. This glaze should be smooth and glossy—a lovely liquid gold that transforms these simple scones into something truly spectacular. The balance between sweetness from the sugar and creaminess from the coconut milk creates an irresistible topping that no one can resist.
You want your glaze just thick enough so that when you drizzle it over those cooled scones, it clings beautifully but still runs just slightly down their sides—think delicate ribbons rather than globs! If it seems too thick for drizzling, add just a splash more coconut milk until you reach that perfect consistency. Don’t forget to taste as you go; this is important not only because it’s delicious but also helps ensure you’re happy with the flavor balance before drenching those delightful scones in sweet goodness.
Step 8: The Finishing Touch – Drizzling & Garnishing
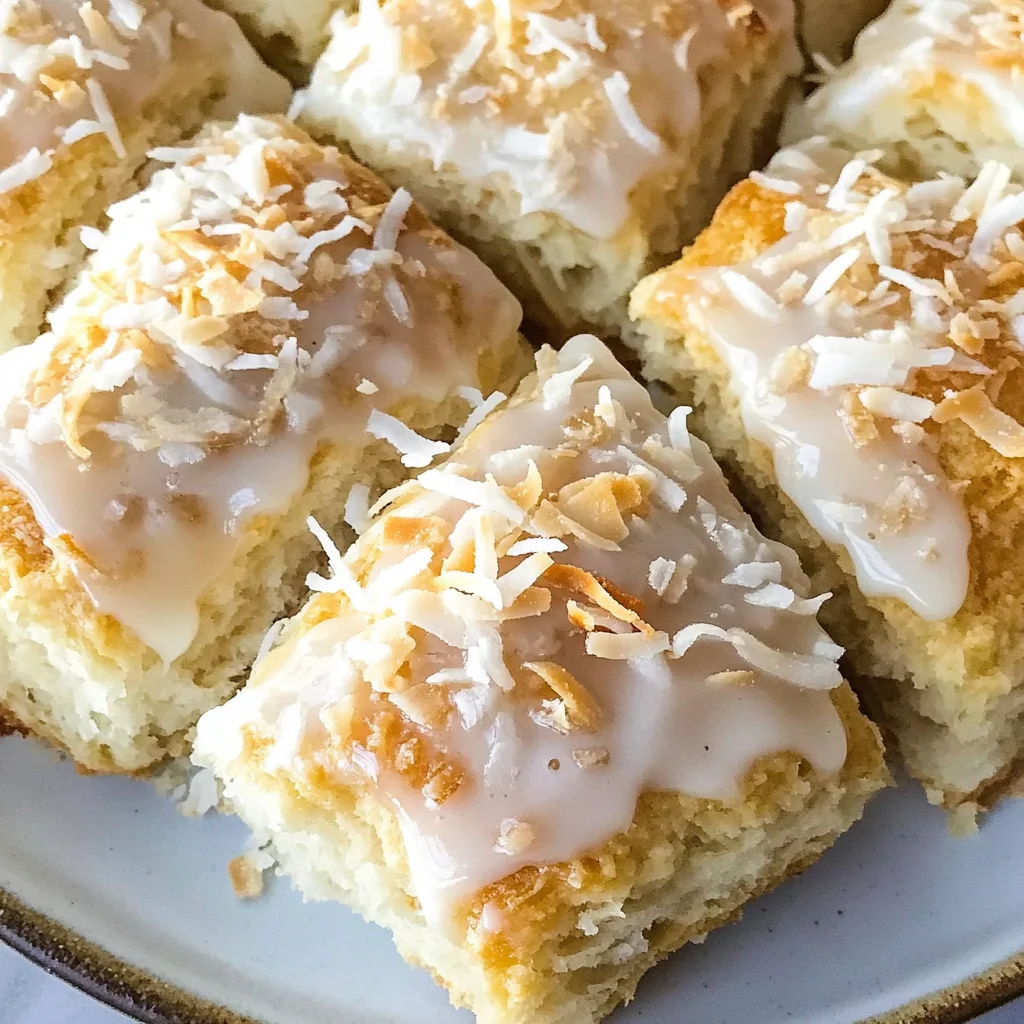
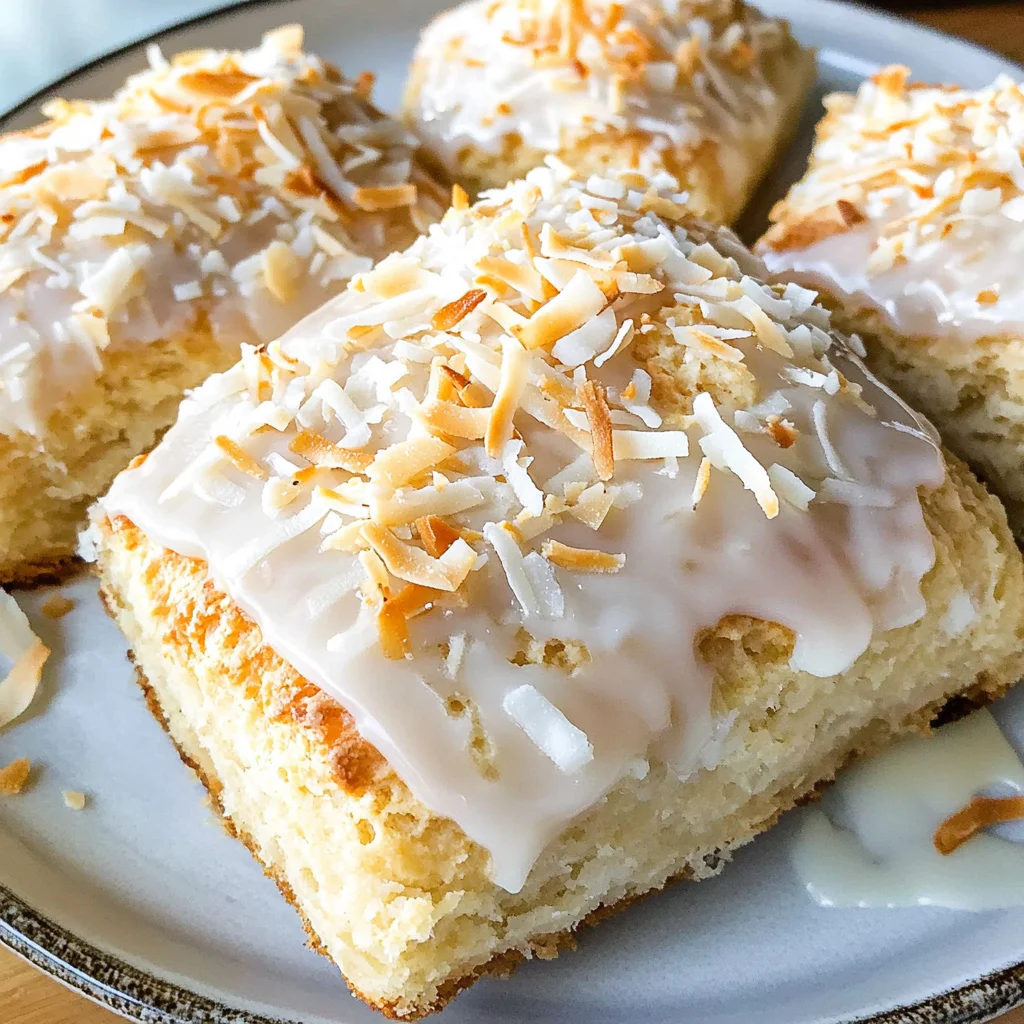
Now comes my favorite part—the grand finale where we drizzle the glaze over our exquisite Coconut Scones! Once you’ve whisked together that delightful glaze and ensured it’s just right in terms of thickness and sweetness, take each cooled scone and place them on a serving platter or back on their cooling rack (which makes cleanup much easier!). With a spoon or even better—if you’re feeling fancy—a piping bag fitted with a small round tip, gently drizzle the glaze over each scone in sweeping motions. Picture cascading ribbons of sweetness flowing down; it’s not just about taste but also about creating an aesthetically pleasing masterpiece!
As if that were not enough excitement already, sprinkle toasted shredded coconut generously over each glazed scone while they’re still wet—that crispy texture offers such an incredible contrast against the soft interior of the scone itself. This finishing touch isn’t merely decorative—it adds another layer of flavor complexity that’s profoundly satisfying! Allow a few moments for that glaze to set before serving these beauties up—you want them looking their best when they make their debut on your breakfast table or at brunch gatherings with friends.
Conclusion:
As we wrap up our delightful journey through crafting these Coconut Scones with Coconut Glaze, I can’t help but feel a surge of excitement about sharing this beloved recipe with you. The combination of fluffy textures and sweet coconut creates a symphony of flavors that dances on your palate, elevating what could be an ordinary morning into something profoundly satisfying and extraordinary. Each bite transports you to sun-kissed beaches where tropical breezes carry whispers of coconut trees swaying gently in the wind—it’s pure bliss on a plate!
This recipe is not merely about taste; it’s about creating joyful moments in your kitchen and sharing happiness with loved ones. Ideal for brunch gatherings or cozy afternoons spent over coffee, these scones offer versatility that shines through every occasion. Imagine pulling them from the oven, their edges perfectly golden brown and glistening with glaze; it’s hard not to feel an overwhelming sense of pride and joy as you present them to family or friends.
For an afternoon pick-me-up treat alongside tea or coffee, imagine savoring one while nestled into your favorite chair as rain patters against the window—what could be better? Or picture serving them as part of a lavish brunch spread where everyone gathers around your table bursting with laughter and stories, making memories over warm scones adorned with toasted coconut flakes.
Feeling adventurous? This recipe is wonderfully adaptable! You could try swapping out some of the shredded coconut for other mix-ins like dark chocolate chips or even bits of dried pineapple for a tropical twist! You might also consider adding spices such as cardamom or cinnamon to create an aromatic experience that’s sure to impress anyone lucky enough to share this treat with you. I wholeheartedly encourage you to dive into this culinary adventure—try it out yourself, tweak it as you see fit, and don’t forget to share your experience! I can’t wait to hear how yours turn out!
Coconut Scones with Coconut Glaze

Indulge in the delightful experience of Coconut Scones with Coconut Glaze, a sweet treat that brings the essence of a tropical paradise right into your kitchen. With their fluffy texture and rich coconut flavor, these scones are perfect for breakfast, brunch, or an afternoon snack with coffee or tea. The addition of a luscious coconut glaze takes them to another level, making every bite a heavenly delight. Easy to make with simple ingredients, this recipe is perfect for both novice and experienced bakers alike. Create warm memories around the table as you share these delicious scones with friends and family.
- Prep Time: 20 minutes
- Cook Time: 25 minutes
- Total Time: 45 minutes
- Yield: Approximately 12 servings 1x
- Category: Breakfast
- Method: Baking
- Cuisine: Tropical
Ingredients
- 2½ cups all-purpose flour
- 1 cup sweetened shredded coconut (pulsed into crumbs)
- ¼ cup granulated sugar
- 1 tbsp baking powder
- ½ tsp salt
- ½ cup cold unsalted butter (cut into pieces)
- ¾ cup coconut milk
- 1 large egg (room temperature)
- 1¼ cups powdered sugar (sifted)
- 1 tsp pure vanilla extract
- Toasted shredded coconut (for garnish)
Instructions
- Preheat your oven to 400°F (204°C).
- In a large mixing bowl, whisk together flour, pulsed coconut crumbs, sugar, baking powder, and salt.
- Cut in the cold butter until the mixture resembles coarse crumbs.
- Create a well in the center and add half of the coconut milk and egg; mix gently until just combined. Add remaining milk and mix until cohesive.
- Shape dough into a circle about ¾ inch thick; cut into triangles.
- Chill triangles on the baking sheet for at least 30 minutes.
- Brush tops with coconut milk before baking for 20-25 minutes or until golden.
- For the glaze, whisk together powdered sugar, coconut milk, and vanilla until smooth. Drizzle over cooled scones and garnish with toasted coconut.
Nutrition
- Serving Size: 1 serving
- Calories: 210
- Sugar: 9g
- Sodium: 105mg
- Fat: 9g
- Saturated Fat: 6g
- Unsaturated Fat: 2g
- Trans Fat: 0g
- Carbohydrates: 30g
- Fiber: 1g
- Protein: 3g
- Cholesterol: 25mg