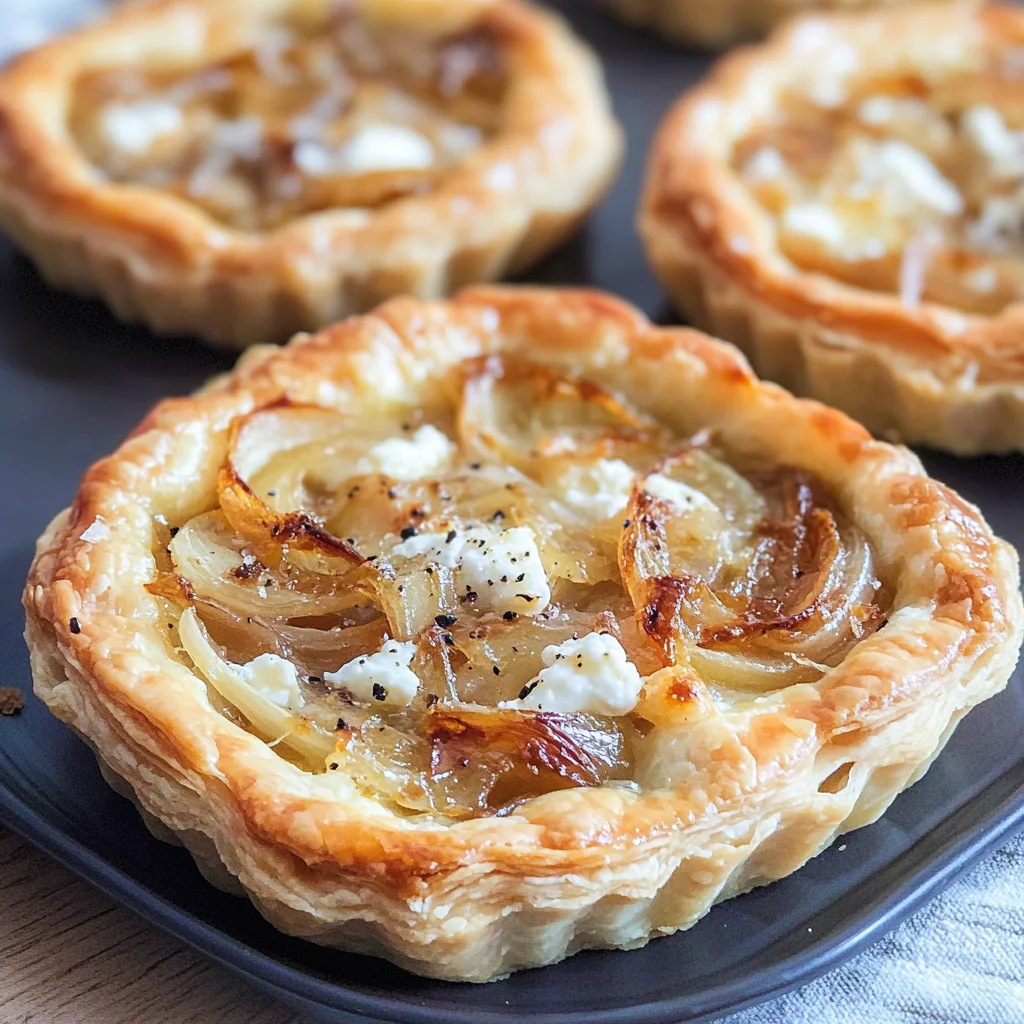
Caramelized Onion and Goat Cheese Tarts
The moment you take a bite of a Caramelized Onion and Goat Cheese Tart, you’re not just tasting food; you’re experiencing an exquisite blend of flavors that speaks of comfort, creativity, and a touch of elegance. Imagine the rich aroma of slow-cooked onions wafting through your kitchen, mingling with the earthy notes of goat cheese, all enveloped in a delicate, flaky puff pastry. This recipe is like a warm hug on a plate—it’s an invitation to pause, savor, and share stories around the table with those you love. The sweet caramelization of the onions creates a symphony of flavors that perfectly balances the tangy creaminess of the goat cheese, making each bite profoundly satisfying and utterly intoxicating. I promise you; this will become one of your go-to recipes for gatherings or cozy evenings at home.
What makes these tarts truly special is not just their taste but also their versatility. Perfectly suited as an appetizer at dinner parties or as a delightful snack while catching up with friends over a glass of sparkling water, they can elevate any occasion. The process of caramelizing onions may seem daunting at first, but trust me—it’s easier than it sounds! As those humble onions transform into liquid gold, your kitchen will fill with an aroma that will make your heart sing. Each step in creating these tarts is infused with care and attention to detail, ensuring that every bite is filled with love and warmth. Let’s embark on this culinary journey together!
Caramelized Onion and Goat Cheese Tarts: A Delightful Culinary Adventure
Ah, these Caramelized Onion and Goat Cheese Tarts are nothing short of magic! They beautifully encapsulate the essence of French cuisine while allowing anyone to shine in their home kitchen. Whether you’re impressing guests or simply indulging yourself after a long day, these tarts bring joy to every table. Plus, they’re incredibly simple to prepare! So let’s roll up our sleeves and dive into this delicious adventure.
Ingredients:
Before we dive into baking bliss, let’s gather our ingredients—and trust me; each one plays a pivotal role in achieving that decadent flavor profile we crave.
- 1 sheet puff pastry. This will be the star of the show, puffing up beautifully to create that dreamy texture we all adore. When choosing puff pastry, look for high-quality brands that use real butter for the best flavor and flakiness. If you’re feeling adventurous, you can even make your own from scratch! But for convenience’s sake, store-bought works wonders too—just make sure it’s thawed before using it.
- 2 large onions, thinly sliced. These beauties are going to caramelize to perfection—transforming from sharp and pungent to sweet and creamy as they cook down slowly. Be patient with them! The key here is low and slow cooking; it allows their natural sugars to develop fully without burning. Sweet yellow onions work beautifully for this dish due to their high sugar content; however, red onions can provide an interesting twist if you’re looking for something unique.
- 2 tablespoons olive oil. This golden elixir is essential for helping caramelize our onions while adding depth to their flavor profile. Olive oil not only prevents sticking but enhances the overall richness of the tarts thanks to its fruity notes. Look for extra virgin olive oil if possible—it’ll give your dish that beautiful Mediterranean flair!
- 1 tablespoon balsamic vinegar. Now here comes the magic ingredient—the balsamic vinegar adds a tangy kick that perfectly balances the sweetness of the caramelized onions while elevating all the flavors involved in this dish. Use good quality balsamic vinegar; it should be thick and syrupy rather than thin and overly acidic—this makes all the difference in achieving that complex flavor profile.
- To taste salt and pepper. These are essential companions in enhancing natural flavors throughout our tarts. Salt draws out moisture from our ingredients while amplifying sweetness—a non-negotiable step in any savory dish! Freshly cracked black pepper adds warmth without overwhelming flavors; don’t hesitate to taste as you go along!
- 4 ounces goat cheese, crumbled. The tanginess and creaminess provided by goat cheese are absolutely paramount for this recipe—it adds richness that complements both the sweet onions and flaky pastry beautifully! When selecting goat cheese, opt for one that’s fresh; its slightly tangy notes will elevate your tarts into something truly extraordinary.
- Fresh thyme (optional, for garnish). Though optional, I highly recommend using fresh thyme as an aromatic touch that uplifts our tarts both visually and flavor-wise! Its earthy scent complements both onion and goat cheese splendidly—plus it adds a pop of color when sprinkled on top right before serving.
Equipment You’ll Need:
Before we embark on creating our delicious tarts, let’s gather some essential tools—having these on hand can turn what could be tedious into sheer joy!
- Baking sheet – This will serve as our canvas during baking! A sturdy baking sheet ensures even heat distribution while allowing our pastries to puff up beautifully without burning on uneven surfaces.
- Parchment paper (optional) – Lining your baking sheet with parchment paper can make cleanup much easier while preventing sticking—a little extra insurance so nothing goes awry during baking!
- Sharp knife or mandoline slicer – For those lovely thin slices of onion! A sharp knife allows precise cuts necessary for even cooking during caramelization while reducing frustration—unless you’d like to test your knife skills under pressure!
- Large skillet – A good quality skillet helps distribute heat evenly across all layers as we sauté our ingredients together—a must-have tool when working with delicate elements like onions.
Now that we’ve got everything prepped let’s delve into preparing these delightful Caramelized Onion and Goat Cheese Tarts!
Step 1: Slicing Those Onions
First things first: grab those two large onions you’ve lovingly chosen! Thinly slice them using your sharp knife or mandoline slicer—aiming for about ¼-inch thickness so they cook evenly without losing too much volume during caramelization. Don’t rush this step; each slice counts toward building layers upon layers of deep flavor later on!
Once sliced up nicely, place them aside momentarily while you heat up 2 tablespoons of olive oil in a large skillet over medium heat. When shimmering but not smoking (a visual cue!), add those precious onion slices directly into the pan—listen closely as they sizzle gently against heated olive oil like music playing softly in background harmony!
Step 2: Slow-Cooking Magic
Now comes one of my favorite parts: patience is key here! Stir occasionally but allow them time alone between turns so they begin releasing their natural sugars beautifully without burning—this process usually takes about 20–25 minutes depending on how well your stove handles temperature control.
As they cook down slowly from translucent beauty towards rich golden glory (the moment we’ve all been waiting for!), consider adding salt halfway through cooking time—it enhances sweetness by drawing out moisture from within each onion slice while encouraging caramelization evenly across surfaces.
Step 3: Adding Balsamic Vinegar
Okay my friend; once those glorious onions have reached optimal caramelized perfection—a rich amber hue—you’ll want to drizzle in 1 tablespoon balsamic vinegar right at this moment! This addition provides acidity which brightens everything while cutting through richness from fat present inside sautéed goodness—a perfect balance achieved indeed!
As soon as it hits hot surface area within pan there will be some sizzling noise again—this signals reduction happening immediately upon contact creating wonderful aromas wafting around kitchen almost instantly captivating senses nearby… Trust me when I say this smells incredible already!
Step 4: Preparing Puff Pastry Base
While those aromatic delights continue bubbling away off heat source nearby—we’ll shift focus now onto preparing our beautiful puff pastry base! Begin by rolling out one sheet onto lightly floured surface until it achieves desired size—not too thin nor too thick (about ⅛ inch).
Once rolled properly out measure dimensions against baking sheet ensuring it fits snugly without overlapping edges then use sharp knife cut corners diagonally giving them lovely flared effect once baked later on—it’s all about details my friend!
With everything set up perfectly we’ll move forward layering ingredients atop crisp foundation next…
Stay tuned as I guide you further into crafting these delectable tarts filled with joy perfecting each bite along way together after all hard work put forth thus far has culminated wonderfully already!
Step 5: The Art of Caramelizing Onions
Now, let’s dive into the heart of our recipe—the caramelized onions! This step is where magic happens, transforming simple onions into a profoundly satisfying symphony of flavors. Start by placing your two tablespoons of olive oil in a large skillet over medium heat. As the oil warms, you’ll notice it shimmering like liquid gold; this is your cue that it’s ready! Add your thinly sliced onions to the pan, ensuring they’re spread out evenly. Watching those onions sizzle is an experience in itself—trust me, you’ll want to take a moment to breathe in that tantalizing aroma as they begin to soften.
Cook the onions for about 15-20 minutes, stirring occasionally. This process is crucial; don’t rush it! You want to coax out their natural sweetness without burning them. The goal here is deep browning and a soft, buttery texture—so if you find they’re browning too quickly, lower the heat. You might even consider adding a pinch of salt at this stage; it draws out moisture and helps them break down beautifully. As those onions caramelize, you’ll see them transform from stark white strands into rich amber hues. When they reach that glorious golden color, add the tablespoon of balsamic vinegar; this tangy kick elevates their flavor profile to another level. Keep cooking for another minute or so until the vinegar reduces slightly and clings to the onions like a sweet glaze.
Step 6: Preparing Your Puff Pastry Canvas
While your onions are undergoing their delicious transformation, let’s turn our attention to the puff pastry—the star of our show! Preheat your oven to 400°F (200°C), allowing it to reach that perfect baking temperature while we prepare our pastry base. Take the sheet of puff pastry and gently roll it out on a lightly floured surface until it’s about 1/8 inch thick. This step isn’t just about making it larger; rolling helps create those beautiful flaky layers that will rise magnificently in the oven.
Once rolled out, cut the pastry into four equal squares or rectangles—whatever shape speaks to you! Remember to keep each piece about 4 inches wide for optimal tart size. Using a sharp knife or pizza cutter ensures clean edges, which are essential for that visually appealing presentation when they come out of the oven. Now comes an important technique: using a fork, gently prick the interior of each pastry square several times without piercing all the way through; this is called docking. It may seem trivial, but trust me—this step prevents unwanted puffing during baking and allows for an even surface on which we’ll pile our luscious toppings later on. After docking, place your pastry squares on a lined baking sheet and pop them in the fridge for about 10 minutes while we finish up with those heavenly onions.
Step 7: Crumbling Goat Cheese Bliss
With your onions beautifully caramelized and your puff pastry prepped and chilled, it’s time to introduce that creamy goat cheese into this delightful equation! Grab your four ounces of goat cheese and crumble it into pieces with your fingers; I love doing this because my hands get to feel its velvety texture while also breaking it down into smaller bits that will melt lovingly into every nook and cranny of our tarts. As you crumble, allow yourself to savor its tangy aroma—it’s utterly intoxicating!
Now comes an exciting assembly phase! Take out those chilled pastry squares from the fridge and sprinkle half of your crumbled goat cheese onto each square, leaving about half an inch around the edges clear—this will give room for them to puff up elegantly as they bake. Next, spoon a generous amount of your caramelized onion mixture right over the cheese layer—don’t be shy here! Each bite deserves a robust combination of flavors. If you’re feeling adventurous (and I highly encourage you to be!), scatter some fresh thyme leaves over the top for an aromatic touch that elevates everything to new heights! Thyme adds such an enchanting fragrance during baking; trust me when I say your kitchen will smell divine!
Step 8: Baking Your Perfect Tarts
Now that everything is assembled perfectly on those beautiful pastry squares, it’s time for the final act—baking! Carefully slide your baking sheet into that preheated oven and set a timer for about 20-25 minutes. This step is absolutely paramount because how you manage these next few minutes can make or break your tarts’ success. As they bake, keep an eye on them; you want golden-brown edges with puffs that rise impressively high.
You’ll know they’re ready when you see those gorgeous golden tops glistening under the oven light—a sign they’re crisped up beautifully—and when you take them out, let them sit on the counter for just a couple of minutes before digging in (I know it’s hard!). This resting period allows steam to escape from beneath while letting all those flavors meld together harmoniously—a truly extraordinary moment in cooking! To check doneness visually, look at both color and feel: they should be firm yet slightly springy when touched.
Final Touches: The Grand Reveal
Step 9: Garnishing Your Tarts with Love
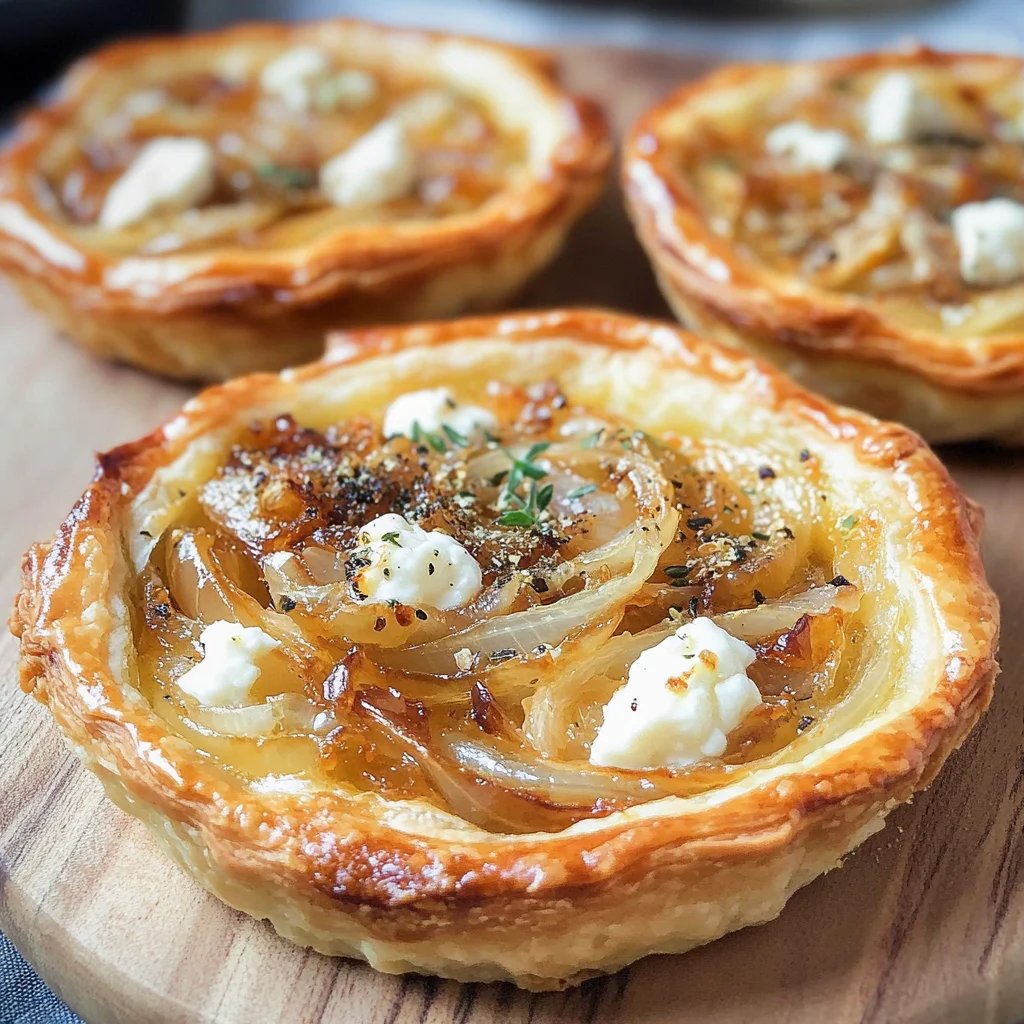
The moment we’ve all been waiting for has arrived—your Caramelized Onion and Goat Cheese Tarts are ready for their grand reveal! Carefully transfer them onto a serving platter using a spatula (they might be delicate!) and take a moment just to admire their splendid appearance—a true testament to culinary artistry! Before serving these beauties at your next gathering or simply indulging solo on a quiet evening at home (I won’t judge!), consider adding one last flourish: a sprinkle of fresh thyme leaves or even microgreens if you’ve got some handy.
This finishing touch doesn’t just add visual appeal but also enhances flavor with its freshness against the rich filling beneath—it’s like putting icing on the cake! As you slice into these tarts, listen closely—the flaky crust will crackle delightfully under pressure; each bite promises layers upon layers of rich caramelized onion mingling effortlessly with creamy goat cheese—all encased in that wonderfully airy puff pastry.
So gather your loved ones around as you serve these exquisite tarts warm from the oven—the smiles on their faces will tell you how much they adore what you’ve created together in your kitchen! Enjoy every bite knowing you’ve crafted something not just nourishing but also deeply meaningful—a dish made with love that’s bound to become a cherished part of your culinary repertoire!
Storage and Enjoyment Tips for Your Caramelized Onion and Goat Cheese Tarts
Now that you’ve created these stunning Caramelized Onion and Goat Cheese Tarts, it’s time to revel in the deliciousness! But let’s be honest – with such a delightful treat, you might not have any leftovers. Still, if you do find yourself with a few tarts left after your gathering (which I truly hope doesn’t happen!), there are some wonderful ways to preserve their magic for later enjoyment. So let me share how to keep these beauties fresh and just as delectable as they were when they first left the oven.
Storing Leftover Caramelized Onion and Goat Cheese Tarts
To maintain the integrity of your Caramelized Onion and Goat Cheese Tarts, it’s best to store them in an airtight container in the refrigerator. This method not only keeps them safe from drying out but also helps preserve that flaky pastry texture we all adore. If stored properly, these tarts will stay fresh for about 3 days. Now here’s a little pro tip: placing a slice of bread in the container can help maintain moisture, ensuring your tarts don’t lose their delightful crispness. When you’re ready to enjoy them again, simply reheat them in the oven at 350°F (about 175°C) for around 10-15 minutes until they’re warmed through and the pastry regains its original flakiness. Trust me on this – the aroma that fills your kitchen will be utterly intoxicating!
Freezing Caramelized Onion and Goat Cheese Tarts for Later
If you want to prepare ahead of time or save some for another day, freezing is a fantastic option! To freeze your Caramelized Onion and Goat Cheese Tarts, cool them completely after baking, then wrap each tart individually in plastic wrap followed by aluminum foil to prevent freezer burn. When stored this way, they can last up to 2 months in the freezer without compromising flavor or quality. When you’re ready to indulge again, just pop them directly into a preheated oven from frozen at 375°F (about 190°C) for around 20-25 minutes. The convenience of having these gourmet delights ready at a moment’s notice is simply too good to pass up! Imagine pulling out a perfectly preserved tart on a busy weeknight or for an unexpected guest – pure culinary joy!
Caramelized Onion and Goat Cheese Tarts

Indulge in delicious Caramelized Onion and Goat Cheese Tarts that are perfect for any occasion! Try making them today and savor every bite!
- Prep Time: 20 minutes
- Cook Time: 25 minutes
- Total Time: 45 minutes
- Yield: Serves 4 (1 tart each) 1x
- Category: Appetizer
- Method: Baking
- Cuisine: French
Ingredients
- 1 sheet puff pastry
- 2 large onions, thinly sliced
- 2 tablespoons olive oil
- 1 tablespoon balsamic vinegar
- Salt and pepper to taste
- 4 ounces goat cheese, crumbled
- Fresh thyme (optional, for garnish)
Instructions
- Preheat your oven to 400°F (200°C).
- Heat olive oil in a large skillet over medium heat. Add sliced onions and cook slowly for about 20-25 minutes until caramelized, stirring occasionally.
- When onions are golden brown, add balsamic vinegar and cook for an additional minute.
- Roll out the puff pastry on a lightly floured surface to about 1/8 inch thick; cut into squares.
- Place pastry squares on a baking sheet lined with parchment paper. Crumble goat cheese onto each square, then top with caramelized onions.
- Garnish with fresh thyme if desired and bake for 20-25 minutes until golden brown.
- Allow to cool slightly before serving.
Nutrition
- Serving Size: 1 serving
- Calories: 210
- Sugar: 3g
- Sodium: 300mg
- Fat: 13g
- Saturated Fat: 5g
- Unsaturated Fat: 7g
- Trans Fat: 0g
- Carbohydrates: 18g
- Fiber: 1g
- Protein: 5g
- Cholesterol: 15mg