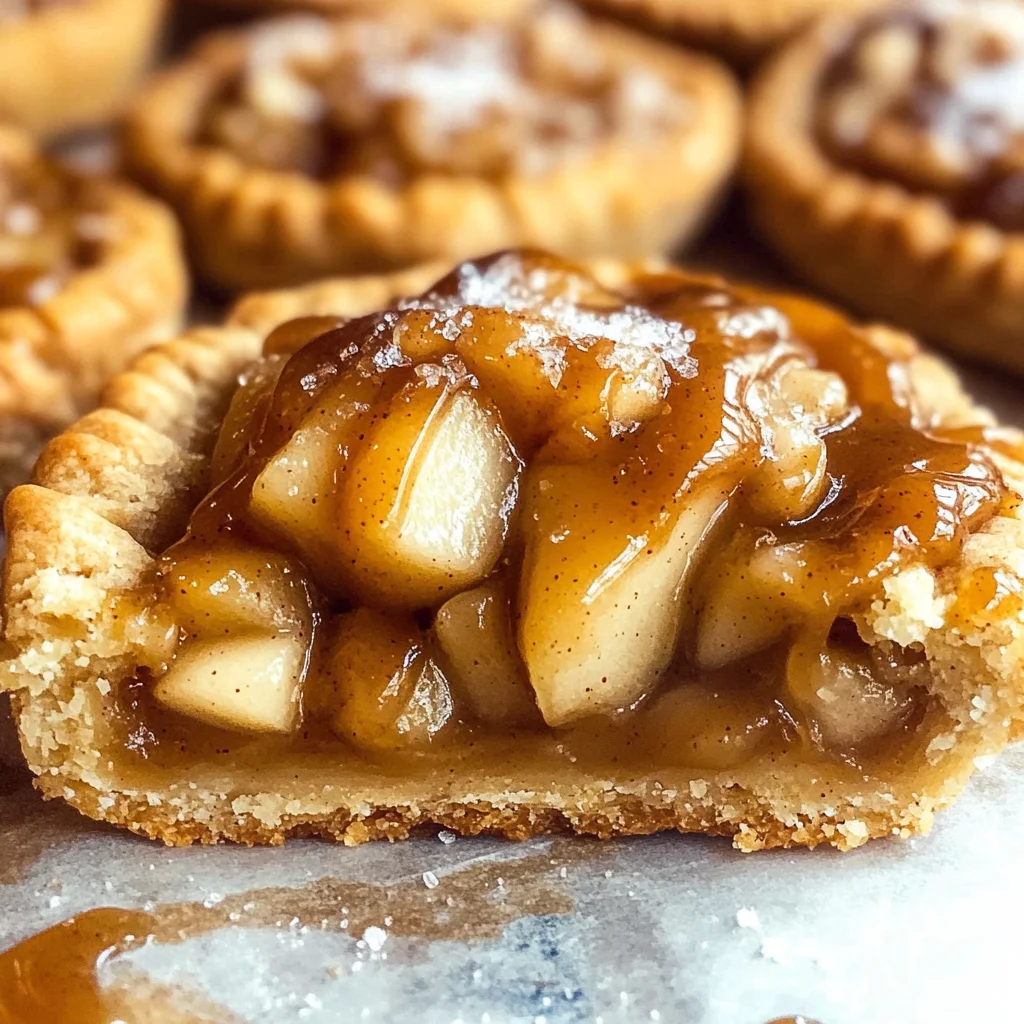
Apple Pie Cookies
As the aroma of warm apples and cinnamon fills the air, it’s hard not to feel a sense of nostalgia wash over you. Apple Pie Cookies are more than just a sweet treat; they are a delightful reminder of cherished moments spent in the kitchen, laughing and sharing stories with loved ones. Picture golden-brown cookie bites that capture all the essence of a classic apple pie—the tender fruit, the gooey caramel, and the hint of spice—all wrapped in an invitingly chewy cookie shell. With each bite, you’re not just tasting dessert; you’re experiencing a symphony of flavors that blend beautifully together, transporting you to cozy family gatherings or quiet afternoons spent baking.
This recipe is my go-to when I’m craving something sweet but don’t want to commit to a full pie. Sometimes, life is too busy for that! These Apple Pie Cookies strike the perfect balance between indulgence and convenience—no fork is required! They are ideal for sharing at potlucks or enjoying on your own as an afternoon snack with a cup of tea. Trust me when I say that once you take your first bite, you’ll be captivated by their sticky sweetness and buttery richness. So let’s dive into this delicious journey together!
Apple Pie Cookies: A Bite-Sized Delight
Welcome to the world of Apple Pie Cookies! This recipe takes everything you love about traditional apple pie and transforms it into easy-to-handle cookies that are as fun to make as they are to eat. Whether you’re baking for a special occasion or simply wanting to treat yourself, these little gems will delight your taste buds and fill your home with an intoxicating aroma that lingers long after they’ve come out of the oven. Get ready for a baking adventure!
Ingredients:
Before we embark on this delicious journey, let’s gather our ingredients. Each one plays an essential role in crafting these mouthwatering Apple Pie Cookies, so pay attention to what they bring to the table.
- 3 apples (about 1 lb), peeled and sliced into 8 slices each. For this recipe, I recommend using a mix of tart and sweet apples like Granny Smith and Honeycrisp. The tartness from Granny Smith balances out the sweetness from other ingredients beautifully while adding texture and flavor depth. Make sure they’re firm and fresh; bruised or overly soft apples won’t hold their shape during baking.
- 1-2 tablespoons lemon juice. This ingredient is crucial because it not only adds brightness but also helps prevent the apples from browning too quickly after slicing. The acidity in lemon juice enhances flavors while keeping our filling looking vibrant and fresh.
- 3 tablespoons white sugar. White sugar serves two purposes here—sweetening our apples while also helping to create that beautiful caramelization as they cook down with other ingredients. Choose fine granulated sugar for even distribution throughout our filling.
- 3 tablespoons brown sugar. Brown sugar adds moisture due to its molasses content which contributes a rich depth of flavor that’s slightly different from white sugar alone. It creates a lovely contrast against the bright notes from our apples.
- 3 tablespoons cornstarch. Cornstarch acts as a thickener for our apple filling, ensuring it has just the right consistency without being overly runny or dry. It’s important to mix it well with the sugars before adding it to the fruit so that it disperses evenly during cooking.
- 1/2 teaspoon cinnamon. Cinnamon is like a warm hug in spice form; its aromatic qualities enhance our apple filling’s flavor profile so beautifully! It pairs wonderfully with both apples and caramel, creating that quintessential fall dessert vibe regardless of the season.
- A dash of nutmeg. Just a pinch goes such a long way! Nutmeg introduces subtle warmth that complements cinnamon perfectly while adding complexity without overwhelming any single flavor.
- 3/4 cup water. This may seem simple, but water helps create steam within our filling as it cooks down on the stove—encouraging those fragrant flavors to meld beautifully together without drying out any ingredients.
- 1 cup (2 sticks) unsalted butter, cut into cubes-chilled. Using chilled butter is absolutely paramount here; it ensures we achieve that flaky texture when making our cookie dough later on! Cold butter doesn’t melt too quickly during mixing, allowing pockets of fat to stay intact which makes for cookies with delightful lift.
- 2 and 1/2 cups all-purpose flour. All-purpose flour provides structure without making these cookies too dense or heavy—just what we want for cookie perfection! If you have access to pastry flour or cake flour, feel free to substitute some of it for an even lighter texture!
- 1 teaspoon salt. Salt isn’t just there for seasoning; it elevates all flavors present in our cookies while balancing sweetness effectively—a non-negotiable step!
- 1 teaspoon sugar (for dusting). A light sprinkle over baked cookies gives them a lovely shimmer while enhancing their sweetness just before serving!
- 1/4 cup ice water. Much like chilled butter throughout this process: ice water helps bind everything together without warming up your dough prematurely during mixing—keeping those coveted flaky layers intact!
- 1 and 3/4 cups apple pie filling-chopped into small pieces. Using prepared apple pie filling simplifies things immensely but chopping it means every bite will be infused with yummy apple goodness—not just blobs!
- 1 cup caramel sauce. Oh yes! Caramel brings unadulterated joy into each bite—a luscious addition that turns ordinary cookies into something extraordinary! Opt for store-bought if short on time; homemade versions can also work wonders if you’ve got some saved up!
- 1 egg-lightly beaten. The beaten egg will act as an adhesive throughout our dough—it binds everything nicely together while also contributing richness as part of its protein content during baking!
- 1 teaspoon cinnamon (for dusting) sprinkled atop before serving creates an inviting aroma reminiscent of freshly baked pies wafting through homes everywhere!
- 1/4 cup sugar (for sprinkling) adds another lovely layer of sweetness right before serving—as if these cookies needed any more encouragement!
Equipment You’ll Need:
Having the right tools can truly transform your cooking experience from mundane to magical! While ingredients are undeniably important, having quality equipment makes every step smoother and more enjoyable—like having reliable friends by your side in the kitchen.
- Mixing bowls – A set of sturdy mixing bowls allows you ample space for combining ingredients without worrying about spills or messes! Opt for glass or stainless steel which are easier to clean post-baking compared with plastic options—especially when working with sticky substances like caramel sauce.
- Measuring cups & spoons – Accurate measurements are crucial in baking where precision matters most; invest in quality dry measuring cups alongside liquid measuring ones so every ingredient contributes exactly how it’s meant to without guesswork involved!
- Cutting board & knife – A good cutting board paired with sharp knives gives you control when preparing fruits; ensure they’re well-maintained because dull knives can lead not only frustration but potential accidents too!
- Rolling pin – If you plan on rolling out dough at any point (like when shaping these cookies), invest in either wooden or marble rolling pins—they provide weight necessary for flattening while allowing precise control over thickness achieved easily!
As we move forward into preparing these delightful treats step-by-step soon enough… remember patience pays off handsomely during each stage along this journey—so let’s get rolling right away!
Step 1: Sautéing Apples
First things first—we need those apples transformed into something magical! Begin by peeling them (if not already done), then slice them evenly into thin wedges—aiming around eight slices per apple should do nicely here! In your favorite skillet over medium heat gather chopped fruits along with lemon juice plus both sugars (white AND brown). Now sprinkle cornstarch directly atop your mixture followed by dashes cinnamon & nutmeg… trust me—the aroma wafting through becomes utterly intoxicating at this point already! Add water next before stirring gently until everything combines well—this creates what I like calling “apple bliss.” Allow them simmer gently—just enough time (about ten minutes) until softened yet still holding shape gracefully throughout cooking process ahead…
Step 2: Preparing Cookie Dough
Now let’s shift gears towards making our cookie base—it’s super simple yet oh-so-key step needed later down line when assembling finished product together nicely … Start by combining chilled cubed butter within large bowl alongside flour plus salt using pastry cutter until mixture resembles coarse crumbs resembling sand-like texture—which ensures we’ve created those desired flaky layers earlier mentioned above—that magic happens here friends! Next stir remaining items such as beaten egg plus ice-cold water gradually until forming cohesive dough forms itself nicely around edges… Remember though not rush this part either since kneading too much can result tough outcomes instead… patience yields perfect results always!!!
Step 3: Assembling Cookies
With both components prepared earlier let’s create something extraordinary now shall we? Preheat oven starting at around 350°F meanwhile laying parchment paper onto baking sheets ahead before moving forward assembling batches together carefully… First scoop small dollops filled generously baked apple mixture onto center each flattened round discs formed previously then top off generously drizzling luscious caramel sauce atop them before finally sealing edges firmly closed ensuring no leakages occur once placed inside hot ovens shortly thereafter…
Step 4: Baking Time!
Once assembled properly now comes exciting part where scents begin wafting through kitchens everywhere transforming spaces instantly into glorious bakeries practically overnight… Bake within preheated environment about twenty minutes checking periodically until edges turn golden brown along tops appear lightly puffed giving hints crispness awaiting beneath surface itself… Enjoy watching magic unfold firsthand trust me—it’ll be worth every moment spent lost within aromas swirling around endlessly…
And there you have it—the first steps toward creating these incredible Apple Pie Cookies! Stay tuned as we continue deep diving further through remaining stages leading us closer towards final delectable results soon enough…
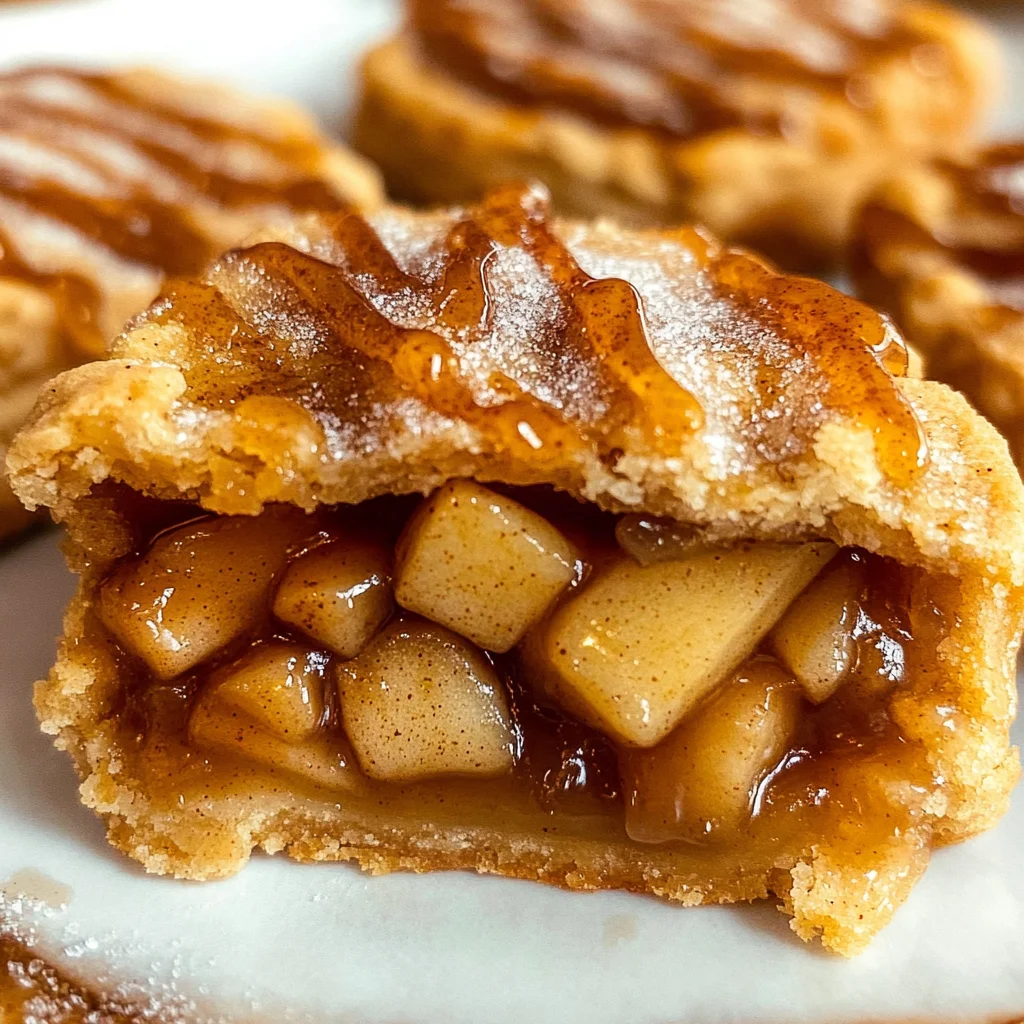
Step 5: Embracing the Filling – The Heart of Your Cookies
Now that we’ve prepared our apple filling and pie crust, let’s bring it all together with the most exciting part of this recipe—stuffing those adorable cookies with the sweet, sticky goodness that makes these Apple Pie Cookies so irresistible! Begin by taking your chopped apple pie filling and combining it with a heavenly mixture of caramel sauce. Using about three-quarters of a cup of caramel sauce will yield an utterly intoxicating blend that clings to the apples like a warm hug. This step is crucial because the caramel not only enhances the sweetness but also adds that delightful gooey texture that makes every bite feel like a cozy fall day. You’ll want to mix gently, ensuring each piece of apple is coated without pulverizing them; we want those lovely, juicy slices to shine through.
Once your filling is ready, take a moment to admire its glossy sheen. This visual cue is important; it tells you the caramel has melted just enough to coat everything perfectly, creating that symphony of flavors you’re aiming for. If your mixture feels too thick or sticky at this point, don’t hesitate to add a splash more caramel sauce—trust me on this one! The right consistency will allow you to spoon the filling easily onto your cookie dough without making a mess. You’re going to want generous dollops of this filling in each cookie; after all, who wants an underfilled dessert? So be bold and give each cookie mound a heaping tablespoon of this luscious concoction before sealing it up!
Step 6: Assembling Your Masterpieces – The Art of Cookie Construction
Now comes the fun part: assembling your Apple Pie Cookies! Preheat your oven to 375°F (190°C) because we’re about to send these little bites into their transformative journey. Take your chilled dough and roll it out on a lightly floured surface until it’s about 1/8 inch thick. I promise you, patience is vital here—too thin, and our cookies risk tearing; too thick, and they’ll lose that delicate balance between crust and filling. You want these beauties to be just thick enough to hold their shape while being soft enough to melt in your mouth.
Using a round cutter or even the rim of a glass (about 3 inches in diameter), cut out circles of dough. This is where your creativity can shine! Place about one tablespoon of that luscious apple-caramel mixture in the center of each circle—it should look like a little treasure waiting to be sealed up. Gently fold the edges over the filling, pinching them together tightly; this step is absolutely paramount because we need our cookies to stay intact during baking. You wouldn’t want all that deliciousness oozing out while they bake, right? A good trick is to make sure you dampen your fingers slightly with water before pinching—that added moisture creates a better seal as well as gives you a bit more flexibility when molding!
Step 7: The Chilling Truth – Why Patience Pays Off
After you’ve beautifully shaped all your cookies, it’s time for another chill session! This step might seem simple but trust me when I say it transforms these cookies from good to extraordinary! Place your assembled Apple Pie Cookies on a parchment-lined baking sheet and pop them into the refrigerator for at least 30 minutes—an hour would be even better if you can spare it. Why chill? Chilling helps solidify the butter within the dough once again so that when they hit the hot oven, they don’t spread too much and instead maintain their shape beautifully while baking.
During this resting phase, something magical happens—the flavors meld together while the gluten in the flour relaxes, allowing for tender cookies rather than tough ones. It’s like giving your dough time to breathe and harmonize with its other ingredients! While you’re waiting, why not sip on some tea or coffee? That way, when you finally pull those golden goodies from the oven, it feels like pure magic!
Step 8: Baking Your Perfect Apple Pie Cookies – Timing Is Everything
Once they have chilled adequately and you’ve preheated your oven, it’s time for some serious baking action! Gently place those delightful morsels into your hot oven and set a timer for about 15-20 minutes. But don’t just walk away; keep an eye on them! You’ll know they’re ready when they start turning a beautiful golden brown around the edges and begin puffing slightly in the middle. This transformation is what we’re looking for—a nice crisp outside with an utterly chewy inside filled with sweet apple-caramel goodness.
Rotate your baking sheet halfway through cooking if you notice uneven browning; ovens can be quirky like that! It’s also important not to overbake these beauties; check at around 15 minutes because nobody wants dry cookies! When they’re done baking, let them rest on the baking sheet for about five minutes before transferring them onto wire racks—this allows them to set properly so they won’t fall apart in transit.
Final Touches – Dusting Magic & Serving Suggestions
Step 9: Finishing Touches – A Sweet Sprinkle Makes All the Difference
Now comes my favorite part—the finishing touches! Once those glorious Apple Pie Cookies have cooled just enough so you can handle them without burning your fingers (but still warm enough that their aroma fills your kitchen), grab yourself some sugar mixed with cinnamon—a classic duo that never fails to impress. Using a fine sieve or simply sprinkling from your fingers above each cookie will create a dusting effect that’s visually stunning and adds an extra layer of flavor reminiscent of classic apple pie.
This step isn’t just decorative; it’s sensory! That sprinkle brings warmth as if whispering fall directly into each bite. And speaking of bites—these cookies are best served warm but can also be enjoyed at room temperature if you’re planning ahead for guests or family gatherings. Try serving them alongside vanilla ice cream or whipped topping made from coconut cream for an indulgent treat that’s beyond compare!
I promise you; once you’ve experienced these sticky-sweet delights bursting with flavor, you’ll never look at traditional apple pie quite the same again! Each cookie offers nostalgia wrapped in comfort—a reminder that sometimes life’s sweetest moments come in small packages. Now gather your loved ones around and celebrate this delightful creation together because sharing good food always makes it taste even better!
Storage and Enjoyment Tips for Your Apple Pie Cookies
Ah, the moment has arrived! You’ve followed each step with care, and your kitchen is now filled with the warm, intoxicating aroma of freshly baked Apple Pie Cookies. As you take that first delightful bite, I promise you’ll be transported to a cozy autumn afternoon, where every mouthful bursts with nostalgia and joy. But what happens when you have leftovers? Believe me, these little gems are so good that you’ll want to savor every last one! Let’s dive into how to keep them fresh and delicious for days to come.
Storing Leftover Apple Pie Cookies
To ensure your delectable Apple Pie Cookies remain just as scrumptious as the day they were baked, store them in an airtight container at room temperature. This keeps them soft and chewy – the way they’re meant to be enjoyed! They will stay fresh for about 3 to 4 days, but trust me when I say they won’t last that long once your family gets a taste! If you want an extra tip for keeping them fresh, try placing a slice of bread in the container; it helps maintain moisture and keeps those cookies delightfully chewy. After storage, the flavors meld beautifully, enhancing that sweet apple-cinnamon goodness. When you’re ready to indulge again, simply pop them in the microwave for a few seconds or enjoy them at room temperature – either way, they’ll still deliver that comforting experience you crave!
Freezing Apple Pie Cookies for Later
If you find yourself with an abundance of these delightful treats (or if you simply want to save some for a rainy day), freezing is a fantastic option! To freeze your Apple Pie Cookies properly, allow them to cool completely before placing them in a single layer on a baking sheet. Once frozen solid (about 1-2 hours), transfer them to an airtight freezer bag or container. They can be stored like this for up to three months! The great part about freezing is that it gives you the convenience of having delicious homemade cookies at your fingertips whenever a craving strikes. Simply reheat from frozen in the oven at 350°F for about 10-15 minutes or microwave them gently until warmed through. It’s like having a little slice of comfort ready whenever you need it!
So whether you’re enjoying these cookies fresh out of the oven or saving some for later indulgence, each bite is bound to bring warmth and joy.
Apple Pie Cookies

Apple Pie Cookies are the perfect blend of nostalgia and convenience, delivering all the flavors of a classic apple pie in a delightful, bite-sized form. Imagine warm, chewy cookies filled with tender apples, rich caramel, and aromatic spices that envelop your senses as they bake. These cookies are not only easy to make but also ideal for sharing at gatherings or enjoying as a sweet afternoon treat with your favorite beverage. With no need for utensils, they promise a hassle-free dessert experience that captures the essence of comfort food in every bite.
- Prep Time: 30 minutes
- Cook Time: 20 minutes
- Total Time: 50 minutes
- Yield: Approximately 24 cookies 1x
- Category: Dessert
- Method: Baking
- Cuisine: American
Ingredients
- 3 apples (about 1 lb), peeled and sliced
- 1–2 tablespoons lemon juice
- 3 tablespoons white sugar
- 3 tablespoons brown sugar
- 3 tablespoons cornstarch
- 1/2 teaspoon cinnamon
- A dash of nutmeg
- 3/4 cup water
- 1 cup unsalted butter, chilled and cubed
- 2 and 1/2 cups all-purpose flour
- 1 teaspoon salt
- 1 egg, lightly beaten
- 1 and 3/4 cups chopped apple pie filling
- 1 cup caramel sauce
Instructions
- Preheat your oven to 375°F (190°C).
- In a skillet over medium heat, combine sliced apples, lemon juice, white sugar, brown sugar, cornstarch, cinnamon, nutmeg, and water. Cook until the apples soften slightly.
- In a mixing bowl, combine chilled butter with flour and salt using a pastry cutter until the mixture resembles coarse crumbs. Gradually stir in the beaten egg and ice water until a cohesive dough forms.
- Roll out the dough on a floured surface to about 1/8 inch thick. Cut out circles using a round cutter.
- Place one tablespoon of the apple filling on each dough circle. Fold edges over to seal tightly.
- Chill assembled cookies in the refrigerator for at least 30 minutes before baking.
- Bake for about 15-20 minutes or until golden brown on edges.
Nutrition
- Serving Size: 1 serving
- Calories: 150
- Sugar: 10g
- Sodium: 90mg
- Fat: 7g
- Saturated Fat: 4g
- Unsaturated Fat: 2g
- Trans Fat: 0g
- Carbohydrates: 22g
- Fiber: 1g
- Protein: 2g
- Cholesterol: 15mg