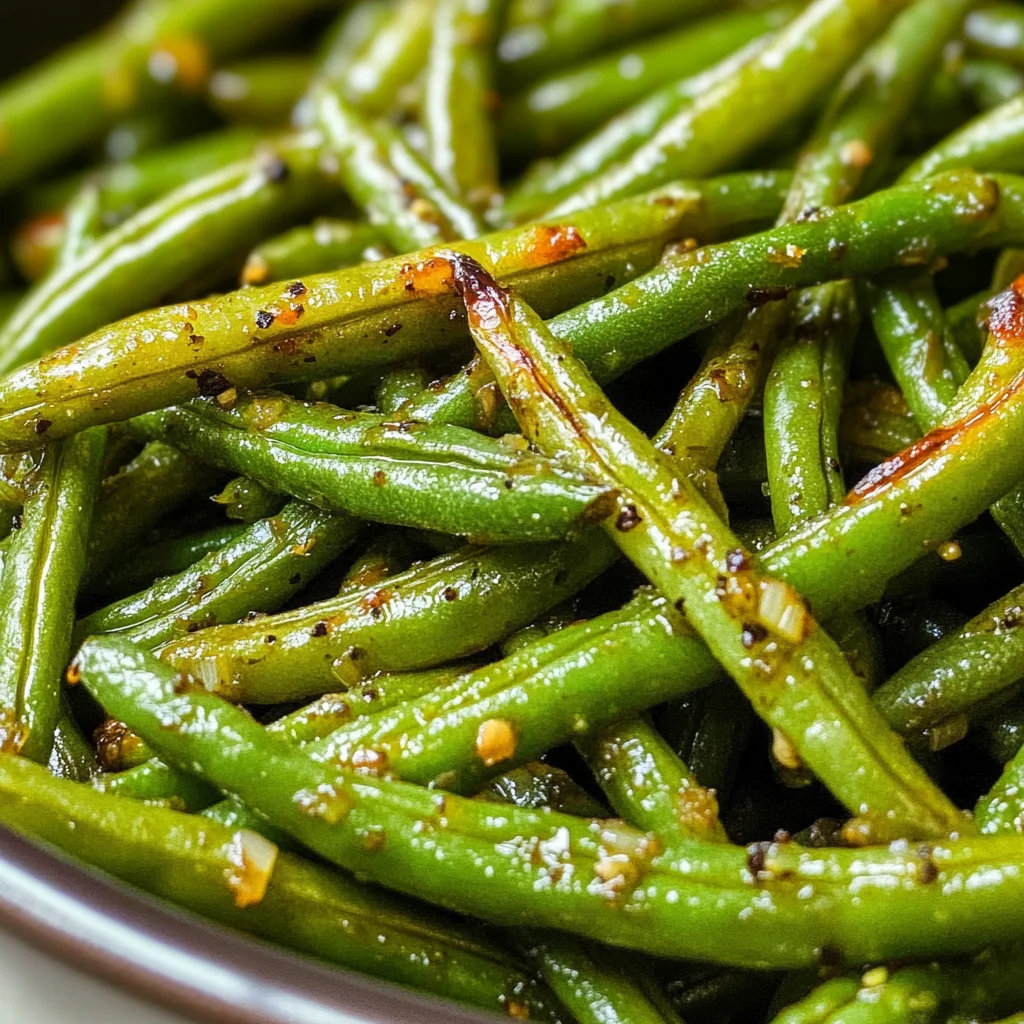
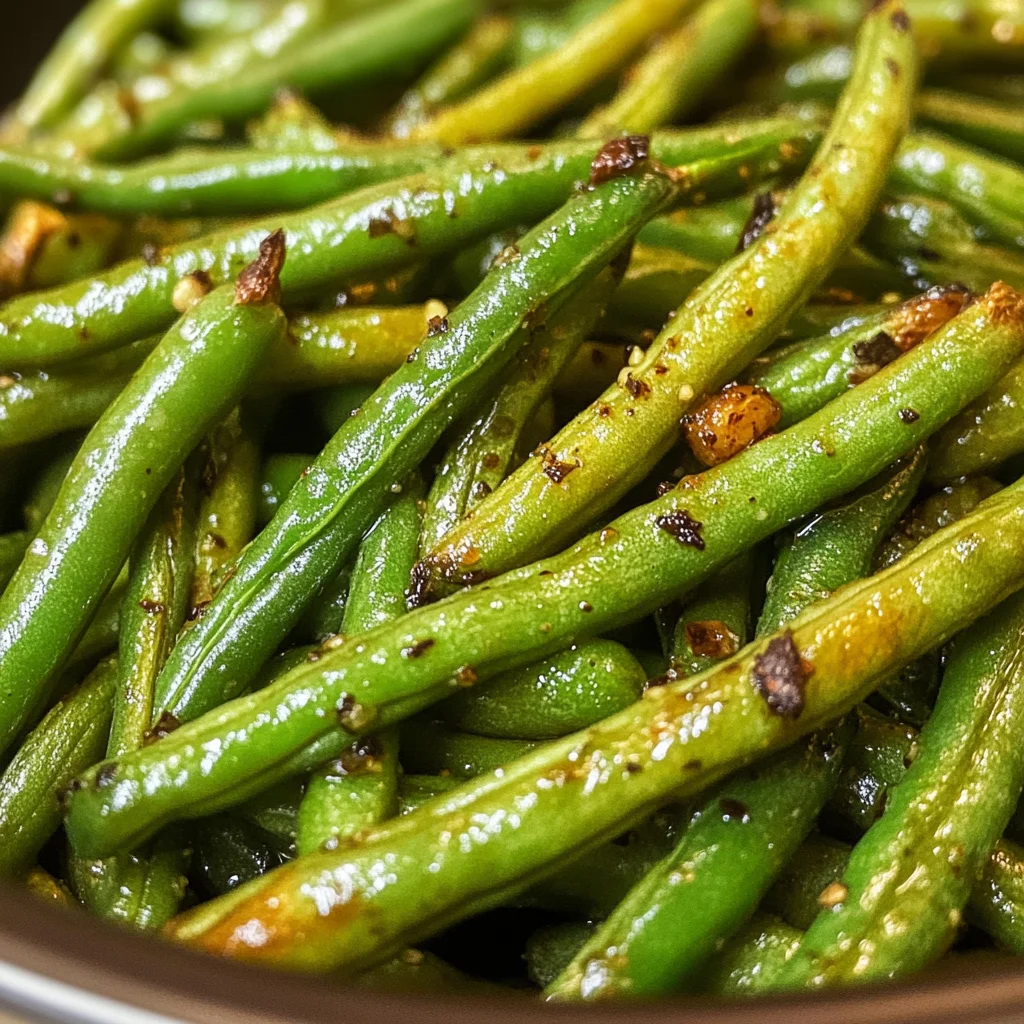
Air Fryer Roasted Green Beans
There’s something so magical about cooking, isn’t there? It’s not just about nourishing our bodies; it’s about creating memories, sharing love, and bringing people together. Think of the aroma that wafts through the kitchen as you prepare a meal—the scent of fresh ingredients mingling in the air, promising comfort and joy. Today, I want to share with you a simple yet profoundly satisfying recipe: Air Fryer Roasted Green Beans. This dish is not merely a side; it’s an experience—an effortless way to elevate any meal while celebrating the vibrant flavors and crisp textures of fresh vegetables. Trust me when I say this is one of those recipes that will have you feeling like a culinary rockstar!
As we embark on this culinary journey, let’s celebrate the beauty of green beans. With their tender yet crisp texture and their ability to soak up flavors like a sponge, they are truly a beloved vegetable in many kitchens. Roasting them in the air fryer brings out their natural sweetness while adding a delightful char that you’ll absolutely adore. Whether you’re tossing these onto your dinner plate next to grilled chicken or serving them as a light snack, these Air Fryer Roasted Green Beans are sure to impress. Are you ready to dive into this vibrant recipe? Let’s go!
Air Fryer Roasted Green Beans: A Delightfully Crisp Side Dish
These roasted green beans are so quick and easy to make—perfect for busy weeknights when you still want something healthy and delicious on your table. Using an air fryer not only speeds up the cooking process but also gives these beans that perfect crispy finish that everyone loves. Plus, they’re incredibly versatile! You can use fresh green beans for that garden-fresh taste or reach for frozen or canned ones if you’re short on time. No matter which option you choose, I promise you’ll end up with a delightful dish that’s bursting with flavor.
Ingredients:
Let’s gather our ingredients! Each component plays a crucial role in creating that sensational flavor profile we’re aiming for.
- 1 pound green beans, ends trimmed. The star of our dish! Fresh green beans bring an incredible snap and bright flavor that elevates this simple recipe to extraordinary heights. When selecting fresh beans, look for those vibrant green pods with no blemishes or wrinkles—they should feel firm when you squeeze them gently. If you’re pressed for time, frozen green beans work beautifully here; just toss them straight into the air fryer without thawing first. Canned green beans can be used too—just make sure to drain them well to avoid excess moisture.
- 1 teaspoon olive oil. This liquid gold is essential for enhancing the flavor of our green beans while ensuring they roast beautifully without drying out. Olive oil adds richness and helps achieve that golden-brown color we all crave! When choosing olive oil, opt for extra virgin if possible; its robust flavor complements the natural sweetness of the beans perfectly. Remember, this oil acts as a carrier for salt and pepper too—so don’t skip this step!
- ¼ teaspoon salt. Ah yes, salt—nature’s flavor enhancer! Just a touch is needed here to draw out the inherent sweetness of the green beans while balancing their earthy notes. Salt helps every bite sing with flavor without overwhelming the dish; it’s all about harmony! Feel free to adjust according to your preference; remember that it’s easier to add more than it is to take away.
- Sprinkle fresh ground black pepper. This seasoning adds a warm kick that elevates our roasted green beans from simple to spectacular! Freshly ground pepper has a more pronounced flavor than pre-ground varieties and offers subtle complexities that can really make each bite pop. Don’t be shy; season generously based on your taste preferences!
Equipment You’ll Need:
Before we jump into the cooking process, let’s talk tools! Good equipment truly makes all the difference in achieving fantastic results without any fuss.
- Air fryer – This handy appliance is essential for achieving perfectly roasted vegetables in record time! An air fryer circulates hot air around your food, creating that crispy texture we love without excessive oil or longer cooking times associated with traditional roasting methods. If you don’t have an air fryer yet, I highly recommend investing in one—you’ll find yourself using it far more than you’d imagine!
- Mixing bowl – A simple yet vital piece of equipment where we’ll toss our seasoned green beans with olive oil before cooking them in the air fryer. Choose one that’s large enough to allow plenty of room for tossing—that way every bean gets evenly coated with oil and seasoning.
- Tongs or spatula – These tools will help you handle your green beans effortlessly when transferring them into and out of the air fryer basket or giving them a gentle toss during cooking to ensure even roasting.
Preparing Air Fryer Roasted Green Beans
Step 1: Preheat Your Air Fryer
The first thing we need to do is preheat our air fryer to 400° F (200° C). This step is crucial because starting with a hot environment allows our green beans to cook evenly while developing those beautiful charred edges we all adore. While it may feel like an extra step, trust me—it sets us up for success right from the get-go! Allowing your appliance time to heat ensures that once those gorgeous green gems hit the basket, they begin sizzling away immediately instead of steaming—which can happen if you skip this part.
Step 2: Prepare Your Green Beans
Take your freshly trimmed (or thawed) green beans and place them into your mixing bowl—this is where all the magic begins! Drizzle in your olive oil over the top; its richness will enhance both flavor and texture throughout our recipe journey together. Now sprinkle on that salt and freshly ground black pepper as well—this combination will transform those humble beans into something truly extraordinary! Use your hands or tongs to toss everything together until every single bean is beautifully coated with oil and seasonings; don’t rush this step! Ensuring each bean gets equal treatment will yield even roasting results later on.
Step 3: Load Up Your Air Fryer Basket
Once everything is well combined, it’s time for some action! Carefully transfer those seasoned green beans into your preheated air fryer basket—make sure they’re spread out evenly rather than overcrowding them; otherwise they won’t brown properly due to steam building up inside! If you’re unsure how many fit comfortably without crowding? Aim for one layer only; there’s no need for overlapping here—we want them crisped up perfectly!
Step 4: Cook Those Beautiful Beans
Set your timer for 6-10 minutes depending on how crispy you like them—the magic number often lies somewhere around 8 minutes for most people—but keep an eye on things because every air fryer has its personality! Halfway through cooking time (around 3-4 minutes), open up that basket and give it a gentle shake so they roast evenly; trust me when I say this little action will yield fantastically caramelized results across all sides of each bean.
As they cook away—and let me tell you, during this phase you’ll start smelling something utterly intoxicating waft through your kitchen—you’ll want check on their doneness toward those last few moments by giving another shake right before removing from heat source entirely; visual cues such as browning edges indicate perfection awaiting outside!
And there we have it—simple yet oh-so-satisfying Air Fryer Roasted Green Beans ready at last! Just remember: feel free topping off with additional salt or pepper based on personal preference before diving in deliciously headfirst into each bite!
Stay tuned as we dive deeper into more steps together soon… Happy cooking!
Step 5: Preheat the Air Fryer for Optimal Crispiness
Now that your green beans are beautifully coated with olive oil, salt, and pepper, it’s time to turn our attention to the air fryer. Preheating your air fryer to 400°F (which is about 200°C) is absolutely paramount in achieving that perfectly roasted texture. This initial blast of heat ensures that the green beans start cooking immediately upon entering the basket, creating a delightful exterior that’s both crispy and golden brown while preserving a tender interior. Trust me on this—if you skip this step, you might end up with limp or unevenly cooked vegetables, and we absolutely don’t want that!
While the air fryer warms up, take a moment to appreciate how your kitchen is beginning to fill with the fragrant aroma of fresh green beans mingled with olive oil. It’s a sign of good things to come! Once the air fryer indicates it’s hot enough, you’ll be ready to move on. This preheating process usually takes about 3-5 minutes, so don’t rush it. Use this time to tidy up or prepare any additional ingredients you might want to serve alongside your roasted green beans.
Step 6: Air Frying for That Perfect Roast
With the air fryer now at optimal temperature, gently place your seasoned green beans into the basket. It’s essential not to overcrowd them; you want each bean to have enough space for that glorious hot air to circulate around them. This circulation is what gives roasted green beans their signature crispness—the very essence of air frying! If you find your batch is too large, don’t hesitate to cook them in two separate rounds; quality over quantity here is key.
Set your timer for 6-10 minutes depending on how crispy you desire your green beans. At around halfway through—about the 3-5 minute mark—give the basket a good shake. This action not only helps prevent sticking but also ensures even cooking and browning all around. You’ll likely hear a satisfying rustling sound as they shift; consider it music to your ears! As they roast, keep an eye on their color; ideally, you’re aiming for a vibrant emerald hue with hints of golden brown—that’s when you know they’re truly coming together.
Step 7: The Art of Checking for Doneness
As we near the end of our cooking time, this step becomes especially crucial—checking for doneness is where we make sure those lovely green beans reach their full potential! Open the basket carefully (watch out for steam!) and take a closer look at those crispy beauties. They should be tender yet firm when pierced with a fork—a perfect balance that speaks volumes about their quality and care during cooking. If they look gorgeous but seem just a tad undercooked, don’t hesitate to pop them back in for another 1-2 minutes—it’s all about finding that sweet spot.
During this time, feel free to give them another gentle shake or toss; this will help distribute heat evenly and encourage even browning across all sides. Remember that each air fryer can behave slightly differently depending on its brand and model; some might cook faster or slower than others. So trust yourself as you gauge their readiness and always lean towards caution if you’re unsure—better a little extra time than undercooked veggies!
Step 8: The Grand Reveal – Serving Your Roasted Green Beans
Once you’ve reached that moment of culinary triumph and have removed those beautifully roasted green beans from the air fryer basket, it’s time for the grand reveal! Let me tell you—the satisfaction of watching them shimmer in their olive oil coating while releasing an enticing aroma is absolutely extraordinary! Before serving, I highly recommend tasting one right away (a little chef’s privilege!). If they need an extra sprinkle of salt or more pepper for seasoning perfection, now’s your chance.
When plating these vibrant vegetables, consider adding an extra drizzle of high-quality olive oil or even a squeeze of lemon juice if you’re feeling adventurous—it elevates their flavor profile into something utterly intoxicating! And don’t forget those optional garnishes like toasted almonds or fresh herbs; they add not only texture but also visual appeal. Remember, presentation can elevate your dish from simple side fare into something truly special fit for any occasion.
I promise you—these Air Fryer Roasted Green Beans will make an unforgettable addition to any meal whether it’s a casual weeknight dinner or an elegant gathering with friends. Serve them warm beside grilled chicken or as part of a hearty grain bowl—they’re versatile enough to complement any dish! Enjoy every bite as you celebrate this delightful symphony of flavors; it’s moments like these that make cooking such a joyous experience!
Storage and Enjoyment Tips for Your Air Fryer Roasted Green Beans
Now that you’ve masterfully prepared your Air Fryer Roasted Green Beans, it’s time to revel in their delightful crunch and vibrant flavor! Whether they accompany a hearty main dish or stand alone as a healthy snack, these green beans are a culinary triumph. But what if you have leftovers? Don’t worry; I’ve got you covered! Let’s talk about how to store these beauties so you can enjoy them even after they’ve graced your table.
Storing Leftover Air Fryer Roasted Green Beans
To preserve the magic of your Air Fryer Roasted Green Beans, it’s essential to use the right container. Opt for an airtight glass or plastic container—this is crucial because it keeps moisture out and extends freshness. When stored properly in the refrigerator, these delightful veggies can last up to three days. To maintain their crispy texture, consider placing a slice of bread inside the container; this little trick absorbs excess moisture and keeps your beans as crisp as the day you made them! Now, I must confess that while they’re best enjoyed fresh from the air fryer, leftover roasted green beans still pack a punch of flavor. When reheating, simply pop them back in the air fryer or on a baking sheet at a low temperature until warmed through—trust me, this method ensures they regain some of that lovely crunch.
Freezing for Later
If you find yourself with an abundance of green beans—or if you just want to prep ahead—freezing is an excellent option! First, let your roasted beans cool completely before transferring them to a freezer-safe bag or container. Be sure to remove as much air as possible; this will help prevent freezer burn and keep them tasting like the fresh flavors you love. These frozen treasures can last up to three months in the freezer! When you’re ready to use them, there’s no need to thaw; just toss them straight into the air fryer from frozen for a quick reheat. This convenience is truly wonderful—it allows you to whip up a nutritious side dish in mere minutes whenever cravings strike!
Air Fryer Roasted Green Beans

Enjoy crispy and flavorful Air Fryer Roasted Green Beans in just 18 minutes! A quick side dish that’s healthy and delicious—try it today!
- Prep Time: 5 minutes
- Cook Time: 10 minutes
- Total Time: 15 minutes
- Yield: Approximately 4 servings 1x
- Category: Side
- Method: Frying
- Cuisine: American
Ingredients
- 1 pound green beans, ends trimmed
- 1 teaspoon olive oil
- ¼ teaspoon salt
- Freshly ground black pepper to taste
Instructions
- Preheat your air fryer to 400°F (200°C).
- In a mixing bowl, combine the trimmed green beans, olive oil, salt, and pepper. Toss until evenly coated.
- Place the seasoned green beans in the air fryer basket, ensuring they are spread out in a single layer.
- Cook for 6-10 minutes, shaking the basket halfway through for even roasting.
- Check for doneness; they should be tender yet crisp. If needed, cook for an additional 1-2 minutes.
Nutrition
- Serving Size: 1 cup of roasted green beans (approx. 125g)
- Calories: 55
- Sugar: 2g
- Sodium: 180mg
- Fat: 3g
- Saturated Fat: 0.5g
- Unsaturated Fat: 2.5g
- Trans Fat: 0g
- Carbohydrates: 10g
- Fiber: 4g
- Protein: 2g
- Cholesterol: 0mg