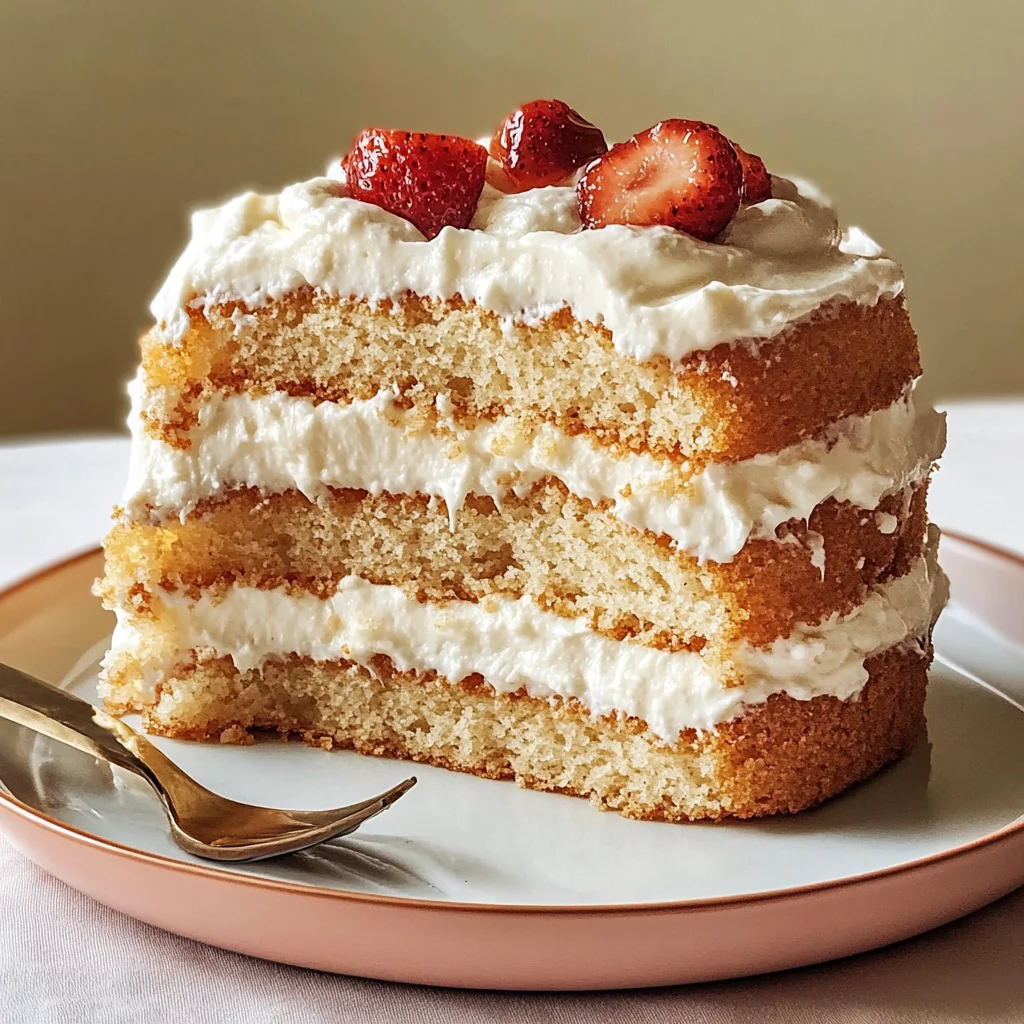
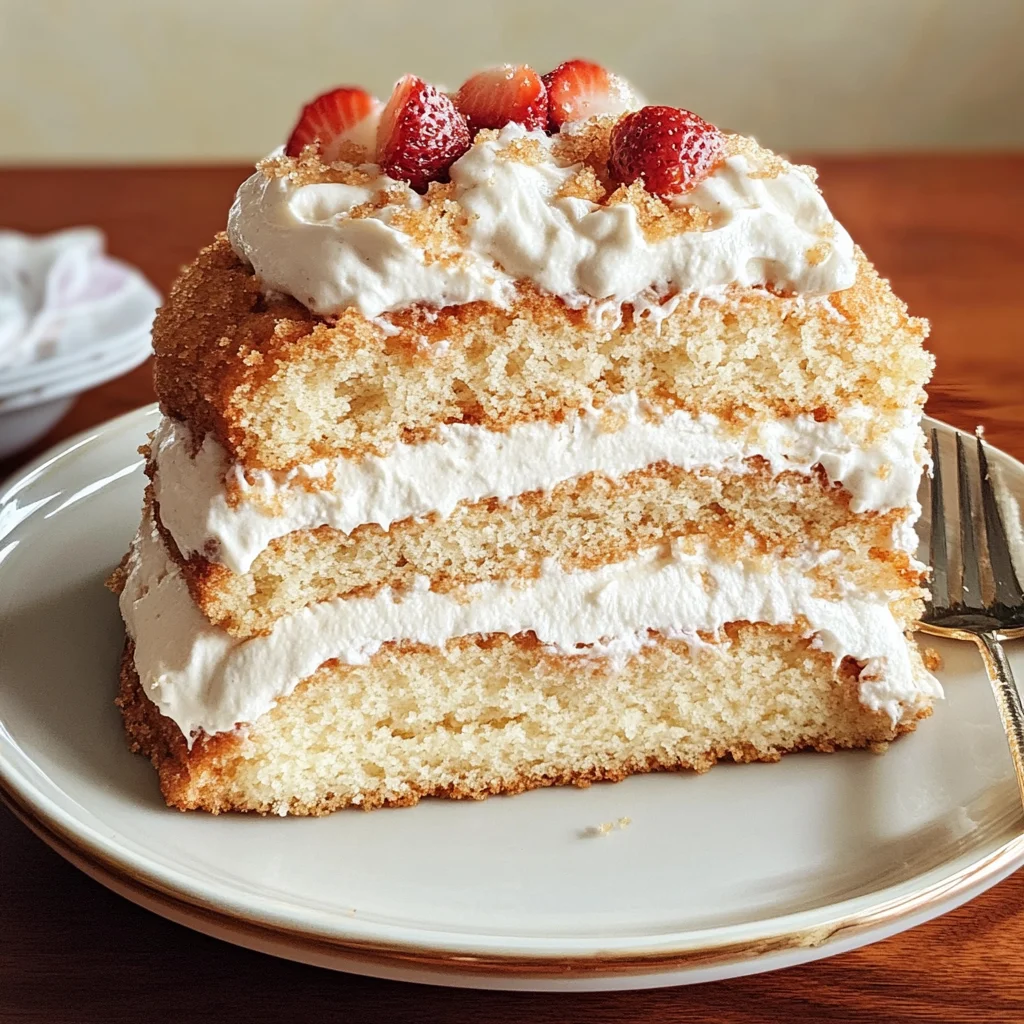
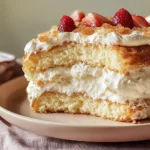
Angel Food Cake with Brown Sugar Bourbon Cream
There’s something profoundly magical about creating a dessert that feels as light as a whisper yet tastes like heaven. When I think of the Angel Food Cake with Brown Sugar Bourbon Cream, I don’t just see a recipe; I see a canvas for celebration, an experience rooted in love and tradition that fills my heart with warmth. It’s more than just food—it’s an invitation to gather around the table, to share stories and laughter, and to indulge in a moment that feels both indulgent and blissfully airy. The cake itself is ethereal, each bite dissolving on your tongue, while the rich cream is like liquid gold, draping over it with a subtle sweetness that dances between caramel notes and vanilla whispers. This isn’t merely dessert; it’s a symphony of flavors that resonates deeply within us.
As you embark on this culinary journey to make your own Angel Food Cake with Brown Sugar Bourbon Cream, know that you’re not just following instructions; you’re participating in a time-honored tradition that bridges generations. This cake, celebrated for its lightness and airy texture, has roots in the Southern cuisine of America where it graces tables at weddings, birthdays, and holidays alike. Its versatility is part of what makes it so special; whether served plain or adorned with fresh berries or this decadent cream, it manages to capture joy in every slice. And let me tell you about that Brown Sugar Bourbon Cream—it’s an utterly intoxicating topping that elevates this cake from simple to extraordinary. The brown sugar adds depth and richness while the bourbon (which can be easily substituted or omitted) provides an aromatic warmth that complements the cake’s delicate flavor beautifully.
Angel Food Cake with Brown Sugar Bourbon Cream: A Heavenly Delight
Let’s dive into this delightful recipe together! This Angel Food Cake with Brown Sugar Bourbon Cream is not just about baking—it’s about creating memories and sharing love through food. As we go through each step, I promise you’ll feel empowered to recreate this dish in your own kitchen, filling your home with sweet aromas and happy vibes.
Ingredients:
Before we start mixing and whipping our way to heaven, let’s take a moment to appreciate the ingredients we’re going to use. Each one plays a crucial role in crafting our perfect cake and cream—so let’s get acquainted!
- 1 cup egg whites (approximately 8-10 whites). Egg whites are the backbone of our angel food cake’s structure. They provide volume and lightness when whipped into stiff peaks. It’s important to use fresh egg whites as they whip better than older ones. Make sure there are no traces of yolk in your whites—this will hinder their ability to whip up properly. If you want an easy alternative, you can find carton egg whites at the store which can save time!
- 1 cup granulated sugar. This ingredient isn’t just for sweetness; it also helps stabilize those precious egg whites during whipping. When combined with air during whipping, sugar creates tiny bubbles that contribute to that sought-after fluffiness we crave in angel food cake. The quality of sugar matters too—opt for fine granulated sugar for best results since it dissolves more easily into the mixture.
- 1 cup cake flour (sifted). Sifting is essential here! Cake flour has a lower protein content than all-purpose flour which helps keep our cake light and tender instead of dense. Sifting before measuring ensures there are no lumps and adds air which contributes further to the fluffiness you’ll adore in every bite.
- 1 teaspoon cream of tartar. This ingredient plays an absolutely pivotal role by stabilizing our egg whites while they whip up into those glorious peaks we’re after! It helps maintain their structure so they don’t collapse under pressure once added to the batter—a non-negotiable step if you want success.
- 1 teaspoon vanilla extract. Vanilla is like a hug for our cake! It imparts warmth and depth of flavor which beautifully complements the other ingredients without overpowering them. Always go for pure vanilla extract made from real beans over imitation varieties; trust me on this—you’ll notice the difference!
- A pinch of salt. Just a pinch! Salt enhances sweetness and rounds out flavors in baked goods beautifully. It may seem insignificant but believe me when I say it’s crucial for balance—it makes everything taste better!
- 1 cup heavy whipping cream. Heavy cream whips up luxuriously thick and creamy—a dream come true for any dessert lover! The fat content allows it to hold its shape well once whipped—perfect for dolloping generously over your cake.
- 1/4 cup brown sugar. Here comes another layer of flavor! Brown sugar brings warmth thanks to its molasses content which adds rich caramel notes to our cream—absolutely divine when coupled with vanilla!
- 1 tablespoon bourbon (optional). While optional due to dietary preferences, bourbon adds depth and complexity—the kind of warmth you feel wrapping around you on a chilly evening! If you’d prefer not using alcohol, simply substitute with additional vanilla extract or even some brewed coffee for an interesting twist.
- 1 teaspoon vanilla extract (for cream). Just like before, adding vanilla enhances the overall flavor profile of our creamy topping—it ties everything together beautifully!
Now that we’ve met our star players for this heavenly dessert, let’s gather our tools and prepare ourselves for some delightful baking magic!
Equipment You’ll Need:
Having the right kitchen tools can turn what might seem like a daunting task into an enjoyable experience filled with ease! Each piece helps ensure everything goes smoothly as we bring our angel food cake vision into reality.
- Mixing bowls – A set of bowls in various sizes is key here! You’ll need one large bowl for whipping egg whites and another medium-sized one for combining dry ingredients without worry about spills or messes as you mix things up!
- Electric mixer – A stand mixer or hand mixer will do wonders when aerating those egg whites into clouds of fluffy perfection! Trust me: whisking by hand will only leave you exhausted without achieving quite the same results—you want those stiff peaks after all!
- Sifter – Since we’re using cake flour, having a sifter on hand is absolutely paramount for removing lumps before measuring out your flour accurately; this ensures even mixing without clumps ruining your final product later on!
- Rubber spatula – A good rubber spatula helps gently fold ingredients together without deflating all that wonderful air we worked hard to incorporate into our batter; it’s great for scraping down sides too so nothing goes wasted!
Understanding these essentials will pave your way toward success as we prep our gorgeous Angel Food Cake with Brown Sugar Bourbon Cream!
Preparing the Angel Food Cake with Brown Sugar Bourbon Cream
Step 1: Whipping Up Those Egg Whites
Let’s start by separating those eggs carefully! Crack each egg into separate bowls first—this way if you accidentally break a yolk, you won’t ruin all your egg whites at once! Once you’ve separated them perfectly (and trust me on taking your time here), grab your electric mixer fitted with clean beaters because any grease residue can prevent proper whipping later on—we want pristine peaks! Begin by beating them at medium speed until they form soft peaks—think fluffy clouds swirling around happily—that’s where you’ll notice their volume increase dramatically as tiny bubbles form throughout.
Step 2: Add Cream of Tartar & Gradually Incorporate Sugar
As soon as those clouds appear before us (after about 2 minutes), sprinkle in your cream of tartar—it acts like magic dust ensuring stability during mixing—and continue beating at medium-high speed until soft peaks transform into stiff ones resembling waves crashing onto shorelines when lifted off beaters! Now slowly add granulated sugar while still mixing—this gradual incorporation prevents deflation while allowing everything else meld nicely together into beautiful harmony before adding flour next step!
Step 3: Sifting & Folding In Flour
Once you’ve achieved stiff peaks (they should stand tall without drooping!), it’s time gracefully sift cake flour over beaten egg white mixture—remember how we talked about sifting? This step ensures zero lumps exist within batter ensuring smooth baking process ahead too without any surprises popping up unexpectedly later on down road…we want purity here folks!! Using rubber spatula gently fold flour mixture until fully incorporated being careful not deflate precious airiness created earlier—it should feel light yet cohesive at same time!
Step 4: Baking That Beautiful Cake!
Now that everything’s mixed perfectly together let’s pour batter into ungreased tube pan (it needs those sides untouched so batter climbs higher while baking!). Smoothtop surface slightly then place into preheated oven set around 350°F (175°C) placing pan onto center rack ensuring even cooking from all angles possible during bake-time approximately 35 minutes—or until golden brown appears atop edges along sides revealing heavenly aroma wafting through kitchen inviting everyone nearby asking “What’s cooking?” Allow cooling upside down once finished preventing collapse post-baking—this simple technique retains structure inside retaining fluffiness intact!
And there we have it—the first steps toward creating this stunning dessert masterpiece await us next week when we’ll prepare luscious Brown Sugar Bourbon Cream topping resulting pairing perfect alongside fluffy angel food delight above bringing smiles faces everywhere enjoyed upon serving moments shared loved ones gathered around table…until then happy baking friends!!!
Step 5: Whipping the Egg Whites to Perfection
Now comes one of the most magical moments in our journey to create this Angel Food Cake with Brown Sugar Bourbon Cream: whipping those egg whites. You’ll want to grab a clean, dry mixing bowl for this step—any residual fat can hinder the egg whites from achieving that beautiful, voluminous peak we’re after. Begin by adding your egg whites and a pinch of salt into the bowl. Using an electric mixer on medium speed, start whisking those egg whites gently until they become frothy, almost like a delicate cloud beginning to form. This initial stage is crucial because it sets the foundation for the airy texture of your cake.
Once they’re frothy, sprinkle in the cream of tartar—a non-negotiable ingredient that stabilizes our meringue and helps it hold its shape as it whips. Continue mixing on medium-high speed until soft peaks form; this means when you lift the beaters out of the mixture, the peaks will bend over slightly at the tips. Don’t rush this step! You want to take your time, allowing those bubbles to develop fully. If you go too far and reach stiff peaks, you’ll end up with a grainy texture that won’t be as delightful in your cake. Trust me on this; patience here pays off immensely!
Step 6: Introducing Sweetness with Granulated Sugar
As soon as you’ve achieved those lovely soft peaks, it’s time to incorporate sweetness into our fluffy creation. Gradually add in your granulated sugar—about a tablespoon at a time—while continuing to beat on high speed. This gradual addition is paramount because it allows each spoonful of sugar to dissolve into the egg whites without overwhelming them. The sugar not only sweetens our batter but also helps stabilize the meringue further, ensuring that we maintain that luxurious volume we’ve worked so hard to achieve.
You’ll know when you’re ready for the next phase when your mixture turns glossy and thick, resembling liquid gold as it glistens under your kitchen lights. This transformation is absolutely extraordinary! Keep mixing until you reach stiff peaks—this is where those peaks stand straight up without bending at all when you lift out your beaters. Take a moment to appreciate this silky creation before moving on; it’s part of what makes baking so incredibly rewarding!
Step 7: Folding in Dry Ingredients
With our meringue now perfectly whipped and ready for action, let’s gently fold in our dry ingredients—cake flour and any remaining granulated sugar (if using). Start by sifting your cake flour over the whipped egg whites; sifting not only removes lumps but also aerates the flour, contributing to that ethereal lightness we crave in an Angel Food Cake. Using a rubber spatula or wooden spoon, carefully fold from bottom to top while turning your bowl—this technique is known as “folding” and is essential for maintaining that airy structure we’ve created.
Be gentle here; we don’t want to deflate our masterpiece! It’s like cradling a newborn—you want to be firm enough to get things done but gentle enough not to break their spirit. Continue folding until you no longer see streaks of flour; however, don’t overdo it either! A few small lumps are perfectly fine; they will bake out beautifully in the oven. The goal is a homogenous batter with little air bubbles within it; these will rise spectacularly during baking.
Step 8: The Bake – Bringing It All Together
Now that our batter is beautifully mixed, it’s time for baking magic! Preheat your oven to 350°F (175°C) if you haven’t already—it’s crucial that we have an adequately heated environment waiting for our cake batter. Carefully pour the batter into an ungreased tube pan or angel food cake pan—this special pan allows for even heat distribution and provides those lovely ridges that help support rising during baking. With no grease (this is absolutely paramount), the batter can cling to the sides and rise splendidly.
Pop that pan into your preheated oven and let it bake for about 35 minutes or until golden brown and springy to touch—the top should spring back when lightly pressed. What makes this step so important is how heat transforms our batter from a simple mixture into an airy marvel—the proteins from eggs coagulate while sugars caramelize slightly at high temperatures, creating a crust while keeping everything inside tender and fluffy. Keep an eye on it toward the end of baking; every oven has its quirks! A toothpick inserted should come out clean but remember—don’t open that oven door too soon! Sudden temperature changes can cause sagging.
And there you have it—a comprehensive guide through every delightful step needed to create an unforgettable Angel Food Cake with Brown Sugar Bourbon Cream! I hope this recipe inspires joy and creativity in your kitchen just as much as it’s inspired me throughout my culinary adventures! Happy baking!
Storage and Enjoyment Tips for Your Angel Food Cake with Brown Sugar Bourbon Cream
Now that you’ve created this light and airy masterpiece, it’s time to talk about how to enjoy every last bite! The beauty of the Angel Food Cake with Brown Sugar Bourbon Cream lies not only in its delightful flavors but also in its ability to stay fresh and scrumptious even after it’s been made. If you find yourself lucky enough to have leftovers—though I doubt they’ll last long—let’s dive into the best ways to preserve this treat so you can savor it again later.
Storing Leftover Angel Food Cake with Brown Sugar Bourbon Cream
To keep your Angel Food Cake with Brown Sugar Bourbon Cream tasting as fresh as the day you made it, you’ll want to store it in an airtight container or wrap it tightly with plastic wrap. This will help lock in moisture and prevent it from drying out. Ideally, keep your cake in a cool, dry place, away from direct sunlight. It should stay delicious for about 2-3 days at room temperature. If you’re worried about keeping its texture intact (and trust me, you want that fluffy goodness), try placing a slice of bread inside the container; it’ll work wonders by absorbing excess moisture and maintaining that light-as-a-cloud feel of your cake. As for the flavor? Oh, my friends, even after a day or two, this cake retains its charm, almost like it matures into something beautifully tender and moist. When you’re ready to indulge again, simply serve it chilled or at room temperature—no reheating necessary!
Freezing the Components for Later
If you’re looking ahead or just want to be prepared for unexpected guests (or a sudden craving!), freezing this cake is an excellent option that I wholeheartedly recommend. To freeze your Angel Food Cake, slice it into individual portions and wrap each slice tightly in plastic wrap before placing them in a freezer-safe container or zip-top bag. When done right, your cake can be frozen for up to three months without losing its charming texture or flavor. When you’re ready to enjoy your frozen slices, simply remove them from the freezer and let them thaw overnight in the refrigerator or on your kitchen counter for a couple of hours. This convenience allows you to whip up dessert plans on a whim—just imagine pulling out a slice of this ethereal cake during an impromptu gathering! It’s a fantastic way to always have something special on hand.
So there you have it! With these tips tucked away in your culinary toolkit, I promise you will be able to relish this delightful dessert time and time again!
Angel Food Cake with Brown Sugar Cream
Indulge in the ethereal delight of Angel Food Cake with Brown Sugar Cream, a dessert that combines lightness and richness in every bite. This fluffy cake is a classic favorite, known for its airy texture that melts in your mouth. Topped with a luscious Brown Sugar Cream, it elevates your dessert experience to heavenly heights. Perfect for celebrations or quiet evenings at home, this recipe invites you to create joyful memories around the table.
- Prep Time: 20 minutes
- Cook Time: 35 minutes
- Total Time: 55 minutes
- Yield: Serves 8
- Category: Dessert
- Method: Baking
- Cuisine: American
Ingredients
- 1 cup egg whites (approximately 8–10 whites)
- 1 cup granulated sugar
- 1 cup sifted cake flour
- 1 teaspoon cream of tartar
- 1 teaspoon vanilla extract
- A pinch of salt
- 1 cup heavy whipping cream
- 1/4 cup brown sugar
Instructions
- Preheat your oven to 350°F (175°C).
- In a clean mixing bowl, whisk egg whites until frothy. Add cream of tartar and continue beating until soft peaks form.
- Gradually add granulated sugar while mixing until stiff peaks develop.
- Sift in cake flour and gently fold into the mixture using a rubber spatula until combined.
- Pour batter into an ungreased tube pan and smooth the top. Bake for about 35 minutes or until golden brown.
- While cooling upside down, prepare the Brown Sugar Cream by whipping heavy cream until soft peaks form; then add brown sugar and whip until stiff peaks form.
- Once cooled, remove cake from pan and serve with dollops of Brown Sugar Cream.
Nutrition
- Serving Size: 1 slice (90g)
- Calories: 193
- Sugar: 20g
- Sodium: 55mg
- Fat: 9g
- Saturated Fat: 5g
- Unsaturated Fat: 4g
- Trans Fat: 0g
- Carbohydrates: 26g
- Fiber: 0g
- Protein: 3g
- Cholesterol: 52mg