Vegan Apple Pie
The moment I think of a warm slice of pie, my heart swells with nostalgia. There’s something utterly enchanting about the smell of apples mingling with spices as they bake, wafting through the kitchen like a warm hug from an old friend. This Vegan Apple Pie isn’t just a dessert; it’s a celebration of life’s simple joys. Made with tart Granny Smith apples and enveloped in a flaky crust, each bite offers a symphony of flavors that dance on your palate—sweetness, warmth, and that unmistakable hint of spice. Trust me when I say, this pie has the power to turn any ordinary gathering into an extraordinary occasion. It’s perfect for family dinners, holiday feasts, or simply when you need a little comfort food to brighten your day.
As we embark on this culinary adventure together, I want you to know that every step in this recipe is infused with love and intention. The process of making this Vegan Apple Pie is not just about following instructions; it’s about creating memories in your kitchen that will last a lifetime. Imagine yourself peeling those crisp apples, feeling their cool skin under your fingers while the aroma fills the air with promise. It’s these moments that make cooking so profoundly satisfying. So grab your apron and let’s dive into this delightful recipe!
Vegan Apple Pie: A Slice of Autumn Bliss
This Vegan Apple Pie is not only a delicious dessert but also an experience that evokes feelings of warmth and togetherness. With its perfectly flaky crust and sweet-tart apple filling spiced to perfection, it has all the elements of a comforting classic while being entirely plant-based.

Ingredients:
Before we dive into the baking process, let’s gather our ingredients and understand why each one plays a vital role in crafting this delightful pie.
- double pie crust – The foundation of any great pie lies in its crust. For this recipe, using a double pie crust ensures that we have both a bottom layer to cradle our luscious filling and a top layer for that beautiful golden finish. You can opt for store-bought vegan pie dough for convenience or make your own from scratch if you’re feeling adventurous! Just remember: chilling the dough is non-negotiable; it helps maintain its structure during baking and creates that coveted flakiness.
- 6 medium Granny Smith apples – These apples are the star of our show! Their tartness provides the perfect contrast to the sugars we’ll add later, creating depth in flavor that sweet varieties simply can’t match. When selecting your apples, look for firm fruits without bruises; they should feel heavy for their size and have vibrant green skin. If Granny Smiths aren’t available, feel free to substitute with other tart varieties like Honeycrisp or Braeburn—but I promise you, Granny Smith is where it’s at!
- ½ tablespoon lemon juice – This humble ingredient serves as both an acid and a flavor enhancer. The lemon juice brightens up our apple filling, preventing it from becoming overly sweet while also helping to preserve their color as they sit before baking. It’s like sunshine in our pie! Make sure not to skip this step; it balances out all those rich flavors beautifully.
- ½ cup white sugar – White sugar adds sweetness but also contributes to that lovely caramelization during baking which gives our filling its rich flavor profile. While you could use coconut sugar or another alternative if you wish, I find white sugar works best here for achieving that classic apple pie taste.
- ⅓ cup brown sugar – Brown sugar brings an extra layer of richness thanks to its molasses content. This sweetness complements the tartness of our apples perfectly while adding moisture to keep our filling juicy rather than dry. If you’re in a pinch and don’t have brown sugar on hand, you can make your own by mixing white sugar with a little molasses!
- 1 teaspoon cinnamon – Ahh, cinnamon—the quintessential spice in any autumnal recipe! Its warm notes evoke feelings of comfort and nostalgia; it pairs flawlessly with apples to create that familiar cozy aroma we all adore during fall gatherings.
- ½ teaspoon nutmeg – Nutmeg offers an earthy warmth that deepens the flavor complexity of our pie. A little goes a long way here; it adds just enough spice without overpowering the delicate balance we’re aiming for.
- ¼ teaspoon ginger – Ginger introduces a gentle zing—a touch of brightness—that contrasts beautifully with the richer flavors from cinnamon and nutmeg. Freshly grated ginger is fantastic if you have it handy; however, ground ginger works wonderfully too!
- 3 tablespoons all-purpose flour – Flour acts as a thickening agent in our filling by absorbing excess juices released from those beautiful apples as they bake down. This step is crucial because nobody wants soupy apple pie!
- 2 teaspoons vanilla extract – Vanilla extract enriches our filling with warmth and depth—it’s like adding an invisible hug! Opt for pure vanilla extract whenever possible for the most authentic flavor; imitation extracts just won’t deliver the same magic.
- 2 tablespoons melted vegan butter – Melted vegan butter brings richness and moisture to our filling while enhancing overall flavor—it really ties everything together beautifully! If you’re looking for alternatives due to allergies or preferences, consider swapping in coconut oil.
- 2 teaspoons oil – A light brushing of oil over our top crust promotes browning and adds shine to finish off this gorgeous pie nicely! You can use neutral oils like canola or grapeseed oil—just avoid anything too strong-flavored since we want those apple aromas shining through.
Equipment You’ll Need:
Having the right tools makes all the difference when creating something magical in the kitchen! While these items aren’t technically ingredients, they are essential partners on this journey towards crafting perfection.
- 9-inch pie pan – A sturdy 9-inch pie pan will be key here; it offers enough space for generous layers of fruit without risking spilling over during baking. If you don’t have one on hand, glass or ceramic pans work wonders too—they even allow you to keep an eye on how golden brown your crust gets while baking!
- Mixing bowls – A set of mixing bowls in various sizes allows us to prep components separately before bringing them all together harmoniously when making our filling and assembling everything seamlessly.
- Peeler & paring knife – These tools are essential for prepping those lovely Granny Smith apples! A good peeler will make quick work of removing skins while providing precision cutting options—all aimed at achieving even slices throughout each layer within our pie.
- Rolling pin – If you decide on making your own crust instead of using store-bought dough (which I wholeheartedly encourage!), having a rolling pin makes spreading out your dough easier than ever! Choose one that’s lightweight yet sturdy enough not to bend during use—this way it rolls out effortlessly every time.
Now let’s roll up those sleeves (figuratively speaking!) because we’re ready to prepare this scrumptious Vegan Apple Pie!
Step 1: Preheat Your Oven & Prepare Dough
First things first: preheat your oven to 375℉ (190℃). This initial step is crucial because placing your pie directly into hot air will help achieve that wonderful flaky texture we crave in pies—it creates steam which lifts layers apart beautifully as they cook! If you’ve opted for storebought dough (no shame there!), now’s also the time to set it out so it can thaw properly—you don’t want cold dough trying desperately not-to-tear when rolling out later!
Step 2: Peel & Slice Those Apples
As your oven warms up like sunbeams kissing morning dew off grass blades outside your window, focus on preparing those gorgeous Granny Smith apples! Start by peeling them carefully with either a vegetable peeler or paring knife—take care not only save every bit but ensure smooth edges where possible since rough cuts might impact consistency once baked down into gooey goodness inside! After peeling comes coring—slice vertically through each apple until reaching core then gently twist away unwanted bits before discarding them altogether (or composting!). Finally thinly slice remaining flesh into half-moon shapes about ¼ inch thick—you want them chunky enough retain shape yet tender enough melt lovingly upon tongue once baked through… mmm! As you go along toss slices together lightly mixed with lemon juice—this will prevent browning while enhancing their overall freshness throughout process later on!
Step 3: Mix Dry Ingredients
Now onto assembling flavors! In another bowl (you see why multiple ones came handy?), mix together white sugar alongside brown sugar alongside spices: cinnamon nutmeg ginger plus flour until well combined—they’ll form delightful coating for those precious apple slices waiting patiently nearby… Don’t be shy here—mix thoroughly so every granule blends beautifully into uniformity before moving forward—it’ll help distribute sweetness evenly throughout entire mixture once tossed together next step!
Step 4: Coat Apples & Fill Crust
With dry ingredients ready let’s bring everything together now by tossing dry mixture onto freshly sliced apples gently until fully coated—a tactile experience worth savoring indeed as textures meld perfectly creating harmony between all components involved within dish itself! Afterward drizzle melted vegan butter followed by fragrant vanilla extract pouring generously over top then fold gently again ensuring no piece left unturned… Next grab prepared crust lining bottom neatly across base pressing firmly against edges leaving enough room around perimeter allow slight expansion during baking time ahead—once filled evenly pile remaining apple goodness atop spreading them around evenly ensuring luscious layers present themselves visually pleasingly once cooked golden brown…
Now that we’ve laid down some groundwork towards success let me assure you there’s still more excitement waiting ahead as we continue exploring next steps toward completing masterpiece…
Stay tuned as we venture deeper into crafting this exquisite Vegan Apple Pie—the journey has only just begun!
Step 5: Laying the Foundation of Flavor
Now that your filling is beautifully coated and bursting with flavor, it’s time to prepare the crust. The crust is more than just a vessel for the delicious apple filling; it’s an integral part of the experience, providing that perfect flaky texture that contrasts with the tender apples. Begin by taking one half of your pie dough and gently rolling it out on a lightly floured surface. You want to achieve about a 12-inch circle—this allows enough overhang to fit snugly into your 9-inch pie pan while also leaving room for crimping those edges later. Take your time here; rushing can lead to cracks or tears in the dough, which would compromise your crust’s integrity.
Once rolled out, carefully transfer the crust into the pie pan. You can do this by folding it into quarters and then placing it in the pan, gently unfolding it once it’s settled at the bottom. Now, trim any excess dough hanging over the edges, leaving about a half-inch overhang. This step is crucial because you’ll need that extra dough for crimping later on! Crimping not only seals in all those luscious flavors but also gives your pie its charming final touch, so don’t skimp on this part. Make sure you press gently into the sides of the pan, ensuring there are no gaps where those delectable juices can escape during baking.
Step 6: The Heart of Your Pie – Filling It Up
With your crust prepped and ready for action, it’s time to fill it with those gorgeous apple slices! Carefully spoon the apple mixture into your pie crust, arranging them evenly as you go. This step isn’t just about filling; it’s about creating a stunning visual experience when you cut into your pie later on. Layering the apples allows for even cooking and ensures that every slice you serve is packed with that delightful flavor combination of cinnamon and sugar mingling with fresh apples. Trust me when I say that this careful arrangement will pay off when you see those perfectly aligned slices glistening through the crust.
What makes this moment so special is imagining how all those flavors will meld together while baking—it’s utterly intoxicating! As you layer in those tender apple slices, don’t hesitate to give them a gentle pat down to help them fit snugly within their buttery home. Before sealing everything up, take a moment to admire your handiwork—you’re not just making a pie; you’re crafting a centerpiece for joy-filled gatherings and comforting evenings at home.
Step 7: Sealing It All In – Covering Your Creation
Now comes one of my favorite parts: covering your beautiful apple-filled masterpiece with the second half of your pie dough! Roll out this piece exactly like you did before—aim for another generous 12-inch circle—and carefully place it atop your filled pie. At this moment, I encourage you to think about how each layer contributes to that symphony of flavors we’re crafting together. Once positioned atop, use a sharp knife to trim away any excess dough from this top layer as well; we want a clean edge here but still enough overhang to seal everything in.
Now let’s talk crimping—this is where artistry meets functionality! Using your fingers or a fork, press down along the edges to seal them tightly together; this step is absolutely paramount because it prevents any juices from leaking out during baking—a true disaster we want to avoid at all costs! Plus, crimped edges add such charm and character to our pie—it’s like giving your creation a little hug! After crimping, don’t forget to vent your pie by slicing four or five 2-inch slits from center towards edges on top; these vents allow steam to escape while keeping that delicious filling intact.
Step 8: The Baking Process – Magic Happens Here!
Now we enter what I like to call the magic phase—baking your Vegan Apple Pie until golden perfection! Preheat your oven to 375℉ (190℃) if you haven’t already done so as this step sets us up for success right from the start. Place your beautifully assembled pie onto a baking sheet lined with parchment paper (this helps catch any potential drips). Now cover those delicate edges with foil or use a crust shield if you have one—this step protects them from burning while allowing the middle to cook thoroughly.
Bake for approximately 30 minutes covered with foil; during this time, you’ll start smelling an intoxicating aroma wafting through your kitchen—a sure sign that something wonderful is happening inside that oven! After 30 minutes, carefully remove the foil and brush those gorgeous golden-brown edges with oil; this gives our crust that irresistible shine and extra crispiness we all crave in a dessert. Return it back into the oven for another 15-20 minutes without foil until it’s perfectly browned and bubbling with delicious juices peeking through those vents.
Keep an eye on your pie during these last moments—ovens can vary wildly in temperature and cooking times can differ slightly depending on how thickly you’ve layered those apples or how well-done you prefer your crusts. You’re looking for a beautiful coppery color across both top and sides as well as bubbling juices visible through those vent holes—this signifies that not only is everything cooked beautifully but also ready for cooling!
Final Touches – Letting Your Pie Rest
Once you’ve pulled out this glorious Vegan Apple Pie from its hot sanctuary, resist temptation (I know it’s hard!) and allow it to cool for about 30 minutes before serving. This resting period is crucial because it lets all those luscious juices settle back into place instead of spilling out when you cut into it—nobody wants an unmanageable mess when you’re presenting something so lovingly crafted! Patience here pays off immeasurably; trust me when I say you’ll want every slice intact on their plate!
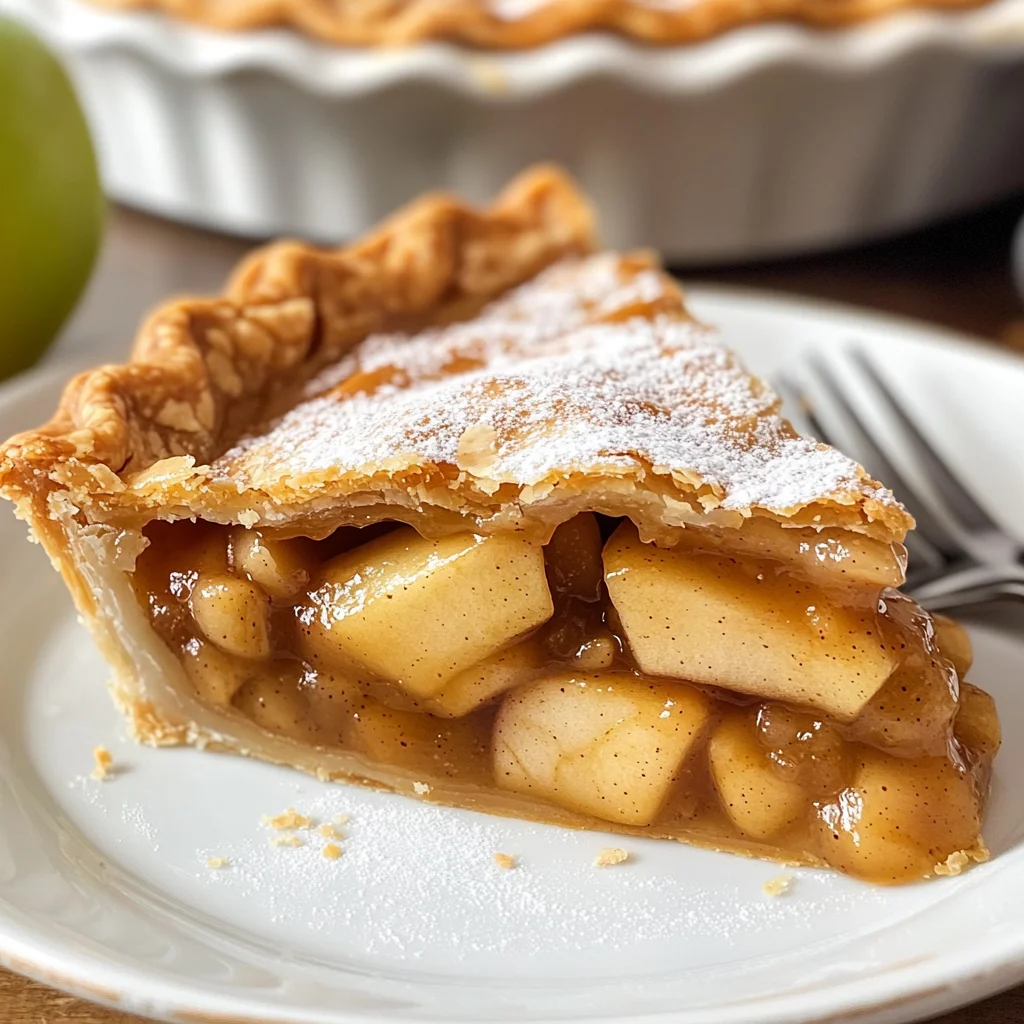
After cooling has completed—and oh boy will that smell linger—you can finally slice into this masterpiece! Each cut reveals layers upon layers of tender apples enveloped in warm spices wrapped in flaky perfection—a truly extraordinary sight worthy of any celebration or cozy family gathering. Serve alone or pair with vegan ice cream or coconut whipped cream for some added indulgence—it’s completely up to you! Enjoy every bite knowing you’ve created something magical right from scratch—a Vegan Apple Pie that’s bound to become part of family traditions for years to come!
Storage and Enjoyment Tips for Your Vegan Apple Pie
Now that your kitchen is filled with the intoxicating aroma of freshly baked Vegan Apple Pie, it’s time to dive into the deliciousness! But let’s not rush the enjoyment; this pie deserves a little TLC even after it’s out of the oven. If you find yourself with leftovers (though I doubt there will be much!), let’s talk about how to preserve that delightful flavor and texture so you can savor every last bite.
Storing Leftover Vegan Apple Pie
To keep your Vegan Apple Pie at its best, store it in an airtight container or cover it tightly with plastic wrap. The ideal spot? A cool, dry place like your pantry or the refrigerator if you prefer it chilled. This pie will keep well for about 3 to 4 days, but I must admit, the flavors seem to deepen and become even more harmonious on the second day—like a fine wine! One of my favorite pro tips is placing a slice of bread in the container alongside the pie; this little trick helps maintain moisture and keeps the crust from becoming too chewy. When you’re ready for a serving, simply reheat a slice in the microwave for about 15-20 seconds or pop it back in a warm oven until heated through. Trust me, nothing beats that comforting warmth mingling with the sweet, spiced apple filling!
Freezing Vegan Apple Pie for Later
If you want to enjoy your Vegan Apple Pie beyond just a few days, freezing is an excellent option! Let the pie cool completely before wrapping it tightly in plastic wrap and then aluminum foil; this double-layer ensures it stays fresh and free from freezer burn. It can be kept frozen for up to three months—perfect for those surprise guests or cozy nights when you need a slice of happiness at hand! When you’re ready to indulge again, simply thaw it in the refrigerator overnight and then reheat as mentioned above. Isn’t that convenience just magical? Imagine having homemade pie waiting for you when life gets busy—pure bliss!
Vegan Apple Pie
Indulge in the comforting embrace of our Vegan Apple Pie, a delightful treat filled with tart Granny Smith apples and warm spices. This plant-based dessert captures the essence of autumn in every bite, making it perfect for family gatherings, holiday feasts, or simply when you need a bit of sweetness to brighten your day. With a flaky crust that cradles a sweet-tart apple filling, this pie is more than just a dessert—it’s an experience that brings people together. Each slice is a celebration of flavors, offering warmth and nostalgia that will have everyone asking for seconds.
- Prep Time: 20 minutes
- Cook Time: 50 minutes
- Total Time: 1 hour 10 minutes
- Yield: Approximately 8 servings 1x
- Category: Dessert
- Method: Baking
- Cuisine: American
Ingredients
- double pie crust
- 6 medium Granny Smith apples
- ½ tablespoon lemon juice
- ½ cup white sugar
- ⅓ cup brown sugar
- 1 teaspoon cinnamon
- ½ teaspoon nutmeg
- ¼ teaspoon ginger
- 3 tablespoons all-purpose flour
- 2 teaspoons vanilla extract
- 2 tablespoons melted vegan butter
- 2 teaspoons oil
Instructions
- Preheat your oven to 375°F (190°C).
- Peel, core, and slice the Granny Smith apples into thin half-moon shapes. Toss them with lemon juice to prevent browning.
- In a mixing bowl, combine white sugar, brown sugar, cinnamon, nutmeg, ginger, and flour. Mix well.
- Coat the apple slices with the sugar and spice mixture, followed by melted vegan butter and vanilla extract.
- Roll out one half of the pie dough into a circle and fit it into a 9-inch pie pan.
- Fill the crust with the apple mixture, spreading it evenly.
- Roll out the second half of the dough and place it over the filling. Crimp edges to seal and cut slits for ventilation.
- Bake for about 30 minutes covered with foil. Then remove foil and bake for an additional 15-20 minutes or until golden brown.
- Allow to cool for at least 30 minutes before slicing.
Nutrition
- Serving Size: 1 serving
- Calories: 220
- Sugar: 18g
- Sodium: 100mg
- Fat: 8g
- Saturated Fat: 2g
- Unsaturated Fat: 5g
- Trans Fat: 0g
- Carbohydrates: 36g
- Fiber: 3g
- Protein: 2g
- Cholesterol: 0mg