Coffee Brownie Cheesecake
There’s something utterly intoxicating about the combination of rich coffee, decadent chocolate, and the creamy texture of cheesecake. When I think about my Coffee Brownie Cheesecake, it embodies not just a recipe but an experience—a delightful journey that marries two beloved desserts into one extraordinary creation. Imagine sinking your fork into a luscious layer of coffee-infused cheesecake sitting atop a dense, fudgy brownie base. It’s like a comforting hug from your favorite dessert, and each bite envelops you in warmth and joy. This is more than just food; it’s a celebration of flavors that dances on your palate and leaves you craving more. Trust me when I say that this Coffee Brownie Cheesecake will quickly become a cherished favorite in your home.
Each element of this dessert has its own story to tell; the robust flavor of coffee awakens your senses while the smooth, rich chocolate brings everything together in perfect harmony. As you prepare this dish, let yourself indulge in the joy of baking—it’s about creating memories as much as it is about crafting something delicious. Whether you’re celebrating a special occasion or simply treating yourself after a long day, this cheesecake is sure to impress anyone fortunate enough to share it with you. So roll up those sleeves and let’s dive into making something truly special together!
Coffee Brownie Cheesecake: A Heavenly Fusion of Chocolate and Coffee
Embrace the magic of dessert with this delightful Coffee Brownie Cheesecake. With its two-layer structure—a dense brownie bottom paired with creamy coffee cheesecake—this treat is not only visually stunning but also an absolute delight for chocolate and coffee lovers alike. You’ll find that every layer complements the other perfectly, creating an indulgent experience that feels both luxurious and comforting.
Ingredients:
As we embark on this delicious culinary journey together, let’s take a moment to appreciate each ingredient’s role in crafting our masterpiece. Every component plays a vital part in bringing out the flavors we adore.
- Chocolate covered coffee beans: These little gems are not just for decoration; they add an irresistible crunch and burst of coffee flavor that enhances the entire dessert experience. When selecting chocolate-covered coffee beans, look for high-quality brands that use dark chocolate with minimal additives—this ensures that deep flavor comes through beautifully.
- Cocoa Powder, for dusting: A light dusting of cocoa powder adds elegance while also enhancing the chocolatey notes of our brownie base. Opt for unsweetened cocoa powder with a rich color—this usually indicates higher quality—and sift it before using to prevent any lumps from forming.
- 1 cup heavy cream, cold: Heavy cream is essential for creating that luxurious whipped topping we all love. Using cold cream will help achieve those beautiful peaks when whipping; remember to chill your mixing bowl as well for optimal results.
- 1 tablespoon instant coffee granules: Instant coffee granules are magical here! They deliver concentrated coffee flavor without adding excess liquid, which could alter our dessert’s texture. Look for high-quality granules made from 100% Arabica beans for the best taste.
- 6 tablespoons powdered sugar: This fine sugar gives our whipped cream its sweetness while ensuring it holds its shape beautifully when piped onto our cheesecake. It’s important to sift powdered sugar before measuring—it can clump together easily!
- 5 oz. dark chocolate, chopped: The addition of finely chopped dark chocolate enriches our ganache and infuses it with depth. Always choose chocolate with at least 70% cocoa content for a richer flavor profile that perfectly balances sweetness.
- 1 tablespoon vegetable shortening: Though often overlooked, vegetable shortening helps create a glossy finish on our ganache and keeps it firm at room temperature—making cutting slices easier later on.
- 1 and 1/2 cups dark chocolate chips: These are key players in our ganache! Dark chocolate chips melt beautifully and provide that rich chocolaty taste we all crave. Choose high-quality brands that use real cocoa butter for best results.
- 1/2 cup heavy cream: Similar to our earlier ingredient, this heavy cream will be heated to create a smooth ganache—adding richness without being overly sweet.
- 2 tablespoons instant coffee granules: You guessed it—more instant coffee! This time, it brings another layer of flavor directly into our ganache.
- 3 (8 ounce) packages (24 oz) cream cheese, room temperature: Cream cheese is the heart of our cheesecake filling! Ensure it’s at room temperature so it blends smoothly without lumps; this creates that velvety texture we’re after.
- 1 cup granulated sugar: Sugar isn’t just there for sweetness; it helps stabilize the cheesecake filling while balancing out the bitterness from the coffee.
- 1 tablespoon cornstarch: Cornstarch works as a binder in cheesecakes—it helps set our filling so that every slice holds its shape beautifully when cut.
- 2 tablespoons instant coffee granules & 2 tablespoons hot water: This combination creates an espresso-like shot that’s fully dissolved and ready to infuse flavors into our cheesecake mixture seamlessly.
- 2 teaspoons pure vanilla extract: Vanilla is non-negotiable in desserts—it adds warmth and complexity to every bite! Always use pure vanilla extract rather than imitation; trust me—the difference is palpable!
- 1/2 cup sour cream, room temperature: Sour cream contributes moisture while also adding subtle tanginess—a perfect counterbalance to all those rich flavors!
- 1/2 cup heavy cream, room temperature: Another round of heavy cream! It enhances richness without overwhelming sweetness; ensure it’s warmed slightly for easier blending into your batter later on.
- 3 large eggs & 1 large egg yolk (all at room temperature): Eggs add structure while keeping everything moist and creamy—room-temperature eggs emulsify better than cold ones do!
- 3/4 cup unsalted butter, cubed: Unsalted butter is crucial here; we want complete control over salt levels in desserts! Use good quality butter—you’ll taste its richness in every bite!
- 3/4 cup granulated sugar & 1/2 cup light brown sugar (packed): Combining both sugars creates depth—not only does brown sugar add sweetness but also a hint of caramel flavor from molasses content!
- 2 large eggs & 1 large egg yolk (all at room temperature): Like before—these guys contribute structure while keeping things creamy!
- 1 and 1/2 teaspoons pure vanilla extract & 3/4 cup all-purpose flour & 1/2 cup unsweetened cocoa powder & 1/4 teaspoon salt: Flour provides structure; cocoa powder intensifies flavor; salt elevates everything! Each component plays its part perfectly here.
Now that we’ve gathered all these fantastic ingredients together let’s move on to choosing our essential tools!
Equipment You’ll Need:
Having the right tools makes all the difference in achieving success when preparing any recipe—including our divine Coffee Brownie Cheesecake! Let’s gather these essential partners-in-crime so we can create something wonderful together.
- 9-inch springform pan – This pan is crucial because it allows us to easily remove our cheesecake once it’s done baking without risking damage to its delicate structure. Make sure it’s tightly sealed so no water seeps in during baking—a water bath ensures even cooking!
- Electric mixer or handheld mixer – A powerful mixer saves time by effortlessly whipping cream cheese until smooth or beating egg whites into fluffy peaks! If using a handheld version instead, be prepared for some arm workout but trust me—it’s worth every minute spent mixing away!
- Rubber spatula – This trusty tool ensures no batter goes wasted—from scraping down sides during mixing stages to helping transfer layers carefully into pans without messes along way!
- Medium heat-safe mixing bowl – For melting butter or combining various mixtures safely over boiling water—choose glass or metal bowls equipped for handling heat levels involved here comfortably!
- Large saucepan or stockpot (for water bath) – We need something sturdy enough to hold boiling water around springform pan without spilling everywhere while also fitting snugly into oven space allocated nicely—safety first!
Now that we have everything prepped let’s dive deeper into creating this masterpiece!
Step 1: Prepping Your Springform Pan
To kick things off right—and trust me when I say this sets everything else up beautifully—we must prepare our springform pan properly first! Start by preheating your oven to 350°F (180°C), ensuring it’s nice and hot before introducing any batter inside later on which helps ensure even baking throughout the process ahead. While waiting patiently for it reach temperature blissful warmth—a true kitchen comfort—we can line base using parchment paper carefully cut out into circle shape fitting snugly within bottom area followed by spraying sides generously with non-stick spray allowing seamless release later post-baking adventures too; avoiding sticking issues altogether becomes absolutely paramount here folks!
Step 2: Melting Butter
Next up? Time to melt some glorious butter! In medium heat-safe mixing bowl set above simmering water within saucepan below (a method known as double boiler), place cubed pieces allowing gentle heat work their magic until fully liquefied while stirring constantly throughout process until smooth consistency achieved ultimately creating golden liquid gold ready join forces alongside chocolates soon thereafter…
Step 3: Incorporating Sugars
Once melted blissfully warm enters stage next step involves adding both granulated sugars directly following removal from heat source ensuring whisking thoroughly until mixture appears glossy resembling thick syrupy delight—that particular shine indicates sugars dissolved properly yielding excellent flavor development overall during baking phase ahead so don’t rush this step—patience rewarded immensely here my friends as lovely textures begin forming already enticing sweet aromas wafting through kitchen air…
Step 4: Whisking Eggs & Vanilla
This part brings us closer yet still requires attention given importance behind fluffiness achieved during creaming stage involving incorporating eggs one-by-one slowly followed by luscious vanilla extract poured gently alongside heavenly concoction created earlier whilst maintaining rhythmic whisking motion continuing process till combined entirely resembling silky uniformity throughout mixture achieved…
So continue reading as we layer upon these incredible steps leading towards absolute perfection unfolding eventually within those heavenly bites waiting eagerly ahead don’t you agree?
Step 5: The Heart of the Cheesecake Mixture
Now that your brownie base is nice and cool, it’s time to whip up that luscious cheesecake filling that will elevate this dessert to extraordinary heights. In a bowl fitted with an electric mixer, or using a handheld mixer if you prefer a little workout in the kitchen, beat the room temperature cream cheese on medium-low speed for about 2 to 4 minutes. You want it to become creamy and smooth—this is an essential step because any lumps left in your cream cheese will lead to a less-than-ideal texture in your final cheesecake. Trust me on this; we are aiming for heavenly creaminess! After you’ve achieved that beautiful consistency, scrape down the sides of the bowl like a pro to ensure everything is incorporated evenly.
Next, add in the granulated sugar and cornstarch. This duo serves a dual purpose: the sugar sweetens our cheesecake while the cornstarch acts as a stabilizer. Beat these together until they meld into a silky mixture, making sure there are no sugar crystals left behind. Now comes the magic moment—add in the dissolved instant coffee along with pure vanilla extract, sour cream, and heavy cream. Each of these ingredients plays a crucial role: the coffee injects a delightful depth of flavor, while vanilla lends warmth and complexity. Sour cream contributes to that luxurious mouthfeel we’re after, and heavy cream brings richness that makes every bite utterly intoxicating. Beat this mixture until it’s smooth once more; you’re looking for a velvety texture that’s free of any lumps.
Step 6: Incorporating Eggs with Care
Incorporating eggs into your cheesecake batter is where you must tread lightly! One at a time, add your large eggs and egg yolk into the creamy mixture, mixing slowly after each addition until just combined. It’s important not to overbeat at this step because overmixing can introduce too much air into your batter, which can lead to cracks during baking—something we simply don’t want! When you’ve added all your eggs and they’re gently mixed in without overdoing it, scrape down the bowl again to catch any remnants stuck on the sides or bottom. This ensures every last bit of deliciousness gets incorporated into your cheesecake filling.
What you’re aiming for here is a cohesive batter that feels dense yet airy—like liquid gold just waiting to be transformed into something magical in the oven. Remember to take your time with this step; patience is key when creating such an indulgent treat!
Step 7: Pouring Perfection into Your Pan
Now comes one of my favorite moments—the pouring! With great care and excitement (because we’re so close!), pour this incredible cheesecake mixture over your cooled brownie base in the springform pan. It’s important to do this slowly so you don’t disturb your carefully crafted brownie layer underneath; we want them united yet distinct when it comes time for slicing! As you pour, use a spatula to spread it gently into an even layer if needed.
Once poured, place your springform pan inside a larger baking pan—a roasting pan works beautifully here—as this will prepare us for our water bath later on. A water bath helps regulate temperature during baking and prevents our lovely cheesecake from cracking by providing gentle steam. With everything prepped and ready for its journey into the oven, it’s time to create that protective foil shield!
Step 8: The Water Bath Technique Unveiled
Before we pop our masterpiece into the oven, let’s secure everything with aluminum foil—a non-negotiable step that ensures no pesky water seeps into our cheesecake during baking. Grab one extra-large piece of aluminum foil that’s larger than your springform pan; place it beneath the pan and fold it up around the sides so nothing leaks through. If you have any concerns about leakage (and trust me—it happens!), you can also set your springform pan inside another larger pot or dish filled with water.
Now let’s talk about baking: preheat your oven to 300°F (150°C) while bringing several cups of water to boil separately. When ready, carefully pour hot water into the outer pan until it reaches about halfway up the sides of your springform pan—this is crucial for maintaining moisture throughout our long bake time of about 1 hour and 15 minutes. During this process, keep an eye on things: you’ll know your cheesecake is finished when its edges are set but it still has a slight jiggle in the center—I promise you’ll get excited when you see those wobbly waves!
After baking, turn off your oven but leave that beautiful creation inside for another 30 minutes; cracking can occur when drastic temperature changes happen too quickly. After half an hour has passed, crack open the door just slightly and let it rest for another 30 minutes; this gentle cooling process helps maintain its integrity while allowing flavors to deepen beautifully.
Final Touches: Transforming Your Cheesecake Into Art
Step 9: Crafting That Irresistible Ganache
Once you’ve navigated through all those careful steps—and I know they require patience—it’s time for one more layer of decadence: chocolate ganache! Start by placing chocolate chips in a medium bowl while bringing heavy whipping cream just shy of boiling over medium heat in a small saucepan; keep an eye on it since milk tends to bubble over quickly! Once hot enough, remove from heat immediately and stir in instant coffee granules until fully dissolved—this adds yet another dimension of rich coffee flavor that’s going to make every bite unforgettable.
Pour this hot cream mixture directly over those waiting chocolate chips and cover with plastic wrap or another plate for about five minutes—this resting period allows residual heat from the cream to melt those chocolate chips perfectly without burning them! When those five minutes are up, remove cover and stir gently until smooth; if there are any stubborn pieces left unmelted, don’t hesitate to microwave them in short intervals (15 seconds at most) while stirring frequently until you achieve that gorgeous glossy finish.
Once completely smooth—you’ll be enamored by its shiny allure—carefully pour ganache over chilled cheesecake like you’re draping fine silk across luxury linens. Smooth out any uneven spots with a spatula if necessary before transferring it back into refrigeration where it needs at least eight hours (or overnight if possible) to set properly before serving.
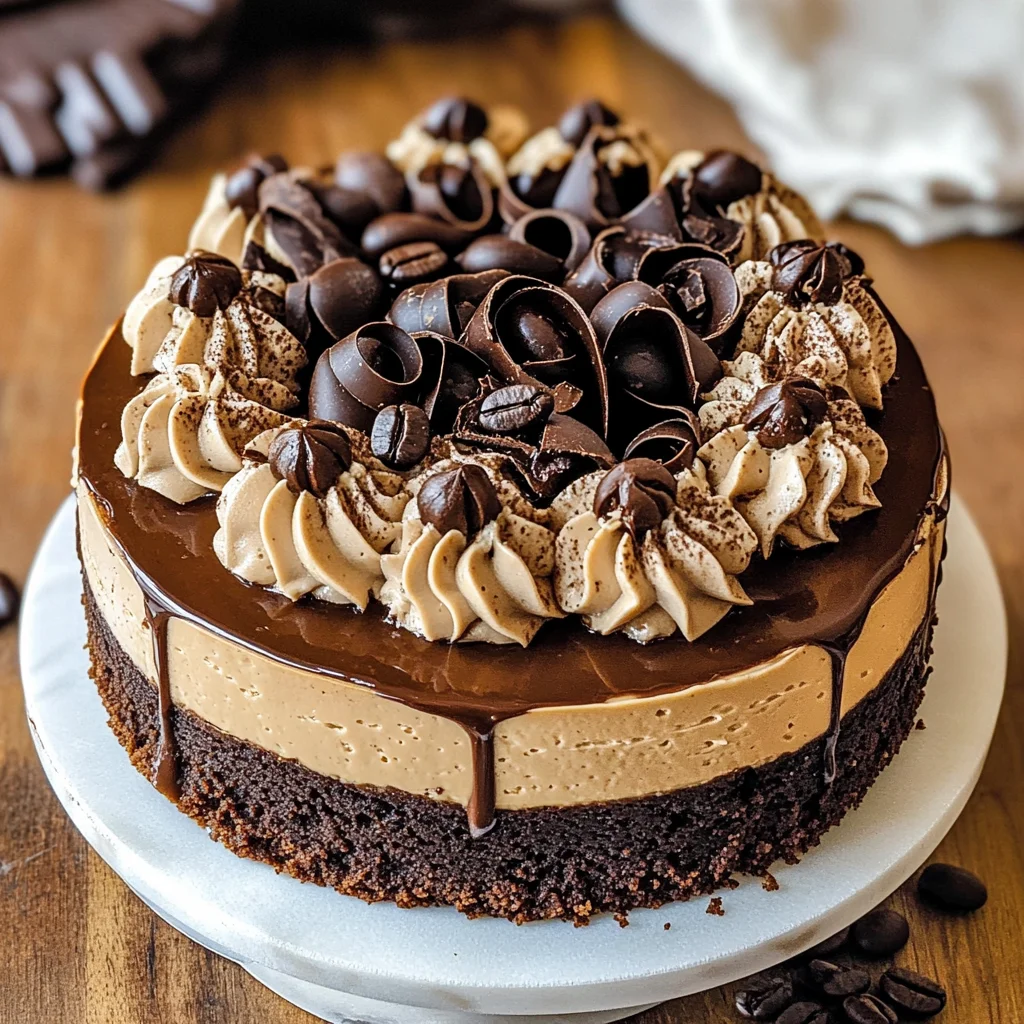
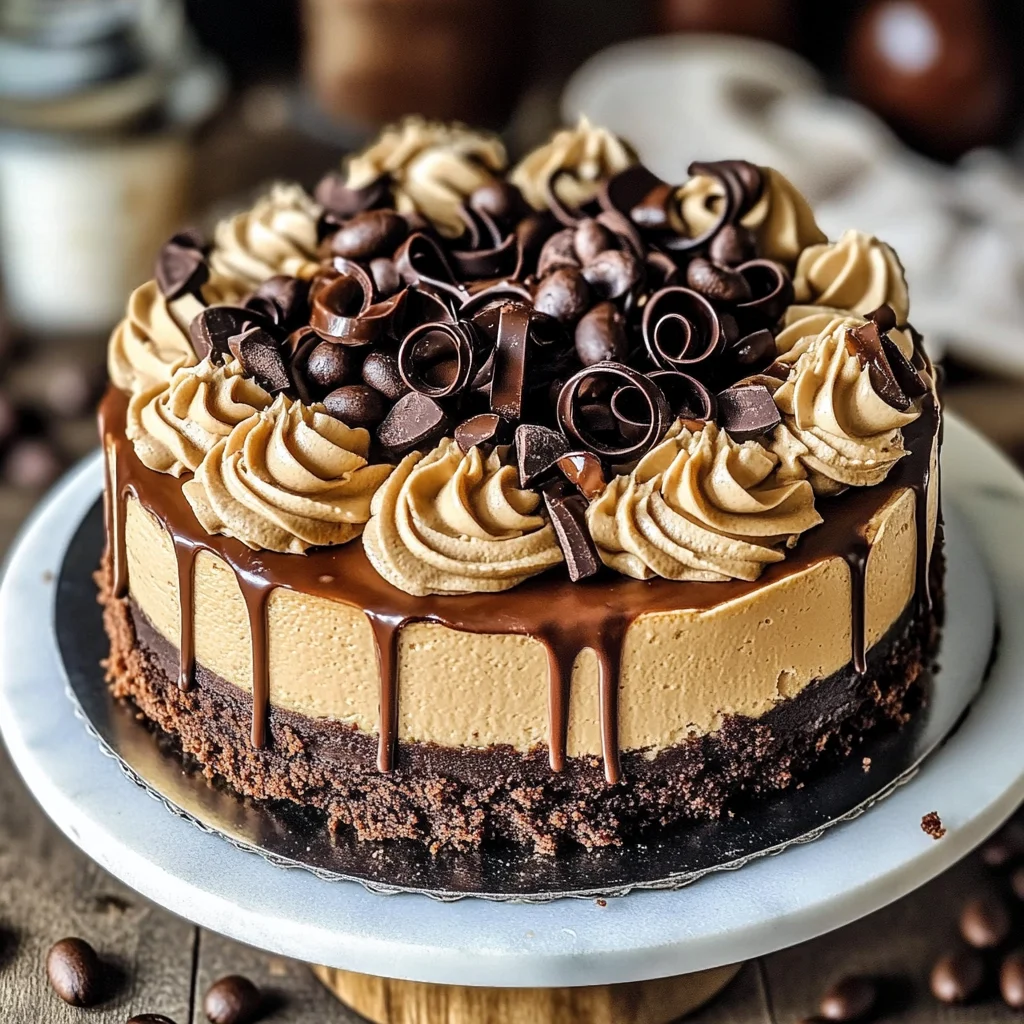
Step 10: Decorating Like A Pastry Chef
The day has arrived—the pièce de résistance is almost complete! Once you’ve allowed ample chilling time for both flavors and textures to meld perfectly together overnight (I promise you this will make all difference), retrieve that stunning cheesecake from refrigeration before removing its springform ring gently; do so cautiously so as not disrupt all those layers we’ve worked so hard on creating!
It’s time now for some decorative flair! In another chilled stainless steel bowl (chilling beforehand ensures optimal whipping), combine cold heavy cream with powdered sugar and instant coffee granules before whipping away until those glorious stiff peaks form—about three or four minutes should do just fine depending on mixer strength used here! Transfer whipped cream into a pastry bag fitted with star tip (I love using Wilton 1M) because who doesn’t appreciate some artful piping? Pipe generous swirls around outer edge then sprinkle cacao powder dust delicately atop center where you’ll nestle those beautiful chocolate curls we created earlier along with glistening chocolate-covered coffee beans resting atop each swirl—a truly breathtaking presentation!
Finally slice generously yet carefully so everyone gets their fair share of blissful layers within each piece served alongside steaming cups joe or perhaps even after dinner drinks? Whatever route taken afterward know one thing—we’ve created something profoundly satisfying together today—the Coffee Brownie Cheesecake will undoubtedly become cherished among friends gathered around as stories unfold while indulging these scrumptious bites!
Happy baking dear friends—I can’t wait for you all dive headfirst into blissful bites together soon!
Storage and Enjoyment Tips for Your Coffee Brownie Cheesecake
Ah, the moment we’ve all been waiting for is finally here—your spectacular Coffee Brownie Cheesecake is ready to be enjoyed! But before you dive in, let’s talk about how to preserve this culinary masterpiece for later indulgence. Whether you plan to savor every bite right away or save some for a special occasion, I promise you’ll want to know how to keep this dreamy dessert while maintaining its rich flavors and textures.
Storing Leftover Coffee Brownie Cheesecake
To ensure your beloved Coffee Brownie Cheesecake stays fresh and delicious, it’s best to store it in an airtight container. This helps lock in all those fantastic flavors while keeping any unwanted moisture at bay. If you’re using a springform pan, simply cover the top with plastic wrap or aluminum foil and place it in the refrigerator. It will stay good for 3-5 days; however, I promise it won’t last that long because it’s just too irresistible! For those who want to maintain peak quality, try placing a slice of bread inside the container—this little trick keeps everything moist and delightful. Don’t worry if it tastes even better after a day or two; the flavors meld together beautifully, creating an utterly intoxicating experience with every bite. When it’s time to serve again, just let it come to room temperature before slicing into it; trust me on this one!
Freezing Coffee Brownie Cheesecake for Later
If you find yourself with leftovers (or simply want to prepare ahead), freezing your Coffee Brownie Cheesecake is a fantastic option! To freeze it properly, allow the cheesecake to set completely in the refrigerator first. Then wrap it tightly in plastic wrap followed by aluminum foil for extra protection against freezer burn. It can be frozen for up to three months, maintaining its luscious texture and flavor. When you’re ready to indulge again, simply transfer it from the freezer to the fridge and allow it to thaw overnight—or if you’re impatient like me, leave it out on the counter for a couple of hours until it’s perfectly chilled and ready to enjoy again. The convenience of having this decadent dessert waiting in your freezer adds such joy; imagine pulling out a slice on a rainy afternoon or as an impromptu treat when friends drop by—it’s pure happiness!
Coffee Brownie Cheesecake
Indulge in rich layers of creamy coffee cheesecake on a dense brownie base. Try this Coffee Brownie Cheesecake recipe today—it’s pure bliss!
- Prep Time: 30 minutes
- Cook Time: 1 hour and 40 minutes
- Total Time: 0 hours
- Yield: Serves approximately 12 slices 1x
- Category: Dessert
- Method: Baking
- Cuisine: American
Ingredients
- Chocolate-covered coffee beans (for garnish)
- Cocoa powder (for dusting)
- 1 cup heavy cream, cold
- 1 tablespoon instant coffee granules
- 6 tablespoons powdered sugar
- 5 oz. dark chocolate, chopped
- 1 tablespoon vegetable shortening
- 1 and 1/2 cups dark chocolate chips
- 1/2 cup heavy cream
- 2 tablespoons instant coffee granules
- 3 (8 ounce) packages cream cheese, room temperature
- 1 cup granulated sugar
- 1 tablespoon cornstarch
- 2 tablespoons instant coffee granules & 2 tablespoons hot water
- 2 teaspoons pure vanilla extract
- 1/2 cup sour cream, room temperature
- 1/2 cup heavy cream, room temperature
- 3 large eggs & 1 large egg yolk (all at room temperature)
- 3/4 cup unsalted butter, cubed
- 3/4 cup granulated sugar & 1/2 cup light brown sugar (packed)
- 2 large eggs & 1 large egg yolk (all at room temperature)
- 1 and 1/2 teaspoons pure vanilla extract
- 3/4 cup all-purpose flour
- 1/2 cup unsweetened cocoa powder
- 1/4 teaspoon salt
Instructions
- Preheat the oven to 350°F (180°C). Prepare a 9-inch springform pan by lining the base with parchment paper and greasing the sides.
- Melt unsalted butter in a bowl over simmering water. Stir in granulated sugars until glossy.
- Gradually mix in eggs and vanilla, then combine dry ingredients: flour, cocoa powder, and salt.
- Pour the brownie batter into the prepared pan and bake for 25 minutes. Allow to cool.
- For the cheesecake filling, beat cream cheese until smooth, then add sugar, cornstarch, dissolved coffee, sour cream, heavy cream, and eggs.
- Pour cheesecake mixture over cooled brownie layer and bake at 300°F (150°C) in a water bath for about 1 hour and 15 minutes.
- Once baked, allow it to cool in the oven with the door slightly ajar for 30 minutes before refrigerating for at least 8 hours.
- Prepare ganache by heating heavy cream and stirring in chopped chocolate until smooth; pour over chilled cheesecake.
- Decorate with whipped cream and chocolate-covered coffee beans before serving.
Nutrition
- Serving Size: 1 slice
- Calories: 420
- Sugar: 29g
- Sodium: 250mg
- Fat: 28g
- Saturated Fat: 16g
- Unsaturated Fat: 10g
- Trans Fat: 0g
- Carbohydrates: 37g
- Fiber: 2g
- Protein: 6g
- Cholesterol: 95mg