Red, White & Blue Cake Pops | Fourth of July Recipes
There’s something profoundly magical about the act of baking, isn’t there? It’s not just about mixing flour and sugar; it’s about creating memories that last a lifetime and weaving together flavors that tell a story. When I think of our beloved Fourth of July celebrations, I envision the brilliant fireworks lighting up the night sky, laughter echoing around barbecues, and of course, the delightful aroma of sweet treats wafting through the air. What better way to celebrate than with these vibrant Red, White & Blue Cake Pops? They are not just desserts; they are little bites of joy that encapsulate the spirit of summer and celebration. Each pop is a delightful explosion of colors and flavors, a perfect representation of unity and festivity that we cherish during this time.
As we embark on this culinary journey together, I can assure you that these cake pops will not only satisfy your sweet tooth but also delight your friends and family. Imagine them taking a bite into these soft, moist cake balls coated in smooth candy melts, their eyes lighting up with surprise and delight as they discover the subtle tanginess from Greek yogurt balancing out the sweetness. Trust me when I say every bite is an experience—a little moment that brings everyone closer together around the table. These Red, White & Blue Cake Pops are not just food; they are a bridge connecting tradition with creativity, showing us how even simple ingredients can come together to create something truly extraordinary.
Red, White & Blue Cake Pops | Fourth of July Recipes: A Sweet Celebration
Let’s dive into making these adorable cake pops! They’re perfect for any summer gathering or festive occasion—especially the Fourth of July! The best part? They’re surprisingly easy to make and absolutely fun to decorate! So roll up your sleeves and get ready to create some magic in your kitchen.
Ingredients:
Before we get started, let’s gather all our ingredients for this colorful confectionery adventure. Each ingredient plays an essential role in crafting these delicious cake pops, so pay close attention!
- 1 box white cake mix. This is our base—the foundation upon which we build these delightful treats. Not only does it provide structure, but it also contributes to that light texture we all love in cake pops. If you want to experiment or simply prefer homemade cakes, you could use your favorite vanilla cake recipe instead! Just remember to keep an eye on baking times if you decide to venture off the beaten path.
- 1 cup plain Greek yogurt. Here’s where we add some magic! Greek yogurt not only keeps our cake moist but also adds a wonderful depth of flavor with its slight tanginess. It’s like a secret weapon against dry cakes! When choosing Greek yogurt, go for full-fat versions if possible; they provide creaminess that enhances the overall taste without compromising texture.
- 1 cup water. This may seem simple, but water is vital for hydrating the dry ingredients in our cake mix and ensuring everything comes together smoothly. It assists in activating the leavening agents in the mix so that our cakes rise beautifully while baking.
- 1 cup white candy melts. This is what gives our cake pops their gorgeous outer layer! White candy melts melt down into a silky-smooth consistency that’s easy to work with; plus, they take on color beautifully if you choose to tint them further. Make sure to look for quality brands—some might have better melting properties than others.
- 1 tablespoon vegetable shortening. Adding shortening to our candy melts is absolutely paramount for achieving that ideal smooth texture when melting. It helps thin out the candy coating slightly so it glides perfectly over your pops without clumping or cracking.
- Food coloring (red & blue). These bright hues are what make our cake pops festive! Use gel food coloring for more vibrant shades; just remember—you can always add more but can’t take away once it’s mixed in!
- Red, white & blue sprinkles (for decorating). Sprinkles are like confetti—they bring joy and celebration! Choose sprinkles that are vibrant and fun—they’ll add texture and an inviting crunch against those soft cake balls while making them visually appealing!
Equipment You’ll Need:
Now that we have all our ingredients lined up like eager participants at a parade, let’s chat about some essential tools needed for this exciting process. Having the right equipment makes everything smoother—like having supportive friends cheering you on as you bake!
- Mixing bowls – A good set of mixing bowls is crucial because they allow you to separate ingredients easily as we prepare our colorful batter. Opt for glass or stainless steel; they’re durable and won’t absorb odors or stains from your mixes.
- Whisk – This simple yet effective tool is perfect for blending ingredients thoroughly without leaving any lumps behind. A whisk encourages air into your batter as well; this will contribute to a fluffier texture in your baked cakes!
- Baking dishes – You’ll need three separate greased baking dishes or pans for each colored layer of batter. Make sure they’re similar in size so everything bakes evenly—this ensures uniformity when creating those adorable balls later on.
- Cooling racks – These are non-negotiable after baking! Allowing your cakes to cool properly prevents sogginess while also making it easier to crumble them later into those delightful bites.
- Microwave-safe mug or bowl – We need this for melting those white candy melts efficiently without burning them! Choose something deep enough so you won’t have any drips when dipping your chilled cake balls.
Now that we’ve gathered everything necessary for this delightful endeavor let’s get down to business!
Preparing the Red, White & Blue Cake Pops | Fourth of July Recipes / Creating Colorful Cake Layers
Step 1: Preheat Your Oven & Mix Your Batter
First things first—let’s preheat that oven to 350°F (175°C) because we want it nice and ready when we’re done mixing! In a large mixing bowl—a spacious one where all those vibrant colors can mingle—we’re going to whisk together our white cake mix with Greek yogurt and water until we achieve a sticky batter consistency that feels almost velvety between your fingers. This step allows us not only to combine all dry ingredients but also enriches flavor thanks to the yogurt’s creaminess interacting with each component beautifully!
Once you’ve formed this lovely batter, divide it evenly among three different bowls—this will give us each color layer we need for our festive pops! Use red food coloring in one bowl until you’ve reached your desired hue (don’t be shy!), then do the same with blue food coloring in another bowl while leaving one bowl uncolored as our white base layer—a beautiful palette awaits!
Step 2: Bake Your Cake Layers
Now it’s time for some oven magic! Pour each colored batter into its respective greased baking dish—don’t worry about perfection here; think playful layers rather than uniformity—and slide them into your preheated oven carefully. Bake them for about 12-15 minutes or until they spring back lightly when touched—the key here is avoiding browning too much since we want those bright colors intact!
Once baked through (you can always do a toothpick test if you’re unsure), remove from heat and let cool completely before transferring them onto cooling racks—this step is crucial because cooling helps prevent sogginess when crumbling later on.
Step 3: Crumble & Form Your Cake Balls
Once cooled fully (patience pays off!), grab all three colorful layers again and toss them into one large mixing bowl—this is where things get delightfully messy! With clean hands (don’t be afraid!), crumble each layer until no pieces exceed half an inch—this will help ensure even distribution throughout every bite later on.
Next comes the fun part: grab about 1–2 tablespoon-sized portions from this crumbled mixture and press them firmly together until they form multicolored balls—think playful marbles bursting with joy! Insert straws gently into each ball without pushing through entirely—it’s essential they stay intact while chilling later on so don’t rush this step—it directly affects how they hold together during decoration!
Step 4: Chill Before Dipping
Now we’re going to chill these adorable creations—pop them into the fridge for at least an hour so they set firmly before dipping action begins! Chilling serves two purposes here: first, it helps solidify those delicate shapes you’ve formed so nothing falls apart during coating; second, it prevents melting issues once dipped into warm candy melts later on which could ruin everything altogether—not what we’re aiming for!
Stay tuned because soon we’ll dive into coating these beauties with their shiny outer layer next—and I promise you’ll see how utterly intoxicating it all becomes as colors collide under sprinkles galore!
With every step forward taken lovingly alongside each other here today leads us closer towards celebrating what truly matters: creating delectable moments filled with laughter shared over tasty treats made from scratch by yours truly—all wrapped up neatly inside vibrant little bites ready just in time for summer festivities ahead!
Step 5: Dipping Into Sweetness
Now that your colorful cake balls have chilled and firmed up beautifully, it’s time to take them to the next level by dipping them in a luscious coating of melted candy. This step is not just about adding a sweet outer layer; it’s crucial for sealing in that moist, flavorful cake center while providing a delightful crunch that contrasts with the tender interior. Begin by placing your white candy melts and vegetable shortening into a microwave-safe bowl. I recommend using a mug or a deep bowl so you can easily dip the cake balls without making too much of a mess—trust me, you’ll appreciate this later! Microwave the mixture in 30-second intervals, stirring gently after each interval until it transforms into a smooth, velvety consistency. The addition of vegetable shortening is non-negotiable here; it thins out the candy melts just enough to create a glossy finish that glides over your cake pops like liquid gold.
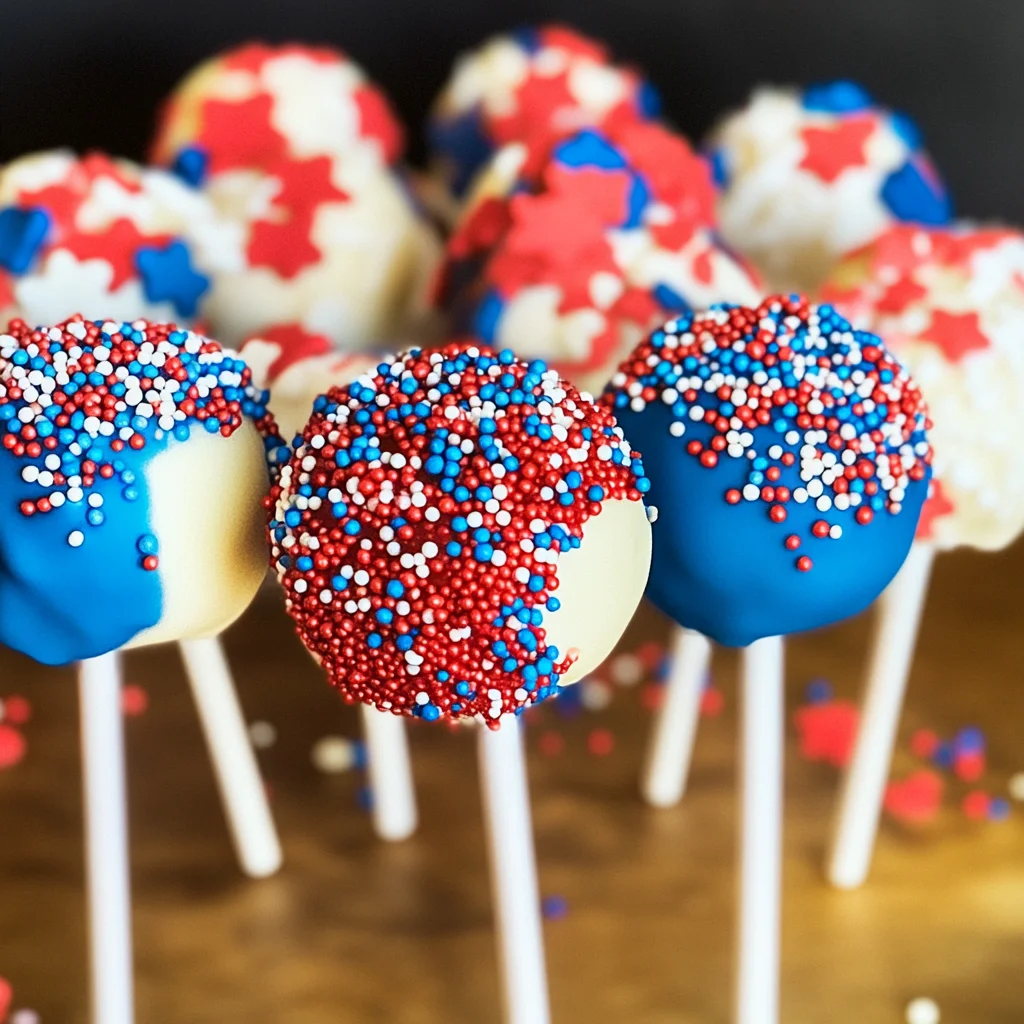
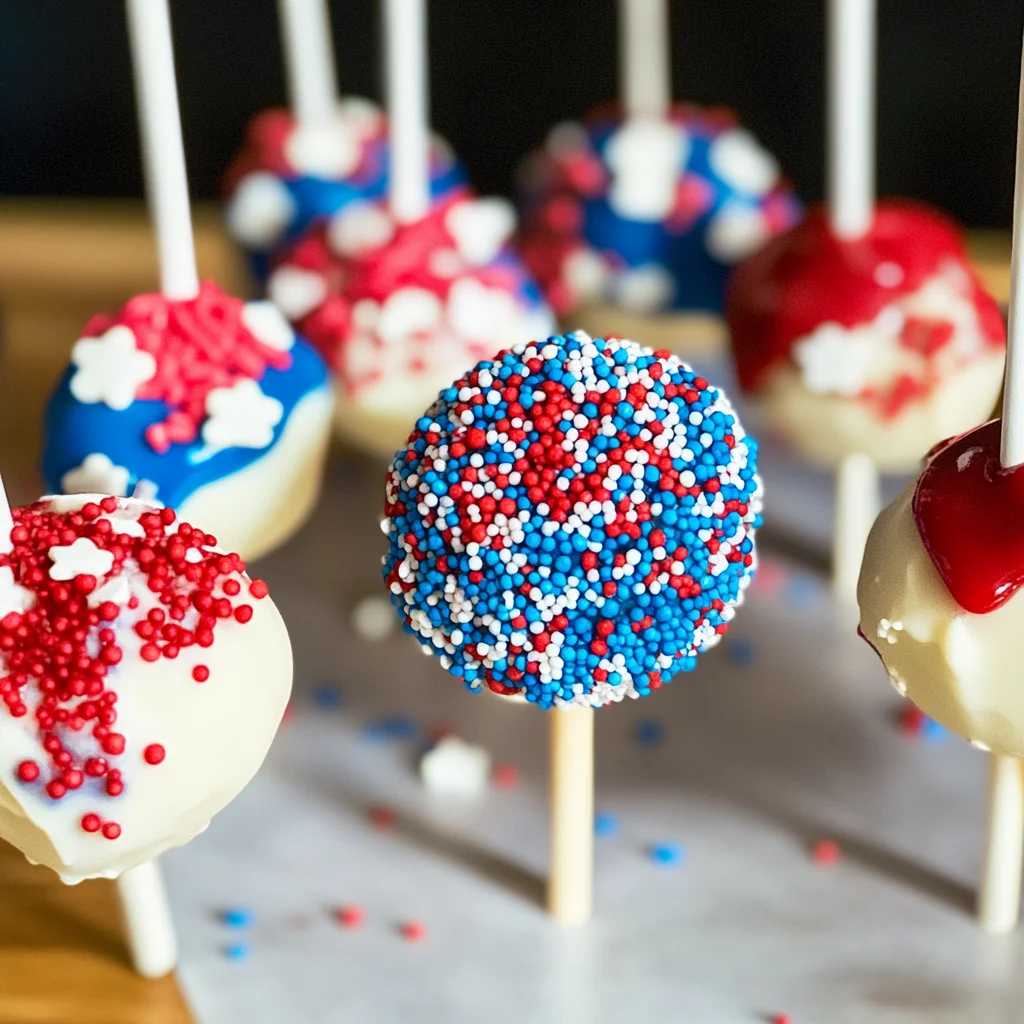
As you dip each cake ball into the melted candy, rotate it slowly to ensure an even coating. You want to avoid any clumps or bare spots because those will affect both the appearance and taste. Keep an eye on the temperature of your melted candy; if it starts to cool down and becomes thick, pop it back in the microwave for another few seconds. This is where patience pays off—take your time with each dip, allowing excess chocolate to drip off before moving on to the next one. You’ll soon see how every swirl creates an utterly intoxicating effect! While the candy coating is still wet, sprinkle generously with red, white, and blue sprinkles—their crunchiness will provide delightful texture and visual appeal.
Step 6: Hardening Your Masterpiece
After dipping and decorating your cake pops, they’re going to need some time to set up properly. This chilling phase is absolutely paramount; it allows the candy coating to harden completely while ensuring that your cake pops maintain their shape and integrity. Place them upright in a block of styrofoam or arrange them gently on parchment paper if you don’t have anything handy for standing them up. Either way, make sure they are spaced out enough so they don’t touch each other—nobody wants their beautiful creations sticking together! Let them chill for at least 30 minutes in the refrigerator or until you can feel that satisfying firmness when you gently press on them.
This waiting period isn’t just about getting solid; it’s also about marrying those incredible flavors together. As they rest in their cool abode, the sweetness from both the cake and the candy coating melds beautifully while ensuring that every bite is an explosion of flavor! So go ahead and resist the temptation to sneak one early—trust me on this one; you’ll be glad you waited!
Step 7: The Grand Reveal
Once those thirty minutes have whisked by (though it may feel like an eternity when you’re excited!), it’s time for the grand reveal of your stunning Red, White & Blue Cake Pops. Carefully pull them from their cooling station and admire what you’ve created—a vibrant array of colors just begging to be shared at your Fourth of July celebration! The moment you take your first bite is nothing short of magical; you’ll experience that gratifying crunch from the candy shell followed by a burst of moist cake infused with creamy Greek yogurt’s tanginess.
To serve these beauties, consider presenting them on a festive platter adorned with fresh berries or even mini flags for added flair! Not only do these pops look adorable, but they also embody everything we love about summer celebrations—colorful, fun, and deliciously shareable! And let’s not forget how effortlessly they capture everyone’s hearts (and taste buds) at your gathering.
Step 8: Savoring Every Moment
Before diving into these delightful treats, take a moment—breathe in that heavenly aroma wafting off these pops and appreciate all that hard work you’ve put in. Whether you’re sharing them with family under fireworks or indulging during an intimate backyard BBQ with friends, each bite is meant to be savored as much as it is enjoyed. Perhaps even consider pairing them with refreshing lemonade or iced tea for an extra special touch!
If there happen to be any leftovers (which I highly doubt!), store them in an airtight container in the refrigerator for up to a week. Though I promise you—they’re far too irresistible to last long! And remember this: each pop tells its own story—a bright burst of joy amidst summer celebrations—and I truly hope this recipe brings as much happiness into your life as it has mine.
Conclusion:
As we wrap up our journey through making these stunning Red, White & Blue Cake Pops, I can’t help but feel an overwhelming sense of excitement. From the moment you whisk together that simple batter infused with Greek yogurt—which not only keeps things moist but also adds a tangy depth—to watching those vibrant colors come together like a beautiful canvas of celebration, every step is filled with joy and creativity! What makes this recipe truly special isn’t just its eye-catching appearance; it’s how it captures the essence of summer gatherings—laughter shared over delicious treats that are both fun and festive.
This recipe is undeniably a must-try—not just because of how heavenly they taste but also due to the sheer joy you’ll experience while creating them. Whether you’re celebrating the Fourth of July or simply looking for something cheerful to brighten up your day, these cake pops fit seamlessly into any occasion. Picture pulling one from your party platter; its colorful exterior hinting at the delightful surprise inside as you take that first bite—it’s pure bliss!
Imagine savoring one alongside an ice-cold lemonade on a warm afternoon or sharing them with friends during game night; they’re just so versatile! For an extra indulgent experience, pair your cake pop with some whipped coconut cream or serve alongside fresh berries—each mouthful becomes an enchanting symphony of flavors that dances across your palate. And if you’re feeling adventurous? Experiment by adding different flavors or colors to your cake mix or using various sprinkles for decorating—each twist enhances this recipe’s charm!
So go ahead and give these Red, White & Blue Cake Pops a whirl! Your kitchen will be filled with laughter and creativity as you craft these sweet treats perfect for sharing—or keeping all to yourself (I won’t tell!). Don’t forget to share your experiences and variations with me; I’d love to hear how they turned out for you!
Red, White & Blue Cake Pops

Celebrate the vibrant spirit of summer with these delightful Red, White & Blue Cake Pops! Perfect for Independence Day or any festive occasion, these treats are not only visually stunning but also packed with flavor. Made with moist cake infused with tangy Greek yogurt and coated in smooth candy melts, they embody the joy of summer gatherings. With their colorful layers and fun decorations, these cake pops will be the hit of your celebration, bringing smiles to both kids and adults alike. Easy to make and even more fun to decorate, get ready to create sweet memories with every bite!
- Prep Time: 30 minutes
- Cook Time: 15 minutes
- Total Time: 45 minutes
- Yield: Approximately 12 cake pops 1x
- Category: Dessert
- Method: Baking
- Cuisine: American
Ingredients
- 1 box white cake mix
- 1 cup plain Greek yogurt
- 1 cup water
- 1 cup white candy melts
- 1 tablespoon vegetable shortening
- Red and blue food coloring
- Red, white & blue sprinkles (for decorating)
Instructions
- Preheat oven to 350°F (175°C). In a large bowl, combine white cake mix, Greek yogurt, and water until smooth.
- Divide batter into three bowls. Color one red and one blue, leaving the third uncolored.
- Pour each color into greased baking dishes and bake for 12-15 minutes. Cool completely.
- Crumble cooled cakes into a large bowl and form mixture into balls using 1-2 tablespoons for each.
- Chill balls for at least an hour.
- Melt candy melts with vegetable shortening in a microwave-safe bowl until smooth.
- Dip each chilled cake ball into melted candy, allowing excess to drip off before decorating with sprinkles.
- Allow cake pops to set in the refrigerator for at least 30 minutes.
Nutrition
- Serving Size: 1 cake pop (45g)
- Calories: 150
- Sugar: 16g
- Sodium: 45mg
- Fat: 6g
- Saturated Fat: 3g
- Unsaturated Fat: 2g
- Trans Fat: 0g
- Carbohydrates: 24g
- Fiber: <1g
- Protein: 2g
- Cholesterol: 5mg