Quick & Easy Crying Tiger Beef
There’s something truly magical about cooking a dish that not only tantalizes the taste buds but also warms the heart. When I think of Quick & Easy Crying Tiger Beef, I’m transported to a world where flavors dance harmoniously, creating a culinary experience that’s both profound and exhilarating. Imagine the aroma of sizzling steak filling your kitchen, mingling with the zesty notes of lime and the earthy depth of tamarind. This dish isn’t just about satisfying hunger; it’s a celebration of vibrant Thai flavors that come together in a way that feels like a warm embrace. In just 30 minutes, you can create something that’s not only better than takeout but also deeply personal and immensely rewarding.
What makes this recipe special is its ability to bridge tradition and innovation in every bite. The name Crying Tiger evokes an image of boldness—an intriguing blend of sweet, spicy, and tangy flavors that leave you yearning for more. The seared steak paired with a delicious dipping sauce embodies the essence of Thai cuisine: fresh ingredients, harmony in taste, and a beautiful presentation. It’s perfect for hectic weeknights when you want something quick yet utterly satisfying. Trust me when I say that once you try this recipe, it will find its way into your regular dinner rotation!
Quick & Easy Crying Tiger Beef: A Flavorful Adventure Awaits
Welcome to my kitchen! Today, we’re embarking on a delightful journey to whip up a dish that’s packed with flavor and comes together effortlessly—Quick & Easy Crying Tiger Beef. This is one of those recipes that feels like a secret weapon for any home cook looking to impress family or friends without spending hours slaving over a hot stove. With juicy strips of steak served alongside an irresistible sweet and spicy dipping sauce, you’ll be amazed at how quickly you can bring restaurant-quality dining to your table.
I promise you’ll love every step of this process as we create something truly extraordinary together! Just gather your ingredients and get ready for some culinary magic.

Ingredients:
Before we dive into cooking, let’s talk about gathering our star players—the ingredients! Each one plays a crucial role in creating the symphony of flavors that make this dish so remarkable.
- 1 lb ribeye steak (or sirloin / striploin / NY strip, 1-inch thick). Choosing quality beef is absolutely paramount for this recipe. Ribeye is known for its marbling, which means it stays juicy and tender even after cooking. If ribeye isn’t available or isn’t your preference, sirloin or striploin are excellent substitutes—they’re leaner but still deliver great flavor when cooked properly. Look for cuts that have a vibrant color and minimal gristle; they’ll ensure you get that melt-in-your-mouth texture we all crave!
- 2 tsp vegetable oil (or any neutral oil). This oil serves as the medium for cooking our steak beautifully without imparting any strong flavors. Vegetable oil has a high smoke point, making it perfect for searing meat at high heat without burning. You could also use grapeseed or canola oil if that’s what you have on hand—both will work perfectly to achieve that golden-brown crust on your beef!
- 1 tbsp oyster sauce (or vegetarian stir-fry sauce). This ingredient adds depth and umami richness to your marinade—a non-negotiable in achieving the signature flavor profile of crying tiger beef! If you’re looking for vegetarian options, ensure to select a quality vegetarian stir-fry sauce that has similar characteristics without animal-derived ingredients.
- 1 tbsp palm sugar (finely chopped; sub: brown sugar). Palm sugar brings an essential sweetness to balance out the savory elements in our dish while contributing its unique caramel-like flavor. If you can’t find palm sugar at your local store or prefer convenience, brown sugar works just fine—it’ll still provide that needed touch of sweetness!
- 1 tbsp lime juice (fresh). Freshly squeezed lime juice adds brightness and acidity—key components in achieving balance in any dish! The zing from fresh lime complements the richness of the beef beautifully while also enhancing other flavors in the marinade.
- 1 tbsp regular soy sauce (or light soy sauce). Soy sauce introduces saltiness and depth to our marinade; it’s another layer of flavor that’s simply indispensable here! Regular soy sauce offers robust flavor while light soy sauce is milder; choose based on your preference or dietary needs.
- 2 tsp garlic (minced). Ahh, garlic—the aromatic superstar! Fresh garlic not only elevates flavors but also adds warmth and complexity to our marinade with its unmistakable scent as it cooks.
- 2 tsp vegetable oil (or any neutral oil) (for cooking). Just as before, having enough oil is key to ensuring our steaks sear beautifully without sticking to the pan—a little precaution goes a long way!
- 1 tbsp tamarind pulp. Tamarind brings an alluring tanginess that pairs seamlessly with both sweet and spicy elements—we simply can’t skip it! If you’re unsure how to handle tamarind pulp, don’t worry; I’ll guide you through it later!
- 3 tbsp hot boiling water. This is used to dissolve our tamarind pulp effectively—it helps release those wonderful flavors while ensuring consistency in our dipping sauce.
- 1 tsp uncooked glutinous rice. Toasting glutinous rice adds texture and nutty flavor when ground into powder; it’ll give our dipping sauce an extra layer that makes all the difference!
- 1 tbsp palm sugar (finely chopped; sub: brown sugar) (for dipping sauce). Sweetness here balances out tartness from the tamarind—a fundamental principle in many Asian cuisines!
- 1 tbsp shallots (finely diced). Shallots add mild oniony sweetness without overwhelming other flavors—they’re delicate yet impactful!
- 1 tbsp cilantro (finely chopped). Fresh cilantro provides brightness and freshness; it’s amazing how herbs can elevate dishes by adding vibrancy!
- 1 tbsp fish sauce. Fish sauce contributes salty umami goodness—it’s essential in authentic Thai cuisine! For those avoiding fish products altogether, feel free to explore vegan replacements available today.
- 1 tbsp lime juice (fresh) again! We want layers—this additional hit keeps everything bright as we finish off our dipping sauce.
- 1/2 tsp Thai chili flakes (or gochugaru). These spices introduce heat—the thrill factor! Adjust according to personal preference; if you’re feeling adventurous or hosting spice enthusiasts—go wild!
Now we have everything prepped! Each ingredient carries its weight towards creating something fabulous—we’re almost there!
Equipment You’ll Need:
Before we embark on cooking this exciting dish together, let’s take stock of some essential tools you’ll need along the way—think of them as partners on this flavorful adventure! Having the right equipment not only makes things smoother but also enhances your overall enjoyment while crafting these delightful bites.
- Heavy-bottomed frying pan or cast iron skillet – This sturdy pan ensures even heat distribution while searing meat perfectly—you want those lovely browned bits developing on each side! Cast iron skillets are particularly renowned for their ability to retain heat well; if seasoned properly they create non-stick surfaces naturally over time.
- Mortar and pestle or spice grinder – To toast rice grains until they reach fragrant perfection before grinding into powder—that’s where all those wonderful textures come from! While mortar/pestle offers traditional charm, electric grinders save time if you’re crunched!
- Fine sieve – Essential for straining out any remnants from our tamarind pulp mixture so only smooth lusciousness remains—this step matters as nobody wants graininess in their dipping sauces!
Now we’re ready to move onto preparing our Quick & Easy Crying Tiger Beef—let’s dive right into those beloved steps that’ll lead us straight toward culinary bliss!
Step 1: Marinating Your Steak
Begin by preparing your marinade—a labor of love worth every moment spent! In a large bowl, combine oyster sauce or its vegetarian counterpart with palm sugar, lime juice, soy sauce, minced garlic, and two teaspoons of vegetable oil—all these ingredients blend beautifully together offering layers upon layers of flavor waiting patiently until they’re wrapped around each juicy slice of steak! Make sure everything is mixed well until palm sugar dissolves completely because trust me—it creates an incredible harmony once infused into meat fibers during marination time.
Next comes coating those luscious strips of ribeye generously within this umami-laden mixture—don’t skimp here; ensure each piece gets ample attention from all sides so they absorb every bit possible during resting time ahead! Cover them lightly with plastic wrap or simply set aside at room temperature for at least fifteen minutes—that short wait allows magic happen when flavors meld together beautifully before hitting heat sources later on…you’ll be glad you didn’t rush through this part because great results come from patience cultivated by heartfelt care put forth here!
Step 2: Preparing Tamarind Paste
While our steaks soak up deliciousness like little sponges thanks to marinating blissfulness occurring nearby—we need another hero joining us: tamarind paste preparation time! Take yourself somewhere cozy near hot boiling water where we’ll dissolve one tablespoon worth through gentle stirring using fork until fully combined without lumps left behind—that’s key as lumps could ruin consistency later down road plus who wants gritty dipping sauces anyway?!
Once dissolved thoroughly enough—not forgetting about keeping an eye out ensuring no stray seeds remaining amidst creamy goodness—we’ll cool down slightly before tackling next step involving hands-on approach running paste through fine sieve carefully extracting every last drop left behind while discarding any unwanted bits…this might sound tedious but believe me—the silky smooth result yielded afterward will be more than worth effort expended here especially knowing what divine dip awaits us just beyond reach…
Step 3: Toasting Glutinous Rice
Now onto one fun technique that’ll elevate our dish even further—time gets real exciting as we toast uncooked glutinous rice grains until they turn golden brown capturing delightful nutty aromas wafting through air around us simultaneously igniting anticipation bubbling beneath surface inside kitchen walls filled warmth already radiating from earlier steps taken thus far…grab heavy-bottomed frying pan heated up over medium flame awaiting future glory incoming soon enough once transformation occurs right before eyes watching intently throughout entire process unfolding before us revealing secrets hidden deep within small unassuming grains now becoming stars shining brightly atop tables everywhere beckoning guests closer than ever imagined possible…
Keep stirring constantly allowing even browning across board preventing burning completely ruining progress made thus far—just three-four minutes should suffice depending upon actual heating element utilized ideally reaching point where fragrance envelops surroundings inviting everyone nearby drawn nearer curious wanting know what happen next…once toasted perfectly transfer contents mortar/pestle/spice grinder blending away until fine powder forms resembling dust covering magical realm below revealing potential hidden treasures lying dormant underneath surface ready emerge finally showcasing true identity waiting patiently always wanting connect world around them passionately embracing moments shared among family/friends enjoying togetherness found within meals crafted lovingly alongside memories created lasting lifetimes ahead…
Step 4: Creating Dipping Sauce
With toasted rice transformed now let’s unite forces combining previously prepared tamarind paste alongside newly acquired rice powder along additional elements bringing life vibrantly alive—we’ll whisk together remaining components such shallots freshly diced cilantro adding aromatic flair finishing touches provided by fish sauce more zesty lime juice along final sprinkle fiery chili flakes welcoming everyone aboard ensuring excitement levels rise sky-high giving all participants something thrilling await their tastebuds soon enough once plated beautifully enticing them closer just mere moments away from indulging fully immersively experiencing entirety journey undertaken wholeheartedly loving twists turns encountered throughout process enriching lives nourishing souls forevermore forming bonds strengthened amid laughter sharing delectable fare…
And there you have it—the foundation laid down perfectly between two worlds colliding harmoniously resulting masterpiece reflecting dedication hard work poured forth throughout entire endeavor culminating finales leading directly towards tasting triumphs awaiting eagerly impatiently outside doors leading gardens filled laughter joyful banter echoing endlessly within hearts intertwined forevermore marking significance moments shared across generations weaving tapestries spun rich vibrant colors memories cherished dearly always returning back again…
Let me know when you’re ready so we can keep going with cooking up those delectable steaks next!
Step 5: Searing to Perfection
Now we’re diving into one of the most exhilarating parts of this Quick & Easy Crying Tiger Beef recipe: the searing! This step is not just about cooking; it’s about coaxing out the rich, deep flavors from the beef and locking in its natural juices. Begin by heating a heavy-bottomed frying pan or cast-iron skillet over medium-high heat. The right temperature is crucial here—too low, and you won’t achieve that gorgeous golden crust that makes your mouth water; too high, and you risk burning the meat before it’s cooked through. You’re aiming for a sizzling sound when the steak hits the pan, an auditory cue that tells you it’s time to get serious.
Add in the vegetable oil, watching as it shimmers and coats the bottom of your pan like liquid gold. Place your marinated steaks in the pan, ensuring they aren’t overcrowded; this is paramount for proper searing. You want each piece to have enough space to develop that beautiful crust without steaming. For a perfect rare to medium-rare finish, let them sear undisturbed for about 3-4 minutes per side. Use an instant-read thermometer if you’re unsure—an internal temperature of 131-139°F will give you that luscious pink center that’s so desirable. If you prefer a more well-done steak, simply reduce the heat slightly and add an extra minute or two on each side. Trust me on this—resting your steak after searing is just as important as this initial cooking phase!
Step 6: The Art of Resting
Once your steaks are beautifully browned and cooked to perfection, it’s time to embrace one of my favorite culinary secrets: resting! I cannot emphasize enough how critical this step is—it’s where the magic happens! When meat cooks, its juices are pushed towards the center due to heat. By allowing your steak to rest for at least 10 minutes after cooking, those juices redistribute throughout the meat instead of spilling out onto your cutting board when you slice in. This small moment of patience transforms your dish from merely good to utterly extraordinary.
While resting, cover your steaks loosely with aluminum foil—this keeps them warm while allowing steam to escape so they don’t become soggy. During this time, take in all those enticing aromas wafting through your kitchen; it’s a reminder of what’s to come! When the timer goes off, feel free to check how firm your steak feels—it should be slightly springy but still tender when pressed. This tactile cue is a great indicator that your meat is ready for its grand unveiling.
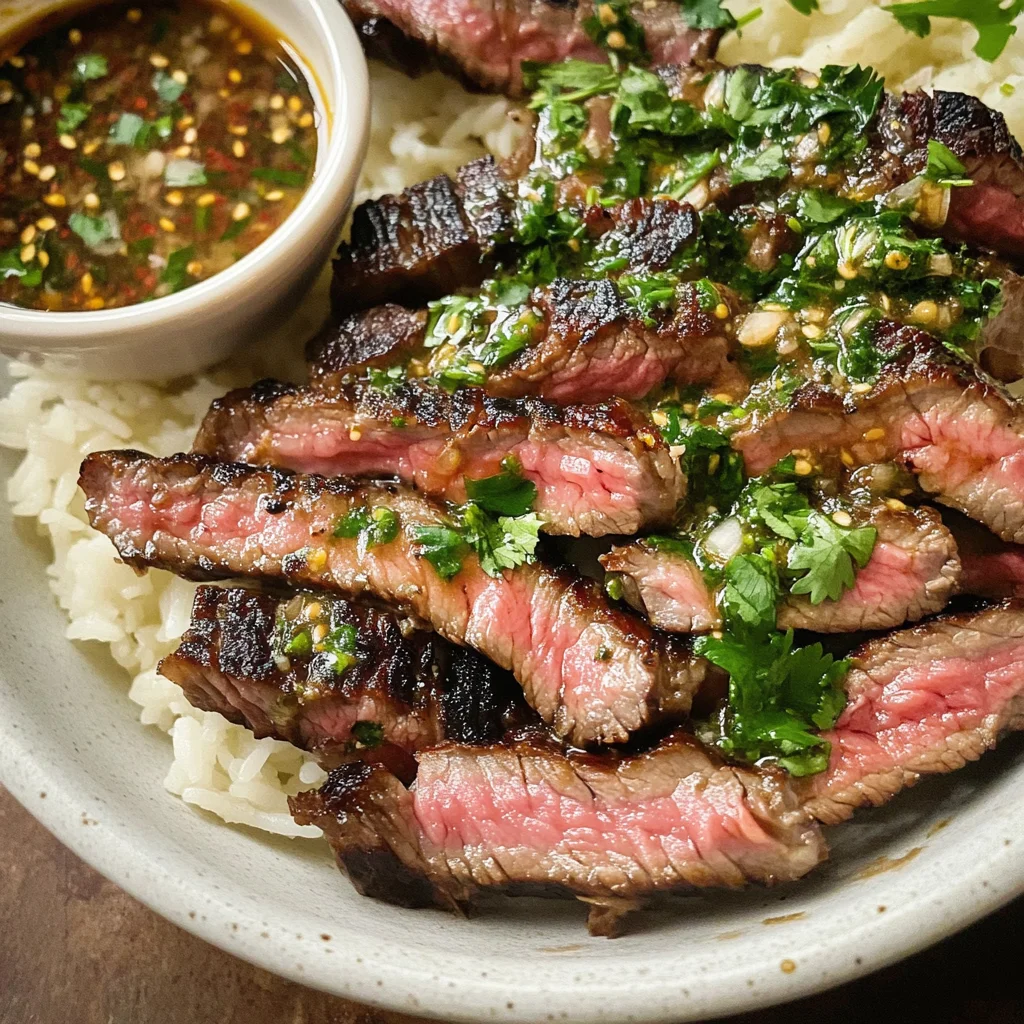
Step 7: Slicing Against the Grain
Now comes my favorite part—the slicing! It may seem simple, but there’s an art form to it that can make all the difference in texture and tenderness. To ensure each bite melts in your mouth, always slice against the grain of the meat. This means identifying which direction the muscle fibers run and cutting perpendicular to them. If you’re unsure, look closely—the grains typically appear as lines running through the steak.
Using a sharp knife will make this process smoother; aim for thin strips about half an inch thick for optimal tenderness and ease of dipping into that divine sauce we’ve prepared earlier. As you slice, notice how beautiful and juicy each piece looks—this visual cue reflects all the care you’ve put into cooking and resting these steaks perfectly! And remember, this isn’t just about presentation—it also affects how easy they are to chew and enjoy later on!
Step 8: Assembly Time – Bringing It All Together
With our glorious slices ready, we’re almost at the finish line! Now it’s time to bring everything together with style—you want each ingredient on display like a masterpiece at a gallery opening. Grab a large serving platter (or individual plates if you prefer) and arrange your sliced beef artistically; allow those glistening pieces to shine! Next up is our sweet and tangy dipping sauce—a true star in this dish.
Pour or ladle some of that beautifully crafted tamarind sauce into a small bowl nestled beside or atop your beef slices. Visually contrasting against the rich brown-red color of the beef, it adds vibrancy while promising an explosion of flavor with every dip. Sprinkle some fresh cilantro on top—not only does it add a pop of color but also offers a hint of freshness that cuts through all that richness beautifully.
Finally, serve immediately while everything is still warm—a plate full of joy awaits you! As everyone gathers around the table eagerly anticipating their first bites, take a moment yourself to appreciate what you’ve created; it’s not just dinner—it’s an experience filled with love and connection shared over food.
As you dive into this Quick & Easy Crying Tiger Beef recipe with family or friends, remember: cooking isn’t just about feeding bodies but nourishing souls too. Enjoy every bite!
Storage and Enjoyment Tips for Your Quick & Easy Crying Tiger Beef
Oh, my friends, the moment we’ve all been waiting for is finally here! The tantalizing aroma of your Quick & Easy Crying Tiger Beef fills your kitchen, beckoning you to gather around the table and dive into this flavor-packed dish. But what happens when you have a bit left over? Fear not! This recipe not only dazzles at the dinner table but also holds its own in leftovers. Let’s talk about how to keep that deliciousness going!
Storing Leftover Quick & Easy Crying Tiger Beef
When it comes to storing those delightful leftover strips of steak, I recommend using an airtight container — glass or BPA-free plastic works wonders. Place your beautifully sliced beef inside and tuck it away in the fridge where it will stay fresh for up to three days. To ensure maximum tenderness and flavor, consider placing a slice of bread in the container before sealing; this little trick absorbs moisture and helps maintain that juicy texture. Trust me on this one! After storage, you’ll find that while the flavors may mellow slightly, the delectable essence of that dipping sauce still sings with every bite. When you’re ready to enjoy again, simply reheat the beef gently in a skillet over medium heat or pop it in the microwave for a quick warm-up; just be careful not to overdo it so it doesn’t dry out.
Freezing Components for Later
If you find yourself with more than enough Quick & Easy Crying Tiger Beef to savor, or if you want to prep ahead for busy nights, freezing is an excellent option! To freeze properly, wrap your beef tightly in plastic wrap or aluminum foil before placing it into a freezer-safe bag or container. This way, you can keep your precious dish frozen for up to three months without losing its charming flavors. When you’re ready to indulge again, simply thaw overnight in the refrigerator and reheat as described above. This method allows you to enjoy a gourmet meal any night of the week without needing extensive prep time — how convenient is that? I can already picture you pulling out that vibrant package from your freezer on a busy weekday evening and feeling like a culinary superstar as you whip up magic in just minutes!
Quick & Easy Crying Tiger Beef

Embark on a culinary adventure with Quick & Easy Crying Tiger Beef, a dish that brings the bold and vibrant flavors of Thai cuisine right to your dinner table in just 30 minutes. This recipe features juicy strips of ribeye steak marinated in a harmonious blend of spices, served alongside an irresistible sweet and spicy dipping sauce. Perfect for busy weeknights or impressing guests, this dish captures the essence of comfort food while offering an exciting burst of flavor in every bite. With simple ingredients and straightforward instructions, you’ll create a meal that’s not only satisfying but also incredibly rewarding.
- Prep Time: 15 minutes
- Cook Time: 15 minutes
- Total Time: 30 minutes
- Yield: Serves approximately four people 1x
- Category: Main
- Method: Frying
- Cuisine: Thai
Ingredients
- 1 lb ribeye steak (or sirloin/striploin)
- 2 tsp vegetable oil
- 1 tbsp vegetarian stir-fry sauce
- 1 tbsp palm sugar (or brown sugar)
- 1 tbsp fresh lime juice
- 1 tbsp soy sauce
- 2 tsp minced garlic
- 1 tbsp tamarind pulp
- 3 tbsp hot boiling water
- 1 tsp uncooked glutinous rice (toasted)
- 1 tbsp shallots (finely diced)
- 1 tbsp cilantro (finely chopped)
- 1 tbsp fish sauce (or vegan alternative)
- 1/2 tsp Thai chili flakes
Instructions
- In a large bowl, mix the vegetarian stir-fry sauce, palm sugar, lime juice, soy sauce, minced garlic, and vegetable oil until well combined. Add the steak strips, ensuring they are coated evenly. Let marinate for at least 15 minutes.
- In a bowl, dissolve tamarind pulp in hot boiling water until smooth. Strain through a fine sieve to remove any solids.
- In a heavy-bottomed skillet over medium heat, toast uncooked glutinous rice until golden brown and fragrant. Grind into a fine powder using a mortar and pestle or spice grinder.
- Combine tamarind paste, rice powder, shallots, cilantro, fish sauce, lime juice, and chili flakes in a small bowl.
- Heat vegetable oil in a skillet over medium-high heat. Add marinated steaks in batches without overcrowding the pan. Sear for about 3-4 minutes on each side for medium-rare.
- Remove from heat and let rest for at least 10 minutes before slicing against the grain into thin strips.
- Arrange sliced beef on a platter with dipping sauce on the side.
Nutrition
- Serving Size: About 4 oz (113g) beef with dipping sauce
- Calories: 350
- Sugar: 6g
- Sodium: 800mg
- Fat: 20g
- Saturated Fat: 8g
- Unsaturated Fat: 10g
- Trans Fat: 0g
- Carbohydrates: 16g
- Fiber: 1g
- Protein: 30g
- Cholesterol: 80mg