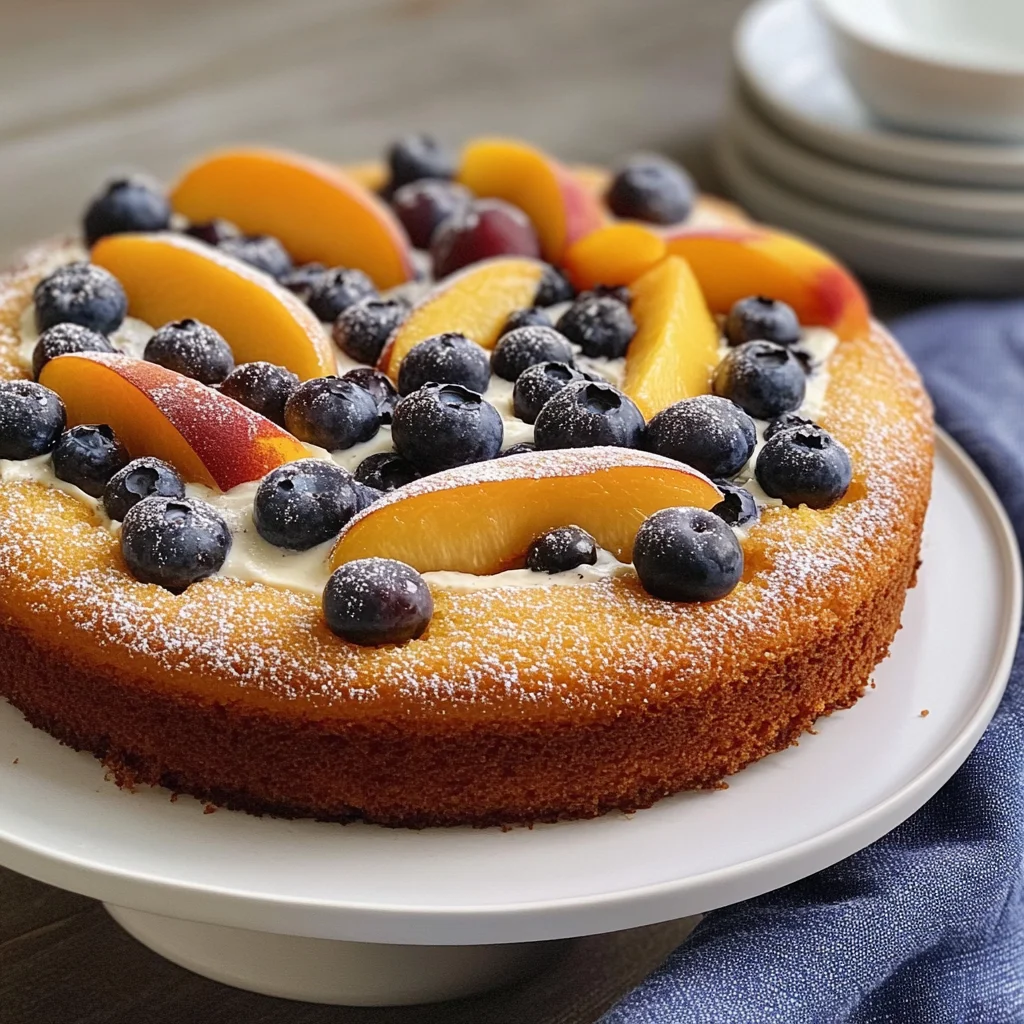
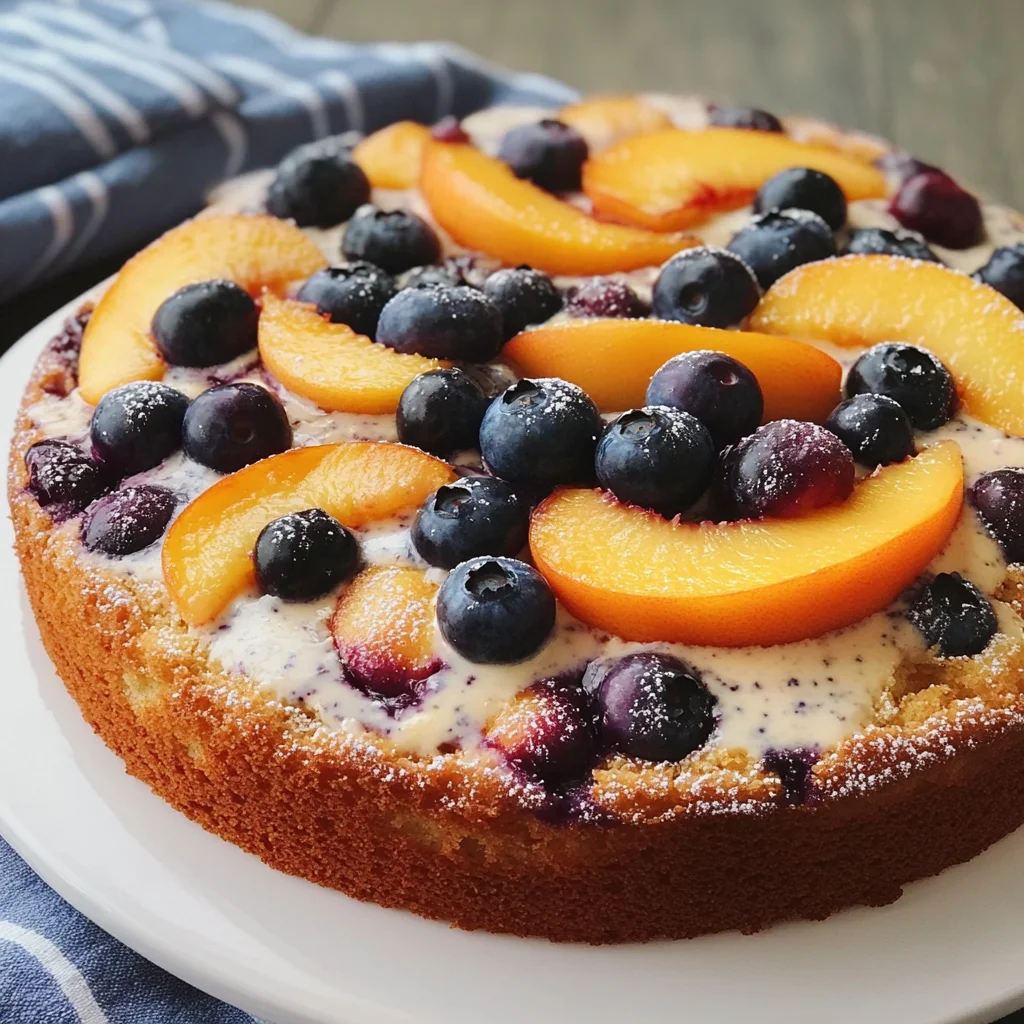
Peach and Blueberry Greek Yogurt Cake
There’s something truly magical about baking—a simple act that transforms humble ingredients into something extraordinary. When I think of my favorite recipes, this Peach and Blueberry Greek Yogurt Cake always comes to mind, evoking memories of sun-drenched afternoons spent in the kitchen. The scent of ripe peaches mingling with juicy blueberries fills the air, creating a warm embrace that welcomes everyone into your home. This isn’t just a cake; it’s a celebration of summer’s bounty, a sweet reminder that life is best enjoyed when shared with friends and family. Each slice reveals a delightful balance of flavors and textures, where tangy yogurt meets the sweetness of fresh fruit, creating an experience that’s both profoundly satisfying and utterly comforting.
What makes this Peach and Blueberry Greek Yogurt Cake even more special is how it bridges tradition with innovation. Using Greek yogurt not only enhances the cake’s moisture but also adds a delightful tang that elevates each bite. It’s fascinating to think about how recipes evolve over time—this particular one is like a cherished heirloom, adapted to fit modern tastes while retaining its roots. Whether you’re serving it for dessert after a casual dinner or enjoying it as an afternoon snack with a cup of tea, this cake perfectly captures the essence of those languid summer days filled with laughter and love.
Peach and Blueberry Greek Yogurt Cake: A Slice of Summer Bliss
Now that I’ve set the stage for this delightful treat, let’s dive into the preparation! This recipe is so straightforward that you’ll find yourself whipping it up on repeat—trust me on this one! With just a handful of ingredients, you’ll create a cake that not only looks stunning but tastes even better. So, gather your supplies, roll up your sleeves, and let’s embark on this culinary journey together!
Ingredients:
As we prepare to make this incredible Peach and Blueberry Greek Yogurt Cake, let’s take a moment to appreciate each ingredient that plays such an essential role in our delicious creation.
- 1 1/2 cups all-purpose flour: This staple ingredient forms the robust foundation of our cake. When choosing flour, look for high-quality all-purpose flour that has been finely milled; this ensures lightness in texture while providing enough structure to hold everything together beautifully. Sifting it before use is non-negotiable—it aerates the flour and helps prevent clumps from forming later in our batter.
- 1 teaspoon baking powder: This leavening agent works wonders by creating tiny bubbles of carbon dioxide when heated, which makes our cake rise! It’s crucial for achieving that airy texture we desire. Make sure to check the expiration date on your baking powder; old or expired leavening agents won’t provide the lift we need.
- 1/2 teaspoon baking soda: Often paired with acidic ingredients like yogurt, baking soda acts as another leavening agent that contributes to our cake’s rise while also helping balance flavors. It’s important to measure accurately here—too much can give an off taste while too little won’t provide enough lift.
- 4 oz butter (softened): The role of butter in baking cannot be overstated! It adds richness and flavor while contributing to our cake’s tender crumb. Softening the butter allows for better incorporation into the sugar during creaming—this process is vital for incorporating air into our batter, resulting in a fluffy texture. If you forget to soften it beforehand, you can cut it into small cubes and microwave it briefly (about 10 seconds) until just soft but not melted.
- 1 cup sugar: You might be surprised at how much sugar impacts not only sweetness but also moisture retention in baked goods. For this recipe, granulated sugar works perfectly; it dissolves easily during mixing and creates that beautiful golden crust as it bakes. Remember to use fresh sugar; old sugar can harden or lose its sweetness!
- 2 eggs: Eggs are essential for binding ingredients together while also providing moisture and richness. They help create structure within the cake while contributing to its overall flavor profile. Always use room-temperature eggs for optimal blending—cold eggs can cause the batter to seize up!
- 1/2 teaspoon vanilla: Vanilla extract adds depth and warmth to our cake’s flavor profile—it’s like adding a hug in liquid form! Opt for pure vanilla extract whenever possible; synthetic varieties simply do not compare in terms of flavor complexity.
- 1/2 cup Greek yogurt (low-fat): Here’s where we bring in the star player! Greek yogurt not only keeps our cake moist but also infuses it with protein and tanginess that pairs beautifully with sweet fruits like peaches and blueberries. I recommend using full-fat or low-fat versions rather than non-fat because they contribute creaminess without compromising flavor.
- 2 peaches (sliced into wedges): Fresh peaches are simply divine in this recipe—they add juiciness alongside their sweet-tart flavor profile that complements blueberries beautifully! When selecting peaches at your local market, look for ones that are slightly soft yet firm; they should yield gently when pressed but not be overly mushy.
- 6 oz blueberries: These little gems burst with juice when bitten into—they’re nature’s candy! Their sweetness balances out any tartness from the yogurt or peaches perfectly. Fresh blueberries are fantastic here; however, if you opt for frozen ones in off-seasons, just ensure they’re thawed completely before tossing them into your batter.
- 1 teaspoon granulated sugar: A light sprinkle over our fruit before baking caramelizes slightly during cooking, enhancing their natural sweetness while creating an aesthetically pleasing topping atop our cake!
Equipment You’ll Need:
Having the right tools at your disposal makes all the difference between a smooth cooking experience and one fraught with frustration! Think of these pieces as essential partners in bringing our Peach and Blueberry Greek Yogurt Cake to life.
- 9×3-inch springform pan: This versatile tool is perfect for cakes like ours because it allows us easy access when removing delicate bakes without damaging them. The removable bottom means you can release your masterpiece without worry about flipping or sliding—just make sure it’s well-greased!
- Mixing bowls: A good set of mixing bowls will make your life easier by keeping things organized as you combine ingredients at different stages. I prefer glass or stainless steel bowls because they’re durable and easy to clean.
- Electric mixer: While you can certainly mix by hand if you’re feeling particularly ambitious (or wish for some arm workout), an electric mixer saves time and energy while ensuring everything blends seamlessly together—especially crucial during the creaming process!
- Sifter: This handy tool isn’t just for sifting flour—it helps aerate dry ingredients before they enter your batter mixture too! A fine-mesh sieve works beautifully here if you don’t have an actual sifter on hand.
Now that we have gathered everything we need—the ingredients laid out invitingly before us and our tools ready—it’s time to dive into preparing our incredible Peach and Blueberry Greek Yogurt Cake!
Step 1: Setting Up Your Canvas
Before diving headfirst into mixing those lovely ingredients together, let’s ensure everything is prepped correctly—you want no surprises once you start pouring batter! Preheat your oven to 350°F (that sweet spot where magic happens), placing an oven rack right in the middle where heat circulates evenly around your cake throughout baking time.
Next comes greasing your springform pan generously with butter or cooking spray—this step is crucial because no one wants their creation stuck stubbornly inside after all that effort! Follow up by lining just the bottom with parchment paper which gives added insurance against sticking—or if using a round pan instead make sure it’s greased thoroughly too!
Step 2: Weighing & Mixing Dry Ingredients
In one medium bowl sift together 1 ½ cups all-purpose flour along with 1 teaspoon baking powder plus ½ teaspoon baking soda until combined well—a gentle breeze wafts through my kitchen every time I sift flour like this…and trust me—the result is so worth taking those extra moments! These dry ingredients work as allies throughout bake time ensuring everything rises appropriately while giving us fantastic structure too!
Step 3: Creaming Butter & Sugar
Now onto my favorite part—the creaming process! In another bowl (preferably large enough so things don’t get messy), beat together softened butter (4 oz) alongside granulated sugar (1 cup) until pale yellow fluffiness radiates from within about two-three minutes at high speed should do nicely here! This critical step invites air bubbles into our mixture which will help create lift later on—don’t rush through this; take pleasure watching transformation happen right before your eyes!
After achieving lightness switch gears slightly dropping mixer speed down low then introduce eggs (two) followed by half teaspoon vanilla extract plus creamy low-fat Greek yogurt—we want thorough blending here without losing all those magnificent air pockets built earlier so keep things gentle yet steady across next minute or so…you’ll notice mixture becoming incredibly silky smooth almost tempting enough just scoop straight out bowl!
Step 4: Marrying Dry & Wet Ingredients
Now comes uniting each component harmoniously together by adding those sifted dry ingredients from earlier gradually mixing until just combined—it’s absolutely paramount not overmixing here since doing so risks toughening up what could otherwise turn out delightfully tender crumbed goodness…so employ patience instead allowing flavors mingle as they marry gently under low speed till no more dry streaks remain visible within batter…the anticipation builds now doesn’t it?
With these initial steps completed successfully we’re inching closer towards enjoying every delicious morsel from this enchanting dessert soon enough—I promise you won’t regret diving headfirst into such blissful culinary delights ahead!
Stay tuned as we progress further through crafting every aspect involved completing this tantalizing masterpiece ahead…
Continuing the Journey: Crafting Your Peach and Blueberry Greek Yogurt Cake
Ah, we’re getting closer to that moment when this Peach and Blueberry Greek Yogurt Cake transforms from a simple batter into a culinary masterpiece! Each step is infused with love and care, and it’s crucial to embrace each one fully. I can practically smell those delightful aromas wafting through the air already, can’t you? Let’s dive deeper into the next steps of this delicious adventure.
Step 5: Combining for Creamy Perfection
Now that your butter, sugar, and eggs are beautifully fluffy—light as a cloud—you’re ready to introduce your Greek yogurt and vanilla into the mix. Trust me on this: adding these ingredients will not only elevate the flavor profile but also enhance the cake’s moistness. As you beat in the yogurt, take a moment to appreciate how it adds a tangy richness that balances perfectly with the sweetness of the sugar. You’ll want to continue mixing until everything is combined into a luscious batter, about one more minute. This is absolutely paramount because the thorough incorporation of these elements ensures an even texture throughout your cake.
Having successfully created this creamy foundation, it’s time to bring in our dry ingredients! Gently sift together your flour, baking powder, and baking soda in a separate bowl—this technique aerates the flour and helps create that lightness we’re after. When you fold this mixture into your wet ingredients using low mixer speed or even by hand with a spatula, be careful not to overmix; we’re aiming for just combined here. Overmixing can develop gluten too much, leading to a denser cake than we desire. Picture instead a soft crumb that melts in your mouth—this is what we want!
Step 6: The Art of Arranging
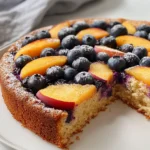
With your batter ready and begging to be poured into the springform pan, let’s talk about presentation because we eat with our eyes first! Carefully transfer your batter to the prepared pan; it should glide smoothly as you spread it evenly across the bottom. Now comes one of my favorite parts: adorning your cake with those gorgeous peach slices and blueberries. Layer those succulent peach wedges artistically on top of your batter—they’ll caramelize beautifully as they bake—and scatter those vibrant blueberries in between for pops of color and flavor.
Sprinkling them with granulated sugar isn’t just for aesthetics; this step will create an utterly intoxicating caramelized crust as they bake! It enhances their natural sweetness while providing a slight crunch on top—trust me on this little trick; it’s non-negotiable if you want every bite to be extraordinary! Once adorned, take a moment to admire your creation before sliding it into the oven.
Step 7: The Baking Process – Patience is Key!
Now let’s talk about what happens inside that oven as our cake bakes to perfection! Set your timer for about an hour but don’t walk away just yet—this is where your senses come alive! As it bakes at 350°F, you’ll start smelling an intoxicating blend of peach and blueberry enveloping your kitchen—a sure sign that something magical is happening. The edges will begin turning golden brown, while the center should rise gently without cracking.
To check for doneness without ruining all that lovely work you’ve done, use a toothpick or a cake tester inserted in the center; it should come out clean or with only a few moist crumbs clinging to it. If you find any batter stuck to your tester, don’t fret—just give it another few minutes in the oven; remember each oven has its quirks! If you’re feeling fancy (and I know you are!), consider adding some extra peach slices and blueberries halfway through baking for not just taste but visual appeal too—because let’s be honest, we eat with our eyes first!
Step 8: Cooling Down – The Crucial Rest
Once baked to golden perfection (and oh my goodness does it look divine!), resist that urge to dive right in. This cooling phase is crucial—it allows flavors to settle while helping firm up the structure of your cake so it doesn’t crumble apart when you slice into it later. Place your cake on a wire rack (still in its pan) for about 40 minutes. This is such an important moment; patience here will reward you later when you unveil those perfect slices!
After this waiting period, carefully release the sides of the springform pan—you might want to do this slowly so as not to disturb all that lovely fruit topping you’ve arranged so beautifully. If all goes well (and I have faith!), you can slide your hand under the cake via parchment paper’s edge and gently transfer it onto a serving plate without any fuss! If you’re using a round cake pan instead of springform, allow yourself about 10 more minutes before attempting inversion onto a plate.
Conclusion:
As we wrap up this delightful journey of creating your Peach and Blueberry Greek Yogurt Cake, I can’t help but feel excited for you! From the moment you took your first whisk to the final golden-brown bake, this recipe has been nothing short of extraordinary—not just because of its stunning layers of flavor but also because of how it brings people together around the table. The sweet juiciness of ripe peaches combined with bursts of tangy blueberries creates an irresistible symphony that captivates anyone who takes a bite. Let’s not forget about the moist texture contributed by our star ingredient—the Greek yogurt—which elevates this cake beyond any ordinary dessert.
So why should you make this cake? Well, it’s not just about taste; it’s about creating memories in your kitchen that linger long after the last crumb has been devoured. Whether you’re celebrating a special occasion or simply treating yourself on a Wednesday afternoon, there’s something undeniably joyful about pulling this cake from the oven, watching friends’ eyes light up as they catch that intoxicating aroma wafting through the air. Trust me when I say it becomes more than just dessert; it transforms into an experience—a moment filled with laughter as everyone shares their favorite bites.
Imagine savoring one slice alongside a steaming cup of tea on a cozy afternoon or serving it at gatherings where laughter fills the room; think about how each bite pairs beautifully with dollops of whipped coconut cream or even drizzles of honey for an extra touch of sweetness. For an afternoon pick-me-up with friends, why not serve slivers alongside fresh fruit platters? And if you’re feeling truly indulgent, consider pairing it with vanilla ice cream—because let’s face it; ice cream makes everything better!
Feeling adventurous? This recipe is wonderfully adaptable! You could swap out peaches for nectarines when they’re in season or experiment with other berries like raspberries or blackberries for unique flavor combinations that will leave everyone guessing what magical ingredients you’ve conjured up! Imagine adding lemon zest for brightness or folding in crunchy nuts for added texture—each variation opens up new possibilities waiting to be explored! So don’t hesitate—dive into this recipe, savor every moment spent creating it, share it with loved ones, and let me know how your adventures unfold. Happy baking!
Peach and Blueberry Greek Yogurt Cake
Enjoy a moist Peach and Blueberry Greek Yogurt Cake that’s bursting with flavor! Perfect for any occasion—try this easy recipe today!
- Prep Time: 15 minutes
- Cook Time: 60 minutes
- Total Time: 1 hour 15 minutes
- Yield: Approximately 12 servings 1x
- Category: Dessert
- Method: Baking
- Cuisine: American
Ingredients
- 1 1/2 cups all-purpose flour
- 1 teaspoon baking powder
- 1/2 teaspoon baking soda
- 4 oz softened butter
- 1 cup granulated sugar
- 2 eggs
- 1/2 teaspoon vanilla extract
- 1/2 cup low-fat Greek yogurt
- 2 ripe peaches, sliced
- 6 oz blueberries
- 1 teaspoon granulated sugar (for topping)
Instructions
- Preheat your oven to 350°F (175°C) and grease a 9-inch springform pan.
- In one bowl, sift together flour, baking powder, and baking soda; set aside.
- In another bowl, cream softened butter and sugar until light and fluffy. Beat in eggs, vanilla extract, and Greek yogurt until smooth.
- Gradually add the dry ingredients to the wet mixture until just combined—do not overmix.
- Pour the batter into the prepared pan and arrange peach slices and blueberries on top. Sprinkle with extra sugar.
- Bake for about 50-60 minutes or until a toothpick inserted comes out clean.
- Allow cooling before removing from the pan and serving.
Nutrition
- Serving Size: 1 slice (80g)
- Calories: 178
- Sugar: 14g
- Sodium: 144mg
- Fat: 7g
- Saturated Fat: 4g
- Unsaturated Fat: 3g
- Trans Fat: 0g
- Carbohydrates: 25g
- Fiber: 1g
- Protein: 3g
- Cholesterol: 40mg