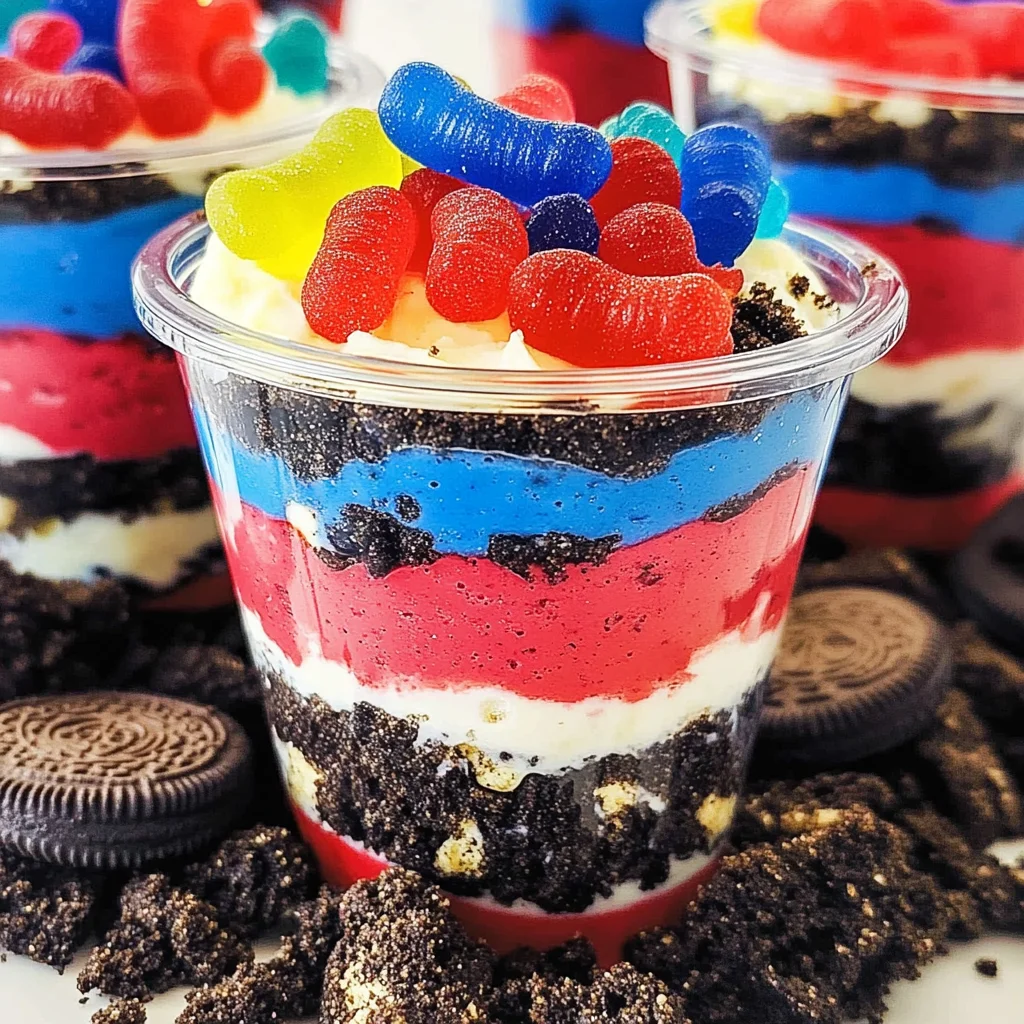
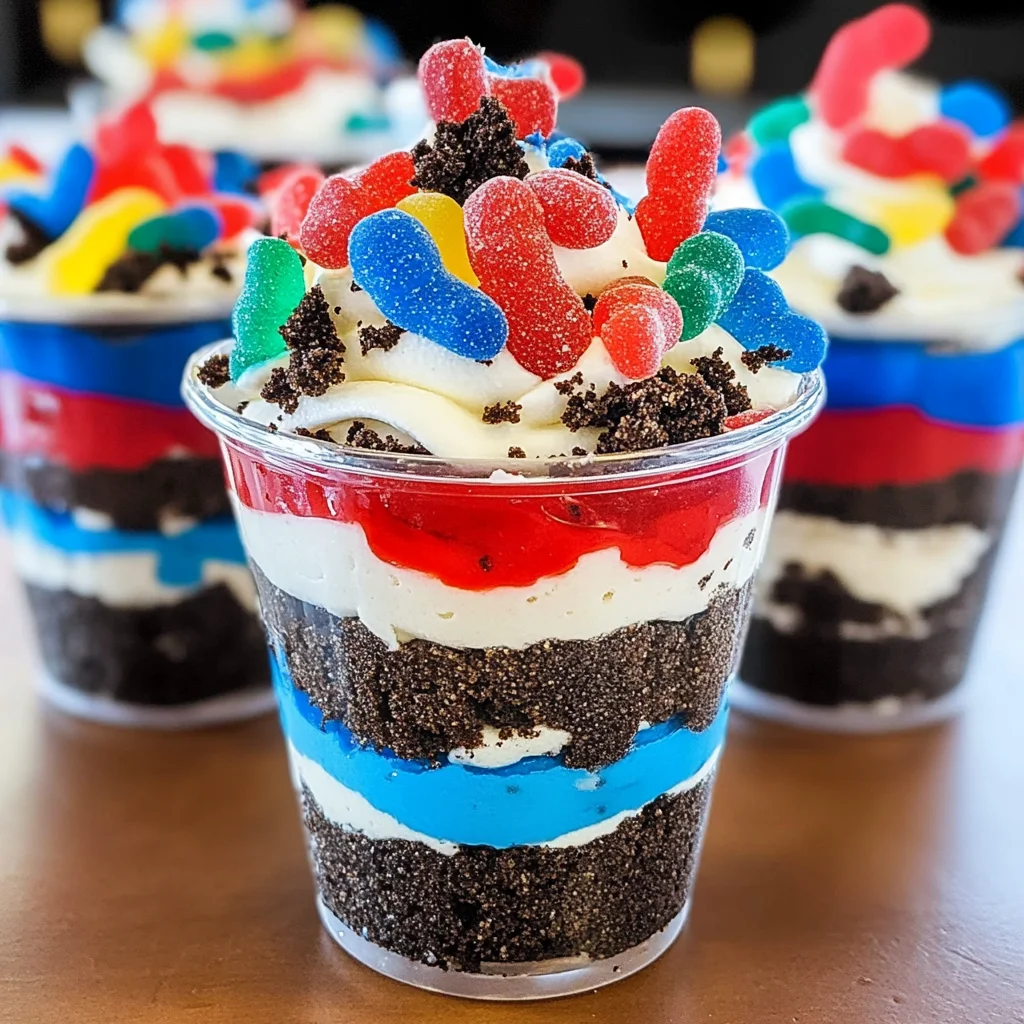
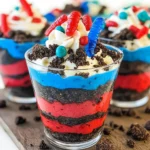
Red, White and Blue Dirt Cups
There’s something utterly magical about gathering around a table filled with desserts that not only look stunning but also taste divine. It’s as if the vibrant colors and delightful textures whisper stories of summer celebrations, laughter, and love. And when it comes to festive occasions like the 4th of July, my heart races with excitement at the thought of creating something truly special — like these Red, White and Blue Dirt Cups. Imagine layers of creamy cheesecake pudding cradled between crunchy crushed Oreos, topped with vibrant pectin-based gummy candies that evoke the colors of our flag. Each spoonful is an experience, a little celebration nestled in a cup that brings joy not just to the palate but to the spirit.
This recipe is more than just a dessert; it embodies summer’s spirit and the joy of sharing sweet moments with friends and family. The beauty of these Red, White and Blue Dirt Cups lies in their simplicity — they require no baking, just a bit of mixing and layering. Trust me on this: once you serve these delightful treats at your gathering, they’ll become a beloved staple for years to come. Watching your loved ones dig into these cups, their eyes lighting up with delight at each colorful layer, is a sight you won’t soon forget.
Ingredients:
As we embark on this culinary journey to create our dazzling Red, White and Blue Dirt Cups, let’s explore each ingredient in detail. Each plays a vital role in crafting this perfect summer dessert that will have everyone clamoring for seconds.
- 2 boxes (3.4 ounces each) cheesecake pudding. This is where the magic begins! Cheesecake pudding brings a rich, creamy texture that perfectly mimics the indulgent taste of cheesecake without all the fuss of baking. When you mix it with milk, it thickens beautifully into a luscious filling that’s both satisfying and utterly delicious. Be sure to choose high-quality instant pudding; it’s important for achieving that velvety consistency we’re aiming for!
- 4 cups milk. This ingredient acts as the lifeblood of our pudding mixture. The milk hydrates the dry pudding mix and transforms it into that divine creaminess we all crave. Whole milk will give you a richer flavor and creamier texture; however, if you’re looking for lighter options or are lactose intolerant, almond or oat milk can be fantastic alternatives! Just remember, whatever milk you choose should be cold for optimal results.
- 19 Oreo cookies (crushed). Ah, Oreos! These beloved cookies provide not just crunch but also an iconic chocolate flavor that perfectly balances the sweetness of our pudding layers. Crushing them creates a delightful contrast in texture against the smooth pudding – it’s like biting into nostalgia itself! For those looking for gluten-free options, there are gluten-free sandwich cookies available that will work splendidly here too.
- ¼ teaspoon red gel food dye. This gel food dye is crucial for achieving that vibrant red hue that makes our dessert visually stunning! Unlike liquid food coloring which can dilute our pudding mixture, gel dye gives us brilliant color without compromising texture or flavor. Use sparingly — a little goes a long way!
- ¼ teaspoon blue gel food dye. Just like its red counterpart, blue gel food dye ensures that our dessert celebrates Independence Day in style! It’s non-negotiable when it comes to creating those striking layers we all adore in this festive treat.
- 8 red and blue pectin-based gummy candies. These little gems are not just decorative; they add pops of chewy fun atop each cup! Opting for pectin-based candies means we’re keeping things free from animal-derived gelatin while still enjoying those classic gummy textures we love so much.
Equipment You’ll Need:
Having the right tools in your kitchen can make all the difference between chaos and culinary bliss! As we dive into creating these delightful dirt cups, let’s ensure we have everything we need to make this process smooth and enjoyable.
- Large mixing bowl – A sturdy large mixing bowl is essential for combining our pudding ingredients without any splashing or messes along the way! Opt for one that’s easy to grip; this makes whisking together your pudding mixture much simpler.
- Whisk – An essential tool in any kitchen! A good whisk allows you to blend ingredients smoothly together without lumps — particularly important when preparing our cheesecake pudding mixture. If you don’t have one on hand, a fork can work in a pinch!
- Plastic cups – These are your canvas! Whether you opt for clear plastic cups or colorful ones adds an element of fun; I love seeing those beautiful layers shine through! Choose sizes according to your preference; smaller cups can create adorable mini versions perfect for kids.
- Tablespoon & measuring spoons – Precision matters when layering your ingredients! Having these tools handy ensures each layer looks beautiful and uniform – trust me; your guests will appreciate it!
Now that we’ve gathered our ingredients and tools let’s dive into preparing our marvelous Red, White and Blue Dirt Cups!
Step 1: Whisking Up Creamy Goodness
First off, grab that large mixing bowl we talked about earlier and place both boxes of cheesecake pudding inside it. Next comes one of my favorite parts—pouring in those four cups of cold milk! As you whisk away with enthusiasm (and maybe even some music playing softly in the background), you’ll watch as those two simple components come together to form something magical: thickening creamy goodness reminiscent of classic cheesecakes without any oven time required! Don’t rush this step; take your time whisking until everything is fully combined — about two minutes should do — until it’s smooth with no lumps remaining.
Step 2: Dividing Delight
Once you’ve achieved that luscious texture (and oh boy, does it smell heavenly!), it’s time to separate our pudding into two bowls — one holding one cup and another holding one-and-a-half cups worth of creamy goodness (yes folks, divide like you’re sharing secrets!). Why do we do this? Well, we’re preparing ourselves for some colorful layers later on — think reds and blues reminiscent of fireworks lighting up the night sky!
Step 3: Adding Color
Now comes the fun part: adding color! To your bowl containing one cup of pudding, carefully add ¼ teaspoon of blue gel food dye — I know it seems small but trust me on this one; it’ll pack quite a punch once mixed thoroughly together until fully incorporated into every nook and cranny! The transformation is spectacular; watch as your once plain white pudding turns into an eye-catching shade worthy of any summer celebration.
Step 4: The Red Layer Comes Alive
With your blue layer complete (and perhaps even licked from fingers!), let’s dive into adding life to our larger bowl containing one-and-a-half cups worth by introducing another splash — this time with ¼ teaspoon red gel food dye! Stir gently yet confidently until every bit has taken on that rich crimson color akin to fresh strawberries under warm sun rays—absolutely stunning!
Stay tuned as we’ll continue building upon these steps shortly…
Crafting the Layers of Flavor
Step 5: Building the Foundation
Now that we have our colorful puddings ready, it’s time to create the very foundation of our Red, White and Blue Dirt Cups. Grab those clear plastic cups and line them up on your counter; trust me, this is where the magic happens! Start with one tablespoon of crushed Oreos at the bottom of each cup. This layer is not just about taste; it provides a delightful crunch that contrasts beautifully with the creamy pudding layers above. The crumbled cookies will soak up a little moisture from the pudding, creating a wonderfully cohesive texture. Make sure to spread them evenly across the bottom—this helps every bite be as satisfying as the last.
Once you’ve laid down that delicious Oreo base, it’s time to add our first layer of pudding. Measure out two tablespoons of blue pudding and gently pour it over the Oreos, using a spatula to delicately spread it out into an even layer. This step is crucial for both aesthetics and flavor—visible layers not only make for stunning presentation but also ensure you get that delightful burst of blueberry flavor in each spoonful. Don’t rush this step; take your time to create a smooth, even surface because it sets the stage for our next delightful layer.
Step 6: Layering More Crunch
Now we’re going back to our trusty container of crushed Oreos for another round! Add another tablespoon of crushed Oreos atop your blue pudding layer. This addition plays an essential role in enhancing texture—imagine biting into a creamy layer only to be greeted by that familiar Oreo crunch! Spread it evenly just like before so that every cup remains consistent and offers that beautiful visual contrast.
Next up, we’ll introduce our luscious white pudding layer. Scoop out three tablespoons of the creamy cheesecake pudding and let it cascade over the Oreo layer. Use your spatula once more to smooth it out to ensure an even distribution throughout each cup. The white pudding is rich and velvety, bringing a delightful creaminess to balance against both the sweetness of the Oreos below and the vibrant blue above. This layering process transforms simple ingredients into something truly extraordinary—not just visually but also in terms of taste!
Step 7: Adding More Layers
As we continue building our dessert masterpiece, we now want to add yet another tablespoon of crushed Oreos directly on top of that lovely white pudding layer you just created. This repeated layering is absolutely paramount—it creates a textural journey through each bite where you experience different flavors and sensations. It’s like taking a trip through summer itself! Each spoonful you take will remind you of playing outside under a bright blue sky with your favorite treats in hand.
Now comes another generous helping of white pudding; this time, measure out one and a half tablespoons before placing it on top. Again, use your spatula to spread this creamy goodness evenly across your cup. The layering technique here ensures that as you dig deeper into your Dirt Cup, you’ll find pockets of delightful surprise at every level—whether it’s an extra bit of crunch or sweetness waiting for you beneath those colorful layers.
Step 8: The Grand Finale with Red
We’ve reached one of my favorite moments—the grand finale! It’s time to complete our visual symphony by adding four tablespoons of red pudding on top. As you pour this vibrant mixture over your layered dessert, take a moment to appreciate how strikingly beautiful these colors are together—red, white, and blue! This is what makes these Dirt Cups so special; they’re not only delicious but also festive for any summer celebration or gathering.
Spread this red layer carefully over the white pudding below; this smooth finish will make all the difference when it comes time to dig into these treats later! What I love about this step is its transformative power—one moment you’re looking at simple layers, and then suddenly you’re met with an enticing display that’s bursting with patriotic spirit! As you work, watch how each color stands proudly against one another; it’s like painting with flavors on a canvas made from cookies and cream.
To cap off our delicious creation, let’s sprinkle two tablespoons of crushed Oreos on top as the finishing touch for some added crunch and visual appeal. It’s important not only for looks but also enhances flavor complexity as well—each bite should resonate with contrasting textures from crunchy cookie bits to smooth puddings.
Final Touches
Step 9: Dressing Up Your Dessert
Now that you’ve layered these decadently colorful puddings into their cups, it’s time for some final touches before serving them up! For each Dirt Cup, place two pectin-based gummy candies right on top along with a cute little flag if you’re feeling festive! These additions do more than just look adorable—they symbolize joy and celebration at every gathering while also providing extra bursts of fruit flavor as you enjoy each spoonful.
It’s such a simple step but having those bright gummies peeking out adds an inviting element that draws everyone in (and let’s be honest—who can resist gummy candies?). Now take a moment here before serving; if you can manage it, pop these beauties into the refrigerator for about 30 minutes! While enjoying immediately is absolutely fine (I won’t judge!), letting them chill allows all those layers to meld together harmoniously while ensuring that each spoonful remains cool and refreshing during hot summer days.
And there you have it—your Red, White and Blue Dirt Cups are ready to dazzle friends and family alike! These layered wonders are perfect for any summer celebration or simply as an indulgent treat worth celebrating any day (because why not?). Trust me when I say they’ll be gone in no time—and when they are, you’ll feel proud knowing you’ve created something utterly intoxicating filled with love in every single bite!
Storage and Enjoyment Tips for Your Red, White and Blue Dirt Cups
Now that your delightful Red, White and Blue Dirt Cups are made, it’s time to dive in and celebrate with this incredible dessert! The vibrant layers of creamy pudding and crunchy Oreos are just waiting to be enjoyed. But what if you have leftovers? Fear not! These cups store beautifully, allowing you to relish their flavors even after the party ends.
Storing Leftover Red, White and Blue Dirt Cups
To keep your Red, White and Blue Dirt Cups fresh and ready for another indulgent moment, I recommend placing them in airtight containers. This prevents any unwanted air from creeping in and keeps those luscious layers intact. If you’re using plastic cups, simply cover them tightly with plastic wrap or foil; it’ll do the trick just fine! These treats will last about 3-4 days in the refrigerator—just long enough for you to savor their deliciousness throughout the week. Trust me on this: letting them sit overnight allows the flavors to meld beautifully, creating a taste experience that’s almost more profound than when they’re first made. If you want to maintain that delightful crunch of the Oreos, consider placing a small slice of bread inside the container; it helps absorb excess moisture without compromising those precious layers of goodness. When you’re ready to enjoy again, simply pull one out of the fridge and dig right in!
Freezing Pudding for Later
If you find yourself with extra pudding or if you’re prepping for an upcoming gathering (because trust me, these will be a hit!), freezing is an excellent option. To freeze your Red, White and Blue Dirt Cups, start by ensuring they are well-sealed in freezer-safe containers or wrapped tightly with plastic wrap—this is crucial to prevent freezer burn. These gems can stay frozen for up to 2 months without losing any of their charm! When you’re ready to indulge again, just transfer them to the fridge a few hours ahead of time so they can thaw gently. The beauty of this method lies in its convenience; you can whip out these festive desserts for surprise visits or last-minute celebrations without any fuss. Just imagine pulling them out from the freezer on a hot summer day—the anticipation builds as you unveil these colorful delights!
Red, White and Blue Dirt Cups
Celebrate summer with delicious Red, White and Blue Dirt Cups—a fun no-bake treat perfect for any occasion! Try making them today!
- Prep Time: 20 minutes
- Cook Time: None
- Total Time: 0 hours
- Yield: Serves approximately 6 cups 1x
- Category: Dessert
- Method: No-Bake
- Cuisine: American
Ingredients
- 2 boxes (3.4 ounces each) cheesecake pudding
- 4 cups milk (whole, almond, or oat)
- 19 Oreo cookies, crushed
- ¼ teaspoon red gel food dye
- ¼ teaspoon blue gel food dye
- 8 red and blue pectin-based gummy candies
Instructions
- In a large mixing bowl, whisk together both boxes of cheesecake pudding with 4 cups of cold milk until smooth and thickened.
- Divide the pudding into two bowls: one with 1 cup and the other with 1.5 cups.
- Add blue gel food dye to the smaller bowl and mix until fully incorporated. Then, add red gel food dye to the larger bowl.
- In clear plastic cups, layer as follows: start with a tablespoon of crushed Oreos, followed by two tablespoons of blue pudding, another tablespoon of crushed Oreos, three tablespoons of white pudding, a tablespoon of crushed Oreos again, one and a half tablespoons of white pudding, four tablespoons of red pudding on top, and finish with crushed Oreos.
- Top each cup with two pectin-based gummy candies.
Nutrition
- Serving Size: 1 cup (200g)
- Calories: 280
- Sugar: 25g
- Sodium: 180mg
- Fat: 12g
- Saturated Fat: 6g
- Unsaturated Fat: 4g
- Trans Fat: 0g
- Carbohydrates: 42g
- Fiber: 2g
- Protein: 5g
- Cholesterol: 10mg