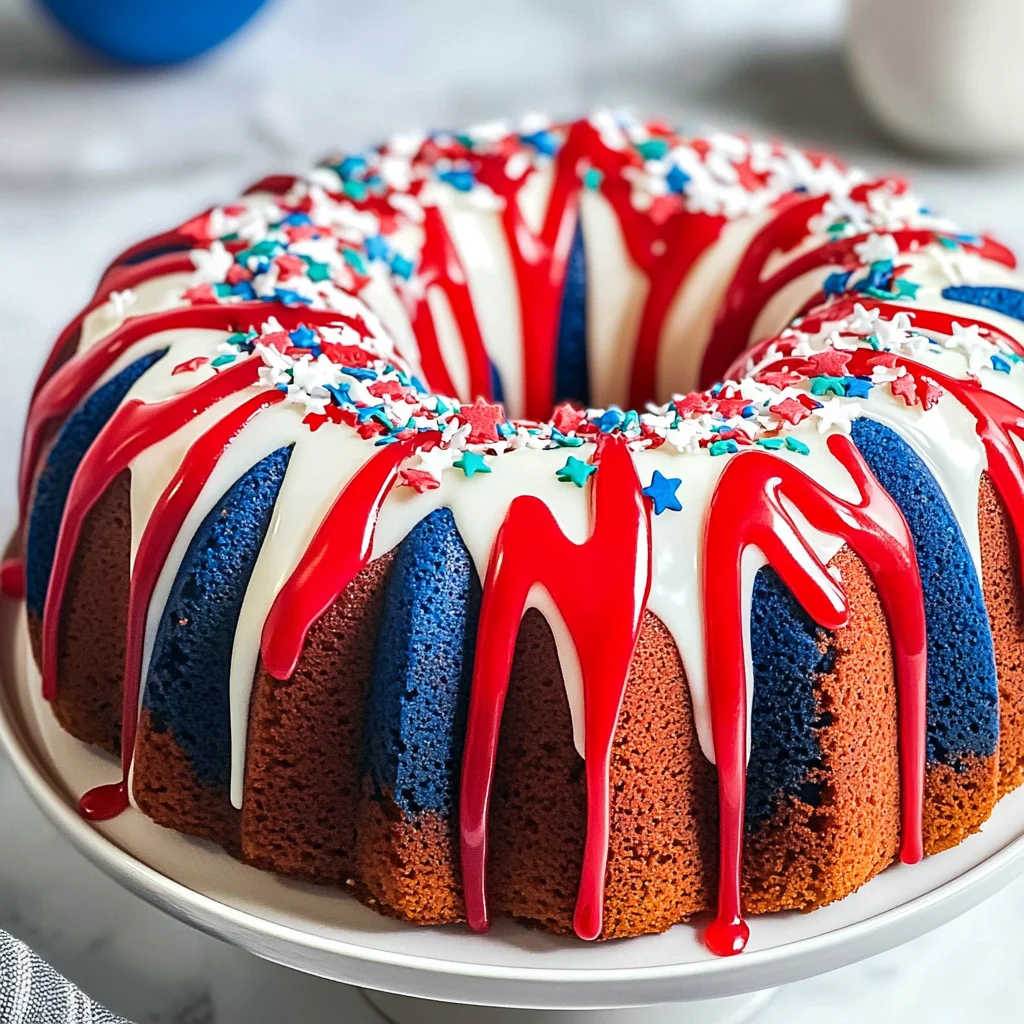
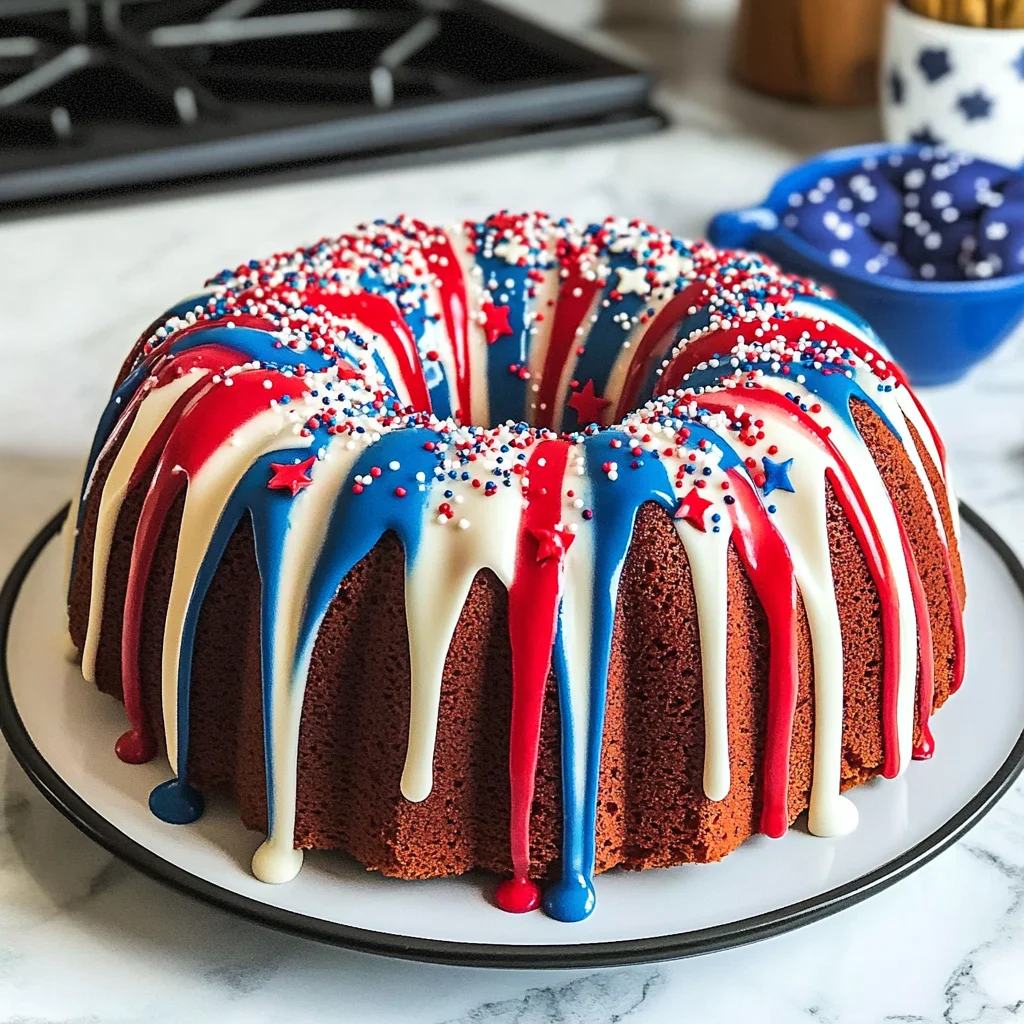
Patriotic Bundt Cake
There’s something extraordinary about baking that goes beyond merely following a recipe; it’s about creating memories, bridging generations, and infusing love into every bite. When I think of my favorite gatherings, the ones that truly bring family and friends together, I can’t help but picture the vibrant colors of the Patriotic Bundt Cake shining at the center of our table, its red, white, and blue layers celebrating not just a holiday but the very essence of togetherness. The way this cake emerges from the oven, its sweet aroma wafting through the kitchen, is an experience that fills me with warmth and nostalgia. Each slice is a celebration—moist, fluffy cake adorned with a creamy glaze and sparkling sprinkles that almost seem to dance in delight. Trust me when I say that this dessert is not just food; it’s a canvas for joy and connection.
As we approach festive occasions like the 4th of July or other summer celebrations, this Patriotic Bundt Cake transforms from a simple dessert into a heartfelt expression of patriotism and unity. Generations have gathered around tables laden with delicious treats to reminisce about past summers filled with laughter and stories passed down through time. This cake brings those moments back to life—its vibrant colors echoing the American flag while inviting everyone to share their own stories and traditions. It’s perfect for barbecues, picnics, or even as a centerpiece for your family gathering during any holiday. So don your aprons, roll up your sleeves, and let’s embark on this delightful baking journey together!
Patriotic Bundt Cake: A Celebration in Every Slice
The Patriotic Bundt Cake represents more than just an eye-catching dessert; it embodies celebration in its most delicious form! With its soft texture and sweet flavor profile enhanced by colorful layers, this cake makes every occasion feel special. Whether you’re hosting friends for an afternoon BBQ or simply looking to brighten up your family’s dinner table with something fun and festive, this cake is sure to create smiles all around. Plus, it’s surprisingly easy to make! So grab your ingredients and let’s dive into making something truly spectacular!
Ingredients:
Before we jump into the fun part of mixing and pouring batter, let’s talk about what we’ll need for our Patriotic Bundt Cake. Each ingredient plays a pivotal role in crafting that moist texture and delightful flavor you’re going to love.
- 1 cup (200g) white granulated sugar. Sugar isn’t just there to sweeten things up; it’s crucial for creating moisture in our cake as well as contributing to its tender crumb. Granulated sugar helps aerate the batter during creaming with butter which leads to a light texture—absolutely paramount! When selecting sugar, make sure it’s fresh because stale sugar can affect both taste and performance.
- 1/2 cup (113g) unsalted butter, softened to room temperature. This step is crucial for creaming properly and creating that lightness we crave in cakes. If your butter is too cold or melted, you won’t achieve the airy texture needed for our masterpiece! Look for high-quality butter with at least 80% fat content; European-style butter will elevate your cake richness.
- 2 large eggs, preferably at room temperature. These little wonders contribute moisture while also acting as binding agents within our batter. Room temperature eggs blend more easily into the mixture without cooling down your batter—this is key! If you forget to take them out ahead of time, simply place them in warm water for about ten minutes.
- 1 cup (240ml) whole milk. Milk adds moisture and helps create that delicate crumb we’re after while enhancing flavor depth too! Whole milk is best here due to its fat content which contributes creaminess; however, if you’re looking for alternatives like almond or oat milk—just ensure they are unsweetened versions so they don’t alter our flavor balance.
- 2 teaspoons vanilla extract. Ahh… vanilla—this aromatic essence adds complexity that elevates all other flavors present in our cake! Always choose pure vanilla extract over imitation if possible; it makes such a difference in taste!
- 2 cups (250g) all-purpose flour. Flour forms the structure of our bundt cake—it binds everything together! Be mindful when measuring; spoon flour into your measuring cup rather than scooping straight from the bag to avoid packing it down which could lead to dry results.
- 2 teaspoons baking powder—the magic leavening agent! This allows our cake to rise beautifully while also lending a soft texture. Always check expiration dates on your baking powder; old leavening agents can result in dense baked goods—which we definitely want to avoid.
- 1/4 teaspoon salt. Though small in quantity, salt enhances all flavors present in our cake while balancing sweetness perfectly—don’t skip it!
- 5-8 drops red gel food color & 5-8 drops blue gel food color provide that stunning patriotic appearance! Gel food coloring is ideal since it doesn’t alter batter consistency as liquid colors might do—plus you can control intensity better with less mess!
- 2 cups (240g) powdered sugar, used for icing later on—it gives us that silky smooth finish we’re after! Make sure it’s sifted before using so there are no lumps when combining with milk!
- 6-8 tablespoons milk, again for icing purposes; adjust based on desired consistency—a thicker icing will hold better while thinner one can drizzle beautifully over each slice.
- 1 teaspoon vanilla extract, because who doesn’t love more vanilla goodness?
- More gel food coloring as above ensures consistent vibrancy across layers when icing!
- Finally, don’t forget those cute little decorations: 2 tablespoons red, white and blue sprinkles, adding flair on top of each slice—the finishing touch that brings smiles all around!
Now that you have everything ready at hand let’s gather some tools before diving deep into our baking adventure!
Equipment You’ll Need:
Having the right tools transforms baking from a chore into pure joy—it makes everything smoother and more enjoyable! While these may not be ingredients themselves, they are essential partners in creating something wonderful together.
- Bundt pan – This iconic pan shapes our cake beautifully while allowing even heat distribution during baking; silicone pans are great for easy release but traditional metal ones offer crisp edges too! Just ensure whichever type you choose gets greased well beforehand so nothing sticks come serving time.
- Mixer (stand or hand-held) – Beating ingredients until fluffy takes effort by hand but having an electric mixer saves energy while yielding impressive results effortlessly! This tool excels at incorporating air into mixtures which leads us toward achieving light-textured cakes.
- Spatulas & Mixing Bowls – A set of sturdy spatulas will help scrape down batter sides effectively ensuring everything blends evenly—crucial when working with thicker mixtures like ours here! Multiple mixing bowls allow us space-efficiently divide colored batters later on too.
- Wire Cooling Rack – Once baked perfectly golden brown outside yet moist inside—we need somewhere safe where they can rest undisturbed post-baking! Cooling racks improve airflow around cakes preventing soggy bottoms helping maintain their lovely shape until served!
With these essentials gathered it’s time to get mixing up some magic—we’re almost there!
Preparing the Patriotic Bundt Cake
Step 1: Preheat Your Oven
First things first: preheat your oven to 350°F (175°C). Why is preheating so critical? Well, starting with an already warm oven allows your cake batter to rise properly as soon as it hits those hot surfaces—it sets off chemical reactions needed for lifting through steam creation quickly! While waiting patiently (which feels like forever!), let’s prepare our bundt pan by greasing it generously with non-stick spray or butter followed by dusting flour evenly across all surfaces inside; this ensures seamless removal after baking—a step I promise you’ll be grateful for later when presenting those gorgeous slices!
Step 2: Combine Dry Ingredients
In a medium-sized bowl combine two cups of all-purpose flour along with two teaspoons of baking powder plus one-fourth teaspoon salt—give them a gentle whisk until thoroughly blended together ensuring no clumps remain within sight (a fine-mesh sieve works wonders here too!). This process helps distribute leavening agents evenly throughout allowing maximum lift during baking—the science behind fluffy cakes never ceases to amaze me!
Step 3: Cream Sugar & Butter
In another bowl fitted onto mixer stand beat together one cup granulated sugar along with half-a-cup softened unsalted butter until creamy—a process known commonly as “creaming.” It may take several minutes but trust me when I say patience pays off big-time here because this step incorporates air bubbles crucially transforming dense batter textures into delicate delights worthy enough for any celebration! You’ll know it’s ready once mixture appears pale yellow fluffy resembling soft clouds—a visual cue indicating success!
Step 4: Incorporate Eggs & Milk
Once creamed beautifully add eggs one at-a-time mixing thoroughly between additions until fully blended before introducing whole milk along with two teaspoons vanilla extract lowering mixer speed slightly—you want ingredients combined without overmixing now since excess gluten formation could yield tough results instead of moist heavenly bites we aim towards achieving here! After everything comes together seamlessly don’t forget—scrape down bowl sides halfway through ensuring no pockets remain unblended so every bite tastes divine!
Stay tuned because we’re just getting started on transforming simple ingredients into something scrumptiously beautiful—the next steps await where color meets creativity allowing us full control over layering colors vibrantly before hitting that oven blissfully soon!
Step 5: The Art of Creaming – Building Flavor and Texture
Now, let’s dive into one of the most crucial steps in baking: creaming the butter and sugar. In your mixer bowl, combine 1 cup of white granulated sugar with 1/2 cup of softened unsalted butter. Begin by mixing them on medium speed until the mixture becomes light and fluffy, which usually takes about 3 to 5 minutes. This step is vital because it introduces air into the batter, which helps create that wonderfully tender crumb we all desire in a cake. The sugar granules cut into the butter, creating tiny pockets of air that expand when baked, resulting in a beautifully risen cake. So don’t rush this step; take your time and enjoy the transformation as the color changes from yellow to a pale yellow with a silky texture.
As you’re creaming, remember to stop occasionally to scrape down the sides and bottom of your mixing bowl. This ensures that every bit of butter and sugar is fully incorporated, preventing any clumps from forming in your batter – and we definitely want to avoid that! Trust me on this: a well-creamed mixture sets the foundation for a moist and flavorful cake. You should be able to see some shine on the surface as it becomes airy; this is your cue that you’re heading in the right direction!
Step 6: Eggs – The Binding Magic
Next up are our 2 room-temperature eggs, which we will add one at a time to our fluffy butter-sugar mixture. This gradual incorporation allows each egg to emulsify properly into the batter, ensuring everything blends seamlessly together. As you beat the mixture after adding each egg, listen for that delightful sound – a soft whirring that tells you everything is coming together beautifully. By incorporating eggs this way, we’re enhancing both flavor and structure; they help bind all our ingredients while contributing moisture.
Let’s take a moment to appreciate why room-temperature eggs matter so much in this process. Cold eggs can cause your batter to seize up, leading to an uneven texture that just won’t rise as beautifully. So if you’ve forgotten to take those eggs out ahead of time, simply place them in warm water for about 10-15 minutes before beginning this step. Your patience will be rewarded with an even batter that bakes evenly – it’s absolutely paramount! After incorporating the eggs, keep an eye out for a smooth consistency; it should appear glossy and cohesive.
Step 7: Pouring in Liquid Gold
With our eggs now incorporated beautifully into our mixture, it’s time to add 1 cup of whole milk and 2 teaspoons of vanilla extract. Switch your mixer speed back down to low as you pour in these liquid gold ingredients; this gentle approach helps prevent splatters while ensuring everything combines harmoniously without overmixing. I can’t stress enough how important it is not to rush—this step brings hydration and flavor directly into your batter.
After adding the milk and vanilla extract, increase the mixer speed back up to medium until thoroughly combined again. While doing this, take a moment and inhale deeply—the aroma of vanilla wafting through your kitchen is nothing short of intoxicating! Once you’ve achieved a beautifully blended mixture (it should feel creamy), prepare yourself for one more important addition: sifted dry ingredients! This careful mixing creates an emulsion that enhances moisture retention during baking—resulting in an incredibly moist cake.
Step 8: Mixing It All Together – The Flour Power
Now comes the moment we’ve been waiting for: integrating our dry ingredients! In your medium bowl, you’ve already combined 2 cups of all-purpose flour, 2 teaspoons of baking powder, and 1/4 teaspoon salt—an essential trio that contributes both structure and flavor. Gradually add this flour mixture into your wet ingredients little by little while mixing on low speed; this method prevents lumps from forming and ensures every bit is evenly distributed throughout.
As you mix, keep an eye on the texture—it should become smooth but be cautious not to overmix! Overdeveloping gluten can lead to a dense cake rather than the lightness we crave in our Patriotic Bundt Cake. You’ll know you’re done when there are no visible streaks of flour left; just remember that small lumps are perfectly fine! If at any point things start looking too thick or difficult to mix smoothly, don’t hesitate to add a splash more milk—this will help relax the batter just enough while maintaining its integrity.
Step 9: Colorful Layers – Creating Our Flag
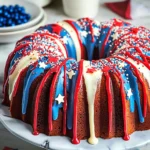
Ah, now comes perhaps my favorite part—the moment we divide our vibrant batter into three bowls! Carefully portion out what feels like an equal amount into three separate bowls: one bowl will be left untouched (the white), while you’ll stir in 5-8 drops each of red gel food coloring into another bowl and 5-8 drops of blue gel food coloring into the last bowl. Using a spatula or spoon gently fold those colors until fully incorporated; watch as they transform before your eyes! This step isn’t just for aesthetics; these vivid colors encapsulate our celebratory spirit perfectly!
When pouring these colorful batters into your prepared bundt pan (don’t forget—you’ve greased it generously!), start with the blue layer first. Pour gently down towards the center so it spreads evenly before layering on white next. Finish strong with red on top—the order matters here since gravity will help create those striking layers once baked! Take note: don’t swirl or mix them together too much at this stage; we want distinct color layers representing our beautiful flag—not a muddled rainbow!
Final Phase – Baking Your Patriotic Masterpiece
Step 10: Baking Bliss
Once you’ve layered those vibrant batters beautifully within your prepared bundt pan, it’s time for some oven magic! Preheat your oven to 350°F (175°C) if you haven’t already done so during preparation—this temperature is optimal for achieving even baking without risking dryness or burnt edges. Carefully place your bundt pan onto an oven rack positioned in the center—a crucial tip since it promotes uniform heat circulation around all sides.
Now here’s where patience truly pays off—set your timer for 30-40 minutes, but don’t just walk away completely! About halfway through baking time (around 20 minutes), peek inside through that oven glass—you want golden brown edges forming around where those vibrant colors meet! At around 30 minutes mark check using a toothpick inserted into its center; if it emerges clean or with just a few crumbs attached (not wet batter), congratulations—you’ve nailed it! But be cautious not to overbake; leaving it even just slightly longer could lead us down a path towards dryness—definitely not what we want!
Step 11: Cooling Down & Loosening Up
After pulling out this magnificent creation from its oven sanctuary (trust me—the aroma will be heavenly!), let it cool within its pan resting atop wire racks for about 10-15 minutes before attempting any further moves. This cooling phase allows residual heat from within to escape gradually while beginning separation between cake edges and bundt pan walls—an absolute must since we don’t want any crumbling upon release!
After those anxious moments pass by peacefully (you can do it—I promise!), take care using either silicone spatula or offset knife along edges where cake meets pan surface—gently loosen everywhere possible without rushing things along too hastily! Then flip cake upside down onto wire rack gently—it should slide out smoothly if all went well during cooling phase!
Step 12: Icing & Decorating Your Delightful Creation
Now comes perhaps my favorite part—the icing! In another mixing bowl combine 2 cups powdered sugar, adding 6-8 tablespoons milk along with another teaspoon of vanilla extract until achieving desired consistency—think thick yet pourable like liquid silk cascading down from above! You might need more or less milk depending on how thick you prefer that glaze—it’s totally customizable!
Add those sprinkles last minute for festive flair—because who doesn’t adore colorful sprinkles shimmering atop their desserts?! Once iced beautifully over cooled cake let it rest briefly before serving—that’s when flavors meld together creating something profoundly satisfying sure makes everyone smile at gatherings celebrating togetherness across generations!
And there you have it—a stunning Patriotic Bundt Cake worthy enough for any celebration under sunlit skies filled laughter among loved ones gathered nearby sharing memories made sweeter by delightful bites shared amongst hearts intertwined forevermore…Enjoy every slice with joy knowing you’ve crafted something truly extraordinary today!
Storage and Enjoyment Tips for Your Patriotic Bundt Cake
Now that your gorgeous Patriotic Bundt Cake has cooled to perfection, it’s time to dive into the deliciousness! But before you slice into this eye-catching masterpiece, let’s talk about how to preserve that vibrant flavor and moist texture. Trust me, you’ll want this cake around for as long as possible because once your friends and family get a taste, they will be coming back for more!
Storing Leftover Patriotic Bundt Cake
To keep your leftover Patriotic Bundt Cake fresh and delightful, the best approach is to store it in an airtight container at room temperature. If you don’t have one handy, wrapping it tightly in plastic wrap or aluminum foil will do the trick. Just remember to place it somewhere cool and dry; a pantry or countertop away from direct sunlight works beautifully. This scrumptious cake can last about 3-4 days without losing its charm, but I promise you, it will likely be gone much sooner than that! A little pro tip to maintain its moisture: consider placing a slice of bread in the container with the cake. It’s like giving your bundt a cozy hug! After storage, the flavors meld beautifully, making each bite even more satisfying—the vanilla notes deepen while the vibrant colors remain cheerful and enticing. If you’re ready for a treat after a couple of days, just serve it as-is or warm it slightly in the microwave for about 10 seconds; it’ll feel like it’s just come out of the oven!
Freezing Patriotic Bundt Cake for Later
If you’re looking to save some of this delightful cake for another occasion, freezing is an excellent option! To do so properly, allow your Patriotic Bundt Cake to cool completely before wrapping it in plastic wrap and then aluminum foil to prevent freezer burn—this double-layer protection is crucial! You can keep it frozen for up to three months. When you’re ready to enjoy a slice again, simply transfer it to the refrigerator overnight to thaw gradually or let it sit at room temperature for an hour or two. The convenience of having a festive dessert on hand makes freezing such an appealing option; imagine surprising guests with a perfectly preserved slice of patriotic delight whenever you please!
From storage tips that keep your cake fresh to convenient freezing methods that ensure you always have a sweet treat at hand, I hope these suggestions help you savor every moment with your stunning Patriotic Bundt Cake!
Patriotic Bundt Cake
There’s something truly special about the Patriotic Bundt Cake that makes it the perfect centerpiece for gatherings and celebrations. With its vibrant red, white, and blue layers, this cake is not only visually stunning but also bursting with flavor. As you slice into this moist, fluffy cake, the delightful aroma will transport you back to cherished memories of family and friends coming together. Ideal for summer festivities like Independence Day or any occasion that calls for a sweet treat, this cake embodies joy and connection in every bite. Plus, it’s surprisingly easy to make! Gather your ingredients and let’s create something spectacular that will be the highlight of your next celebration.
- Prep Time: 20 minutes
- Cook Time: 35 minutes
- Total Time: 55 minutes
- Yield: Approximately 12 servings 1x
- Category: Dessert
- Method: Baking
- Cuisine: American
Ingredients
- 1 cup white granulated sugar
- 1/2 cup unsalted butter (softened)
- 2 large eggs
- 1 cup whole milk
- 2 teaspoons vanilla extract
- 2 cups all-purpose flour
- 2 teaspoons baking powder
- 1/4 teaspoon salt
- Gel food colors (red and blue)
- For icing: 2 cups powdered sugar, 6-8 tablespoons milk, and additional vanilla extract
Instructions
- Preheat your oven to 350°F (175°C) and grease a bundt pan.
- In a bowl, whisk together flour, baking powder, and salt.
- In a separate bowl, cream sugar and butter until light and fluffy. Add eggs one at a time, mixing well after each addition.
- Gradually mix in milk and vanilla until combined.
- Slowly incorporate dry ingredients into wet mixture until just blended.
- Divide batter into three bowls; color one red, one blue, and leave one plain.
- Pour layers into the prepared bundt pan in this order: blue, white, red.
- Bake for 30-40 minutes or until a toothpick comes out clean.
- Let cool for 15 minutes before inverting onto a wire rack.
- Mix icing ingredients together until smooth; drizzle over cooled cake.
Nutrition
- Serving Size: 1 slice (85g)
- Calories: 320
- Sugar: 30g
- Sodium: 180mg
- Fat: 14g
- Saturated Fat: 8g
- Unsaturated Fat: 5g
- Trans Fat: 0g
- Carbohydrates: 45g
- Fiber: 1g
- Protein: 4g
- Cholesterol: 50mg