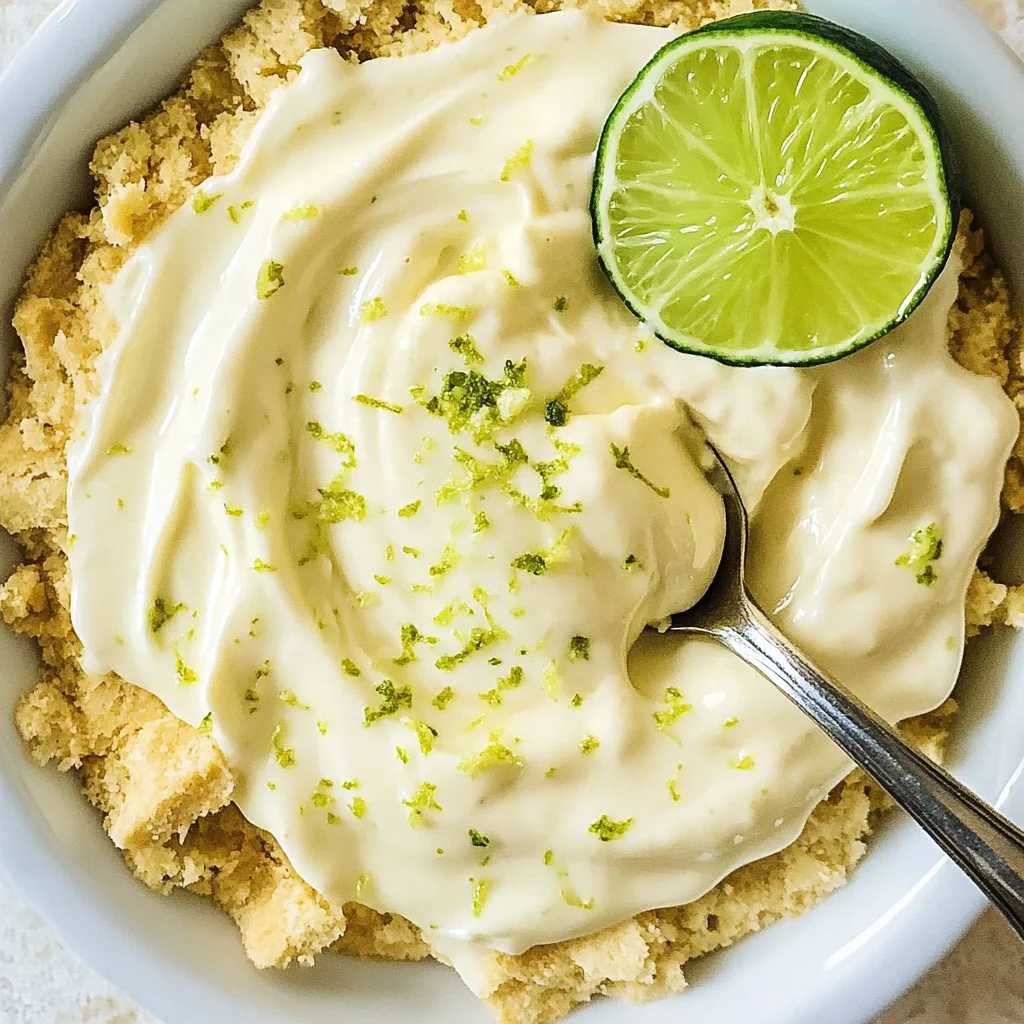
Key Lime Pie Cheesecake Dip
There’s something truly magical about desserts that evoke memories of sun-kissed summers and laughter shared among friends. The Key Lime Pie Cheesecake Dip is not just a dessert; it’s an experience that transports you to a breezy beachside gathering, where the tangy notes of lime dance playfully on your palate, and the creamy texture invites you to indulge in every delicious bite. When I first stumbled upon this recipe, I was captivated by its effortless charm—it’s the kind of dish that makes you feel like a culinary genius, even if you’re just starting out in the kitchen. Imagine dipping a crisp graham cracker or a sweet piece of fruit into this dreamy concoction, feeling the coolness wash over you as you savor each moment. This is no ordinary dip; it’s a symphony of flavors that sings the praises of summer.
As the temperatures rise and gatherings become more frequent, having easy yet impressive recipes at your fingertips is essential. This no-bake Key Lime Pie Cheesecake Dip is perfect for potlucks, backyard barbecues, and family gatherings alike. It’s got that wonderful balance of sweet and tart that keeps everyone coming back for more. Trust me on this—you’ll be the star of your next gathering when you bring this delightful dip. I promise you, once you try it, you’ll find every excuse to whip it up again!
Key Lime Pie Cheesecake Dip: A Creamy, Tangy Delight
Let’s dive into creating this luscious Key Lime Pie Cheesecake Dip! It’s incredibly simple and requires minimal effort but yields maximum flavor—exactly what we all need sometimes. With just a handful of ingredients, you’ll create a dessert that not only looks fabulous but tastes utterly intoxicating.

Ingredients:
Before we embark on this culinary journey together, let’s gather our ingredients. Each one plays an important role in achieving that perfect balance of creaminess and zest.
- 8 oz cream cheese, softened at room temperature. This ingredient is absolutely paramount for creating the dip’s rich base. Cream cheese brings a luscious creaminess that’s both smooth and satisfying. Be sure to allow it to soften fully—this step ensures it blends seamlessly with the other ingredients without any lumps. If you’re looking for alternatives, consider using a vegan cream cheese if dairy isn’t your thing; just ensure it’s well-softened too.
- 1/2 cup sugar (or more or less to taste). Sugar is our sweet companion in this recipe, balancing out the tartness from our limes beautifully. You have some flexibility here; I often taste as I go and adjust according to my mood—sometimes I crave a little more sweetness! Feel free to substitute with coconut sugar or another favorite sweetener if you’re looking for alternatives.
- 3 tablespoons lime juice (from 2 small limes or 3 key limes). The essence of our dip lies in these vibrant little fruits! Fresh lime juice contributes an exhilarating zing that brightens up the entire dish. I always opt for fresh over bottled juice because it captures that refreshing flavor so much better. Plus, squeezing those little limes releases their fragrant oils into your kitchen—an added bonus!
- Zest of 2 small limes. Don’t overlook this treasure! Lime zest offers an extra punch of flavor and aroma that elevates your dip from ordinary to extraordinary. The oils in the zest are concentrated and provide an intense burst of citrus goodness that complements the creaminess beautifully.
- 1 pinch vanilla bean powder. A touch of vanilla adds depth to our mixture, rounding off the sharpness from the lime with its warm undertones. If you can find real vanilla bean powder (not extract), it will make a world of difference! You could also use pure vanilla extract if that’s what you have on hand.
- 1 pinch salt (optional). While it may seem counterintuitive to add salt to something sweet, trust me—it enhances all those wonderful flavors in ways you wouldn’t expect! A tiny pinch can elevate your dip by balancing out sweetness and adding complexity.
- 1/4 cup heavy whipping cream. This liquid gold transforms our cheesecake dip into something truly extraordinary—whipping cream adds lightness and richness simultaneously! When incorporated properly, it helps achieve that velvety texture we’re after while keeping everything airy and delightful.
- Graham crackers, cookies, and/or fruit for dipping. Now here’s where things get fun! Your choice of dippers can really tie everything together—graham crackers echo classic key lime pie flavors while cookies add sweetness; fresh fruit offers a refreshing contrast that pairs beautifully with the creamy dip.
Equipment You’ll Need:
Having the right tools makes all the difference when crafting our Key Lime Pie Cheesecake Dip—it allows us to work efficiently while ensuring success along each step of our journey!
- Stand-up mixer or hand mixer: This tool is essential for creaming together our ingredients smoothly without breaking a sweat! A stand mixer allows for hands-free mixing while ensuring everything combines perfectly—a game-changer if you’re multitasking in the kitchen!
- Mixing bowls: Use a medium-sized mixing bowl for combining ingredients initially before transferring them into serving dishes or containers later on—a versatile staple found in every kitchen!
- Measuring cups and spoons: Precision matters when baking or cooking! Accurate measurements ensure consistent results every time; trust me—this will save you from any unexpected surprises down the line!
Now that we’ve gathered all our ingredients and tools, let’s get started on preparing this sumptuous Key Lime Pie Cheesecake Dip!
Step 1: Creaming Together for Perfection
To begin crafting our glorious dip, we’ll start by creaming together our softened cream cheese with sugar, lime juice, lime zest, vanilla bean powder—and yes, don’t forget that little pinch of salt if you’re using it! Using either your stand mixer fitted with a paddle attachment or handheld mixer set on medium speed will allow these ingredients to blend beautifully over 1-2 minutes until fully combined into one smooth mixture without lumps lingering behind. Taste testing during this phase is crucial; adjust sweetness or acidity based on personal preference—I often go back and forth between adding more sugar or lime juice until perfection strikes! Remember: tasting as you cook makes all meals more enjoyable.
Step 2: Adding Whipping Cream
Next comes my favorite part—the addition of heavy whipping cream! Pouring in this rich liquid transforms our already decadent mixture into something heavenly luxurious—you’ll want every drop incorporated thoroughly here so keep mixing until well blended at medium speed again for about 2 minutes until it’s lightened up considerably! Don’t rush through this step; take time enjoying watching it thicken just enough—not too rigid but still maintain smoothness throughout every bite when served later alongside those delightful dippers waiting eagerly nearby!
Step 3: Chill Out (Optional)
While serving immediately is totally acceptable—and oh-so-delicious—I recommend allowing some chill time afterward if possible after indulging right away will leave everyone wanting seconds (and thirds!). Pop your creamy creation into an airtight container then refrigerate briefly anywhere from 30 minutes up to several hours prior serving time—that way flavors meld beautifully together creating even deeper satisfaction levels across taste buds during indulgence moments ahead!
Step 4: Serving Suggestions
When ready to serve up this exquisite Key Lime Pie Cheesecake Dip treat guests by presenting their options enticingly arranged around bowl edges filled generously inside—you could utilize fresh fruits like strawberries sliced bananas paired alongside crunchy graham crackers stacked high amongst delightful cookie selections too making presentation visually appealing enough alone draw guests closer drawn towards sampling bites along chatty conversations happening around table areas nearby!
With every scoop taken from elegantly designed platter showcasing bright colors contrasting creamy textures within each delicious layer left behind tells stories shared becoming treasured memories made during gatherings enjoyed intimately surrounded loved ones sharing laughter joy spilling forth endlessly across spaces filled warmth connection created through food shared lovingly together…
Step 5: Incorporating the Creamy Magic
Now that you’ve created a zesty, vibrant base with your initial mixture, it’s time for the pièce de résistance: the heavy whipping cream. This is where the magic happens, transforming your delightful blend into something truly extraordinary. Pour in the 1/4 cup of heavy whipping cream and turn your stand mixer to medium speed. I can’t emphasize enough how crucial this step is! Whipping cream adds that luxurious texture, making your Key Lime Pie Cheesecake Dip irresistibly creamy and smooth. As the cream incorporates, you’ll notice the mixture becoming lighter and fluffier—this is exactly what you want!
Trust me, take a moment to watch as it transforms before your eyes. You want to mix until all the ingredients are fully combined and you no longer see any streaks of cream or lumps of cheese. This typically takes about 2-3 minutes. Don’t rush this step; let it happen gradually, allowing air to whip into the cream, which will create that dreamy consistency. If you overmix, however, you might end up with a grainy texture, so stop mixing once everything is well-blended and luscious.
Step 6: Taste Testing for Perfection
Here comes one of my favorite parts—taste testing! With a small spatula or spoon in hand, dip it into your mixture and take a small taste. This moment is magical; you’re not just tasting a dip but experiencing layers of flavor—the tartness from the lime juice harmonizes beautifully with the sweetness of sugar and the rich creaminess of the cheese. This is your chance to adjust flavors to perfection!
Does it need a bit more sweetness? Maybe another teaspoon or two of sugar will do the trick; after all, you’re crafting this dip specifically for enjoyment at potlucks or parties! Or perhaps you want an extra zing—squeeze in a tad more lime juice if you’re feeling adventurous. Remember, this step isn’t just about ensuring a balanced flavor; it’s about creating something that resonates with your personal palate and brings joy to those who will share it with you.
Step 7: The Chill Factor
Once you’ve found that perfect balance of flavors, it’s time for another essential phase: chilling! Why chill? Allowing your Key Lime Pie Cheesecake Dip to rest in the refrigerator for at least 30 minutes (or even up to an hour) will enhance its flavors exponentially and allow it to firm up slightly. The cool temperature will help meld those vibrant lime notes with the rich creaminess, creating an utterly intoxicating experience when served.
Place your mixture in an airtight container or cover it tightly with plastic wrap before popping it into the fridge. During this time, I recommend prepping your dipping accompaniments—think graham crackers, fresh fruit like strawberries or apples, or even crispy cookies if you’re feeling indulgent. When you’re ready to serve, you’ll discover that chilling has made every bite profoundly satisfying as flavors have had time to develop further while providing that perfect texture that’s not too runny but delightfully scoopable.
Step 8: The Grand Unveiling
After patiently waiting (I know it can feel like an eternity!), it’s finally time for the grand unveiling of your masterpiece! Remove your Key Lime Pie Cheesecake Dip from its chill spot in the refrigerator and give it a gentle stir with a spatula. You want to check its consistency—it should be thick yet smooth enough to spread easily onto graham crackers or fruit slices without falling apart. If by chance it seems too thick after chilling, don’t hesitate to fold in a splash more heavy cream until you reach that beautiful balance again.
Now comes one last flourish before serving: consider garnishing it if you’re feeling fancy! A sprinkle of extra lime zest on top not only adds color but also enhances that zesty aroma that’s so inviting. You can also add a few crushed graham cracker crumbs on top for texture and visual appeal—a little crunch amidst all that creamy bliss goes such a long way in elevating this dish from simple dip to showstopper dessert!
Final Touches: Serve & Savor
Alright friends, now we’ve reached one of my favorite moments—the serving part! Grab your assortment of dipping delights—those crunchy graham crackers are just calling out for their moment as they dive into that velvety dip! Arrange everything on a beautiful platter because presentation matters; I promise you people eat with their eyes first.
As guests take their first bites and their faces light up with delight at this easy dessert dip’s creamy tanginess paired perfectly with sweet notes from sugar and vanilla bean powder—you’ll see why I adore this recipe so much! The smiles around you will be absolutely rewarding as they savor each bite alongside laughter-filled conversations.
And there you have it—your No Bake Key Lime Pie Cheesecake Dip is ready to steal hearts at gatherings or simply become your new favorite indulgence at home. Each creamy scoop transports me back to sun-soaked days filled with joy and laughter; I hope each bite does the same for you! Enjoy every moment as you share this delightful creation with those around you; trust me when I say they will be begging for seconds!
Storage and Enjoyment Tips for Your Key Lime Pie Cheesecake Dip
Now that your No Bake Key Lime Pie Cheesecake Dip is ready to be devoured, it’s time to bask in the joy of this delightful dessert! Trust me when I say, the first taste will transport you straight to sun-kissed shores with its zesty freshness and creamy richness. But if you find yourself with any leftovers—though I doubt that will happen—there are some great ways to store this heavenly dip so you can enjoy it later!
Storing Leftover Key Lime Pie Cheesecake Dip
To keep your luscious Key Lime Pie Cheesecake Dip fresh and delectable, transfer it into an airtight container. This is crucial because it prevents any unwanted air from spoiling the flavors or altering the texture. I typically use glass containers, as they help maintain the dip’s chill while also being easy to clean. You can store it in the refrigerator for up to three days, but honestly, I would recommend enjoying it within a day or two for the best taste experience. And here’s a little pro tip: if you’re worried about the dip losing its creamy consistency, place a slice of bread on top before sealing it tight. The bread absorbs moisture and keeps everything just right! When you’re ready to serve again, simply give it a gentle stir; you’ll find that even after a couple of days in the fridge, those bright flavors still sing beautifully!
Freezing Key Lime Pie Cheesecake Dip for Later
If you want to take your indulgence to another level or prepare ahead of time for an upcoming gathering, freezing this dip is an excellent option! To freeze properly, spoon it into a freezer-safe container or zip-top bag, ensuring you expel as much air as possible before sealing it up tightly. This method will help preserve its delightful flavors and creamy texture. You can keep it frozen for up to two months—perfect for those spontaneous cravings or unexpected guests! When you’re ready to enjoy your frozen treasure, simply transfer it to the fridge overnight to thaw gently. This convenience factor is absolutely paramount; there’s nothing better than knowing you have an effortlessly delicious treat waiting for you anytime!
Key Lime Pie Cheesecake Dip

Indulge in the delightful world of our Key Lime Pie Cheesecake Dip, a no-bake dessert that captures the essence of summer in every creamy bite. This zesty treat combines the refreshing tang of fresh lime juice and zest with velvety cream cheese, resulting in a dip that’s perfect for any gathering. Whether you’re hosting a backyard barbecue, enjoying a cozy evening with friends, or celebrating a special occasion, this easy-to-make dip will surely impress your guests. Serve it alongside crisp graham crackers, sweet fruit, or crunchy cookies to create an unforgettable experience that evokes laughter and joy.
- Prep Time: 15 minutes
- Cook Time: None
- Total Time: 0 hours
- Yield: Approximately 10 servings 1x
- Category: Dessert
- Method: No-bake
- Cuisine: American
Ingredients
- 8 oz cream cheese, softened
- 1/2 cup sugar
- 3 tablespoons lime juice
- Zest of 2 small limes
- 1 pinch vanilla bean powder
- 1 pinch salt (optional)
- 1/4 cup heavy whipping cream
- Graham crackers, cookies, and/or fruit for dipping
Instructions
- In a mixing bowl, beat softened cream cheese with sugar, lime juice, lime zest, vanilla bean powder, and salt until smooth and creamy.
- Gradually add heavy whipping cream and mix until well combined and fluffy.
- Taste and adjust sweetness or acidity as desired.
- Chill in the refrigerator for at least 30 minutes before serving for enhanced flavor.
- Serve with your choice of graham crackers, cookies, or fresh fruit.
Nutrition
- Serving Size: 1 serving
- Calories: 180
- Sugar: 14g
- Sodium: 100mg
- Fat: 12g
- Saturated Fat: 7g
- Unsaturated Fat: 3g
- Trans Fat: 0g
- Carbohydrates: 17g
- Fiber: 0g
- Protein: 2g
- Cholesterol: 40mg