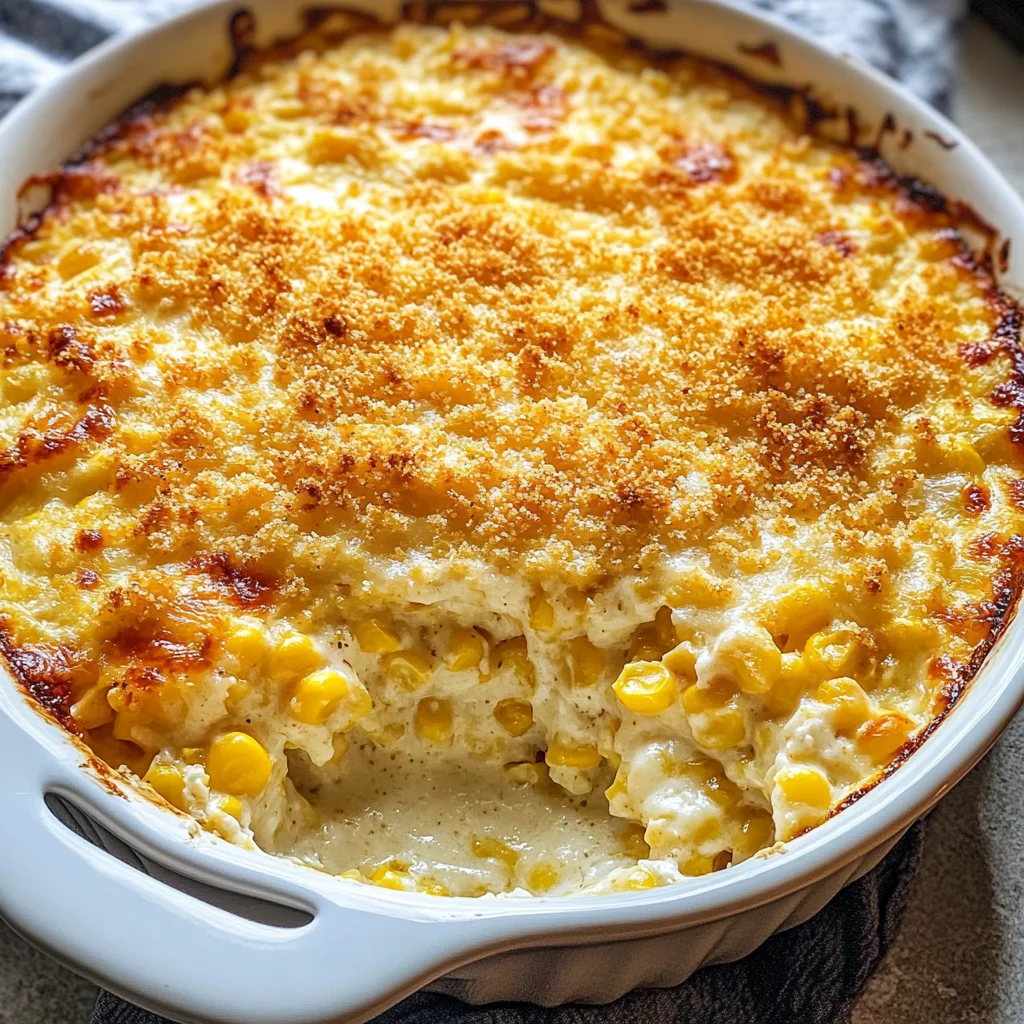
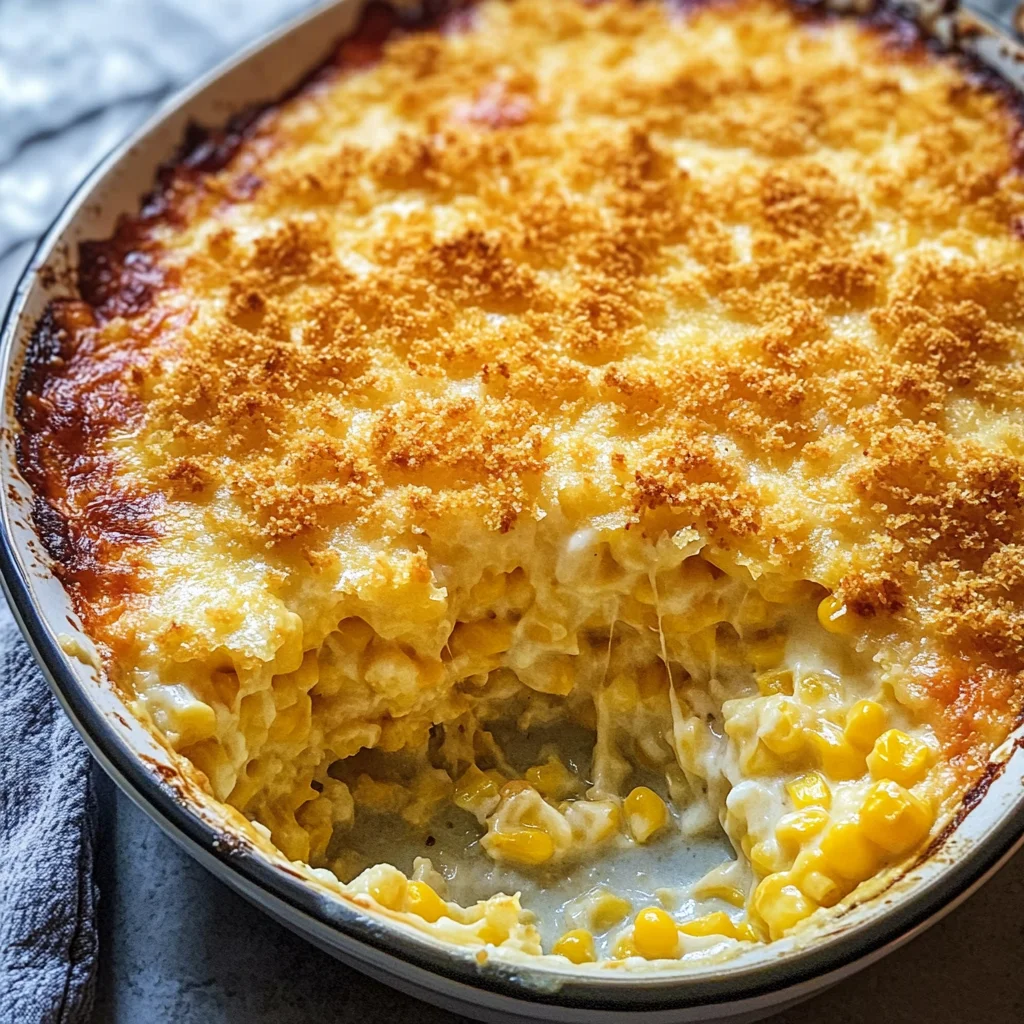
Scalloped Corn
There’s something utterly enchanting about the aroma of comfort food wafting through the kitchen, isn’t there? It’s like a warm hug on a chilly day, a gentle reminder of home and cherished moments shared with loved ones. Today, I want to introduce you to a dish that embodies that very spirit: Scalloped Corn. This recipe is more than just a blend of ingredients; it’s an experience that transports you back to family gatherings, potlucks, and festive celebrations. Picture this: creamy corn enveloped in a luscious custard, topped with golden crackers and bubbly cheese, all melding together in a symphony of flavors that dances on your palate. Trust me when I say, once you take that first forkful, you’ll be hooked!
This Scalloped Corn is truly extraordinary in its simplicity yet profound in its satisfaction. The beauty of this dish lies not only in its taste but also in the memories it evokes. Imagine serving it at Thanksgiving dinner or as a delightful side at summer barbecues; it’s the kind of dish that sparks conversations and brings everyone around the table together. The sweetness of the corn paired with hints of nutmeg creates an irresistible contrast that makes each bite feel like a celebration. So let’s roll up our sleeves and embark on this culinary journey together—I’m here to guide you every step of the way!
Scalloped Corn: A Comforting Classic
Ah, Scalloped Corn—the ultimate side dish that can elevate any meal into something special! This recipe holds a dear place in my heart because it’s reminiscent of family gatherings where we would all gather around the table, plates piled high with food made from love. You might often find it gracing holiday tables or served alongside grilled meats during backyard barbecues, making it versatile enough for any occasion. Its creamy texture is complemented by crispy cracker topping—an absolute delight! Now, let’s dive into what makes this dish shine.
Ingredients:
As we prepare to create this delicious Scalloped Corn, let’s talk about the star players in our recipe—the ingredients! Each one has its own role to play in crafting a dish that’s both comforting and satisfying.
- 5 Tbsp butter (divided). Butter is often referred to as liquid gold, and for good reason! In our Scalloped Corn, butter adds richness and depth of flavor while helping to bind everything together. Using unsalted butter allows you to control the saltiness of your dish better; however, if salted is all you have on hand, just adjust the added salt accordingly. Make sure to soften your butter slightly before using; cold butter can make mixing difficult while melted butter can lead to greasy results.
- 1 32 oz package frozen whole kernel corn (thawed). Frozen corn is perfect for this recipe because it’s harvested at peak ripeness and flash-frozen to preserve flavor and nutrients. Thawing it ensures even cooking throughout our casserole without excess moisture diluting those beautiful flavors. If you’re feeling adventurous and have access to fresh corn during summer months, feel free to substitute with fresh kernels—just be sure to cook them briefly before adding!
- 1 1/2 cups half and half. This magical mixture of cream and milk will give our corn casserole its luxurious creaminess without being overly heavy. Half-and-half creates that perfect balance; if you’re looking for lighter options or dairy-free alternatives, consider using almond milk mixed with coconut cream for an equally delightful effect.
- 3 large eggs. Eggs serve as our binding agent here; they help set the custard while adding protein and structure to our dish. Be sure your eggs are fresh—crack them open to check for any odd smells or colors before incorporating them into your mixture!
- 2 Tbsp granulated sugar. You might be surprised by sugar’s inclusion in this savory dish! The sugar enhances the natural sweetness of corn while balancing out flavors beautifully. Just trust me on this—it’s non-negotiable for achieving that perfect taste profile.
- 1/2 tsp salt. Salt is essential here as it amplifies flavors! It helps bring out the sweetness of the corn and adds depth overall. Again, since we’re using salted butter already (if you opted for that), keep an eye on how much additional salt you add.
- 1/8 tsp ground nutmeg. While nutmeg might seem unconventional in savory dishes, just a pinch adds warmth without overtaking other flavors—almost like a gentle hug from within! It’s crucial not to overdo it; too much nutmeg can quickly overpower your lovely scalloped corn.
- 1 1/2 cups sharp white cheddar or pepper-jack cheese (divided). Cheese brings richness and creaminess while contributing an irresistible savory quality! Sharp white cheddar offers bold flavor that pairs beautifully with sweet corn; however, if you’re feeling adventurous or need some heat, pepper-jack can add just the right zing!
- 1 sleeve round butter crackers (e.g., Ritz) [crushed and divided]. The crushed buttery crackers act as both topping and textural contrast—a crunchy layer atop creamy goodness that will have everyone reaching for seconds! Feel free to opt for gluten-free varieties if needed; just ensure they have similar buttery qualities for best results.
Equipment You’ll Need:
Before diving into creating our Scalloped Corn masterpiece, let’s gather some essential tools that will make this process smooth sailing! Having the right equipment helps streamline your cooking experience so you can focus on what really matters—the joy of creating something delicious!
- 13×9-inch baking dish – This classic size is perfect for making casseroles like our Scalloped Corn! It allows ample space for even cooking while ensuring every inch gets nicely browned around those edges we all love so much.
- Medium bowl – A staple in any kitchen for mixing ingredients together; use it when whisking eggs with half-and-half before combining them into your corn mixture.
- Large bowl – This will hold all those glorious ingredients once combined—it should be large enough so everything comes together easily without spilling over!
- Whisk – A whisk is essential for blending eggs smoothly into liquids like half-and-half; it’ll help incorporate air which contributes lightness once baked.
- Rubber spatula or wooden spoon – Perfect tools for folding ingredients gently yet thoroughly without deflating any air bubbles you’ve worked hard to create!
Now that we’re equipped with everything we need let’s jump right into preparing this delectable Scalloped Corn casserole!
Step 1: Preheat Your Oven & Prepare Your Dish
First things first—preheating your oven is absolutely paramount! Set it at 325°F (163°C) so it’s ready when we assemble everything together later on. While that’s warming up, grab your beloved 13×9-inch baking dish and get ready because we’re about to work some magic! Taking one tablespoon from our divided butter stash (remember we have five total), soften it slightly if needed then spread it evenly across the bottom of your pan using paper towels or clean hands—this prevents sticking during baking which would otherwise rob us of those glorious edges we adore.
Step 2: Whisk Together Your Creamy Mixture
In a medium bowl now waiting patiently nearby, combine your half-and-half with three large eggs—their yolks will lend richness while whites provide stability within our final product! Add two tablespoons granulated sugar next along with half teaspoon salt followed by an eighth teaspoon ground nutmeg—trust me here when I say nutmeg has transformative powers—it elevates flavors exponentially! Whisk this mixture vigorously until fully blended together—don’t rush this step! Proper emulsification ensures an even texture throughout each bite later on.
Step 3: Combine Ingredients for Full Flavor Explosion
Alrighty now—it’s time to bring everything together harmoniously! In another large bowl (you’ve got this!), pour in thawed whole kernel corn straight from its package followed by that luscious egg mixture we just created plus three-fourths cup shredded cheese (save remaining cheese for topping). Then toss in half cup crushed butter crackers—they’ll provide delightful crunch after baking—and mix thoroughly until well combined—the colors should come alive as they dance together creating anticipation within us all!
Step 4: Transfer & Bake
Once everything looks beautifully mixed up like sunshine radiating joyously off each kernel—I mean who wouldn’t want such brightness around their dinner table?—pour this divine concoction directly into prepared baking dish spreading evenly across surface area ensuring no rogue kernels are left behind unaccounted for…we want every single one contributing their sweet essence here! Now slide it lovingly into preheated oven allowing magic time unfold over thirty minutes—keep an eye out though…we’re aiming just until edges begin bubbling merrily up against sides giving us hints towards heavenly goodness soon-to-be revealed…
And there we go—we’ve laid down solid groundwork towards creating something truly wonderful today with our Scalloped Corn casserole journey still unfolding beautifully ahead! Stay tuned as we continue through further steps soon leading us onto crispy toppings that’ll crown off each plate perfectly…
The Ultimate Scalloped Corn: A Journey of Flavor and Comfort
Ah, Scalloped Corn! Just saying those words conjures up memories of family gatherings filled with laughter and the delightful aroma wafting through the kitchen. This dish is a testament to comfort food at its best—each bite offering a warm embrace that feels like home. Whether it’s a holiday celebration or a simple weeknight dinner, this recipe never fails to steal the show. Now, let’s dive deeper into the heart of this scrumptious dish with detailed steps that will guide you to culinary success!
Step 5: Melting Butter for Golden Crunch
Now that your corn mixture has been blissfully baking away for 30 minutes, it’s time for one of the most exciting moments in our scalloped corn journey: preparing the buttery topping! In a small bowl, melt 4 tablespoons of butter until it becomes a rich, golden liquid that smells utterly intoxicating. This step is crucial because the melted butter not only enhances the flavor but also creates that beautiful crunchy texture when tossed with the reserved cracker crumbs. You’ll want to ensure the butter is fully melted—don’t rush this step! If there are tiny solid bits left, they won’t blend as seamlessly with your cracker crumbs.
Once your butter has reached its glorious liquid form, take those remaining cracker crumbs (which should be about half a sleeve) and add them to the bowl. Gently toss everything together until each crumb is coated in that luscious butter. This technique ensures even distribution of flavor throughout your topping, setting the stage for an irresistible crunch on top of your scalloped corn. Trust me, this buttery goodness is absolutely paramount for achieving that perfect contrast between creamy corn and crispy topping.
Step 6: The Grand Topping Ceremony
Now comes one of my favorite parts—it’s time to adorn our baked corn casserole with those deliciously buttery cracker crumbs and cheese! Carefully remove your baking dish from the oven; you’ll notice how beautifully puffed and bubbly your scalloped corn has become. The golden edges are an inviting sight! Sprinkle evenly over the surface with the remaining shredded cheese, ensuring every inch is covered in that sharp white cheddar or pepper-jack cheese you’ve chosen. The cheese not only adds flavor but also creates a lovely layer of gooeyness that ties all components together beautifully.
Next, take your buttery cracker crumb mixture and sprinkle it generously over the top, allowing some of those crumbs to settle into the cheesy layer beneath. This process isn’t just about aesthetics—it’s about building layers of flavor and texture that will delight anyone who digs in. Remember, don’t skimp on this step; a generous amount of topping can elevate your scalloped corn from good to extraordinary! Once you’ve completed this grand topping ceremony, return your dish back to the oven for another 20-30 minutes.
Step 7: Baking Magic – Timing is Everything
As your scalloped corn returns to its warm cocoon in the oven, keep an eye on it as it bakes away toward perfection. During this time, you’ll want to look for visual cues—specifically, watch for that enchanting golden brown color developing on top and listen for that satisfying bubbling sound coming from within. It’s often said that patience is key in cooking; trust me when I say it applies here too! Allowing those final moments in the oven ensures everything melds together beautifully while creating a crust that’s both crunchy and satisfying.
You might wonder how long exactly to bake beyond those initial 30 minutes; I recommend checking around 20 minutes into this second phase. If you gently shake the baking dish and see movement in just the center rather than throughout, you’re right on track! But if there’s still too much jiggle happening across the whole surface, give it another few minutes—just remember not to rush; allow your scalloped corn to reach its full potential before pulling it out.
Step 8: The Resting Period – An Essential Step
Once your scalloped corn has achieved that gorgeous golden hue and bubbly edges—a true testament to its deliciousness—you might be tempted to dig right in. But here’s where I urge you: resist! Letting it rest for about five minutes before serving may seem like a minor detail, but it’s absolutely essential for bringing this dish together harmoniously. During this brief respite, flavors will continue to mingle and settle into each other while allowing some residual heat to finish cooking any lingering moisture inside.
As you let it stand there on your countertop—perhaps while you gather everyone around—the aromas will intensify even more invitingly as they waft through your home like liquid gold. When you finally serve up portions onto plates or into bowls, you’ll notice how easy it is to scoop out perfect portions without everything falling apart—a feat made possible by allowing it those few extra moments of rest!
Final Touches: Serving Your Masterpiece
Step 9: Serving Up Pure Comfort
When it’s finally time to serve up your Scalloped Corn masterpiece, think about presentation as part of the experience! Grab a large serving spoon or spatula; you’ll want something substantial enough to scoop out generous helpings because trust me—everyone will want seconds! As you dish out servings onto plates or alongside other delectable dishes at your table setting, take a moment to appreciate all that’s gone into making this meal come alive.
The combination of creamy kernels mingling with crispy topping creates such an appealing contrast both visually and texturally; it’s sure to elicit “oohs” and “aahs” from friends and family alike! As they take their first bites—the symphony of flavors dancing upon their palates—it’ll be clear why scalloped corn has earned its place as a cherished recipe passed down through generations.
I can assure you that once people taste this dish, they’ll be hooked! So gather around with loved ones, share stories over steaming plates full of comfort food goodness—and celebrate not just what’s on your table but also all those wonderful memories being created along with every bite. Enjoy every moment because cooking isn’t merely about feeding our bodies; it’s about nourishing our souls too!
And there you have it—your very own Scalloped Corn recipe brought to life with love and care! Enjoy every delicious moment as you savor this incredible dish—it’s bound to become a cherished addition at any gathering from now on!
Storage and Enjoyment Tips for Your Scalloped Corn
Now that your Scalloped Corn has emerged from the oven, bubbling with a golden crust and wafting inviting aromas that beckon you closer, it’s time to dig in! But before you do, let’s chat about how to preserve any leftover goodness. Trust me when I say that this dish is not just a one-time delight; it can easily transform into another meal or side that will bring joy long after the initial feast.
Storing Leftover Scalloped Corn
When it comes to storing your leftover Scalloped Corn, I recommend using an airtight container – glass or BPA-free plastic works wonderfully. By keeping it sealed, you’ll lock in that rich cheese flavor and buttery goodness. This dish can happily live in your fridge for about 3-5 days, but I promise you, it rarely lasts that long! If you want to maintain its delightful texture, consider placing a slice of bread on top before sealing the container. It helps absorb excess moisture and keeps everything perfectly moist. When you’re ready to enjoy it again, simply reheat individual portions in the microwave or pop it back into the oven at 350°F until warmed through. The flavors meld even more beautifully after a day or two, making each bite just as delicious as when you first made it!
Freezing Scalloped Corn for Later
If you find yourself with a surplus of this scrumptious dish (or if you’re planning ahead), freezing is an excellent option! To freeze your Scalloped Corn properly, allow it to cool completely before transferring it into freezer-safe containers or heavy-duty freezer bags. Make sure to remove as much air as possible to prevent freezer burn; no one wants their precious corn casserole tasting like ice! When stored correctly, your scalloped corn can be frozen for up to 2-3 months. What’s fantastic about this approach is its convenience; imagine pulling out a frozen casserole on a busy weeknight! Just thaw it overnight in the fridge and reheat in the oven at 350°F until bubbly and hot throughout. You’ll have a comforting meal ready in no time—perfect for those moments when you need something warm and satisfying without any fuss.
Scalloped Corn

Indulge in the warm, comforting flavors of Scalloped Corn—a delightful dish that is sure to become a favorite at your family gatherings and celebrations. This creamy corn casserole features sweet whole kernel corn enveloped in a rich custard, topped with buttery crackers and melted cheese for an irresistible crunch. Its nostalgic aroma fills the kitchen, inviting everyone to the table for a hearty serving of comfort food bliss. Whether served at Thanksgiving or alongside grilled meats at summer barbecues, this Scalloped Corn recipe is versatile enough for any occasion. Gather your loved ones, share stories, and enjoy every delicious bite of this cheesy delight!
- Prep Time: 15 minutes
- Cook Time: 60 minutes
- Total Time: 1 hour 15 minutes
- Yield: Serves approximately 8
- Category: Side Dish
- Method: Baking
- Cuisine: American
Ingredients
- 5 Tbsp butter (divided)
- 1 package (32 oz) frozen whole kernel corn (thawed)
- 1 1/2 cups half-and-half
- 3 large eggs
- 2 Tbsp granulated sugar
- 1/2 tsp salt
- 1/8 tsp ground nutmeg
- 1 1/2 cups sharp white cheddar or pepper-jack cheese (divided)
- 1 sleeve round butter crackers (e.g., Ritz), crushed and divided
Instructions
- Preheat your oven to 325°F (163°C) and grease a 13×9-inch baking dish with 1 Tbsp butter.
- In a medium bowl, whisk together half-and-half, eggs, sugar, salt, and nutmeg until well combined.
- In a large bowl, mix thawed corn with the egg mixture and three-fourths cup of shredded cheese. Fold in half cup crushed crackers.
- Pour the mixture into the prepared baking dish.
- Melt the remaining butter and toss with the remaining cracker crumbs. Top the corn mixture with cheese followed by the buttery cracker crumbs.
- Bake for approximately 30 minutes until bubbly and golden brown.
- Allow it to rest for five minutes before serving.
Nutrition
- Serving Size: 1 cup (240g)
- Calories: 290
- Sugar: 6g
- Sodium: 650mg
- Fat: 15g
- Saturated Fat: 9g
- Unsaturated Fat: 5g
- Trans Fat: 0g
- Carbohydrates: 31g
- Fiber: 4g
- Protein: 10g
- Cholesterol: 120mg