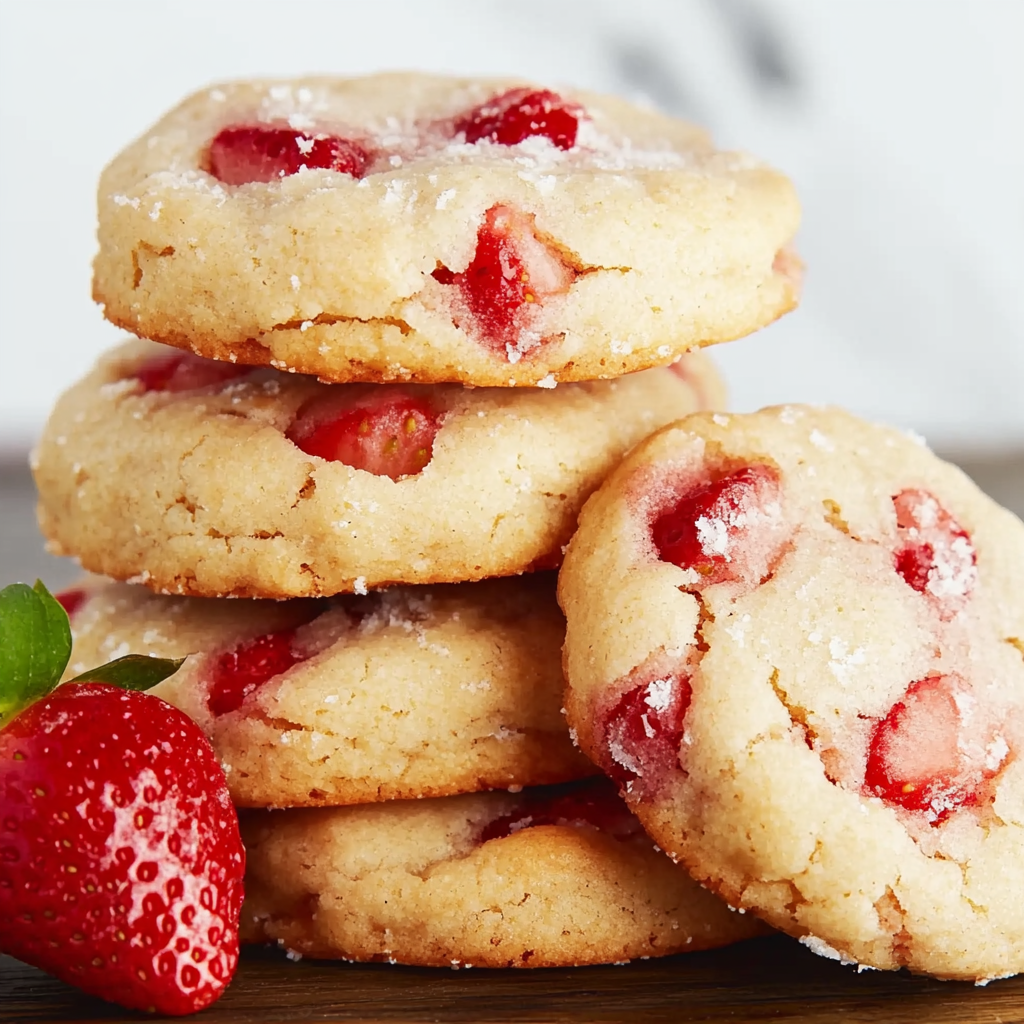
Strawberry Shortbread Cookies
There’s something truly magical about baking cookies, especially when the scent of fresh strawberries wafts through your kitchen, enveloping you like a warm hug. The Strawberry Shortbread Cookies we’re about to embark on creating together are not just delightful treats; they are a heartfelt invitation to savor life’s sweetest moments. Imagine buttery, crumbly cookies shaped into perfect hearts, each bite bursting with the intense flavor of strawberries that have been lovingly freeze-dried to preserve their vibrant essence. These cookies are a celebration of love, friendship, and all those little moments that make life extraordinary. I promise you, this recipe will not only fill your home with an irresistible aroma but also create lasting memories with every delicious bite.
Baking has always been my go-to way of expressing love. It’s like crafting a little piece of joy to share with others. And what better way to show affection than with these Strawberry Shortbread Cookies? With each heart-shaped cookie and the luscious strawberry glaze draped over them, you’re not just making dessert; you’re creating something special for birthdays, anniversaries, or simply as a surprise for someone you cherish. The combination of the rich butter and sweet strawberries creates an experience that is profoundly satisfying and utterly intoxicating. So let’s roll up our sleeves and dive into this delightful culinary adventure together!
Strawberry Shortbread Cookies: A Heartfelt Treat for Every Occasion
These strawberry shortbread cookies are perfect for any occasion where you want to sprinkle a bit of sweetness into someone’s day. Whether it’s a cozy afternoon tea or a festive gathering with friends, these cookies will steal the spotlight! They are not just visually appealing with their charming heart shape; they also pack a punch of flavor that will certainly leave everyone asking for seconds (or thirds!).
Ingredients:
As we gather our ingredients for this heartwarming creation, think of each element as an essential note in our symphony of flavors. Each ingredient plays a crucial role in crafting the perfect cookie, so let’s ensure we choose wisely!
- 1 cup salted butter, softened: This is absolutely paramount for achieving that rich, creamy texture we crave in our Strawberry Shortbread Cookies. The saltiness from the butter balances out the sweetness from the sugar and strawberries beautifully. Make sure your butter is at room temperature—if it’s too cold, it won’t cream properly; too warm, and your cookies will spread like wildflowers on an unkempt lawn.
- 1/2 cup powdered sugar: Unlike granulated sugar, powdered sugar dissolves seamlessly into the dough, which contributes to that tender crumb we adore in shortbread cookies. It gives these treats their characteristic melt-in-your-mouth quality while adding just the right amount of sweetness without being overpowering.
- 1 1/2 cups freeze-dried strawberries: These little gems are what infuse our cookies with intense strawberry flavor! By measuring them first and then blending them into a fine powder, we can evenly distribute their essence throughout the dough. You’ll want to look for high-quality freeze-dried strawberries—they should be vibrant in color and fragrant like summer itself.
- 1 teaspoon vanilla extract: Ah, vanilla—the secret weapon in many baking recipes! Its warm notes enhance the overall flavor profile of our cookies and complement the strawberries perfectly. Opt for pure vanilla extract over synthetic versions; trust me when I say it makes all the difference!
- 2 cups all-purpose flour: The foundation of our cookie dough! Flour provides structure and stability; however, too much can lead to dry cookies. We want just enough to hold everything together while still allowing those buttery flavors to shine through.
- 2 tablespoons milk: This tiny addition helps bring our dough together without making it overly wet or dense. Milk adds moisture and encourages tenderness—just what we need for soft yet structured cookies.
- 1 cup powdered sugar (for glaze): Just as with our dough, using powdered sugar here ensures our glaze is smooth and luscious. This sugary topping not only adds sweetness but also gives our cookies that beautiful finish.
- 1 1/2 tablespoons milk (for glaze): This small amount helps achieve that perfect consistency for spreading over our cooled cookies—smooth but not too runny! The goal is to create a glaze that coats without dripping off entirely.
- 1/4 teaspoon vanilla extract (for glaze): A dash more vanilla in our glaze ties everything back together beautifully! It enhances both aroma and flavor while complementing the strawberries’ natural sweetness.
- 1 tablespoon freeze-dried strawberries (finely processed): Reserved specifically for our glaze, this final touch adds vibrant color and visual appeal while ensuring every bite is bursting with strawberry goodness.
Equipment You’ll Need:
Before we get started on this delicious journey together, let’s make sure we have all the tools ready at hand! Having the right equipment can make all the difference in ensuring your baking process is smooth and enjoyable.
- Mixing bowls: You’ll need at least two mixing bowls—one for creaming your butter and sugar and another for combining your dry ingredients. Opt for glass or stainless steel bowls since they hold temperature well and don’t react with acidic ingredients.
- Measuring cups and spoons: Precision matters in baking! Accurate measurements ensure consistency across batches. Invest in good-quality measuring cups—preferably metal or glass—for liquids since they provide clearer readings compared to plastic ones.
- Stand mixer or hand mixer: While mixing by hand is totally doable (and gives you some lovely arm workout!), I recommend using an electric mixer for creaming butter and sugar effectively. This process aerates your mixture beautifully—a key step toward achieving those light-as-air cookies!
- Rolling pin: A sturdy rolling pin is essential for rolling out your cookie dough evenly without sticking! If you don’t have one on hand, an empty wine bottle can work in a pinch—just remember no alcohol here!
- Cookie cutters (heart-shaped): To achieve those adorable heart shapes that make these cookies so special! If you don’t have heart-shaped cutters handy, feel free to use any shape you prefer; after all, love knows no bounds!
Now that we’ve gathered everything needed for these lovely Strawberry Shortbread Cookies let’s dive into preparing them step by step!

Step 1: Prepare Your Strawberry Powder
To start this delightful journey towards cookie perfection, we’ll need to transform those freeze-dried strawberries into a fine powder that will infuse our dough with flavor like nothing else can do! Begin by placing 1 ½ cups of freeze-dried strawberries into your blender or food processor; pulse until mostly powdered but still slightly grainy—that texture will help maintain some delightful bits throughout your cookie batter later on. Trust me when I say this step is crucial because it allows us to unlock all those incredible fruity flavors without any excess moisture interfering with our shortbread’s delicate texture. Once you’ve achieved that beautiful powdery consistency, set aside one tablespoon specifically reserved for glazing later on—this little detail enhances both appearance and taste!
Step 2: Cream Butter and Sugar
Now comes one of my favorite parts—the creaming process! This step transforms cold ingredients into liquid gold as they meld together harmoniously into something truly magical. In your mixing bowl (preferably chilled if you’re working in warmer weather), add your softened salted butter along with ½ cup powdered sugar carefully measured out earlier on—you’ll want an even distribution here since this forms part of both taste AND texture profile! Beat these two together until lightened in color—think pale yellow—and fluffy enough so it resembles whipped clouds dancing above cake batter dreams! This usually takes about 3–5 minutes using medium speed on an electric mixer; remember patience pays off here as under-creaming can lead directly towards dense rather than airy delights down-the-line!
Step 3: Flavor the Dough
With your butter-sugar mix now perfectly whipped up like sweet dreams come true—it’s time to give life beyond mere sweetness by introducing other star players into this ensemble cast before us! Add in one teaspoon pure vanilla extract followed by two tablespoons milk along with your freshly blended strawberry powder from earlier; mix until thoroughly incorporated but don’t overdo it either—nobody wants tough shortbreads around here after all! At this stage keep an eye out because if things seem too dry simply add another teaspoonful or two more milk until everything comes nicely together resembling a cohesive ball-like mass ready-for-action shortly thereafter… Patience again folks—it’s key here!
Step 4: Rest Your Dough
Now that we’ve created such tantalizingly fragrant dough filled with berry goodness inside let’s allow it some well-deserved rest time before rolling out onto counter surfaces next… Why chill? Well darling friend—it maintains clean heart shapes during cutting while keeping edges sharp as opposed towards rounded-off blobs instead which nobody wants happening after working hard already… Flatten dough gently into disk form then wrap tightly within cling film before heading straight into refrigerator territory waiting patiently there between 15–30 minutes maximum whilst dreaming up visions about blissful baked delights ahead – trust me patience will reward us greatly once completed!
Stay tuned as we continue exploring how to shape these gorgeous Strawberry Shortbread Cookies next…
Step 5: Roll and Cut Cookies into Sweet Hearts
Now that your dough has had a little time to chill—just enough to firm up and become manageable—it’s time for the fun part: rolling and cutting your cookies! This step is where you truly start to see your strawberry shortbread cookies come to life, transforming from simple dough into charming heart shapes. Begin by lightly dusting your work surface with flour; this will prevent the dough from sticking and create a smooth canvas for rolling. Take your chilled dough disk out of the refrigerator, and using a rolling pin, gently roll it out to about a quarter-inch thickness.
Trust me on this: don’t rush this step! Rolling it too thin can lead to crispy cookies rather than the tender texture we’re aiming for, while rolling it too thick may result in undercooked centers. As you roll, be mindful of the edges; if they seem a bit uneven, you can always trim them with your rolling pin or give them a gentle press with your hands. Once you’ve reached that perfect thickness, grab your heart-shaped cookie cutter—or any cutter that speaks to you—and begin cutting out shapes! Place each cookie on a parchment-lined baking sheet, ensuring they have enough space between them to spread slightly during baking. You should aim for about an inch apart; this is crucial to achieving those beautiful golden edges without having your cookies stick together.
Step 6: Bake Your Heart-Shaped Delights
With all your adorable hearts lined up and ready to go, it’s time for the magic of baking! Preheat your oven to 325°F (that’s about 160°C). This moderate temperature is absolutely paramount because it allows the cookies to bake evenly—giving them that delicate crispiness around the edges while keeping the insides soft and buttery. Once preheated, pop your baking sheet in, but don’t just set a timer and walk away; keep an eye on those lovely treats as they bake! In about 13-15 minutes, you’ll start noticing the edges turn a lovely light golden hue, signaling that they’re nearing perfection.
Now here’s where experience comes into play—every oven behaves differently. If you notice after 10 minutes that they are already starting to brown too quickly, it’s okay to rotate your baking sheet or lower the temperature slightly. The goal is those perfect golden edges without sacrificing that melt-in-your-mouth softness at the center. When they’re done baking, allow them to cool completely on the tray before transferring them to a wire rack. This cooling step is essential since it lets steam escape and prevents sogginess—nobody wants a limp cookie!
Step 7: Glaze Those Cookies with Strawberry Bliss
Once your cookies are completely cooled and perhaps even giving off enticing aromas that draw everyone into the kitchen (let’s be honest—they will!), it’s time for one last flourish—the strawberry glaze! In a medium bowl, whisk together one cup of powdered sugar with one and a half tablespoons of milk, along with a quarter teaspoon of vanilla extract. The consistency should be smooth yet thick enough that when you dip or spread it over the cookie surface, it doesn’t run off like liquid gold but instead forms a glossy coat that clings lovingly.
But wait! Don’t forget our reserved tablespoon of freeze-dried strawberries; finely process these until they’re almost powdery and add them into the glaze mixture. This little touch isn’t merely for color—it will infuse each bite with an extra burst of strawberry flavor that makes these cookies truly extraordinary. With each smooth stroke of glaze over your heart-shaped cookies, you’re not just decorating; you’re adding layers of flavor and love! Allow the glaze some time to set at room temperature; this usually takes about 15-30 minutes depending on humidity levels in your kitchen—so be patient as you admire your handiwork.
Step 8: The Final Touches and Serving Suggestions
With those delectable strawberry shortbread cookies now beautifully glazed and set, I promise you’ll feel an overwhelming sense of accomplishment as you gaze upon them. It’s like looking at edible art created by none other than yourself! Now comes one last delightful task before sharing these gems with friends or family: assembling everything beautifully for serving. Consider stacking them on a lovely plate or arranging them in clear jars tied with pretty ribbons for gifting—a thoughtful touch that adds warmth.
When serving these treats, I suggest pairing them with fresh strawberries or perhaps even dollops of whipped coconut cream if you’re feeling indulgent—this contrast adds another layer of enjoyment as you bite into each rich butter cookie enveloped in delightful sweetness. And don’t forget about tea or coffee; their warmth complements these heart-shaped wonders perfectly!
As you gather around with loved ones sharing stories and laughter over delicious strawberry shortbread cookies, remember this moment—this is more than just food; it’s love shared through flavors and memories crafted in every single bite. Enjoy every moment—you’ve earned it!
Storage and Enjoyment Tips for Your Strawberry Shortbread Cookies
Now that your delightful Strawberry Shortbread Cookies are baked, glazed, and beautifully arranged, it’s time to talk about how to savor them well beyond the first bite. These cookies are not just a fleeting treat; they are a little piece of happiness that you can enjoy over days—or even weeks! Whether you’re planning to share them with loved ones or keep them all to yourself (no judgment here!), knowing how to store them properly will ensure their deliciousness lasts. Trust me on this—you’ll want every last crumb to be as enchanting as the moment they came out of the oven.
Storing Leftover Strawberry Shortbread Cookies
To preserve these lovely heart-shaped wonders, store your leftover Strawberry Shortbread Cookies in an airtight container placed in a cool, dry spot. This simple step is absolutely paramount in maintaining their delightful texture, keeping them tender and buttery. When stored correctly, these cookies can stay fresh for up to a week—but I promise you, they won’t last that long because they’re just too irresistible! For an extra touch of magic, consider placing a slice of bread inside the container; it helps retain moisture and keeps the cookies from getting dry—an old baker’s trick that works like a charm! Even after a few days, when you take one out, it should still offer that glorious melt-in-your-mouth experience. If you find yourself yearning for that fresh-baked warmth again, simply pop them in the microwave for about 10-15 seconds before indulging—trust me, it feels like a warm hug!
Freezing Strawberry Shortbread Cookies for Later
If you’re feeling particularly wise (or simply want to prepare ahead), freezing these cookies is not just an option; it’s an exciting game changer! To freeze your Strawberry Shortbread Cookies perfectly, let them cool completely after baking and glaze them if desired. Then place them in a single layer on a parchment-lined baking sheet and freeze until solid before transferring them into a freezer-safe bag or container. They can be frozen this way for up to three months without losing their lovely charm! When you’re ready for another sweet adventure, simply take out as many cookies as you need—there’s no need to thaw the entire batch. Just allow them to sit at room temperature for about 10 minutes or give them a quick reheat in the oven at low heat. The convenience factor here is fabulous; it’s like having a secret stash of joy waiting for you!
Strawberry Shortbread Cookies
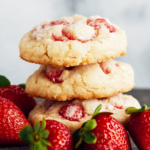
Indulge in the delightful world of Strawberry Shortbread Cookies, where buttery goodness meets the vibrant essence of freeze-dried strawberries. These charming heart-shaped cookies are perfect for celebrating life’s sweetest moments, whether it’s a cozy afternoon tea or a festive gathering. Each cookie offers a melt-in-your-mouth experience, complemented by a luscious strawberry glaze that adds an extra layer of flavor and visual appeal. This easy-to-follow recipe not only fills your home with an irresistible aroma but also creates lasting memories with every bite. So roll up your sleeves and let’s embark on this heartwarming baking adventure together!
- Prep Time: 20 minutes
- Cook Time: 15 minutes
- Total Time: 35 minutes
- Yield: Approximately 24 cookies 1x
- Category: Dessert
- Method: Baking
- Cuisine: American
Ingredients
- 1 cup salted butter, softened
- 1/2 cup powdered sugar (plus more for glaze)
- 1 1/2 cups freeze-dried strawberries (powdered)
- 1 teaspoon vanilla extract
- 2 cups all-purpose flour
- 2 tablespoons milk (plus 1 1/2 tablespoons for glaze)
- 1/4 teaspoon vanilla extract (for glaze)
- 1 tablespoon freeze-dried strawberries (finely processed for glaze)
Instructions
- Prepare strawberry powder by blending freeze-dried strawberries into a fine powder.
- In a mixing bowl, cream softened butter and powdered sugar until light and fluffy.
- Add vanilla extract, milk, and strawberry powder; mix until combined.
- Gradually add flour, mixing until dough forms.
- Chill the dough for 15–30 minutes.
- Roll out chilled dough to a quarter-inch thickness and cut into heart shapes.
- Bake at 325°F (160°C) for 13–15 minutes or until edges are golden.
- Cool cookies completely before glazing.
- For the glaze, whisk powdered sugar, milk, vanilla extract, and reserved strawberry powder until smooth; drizzle over cooled cookies.
Nutrition
- Serving Size: 1 cookie (25g)
- Calories: 120
- Sugar: 8g
- Sodium: 80mg
- Fat: 7g
- Saturated Fat: 4g
- Unsaturated Fat: 3g
- Trans Fat: 0g
- Carbohydrates: 12g
- Fiber: <1g
- Protein: <1g
- Cholesterol: 20mg