Dutch Apple Pie Recipe
There’s something truly magical about the aroma of a freshly baked pie wafting through your home. It’s like a warm hug that wraps around you, whispering sweet memories of family gatherings and cozy evenings spent together. The Dutch Apple Pie Recipe I’m about to share is not just a dessert; it’s an experience—a delightful symphony of flavors that transports you to the heart of autumn with every bite. Imagine sinking your fork into layers of tender apples, perfectly spiced and enveloped in a buttery, flaky crust, topped with a crunchy streusel that adds just the right amount of sweetness. It embodies comfort, nostalgia, and love all at once, making it perfect for sharing with friends and family.
As the leaves turn golden and the air grows crisp, this Dutch apple pie becomes not just a dish but a celebration—a bridge between tradition and innovation. The blend of Granny Smith and McIntosh apples creates a beautiful contrast in flavor and texture; the tartness of the Granny Smith dances harmoniously with the soft sweetness of McIntosh, while the cinnamon weaves through it all like an old friend. This pie is particularly special because it invites everyone to gather around, share stories, and create new memories. So let’s roll up our sleeves and embark on this culinary journey together—trust me; your kitchen will be filled with love (and delicious smells) before you know it!
Dutch Apple Pie Recipe: A Cozy Autumn Delight
This Dutch Apple Pie recipe is a true labor of love that combines perfectly cooked apple filling with an irresistible crumble topping. It’s an ode to fall flavors that will leave your taste buds singing!
Ingredients:
Before we dive into baking, let’s gather our ingredients—each one plays an important role in creating this beloved pie. Think of these components as essential players in our culinary orchestra.
- 1¼ cups all-purpose flour (divided). Flour is the backbone of our crust, providing structure and stability to hold everything together beautifully. Using all-purpose flour strikes that perfect balance between tenderness and strength, which is essential for achieving a flaky pie crust. When measuring your flour, be sure to spoon it into your measuring cup rather than scooping directly from the bag; this prevents it from becoming compacted and ensures you don’t end up with a dry crust.
- 1 tablespoon granulated sugar. This small addition does wonders for enhancing flavor in our crust. Sugar not only contributes sweetness but also helps to achieve that golden-brown color we’re looking for when baking. Plus, it balances out the tartness from our apples later on—making each slice truly harmonious.
- ½ teaspoon salt. Salt is absolutely paramount in balancing flavors; think of it as a flavor enhancer that elevates every ingredient’s taste without making things salty. It adds depth to both our crust and filling, ensuring that everything tastes well-rounded and complete.
- 6 tablespoons cold unsalted butter (cut into ¼-inch slices). Butter is where we get much of our flavor from! Using cold butter helps create those lovely flaky layers in the crust as it melts during baking—think crispy edges! Unsalted butter gives you control over salt levels so you can tailor your pie exactly how you like it; plus, its richness enhances every bite.
- ¼ cup vegetable shortening (chilled, cut into 2 pieces). Shortening has a unique property—it has no water content like butter does—which results in an incredibly tender crust when used correctly. Chilling it beforehand helps maintain its solid state while mixing for optimal flakiness without compromising texture.
- 2 tablespoons ice water. Water brings your dough together but remember—less is more! You want just enough moisture to bind everything without making it sticky or tough; adding ice-cold water helps keep everything cool during this process.
- 2 tablespoons white grape juice (chilled). This delightful addition serves as a subtle sweetener while also acting as moisture for our dough! The grape juice lends fruity notes without overwhelming the palate—perfect for complementing our apples later on.
- 5 large Granny Smith apples (about 2½ pounds). These beauties bring tartness and firmness; their structure holds up beautifully during cooking while their zestiness balances out sweetness elsewhere in the pie.
- 4 large McIntosh apples (about 2 pounds). These apples are softer than Granny Smiths—they break down nicely during cooking to create that luscious filling texture we crave! Their gentle sweetness pairs excellently with Granny Smith’s tangy profile for an all-around wonderful apple experience.
- ¼ cup granulated sugar. We’re using more sugar here specifically for sweetening the apple filling—it encourages caramelization while cooking down those juicy apples to create an utterly intoxicating syrup that coats each slice perfectly!
- ½ teaspoon ground cinnamon. Cinnamon infuses warmth into every bite—it’s what makes this pie feel like home! Its aromatic quality enhances both sweet and savory flavors beautifully—it truly brings everything together in harmony.
- Pinch of salt. Just like before—we need this pinch to enhance those sweet notes while balancing them out against acidity from our apples!
- 2 tablespoons unsalted butter. Butter isn’t just for our crust! Here, we’ll use melted butter to coat those lovely sliced apples as they cook down together—adding richness throughout!
- ½ cup heavy cream. Cream isn’t just indulgent—it provides richness that thickens into a delightful sauce when combined with juices from cooked apples later on! This step ensures each slice remains moist yet structured after baking instead of drying out.
- 1¼ cups all-purpose flour (for streusel topping). We’re back to flour again—but here we want texture more than structure! This flour combines with sugars below to create crumbly bits atop our baked pie—it’s absolutely vital for achieving that signature crunch on top!
- 1/3 cup light brown sugar & 1/3 cup granulated sugar (for streusel topping). Both sugars work together here—brown sugar adds moisture-rich depth while granulated sugar contributes additional sweetness overall; they combine beautifully creating those satisfying chunks we look forward to biting into!
- 7 tablespoons unsalted butter (melted) – Melting butter allows us easy incorporation into our dry ingredients without clumping; this helps achieve even distribution within our streusel topping ensuring every bite has equal crunchiness alongside luscious filling beneath!
Equipment You’ll Need:
Before we roll up our sleeves and get started on this delicious journey toward crafting the perfect Dutch Apple Pie, let’s take a moment to gather some essential tools—our trusty companions in this culinary adventure! Having the right equipment not only streamlines your process but also transforms cooking into something enjoyable instead of stressful.
- Food processor – This handy device will make quick work of mixing your dough—saving time and effort compared to traditional methods by hand! A food processor gives us precise control over how finely mixed our ingredients become without overworking them—a crucial factor for maintaining flakiness!
- 9-inch pie plate – Choosing the right vessel matters here! A deep-dish pie plate gives enough room for generous fillings while promoting even browning along edges thanks to its materials’ heat conductivity—optimum results await!
- Rolling pin – A good rolling pin allows you easy maneuverability when shaping out dough evenly across surfaces; choosing one made from hardwood ensures durability alongside comfortable grip during use!
- Aluminum foil – Foil helps shield areas from direct heat during blind baking so crust doesn’t burn prematurely before we’ve added filling later on—it’s essential if we want perfection instead of disappointment!
With these ingredients gathered lovingly alongside necessary tools at hand…let’s dive headfirst into preparing this incredible Dutch Apple Pie Recipe together!
Step 1: Crafting Your Flaky Pie Crust
To begin crafting this delectable Dutch apple pie, we’ll start by whipping up our flaky pie crust—a process that’s simpler than many think once you get the hang of it! First off, combine three quarters cup of all-purpose flour along with granulated sugar and salt inside your food processor until well blended—this blending sets up great flavor foundations right away by ensuring even distribution across all elements moving forward! Next comes adding those cold slices of butter alongside chilled vegetable shortening before processing again until resembling coarse crumbs or small pebbles about one-third inch long—a visual cue you’ll learn quickly becomes second nature over time!
The trick here lies in keeping everything cold—the colder these fats remain means flakier layers once baked due solely to steam created within them escaping through pastry layers during cooking time itself—that’s where magic happens folks! After reaching desired consistency within just seven seconds max worth noting: scrape down bowl sides gently using rubber spatula redistributing mix evenly before adding remaining half-cup flour then pulse four more times until fully incorporated—don’t rush this step because achieving uniformity ensures success down line when rolling dough out later ahead properly too!
Step 2: Bringing It Together
Now comes my favorite part—the moment where we bring everything together into one cohesive ball ready for rolling out lovingly onto floured surface awaiting transformation ahead! Here’s where patience pays off big time: sprinkle both ice water plus white grape juice over mixture gently folding using rubber spatula until slightly tacky starts forming cohesively around edges gathering nicely towards center—this tactile response indicates progress while allowing us control over moisture levels needed throughout process itself too…
Once fully combined turn dough out carefully upon lightly floured workspace pressing gently downwards molding its shape gradually resembling six-inch round disc—you want something manageable yet firm enough hold form without falling apart too easily either way here folks trust me on this part especially since letting rest afterward really makes difference come bake day later down line too… Now lightly dust top surface once again before grabbing rolling pin working quickly across area toward thirteen-inch circle shape staying mindful picking up rotating quarter turns after couple rolls ensure even thickness throughout entire piece avoiding unnecessary stickiness along bottom side unnecessarily ruining any chances at success later ahead folks!!
Step 3: Shaping Your Perfect Crust
With dough now rolled properly sized appropriately transfer gently onto nine-inch prepared plate pressing firmly against bottom edge sides ensuring snug fit against curves present there shaping according tastes naturally too if desired—for fancy flair try fluting edges or pressing fork tines along rim as final touch showcasing craftsmanship behind creation itself too!! Additionally trim excess dough extending beyond lip about one inch away folding tucked inward toward center making flush finish seamless appearance alike what seen bakery storefronts nearby passing by earlier today…
Now comes refrigeration phase which I find non-negotiable during any serious baking project involving pies overall so tuck wrapped tightly inside plastic wrap chilling two hours minimum set aside focus elsewhere meanwhile prepping filling below ready bring forth next layer scrumptious goodness awaiting soon thereafter folks!!
Step 4: Blind Baking Your Crust
Once chilled sufficiently preheat oven temperature up to three hundred fifty degrees Fahrenheit embracing warmth enveloping space surrounding lovingly ready welcoming aromas soon fill air afterwards… Begin blind baking by lining chilled dough now resting inside plate generously covering bottom plus edges entirely using aluminum foil followed by pouring granulated sugar atop providing weight keeping shape intact through heating period ahead preventing shrinkage occurring instead!!
Bake roughly forty minutes till lightly golden hues emerge around perimeter slowly revealing unmistakable signs readiness thereafter remove foil along sugar gently placing upon wire rack cooling while proceeding onwards crafting exquisite filling unfolding moments following shortly after excitedly indulging graciously beyond imagination awaits dear friends…
And there you have it—the initial steps are laid out clearly so let’s continue exploring further aspects leading towards completing masterpiece awaiting fruition altogether soon enough… Stay tuned as we delve deeper shortly unveiling secrets behind crafting rich apple fillings harmonizing effortlessly beneath streusel toppings wrapping everything up exquisitely later on magically transporting taste buds blissfully thereafter!!
Step 5: Prepping for the Apple Filling – A Dance of Flavors
With your pie crust resting in the refrigerator, it’s time to turn our attention to the apple filling, and I can’t tell you how excited I am about this part! The moment you slice into those crisp Granny Smith and sweet McIntosh apples, you’ll be enveloped in a fresh, fruity aroma that promises the warmth of fall. Start by peeling, coring, and quartering your apples—this is where you begin to build layers of flavor. For each quarter, slice crosswise into pieces that are about ¼ inch thick. This thickness is crucial because it allows for even cooking; if they’re too thick, you risk ending up with crunchy bites instead of tender, meltingly soft apple slices.
Next, toss those beautiful apple slices with sugar, cinnamon, and a pinch of salt in a large bowl. The sugar will draw out the natural juices from the apples while the cinnamon adds an intoxicating warmth that just screams comfort. Why add salt? It might seem counterintuitive when working with sweetness, but salt elevates flavors like nothing else—it balances sweetness and helps to deepen the overall taste profile. Once everything is well combined, we’ll turn our attention to cooking them down. Heat your Dutch oven over high heat until the butter foams; this step is vital as it provides a rich background for our apples to caramelize beautifully without burning.
When you add the apples to the pot, make sure they are coated evenly in that melted butter—this will create a luscious texture as they cook down. Reduce the heat to medium-high and cover them up! You’ll want those apples to sweat out their moisture while still retaining some bite—about ten minutes should do it. Keep an eye on them and stir occasionally; we’re looking for that perfect balance where Granny Smiths are tender yet firm and McIntosh are beginning to soften beautifully.
Step 6: Draining the Juice – The Secret to a Perfect Filling
Now comes one of my favorite moments in this entire Dutch apple pie recipe: draining those beautifully cooked apples in a colander! After letting them cook down for about ten minutes, you’ll see some lovely juices collecting at the bottom of your pot—this is liquid gold! By transferring your cooked apple mixture into a colander set over a large bowl, you’re allowing any excess moisture to escape. This step is non-negotiable if we want our pie crust to remain crisp rather than soggy after baking.
Once you’ve drained off as much juice as possible—don’t be shy here; give that colander a gentle shake—you can bring that precious juice back into your Dutch oven along with some heavy cream. Now comes the exciting part: bringing this mixture to a boil over high heat! As it simmers away, stir frequently until it thickens up nicely; you’re looking for it to reduce enough so that when you drag a wooden spoon through it, it leaves a trail behind—this should take about five minutes or so. Trust me on this step; not only does this intensify flavors dramatically but also ensures that we’ve got a luscious sauce ready to envelop our apple slices when assembled.
Once thickened perfectly, pour this velvety cream mixture over your drained apples which now lie waiting in their glorious glory inside the pie crust. Use your rubber spatula here—it’s perfect for smoothing out that sweet sauce so every slice gets its fair share of creamy goodness!
Step 7: Crafting Your Streusel Topping – The Crunch Factor
Ahh, now we arrive at what truly makes this Dutch apple pie recipe unforgettable—the streusel topping! Picture yourself mixing together flour and sugars in a medium bowl while imagining how delightful each crumb will be once baked—can you smell it already? Combine 1¼ cups of all-purpose flour with both light brown sugar and granulated sugar before drizzling in melted unsalted butter. Now here’s where the magic happens: using a fork (or even your fingers if you’re feeling adventurous), toss everything together until you achieve that perfect blend where large chunks form amidst smaller pea-sized bits.
This part is essential as those larger pieces create delightful crunchiness while smaller crumbs give additional texture throughout each bite of pie! You want every inch of your filling topped with this glorious streusel—so don’t hold back! Generously sprinkle that streusel topping evenly across the surface of your apple filling; just seeing all those golden crumbles come together will fill you with anticipation for what’s about to unfold.
As an extra tip for success: don’t skip measuring accurately here; precision can make or break how cohesive your streusel turns out. If it’s too dry or lacking butter distribution, you’ll miss out on those heavenly crispy bites we all crave!
Step 8: Baking Your Masterpiece – Where Science Meets Artistry
Now comes perhaps one of the most exhilarating steps in our journey—the baking process! With your oven preheated to 425 degrees F (that’s quite hot!), place your pie plate atop a baking sheet; believe me when I say this will catch any delicious overflow during baking (because who wants sticky ovens?). Slide it into that radiant heat source like you’re placing an offering—it deserves every bit of love!
During baking, keep an eye on that streusel topping as it transforms from pale beige into deep golden brown perfection—a visual cue signaling its readiness which should take anywhere from 10 to 20 minutes depending on individual oven quirks. You may notice some bubbling around the edges—that’s completely normal! It’s simply nature’s way of telling us all those wonderful flavors are melding together beautifully.
To ensure doneness beyond mere color checks, consider using an instant-read thermometer if you’re feeling ambitious; once inserted into the center reaches around 205 degrees F—that’s when you know it’s truly ready! Allowing it to cool on a wire rack post-baking is crucial too—it allows residual steam trapped within to escape while helping stabilize everything inside so slices won’t crumble apart upon serving.
Final Touches – The Grand Reveal
Step 9: Cooling and Serving Your Dutch Apple Pie – A Slice of Heaven Awaits
Finally—the moment we’ve all been waiting for has arrived! Allow your masterpiece—the Dutch apple pie—to cool completely on that wire rack until it reaches room temperature (around two hours). I know patience can be tough here because who wouldn’t want to dive right in? But trust me on this one; allowing cooling ensures all those flavors have time to meld together properly while also preventing any melty mess when slicing!
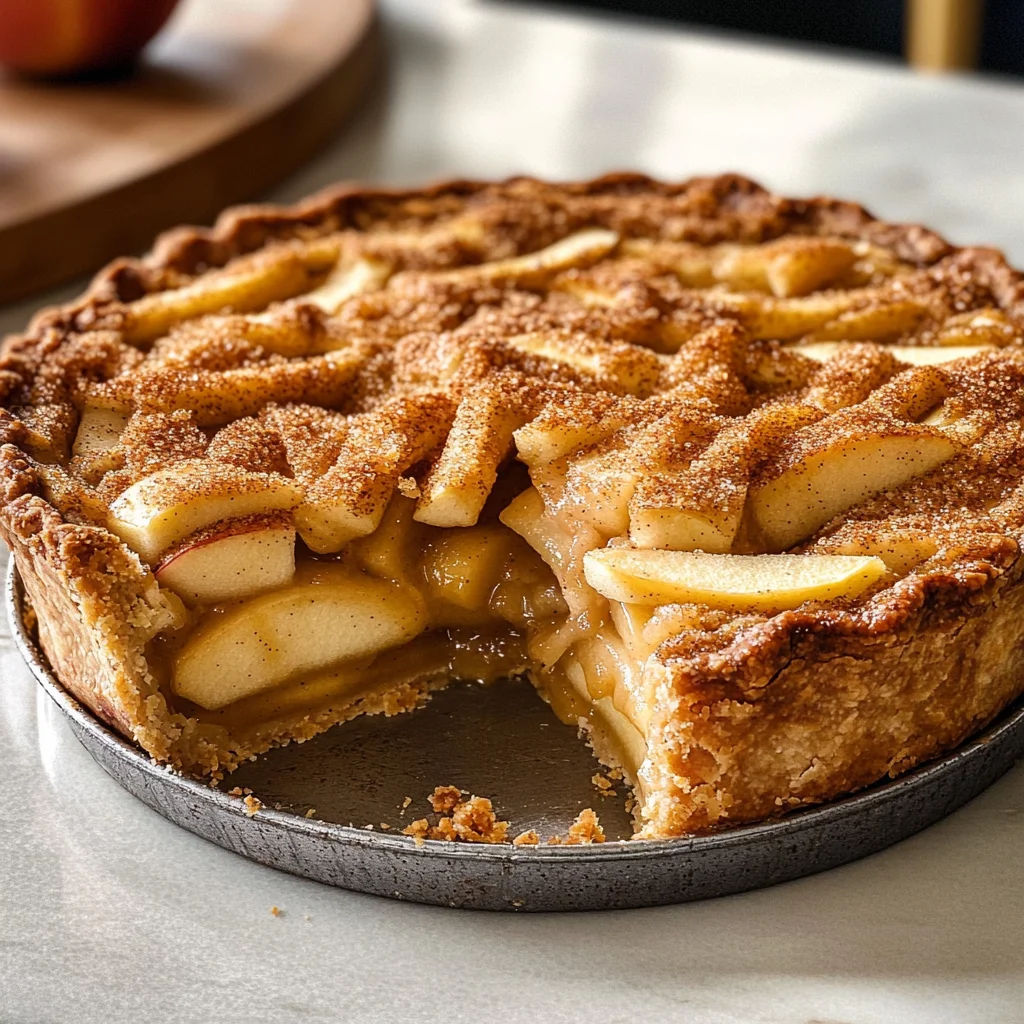
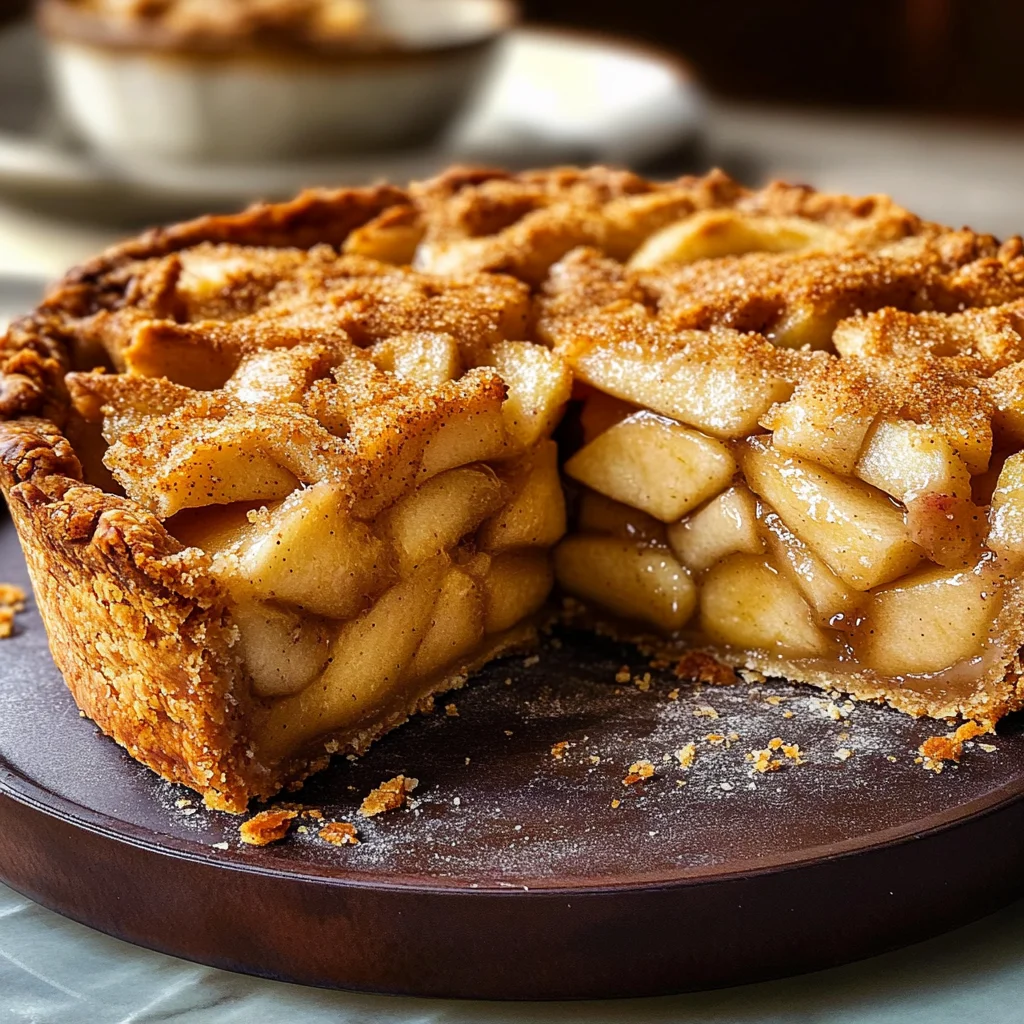
Once cooled down adequately (and believe me when I say it’ll be utterly intoxicating), gather your loved ones around and serve generous slices topped with whipped cream or even vanilla ice cream if you’re feeling indulgent (but hey—you do you!). Each bite will reveal layers upon layers—from tender apples coated in silky cream sauce beneath crunchy streusel topping—all harmonizing beautifully together.
So there you have it—a beloved family recipe brought straight from my kitchen into yours through every word written here today—and I’m beyond excited for you to experience its incredible warmth and comfort firsthand! Enjoy every single bite because after all…you’ve earned this moment!
Storage and Enjoyment Tips for Your Dutch Apple Pie Recipe
Now that your kitchen is filled with the intoxicating aroma of freshly baked Dutch apple pie, it’s time to savor this delightful creation! Nothing quite compares to the moment you slice into that golden-brown crumble topping, revealing the tender apples nestled beneath. But what happens when you have leftovers? Don’t worry; I’ve got you covered with some essential storage tips to ensure this delectable dessert remains just as fabulous for your next indulgence.
Storing Leftover Dutch Apple Pie Recipe
To keep your leftover Dutch apple pie at its best, first, let it cool completely before storing. Place the pie in an airtight container or cover it tightly with plastic wrap to preserve its moisture and flavor. Ideally, you should store it in the refrigerator, where it will stay fresh for about 3 to 4 days. If you’re like me and savor that fresh-baked taste, here’s a fun pro tip: place a slice of bread inside the container with the pie; this will help absorb excess moisture while keeping the crust delightfully crisp. After a few days in the fridge, you’ll find that the flavors meld beautifully, creating a comforting harmony that makes each bite even more satisfying than before. When you’re ready to enjoy another slice, simply reheat it in a warm oven at 350°F for about 10 minutes or pop it in the microwave for a quick fix—trust me; it’s utterly divine!
Freezing Dutch Apple Pie for Later
If you’re planning ahead (or just want to save some for later), freezing your Dutch apple pie is an absolute game-changer! To freeze, ensure your pie is fully cooled and then wrap it tightly in plastic wrap followed by aluminum foil to protect it from freezer burn—this method keeps all those exquisite flavors locked in. You can freeze your pie for up to 3 months! When you’re craving a slice of fall bliss, simply take it out of the freezer and let it thaw overnight in the refrigerator. For an instant taste of home-cooked comfort, pop it into a preheated oven at 350°F until warmed through. This approach not only preserves its delightful essence but also offers a convenient way to treat yourself whenever you desire something sweet without any fuss!
Dutch Apple Pie
Delight in the warm embrace of autumn with this scrumptious Dutch Apple Pie Recipe. Perfectly balanced between tart Granny Smith and sweet McIntosh apples, this pie features a buttery, flaky crust and a crunchy streusel topping that adds a satisfying texture to every bite. As the enticing aroma fills your home, you’ll be transported to family gatherings and cozy evenings spent enjoying comforting desserts.
- Prep Time: 30 minutes
- Cook Time: 60 minutes
- Total Time: 1 hour 30 minutes
- Yield: Serves 8
- Category: Dessert
- Method: Baking
- Cuisine: American
Ingredients
- 1¼ cups all-purpose flour (for crust)
- 1 tablespoon granulated sugar (for crust)
- ½ teaspoon salt (for crust)
- 6 tablespoons cold unsalted butter (cut into ¼-inch slices, for crust)
- ¼ cup vegetable shortening (chilled, cut into 2 pieces, for crust)
- 2 tablespoons ice water (for crust)
- 2 tablespoons white grape juice (chilled, for crust)
- 5 large Granny Smith apples (about 2½ pounds)
- 4 large McIntosh apples (about 2 pounds)
- ¼ cup granulated sugar (for filling)
- ½ teaspoon ground cinnamon (for filling)
- Pinch of salt (for filling)
- 2 tablespoons unsalted butter (for filling)
- ½ cup heavy cream (for filling)
- 1¼ cups all-purpose flour (for streusel topping)
- ⅓ cup light brown sugar (for streusel topping)
- ⅓ cup granulated sugar (for streusel topping)
- 7 tablespoons unsalted butter (melted, for streusel topping)
Instructions
- Preheat your oven to 425°F.
- In a food processor, combine flour, sugar, and salt for the crust. Add cold butter and shortening; pulse until crumbly.
- Sprinkle in ice water and white grape juice; pulse until dough forms. Chill for at least two hours.
- Roll out the dough and fit it into a pie plate. Blind bake for about 40 minutes.
- Meanwhile, peel, core, and slice the apples. Toss with granulated sugar, cinnamon, and salt.
- Cook the apple mixture in butter over medium heat until tender; drain excess juice.
- Bring the reserved juice to a boil with heavy cream until thickened.
- Pour over apples and fill the baked crust.
- Mix flour, sugars, and melted butter for the streusel; sprinkle on top of the filling.
- Bake for another 20 minutes or until golden brown.
Nutrition
- Serving Size: 1 slice (125g)
- Calories: 320
- Sugar: 18g
- Sodium: 150mg
- Fat: 15g
- Saturated Fat: 9g
- Unsaturated Fat: 4g
- Trans Fat: 0g
- Carbohydrates: 45g
- Fiber: 3g
- Protein: 2g
- Cholesterol: 30mg