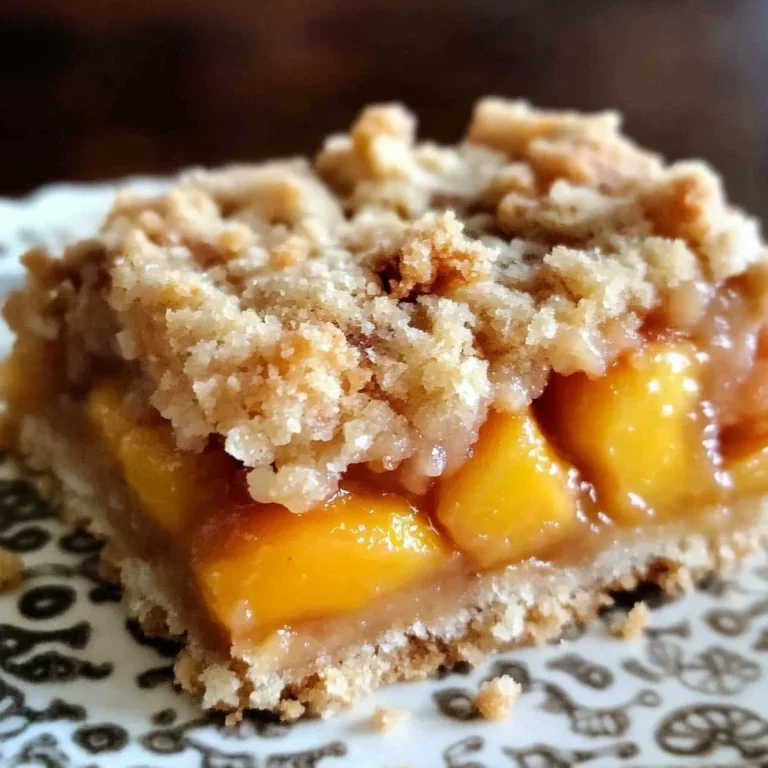
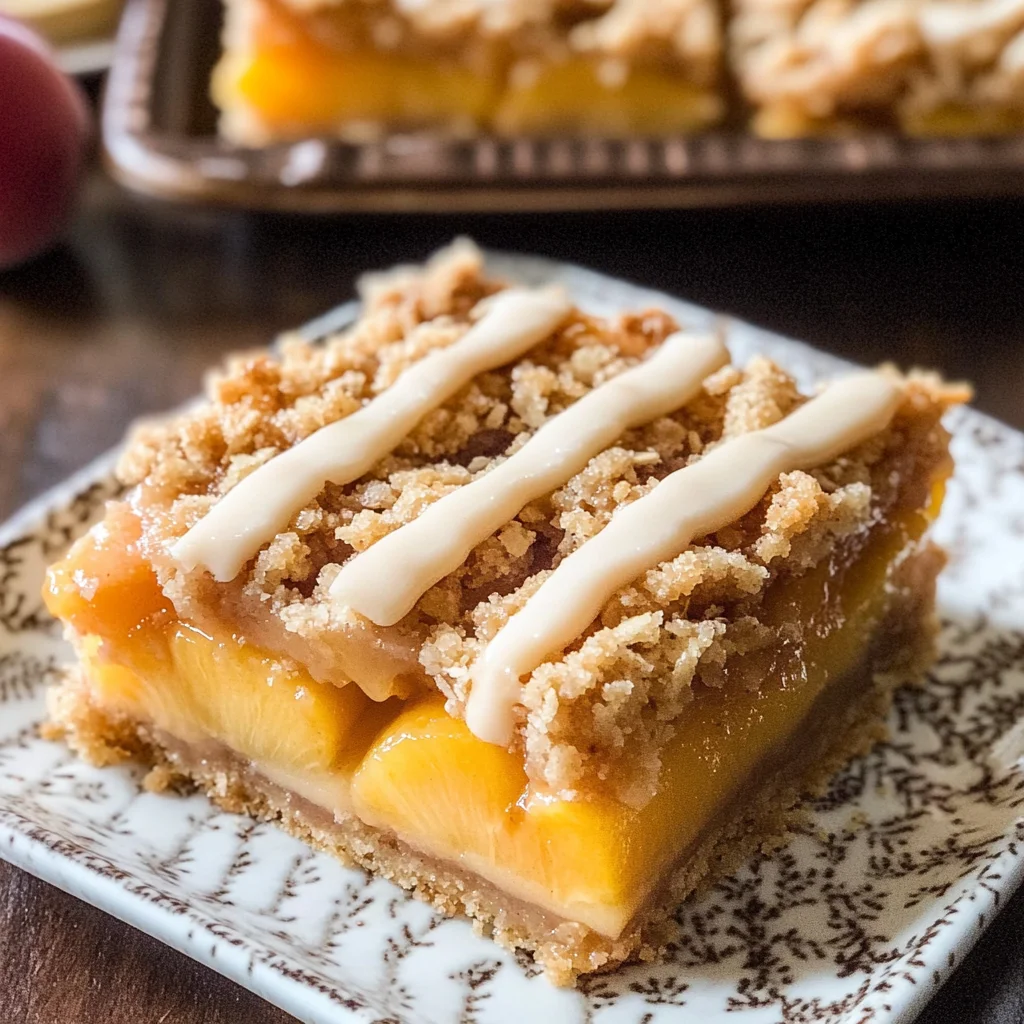
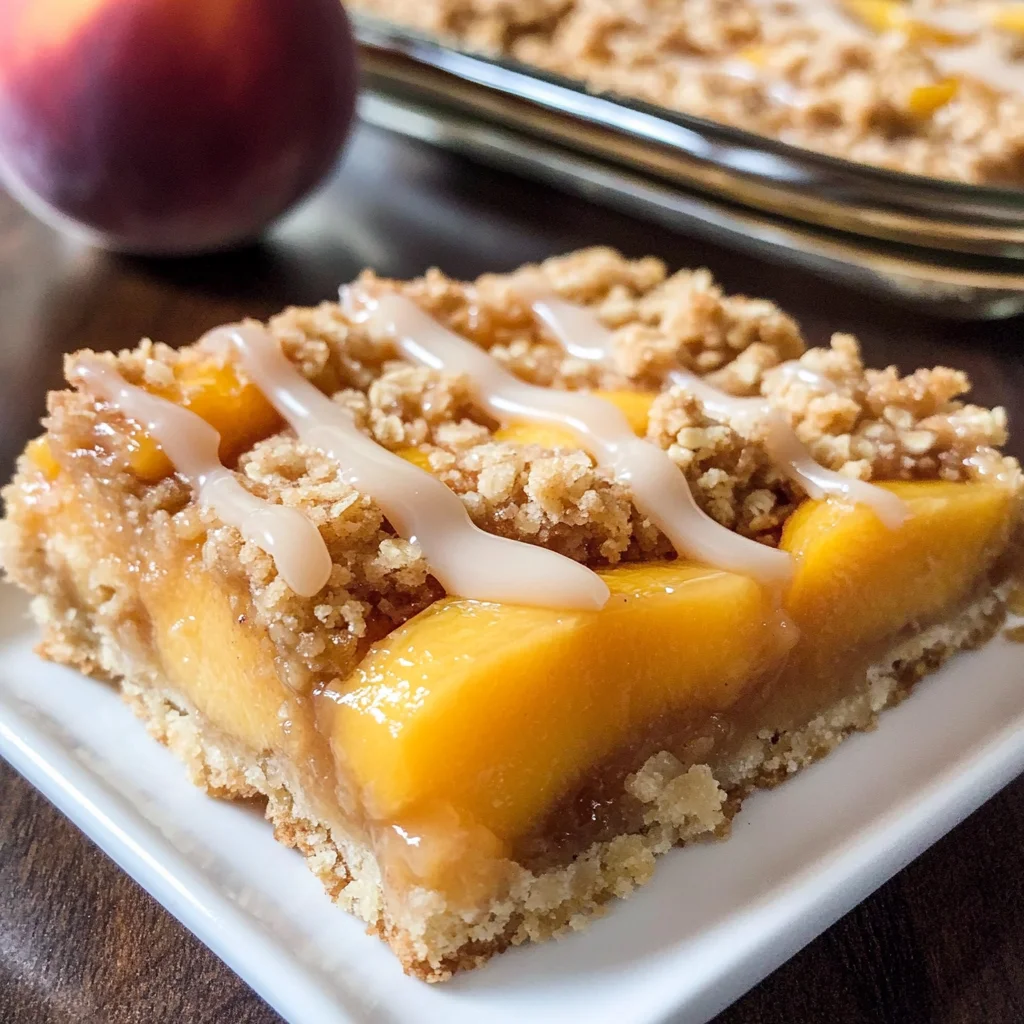
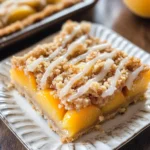
Peach Pie Crumble Bars
There’s something undeniably magical about the aroma of fresh peaches wafting through your kitchen, especially when they transform into a delectable dessert that captures the essence of summer in every bite. These Peach Pie Crumble Bars are more than just a delightful treat; they’re an experience steeped in love, nostalgia, and the thrill of sharing something truly beautiful with those who matter most. Imagine biting into a buttery shortbread base, the sweetness of juicy peaches melting on your tongue, and the satisfying crunch of oatmeal crumble enveloping it all—it’s like wrapping yourself in a warm hug on a sunny afternoon. I promise you, once you try these bars, they will become a cherished addition to your baking repertoire.
What makes these Peach Pie Crumble Bars so special is that they marry two beloved desserts—the classic peach pie and the comforting crumble—into one glorious creation. This isn’t just about flavor; it’s about celebrating the bounty of summer fruits and creating memories with each slice. Picture yourself gathering with friends or family, laughter filling the air as you serve these bars topped with a drizzle of creamy glaze. Whether it’s a summer barbecue or simply indulging on a cozy evening at home, these bars are perfect for any occasion, evoking warmth and joy in every crumb.
Peach Pie Crumble Bars: A Symphony of Summer Flavors
These Peach Pie Crumble Bars are not only easy to make but also incredibly rewarding. The melding of flavors and textures creates something utterly intoxicating that will leave your taste buds singing. So grab your apron and let’s embark on this delightful culinary journey together!
Ingredients:
As we dive into this recipe for Peach Pie Crumble Bars, it’s important to gather our ingredients thoughtfully. Each component plays a vital role in crafting this heavenly dessert, so let’s explore them together.
- 1 1/4 cups all-purpose flour. This ingredient serves as the backbone for both the shortbread base and the crumble topping. When selecting flour, look for high-quality all-purpose flour that will provide just enough structure without being too dense. The gluten content here is crucial; it helps create that delightful texture we crave in desserts. If you want to experiment, consider using half whole wheat flour for a nuttier flavor.
- 1/2 cup powdered sugar. This finely ground sugar dissolves beautifully into our shortbread base, making it melt-in-your-mouth tender while providing just the right amount of sweetness without being overwhelming. Trust me on this—it’s essential for achieving that coveted lightness in your crust.
- 1/4 teaspoon salt. While it may seem minimal, salt is absolutely paramount in enhancing flavors throughout this recipe. It balances out the sweetness and brings forth the natural flavors of the peaches and butter, making each bite profoundly satisfying.
- 2/3 cup unsalted butter, melted. Butter is where much of our flavor comes from! Using unsalted butter allows you to better control the salt levels in your dish. Make sure it’s melted but not too hot; if it’s sizzling or bubbling when you combine it with other ingredients, you risk cooking them prematurely—a no-no when aiming for that perfect texture.
- 3 cups chopped peaches (about 4-5 large peaches). Fresh peaches are truly the stars of this show! Their sweet juiciness transforms during baking into liquid gold that seeps into every layer of these bars. Choose ripe peaches—those with a slight give when gently pressed—because they’ll impart maximum flavor and moisture.
- 1/4 cup granulated sugar. This sugar helps caramelize those luscious peaches as they bake while adding just enough sweetness to enhance their natural flavor without overpowering them.
- 2 tablespoons fresh lemon juice (or water). Lemon juice brightens up our peach layer by adding acidity which enhances their sweetness and balances flavors perfectly. If you’re out of lemons, water will work too—but I highly recommend using fresh lemon juice for its zesty brightness!
- 3 tablespoons cornstarch. This ingredient works wonders by thickening up the peach juices during baking so we don’t end up with a soggy bottom! Without it, you’d have more of a peach soup than a structured bar—definitely not what we want!
- 3/4 cup flour (for crumble). Just as with our first measurement of flour, this will create our crumble topping along with other ingredients that add texture and crunch to our bars while keeping everything together beautifully.
- 1/4 cup large flake oats (quick oats or old-fashioned oats work too). Oats provide an incredible crunch when baked while also lending some heartiness to our crumble topping—transforming it from mere garnish to an essential part of our overall texture experience.
- 1/3 cup brown sugar. The molasses within brown sugar adds depth and richness to our crumble mixture; its slight chewiness complements both the sweetness from our fruits and buttery notes from our base beautifully.
- 1 teaspoon cinnamon. Oh my goodness! Cinnamon adds warmth and an irresistible aromatic quality that transports us right back to grandma’s kitchen during autumn! It pairs wonderfully with peaches—a match made in heaven!
- 1/3 cup unsalted butter, melted (for crumble). Just like before, this butter enriches both flavor and texture while ensuring our crumble stays moist yet achieves that desired crunch as it bakes away in the oven.
- 1 cup powdered sugar (for glaze). We’ll whisk this into a creamy drizzle later on that elevates each bar from delicious to extraordinary!
- 1/2 teaspoon vanilla extract. Vanilla is another magic ingredient here; its sweet aroma harmonizes beautifully with both peachy notes and buttery crusts alike!
- 4-5 tablespoons cream (or milk). This will help us achieve an ideal drizzling consistency for our glaze—thicker than milk yet thinner than frosting! Use whatever you have on hand; even plant-based milks can work well here!
Equipment You’ll Need:
Having the right tools makes all the difference when crafting these Peach Pie Crumble Bars—it turns potentially chaotic baking into an enjoyable process! Think of your kitchen equipment as essential partners working alongside you to create something wonderful.
- 8×8 inch pan – This size is perfect for creating bars with just the right thickness without overcooking any parts! Ensure it’s lined with parchment paper so they lift out easily after cooling—trust me on this little trick!
- Medium mixing bowls – You’ll need several bowls: one for combining dry ingredients like flour and sugar; another for mixing wet elements such as melted butter or fruit mixtures! Having multiple bowls handy keeps things organized while preventing unnecessary messes!
- Whisk – A good whisk is key here—to blend dry ingredients smoothly together before adding liquids ensures everything combines evenly without lumps forming!
Step 1: Preheat & Prepare Your Pan
The first thing we’re going to do is preheat your oven to 350°F (that’s about 175°C if you’re using metric!). Preheating is crucial because starting off with a hot oven ensures even baking right from moment one—no one wants undercooked bars after waiting all that time! While that’s happening, take an 8×8 inch pan (the perfect size!), line it with parchment paper allowing some overhang around edges—it will make removing these beauties later effortless!
Step 2: Create Your Shortbread Base
Now let’s whip up that buttery shortbread base which serves as our foundation! In one medium bowl combine 1 ¼ cups all-purpose flour with ½ cup powdered sugar & ¼ teaspoon salt using a whisk—it’s essential to blend them well so there aren’t any dry pockets left behind! Once mixed thoroughly stir in ⅔ cup melted unsalted butter until every grain has been moistened; don’t skip this step because proper blending results in tenderness when baked! Once combined completely press mixture firmly down into prepared pan covering bottom evenly before sliding it into preheated oven for about 15 minutes—watch closely until golden brown around edges surfaces slightly puffed up—that’s how you’ll know it’s ready!
Step 3: Prepare Your Peach Layer
While that base bakes away nicely let’s turn attention towards those gorgeous chopped peaches waiting patiently nearby! In another medium bowl toss together three cups chopped fresh peaches along with ¼ cup granulated sugar plus two tablespoons fresh lemon juice plus three tablespoons cornstarch until everything gets evenly coated—the idea here being we want even sweetness distributed throughout every bite without excess liquid pooling underneath later on during baking which could ruin those lovely layers we’ve created so far! Set aside once tossed well until needed shortly after crust finishes baking away…
Step 4: Make Your Crunchy Oatmeal Crumble Topping
Now comes my favorite part—the scrumptious oatmeal crumble topping! Grab yet another medium bowl then stir together three-fourths cup flour combined along side one-quarter cup large flake oats plus one-third cup brown sugar & one teaspoon cinnamon until fully blended—they must embrace each other tightly before pouring over melted butter measured at one-third cup right there inside same bowl quickly stirring again until mixture resembles wet sand texture—that’s key folks because if too dry won’t stick properly atop layered fruit below causing disaster otherwise known as “crumbly crumbles!” Once mixed perfectly set aside momentarily till called upon soon enough…
I hope you’re feeling inspired by now because trust me; these next steps lead us straight towards dessert nirvana where everyone raves about how amazing they turned out!! Stay tuned as we keep building upon what we’ve started together…
Step 5: Embracing the Juicy Peach Layer
Now that your shortbread base is baked to a lovely golden hue, it’s time to create the star of the show: the luscious peach layer! Take those freshly chopped peaches—about four or five large ones, depending on their size—and place them in a mixing bowl. You want to gently toss them with 1/4 cup of granulated sugar, 2 tablespoons of fresh lemon juice (or water if you prefer), and 3 tablespoons of cornstarch. This step is absolutely crucial as the sugar will draw out the natural juices from the peaches, creating a deliciously gooey filling that marries beautifully with the buttery crumble topping. The lemon juice adds just a hint of brightness, cutting through the sweetness and elevating the flavors, while the cornstarch thickens everything up as it bakes, ensuring that your bars hold together nicely.
As you’re tossing those peaches, take a moment to really appreciate their vibrant colors and intoxicating aroma. It’s like dipping into summer itself! You want to ensure every peach piece is evenly coated in this sweet mixture—this will help build that layer of flavor that sings with every bite. Don’t rush this step; spend a little extra time making sure everything is well mixed so each bar has an even distribution of that juicy goodness. And once you’re satisfied with your peach concoction, it’s time to spread it across that beautiful shortbread base, ready for its next layer.
Step 6: Crafting the Irresistible Crumble Topping
With your peach layer just waiting to be nestled into its new home, let’s move on to crafting that irresistible crumble topping! In another medium-sized bowl, combine 3/4 cup of all-purpose flour with 1/4 cup of large flake oats—trust me on this one; using oats not only adds texture but also gives a delightful rustic charm to your bars. Then add in 1/3 cup of brown sugar and 1 teaspoon of cinnamon. Here’s where things get exciting! The brown sugar brings a deep caramel flavor that pairs exquisitely with those juicy peaches, while the cinnamon whispers warmth and nostalgia—like a comforting hug on a chilly evening.
Next comes what I like to call the “magic” moment: slowly stir in 1/3 cup of melted unsalted butter until everything comes together beautifully. As you mix, you’ll notice that the mixture begins to resemble wet sand—a perfect consistency for crumbling. This texture is key; it allows for those delectable clumps that will bake up crunchy and golden on top of your soft peach filling. When you sprinkle this topping over your peaches, you’re creating layers upon layers of flavor and texture—an utterly intoxicating experience! So grab a handful and crumble it over the peaches instead of just dumping it all at once; this way, you’ll achieve that beautiful layered look that’s so appealing.
Step 7: Assembling Your Peach Pie Crumble Bars
Now that you have both your luscious peach layer and your crunchy crumble topping ready, it’s time for assembly—a truly rewarding step in this process! Begin by spreading your carefully tossed peach mixture evenly over the baked shortbread base—it should glide on smoothly like liquid gold. Make sure every inch is covered; we want each bite to be bursting with those sweet and tangy flavors! Once you’ve spread out those gorgeous peaches, take a moment to admire how vibrant they look against the buttery base—it’s enough to make anyone swoon!
Next comes sprinkling your crumble topping over the peach layer. This is where I recommend using your hands; gently squeeze small clumps together before letting them fall over the filling like snowflakes on a warm winter day—don’t worry about being too uniform here; a rustic feel adds character! The goal is to cover as much area as possible while still allowing some peach peeks through because who doesn’t love an unexpected burst of fruitiness? Once everything is assembled beautifully, it’s time to pop these bars into the oven for baking.
Step 8: Baking Your Peach Pie Crumble Bars
Preheat your oven to 350°F (175°C) if you haven’t already done so—it’s absolutely paramount that we’re working with a properly heated oven for even baking! Slide your pan into the middle rack and set a timer for anywhere between 35-45 minutes. As they bake, indulge yourself in that heavenly aroma wafting through your kitchen—it’ll be utterly intoxicating! Keep an eye on them towards the end of baking time; you’re looking for that golden-brown color on top which indicates perfection has been achieved.
You might wonder what else signals doneness besides color? A gentle shake or jiggle can help here; if there’s minimal movement in your pan when lightly shaken, you’re likely good to go! If you see some bubbling around the edges—that’s music to my ears—indicating all those fruity juices are happily working their magic inside. Remember though: resist the temptation to open the oven door too early as sudden temperature changes can affect how well they rise and bake. Once they’re perfectly golden on top and smelling divine, pull them out lovingly from their warm cocoon and let them cool fully before moving onto our final touches.
Conclusion:
As we wrap up this delightful journey through crafting your very own Peach Pie Crumble Bars, I hope you feel as excited as I do about this recipe! It’s not just about combining ingredients; it’s about creating something magical—a symphony of flavors where juicy peaches dance alongside buttery crumble atop a shortbread base that melts in your mouth. Each bar tells a story; every bite brings back memories of summer days spent enjoying nature’s sweet bounty. The balance of textures—crunchy yet soft—brings an utterly satisfying experience that is truly extraordinary!
This recipe is not just a must-try because of its taste but also due to the sheer joy of making it! Picture yourself pulling these beauties from the oven while the aroma wraps around you like a warm hug; it’s pure bliss! Whether for family gatherings or cozy nights at home with friends over coffee, these Peach Pie Crumble Bars shine bright on any occasion. You’ll relish sharing these with loved ones while watching their faces light up with delight.
Imagine savoring one with a scoop of vanilla ice cream melting into its warm embrace or serving it alongside freshly brewed tea for an afternoon pick-me-up that feels indulgent yet comforting. For a truly decadent experience, drizzle on some extra glaze or serve with whipped coconut cream—it elevates everything to another level! And don’t forget how wonderful they are when enjoyed straight from the fridge on hot summer days—the kind of refreshment we all crave.
Feeling adventurous? This recipe is wonderfully adaptable! You could swap peaches for ripe nectarines or try adding some blackberries or raspberries for vibrant pops of color and flavor throughout—each variation has its charm! Or imagine infusing some almond extract into your crumble topping instead of vanilla; it adds such depth! Whatever direction you choose to take this beloved recipe in, I invite you to dive into this culinary adventure with enthusiasm and creativity. Share your experiences with me—I can’t wait to hear how yours turn out!
Peach Pie Crumble Bars
Indulge in these delightful Peach Pie Crumble Bars packed with juicy peaches and crunchy crumble—perfect for sharing or enjoying solo!
- Prep Time: 20 minutes
- Cook Time: 50 minutes
- Total Time: 1 hour 10 minutes
- Yield: Approximately 12 servings 1x
- Category: Dessert
- Method: Baking
- Cuisine: American
Ingredients
- 1 1/4 cups all-purpose flour
- 1/2 cup powdered sugar
- 1/4 teaspoon salt
- 2/3 cup unsalted butter, melted
- 3 cups chopped peaches (about 4–5 large peaches)
- 1/4 cup granulated sugar
- 2 tablespoons fresh lemon juice
- 3 tablespoons cornstarch
- 3/4 cup large flake oats
- 1/3 cup brown sugar
- 1 teaspoon cinnamon
Instructions
- Preheat your oven to 350°F (175°C) and line an 8×8 inch pan with parchment paper.
- In a bowl, whisk together flour, powdered sugar, and salt. Stir in melted butter until well combined. Press into the bottom of the prepared pan and bake for 15 minutes.
- Meanwhile, mix chopped peaches with granulated sugar, lemon juice, and cornstarch; set aside.
- In another bowl, combine flour, oats, brown sugar, and cinnamon. Stir in melted butter until crumbly.
- After the crust is baked, layer the peach mixture over it and sprinkle the crumble topping on top.
- Bake for an additional 35-45 minutes until golden brown. Let cool before drizzling with glaze.
Nutrition
- Serving Size: 1 bar (approximately 60g)
- Calories: 220
- Sugar: 12g
- Sodium: 70mg
- Fat: 10g
- Saturated Fat: 6g
- Unsaturated Fat: 4g
- Trans Fat: 0g
- Carbohydrates: 32g
- Fiber: 2g
- Protein: 2g
- Cholesterol: 20mg