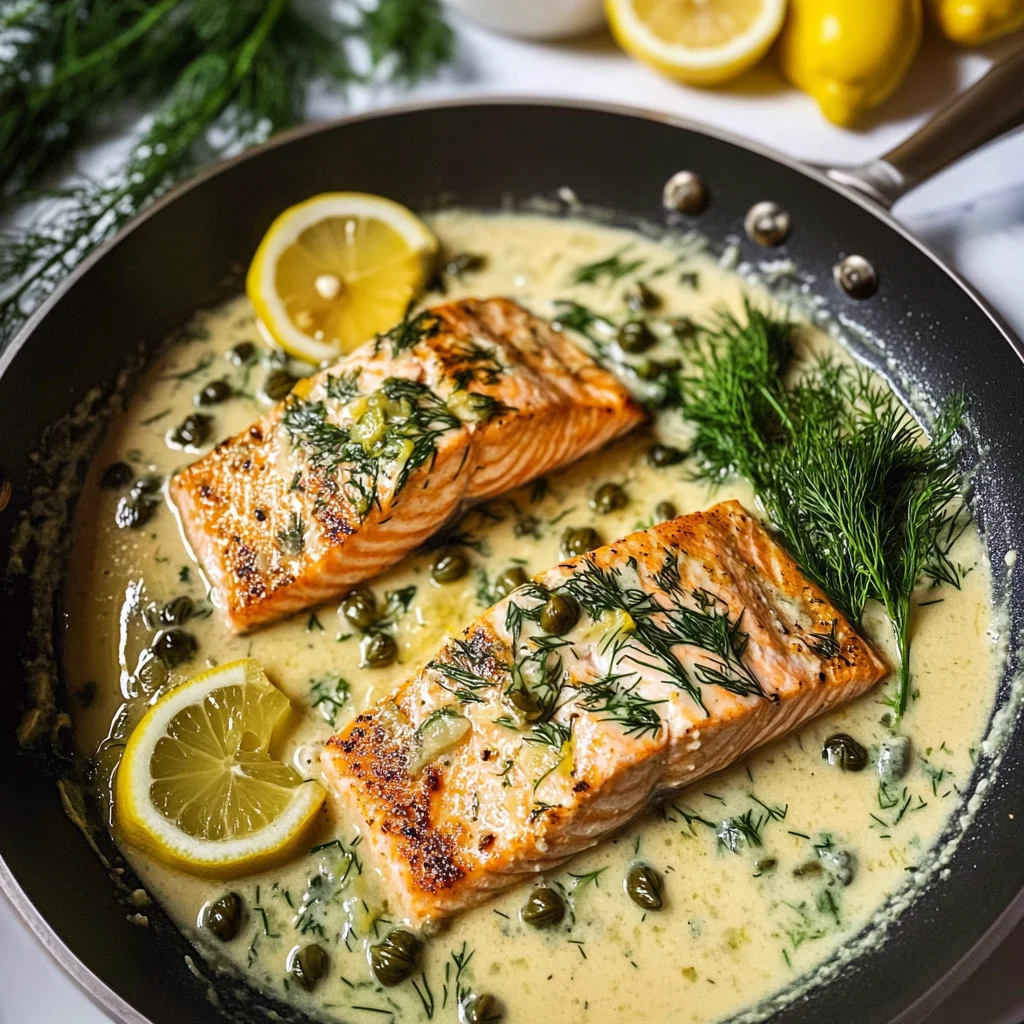
Salmon Piccata (Ready in 20 Minutes)
There’s something undeniably magical about cooking that goes beyond just preparing a meal. It’s an experience, a journey that connects us to our roots and to each other. Take this Salmon Piccata, for example—a dish that marries the richness of tender salmon with a creamy lemon-caper sauce that dances on your palate. Imagine walking into your kitchen, the aroma of sizzling fish mingling with the bright, zesty notes of lemon filling the air. It’s more than just food; it’s a celebration of flavors that embodies warmth, comfort, and elegance—all in just 20 minutes!
I’ve always been captivated by the fusion of classic Italian cuisine and fresh ingredients, and this recipe is no exception. Salmon Piccata is not only quick to prepare but also visually stunning—golden-brown salmon fillets glistening in a luxurious sauce topped with vibrant green dill. It’s like art on a plate! Whether you’re entertaining guests or enjoying a cozy dinner at home, this dish elevates any occasion without requiring hours in the kitchen. So grab your apron and let’s embark on this culinary adventure together!
Salmon Piccata (Ready in 20 Minutes): A Quick Yet Elegant Delight
This Salmon Piccata recipe is perfect for those evenings when you crave something sophisticated but don’t have all night to cook. You’ll find that these simple ingredients come together to create an utterly intoxicating dish that feels both indulgent and refreshing. With each bite, you’ll taste the harmony between tender salmon and that creamy, tangy sauce—it’s simply divine!
Ingredients:
As we set off on this culinary journey, let me introduce you to each ingredient that plays a pivotal role in creating this masterpiece. Each element contributes its own unique flavor and texture, making them essential companions in our Salmon Piccata.
- 1 tablespoon olive oil. This liquid gold is not just for cooking; it infuses your dish with depth and richness while allowing the salmon to sear beautifully. When choosing olive oil, opt for extra virgin for its superior flavor profile—think grassy notes and peppery finish—that will elevate every component of your meal. Plus, it helps achieve that perfect crispy exterior on the salmon which is absolutely paramount for texture.
- 1 ½ pounds salmon (cut into 4 equal pieces). Freshness is key here! Look for bright pink fillets without any discoloration; they should smell like the sea—not fishy at all! Cutting your salmon into equal pieces ensures even cooking; trust me when I say there’s nothing worse than overcooked edges on an otherwise perfect piece of fish! The natural oils in salmon keep it moist during cooking while providing an exquisite flavor that pairs beautifully with our sauce.
- ½ teaspoon kosher salt (more to taste). Salt enhances flavors like nothing else can! In this recipe, it draws out the natural sweetness of the salmon while amplifying the zesty brightness from our lemon-caper sauce later on. Kosher salt has larger flakes than table salt and dissolves easily, allowing for even seasoning throughout your dish without overwhelming it—this balance is non-negotiable!
- ½ teaspoon garlic powder. Adding garlic powder instead of fresh garlic gives us a subtle background flavor without overpowering our main ingredients. It’s essential to use garlic sparingly here because we want the bright flavors of lemon and capers to shine through! Plus, garlic powder seamlessly coats the salmon during dredging, ensuring every bite has just a hint of garlicky goodness.
- ¼ cup all-purpose flour (for dredging). Dredging our salmon in flour serves two purposes: it creates a beautiful crust when seared while also thickening our sauce as it cooks later on—what a dual-purpose ingredient! Be generous but not excessive; too much flour can lead to clumping in our sauce instead of achieving that silky smooth consistency we’re aiming for.
- 2 tablespoons unsalted butter. Butter adds richness and depth to our sauce; I recommend using unsalted so you can control the seasoning perfectly as you cook—the last thing we want is a salty mess! As it melts into our shallots, it creates an irresistible base for our creamy concoction—trust me when I say this step brings everything together harmoniously.
- 1 medium shallot (finely chopped). Shallots offer a milder taste than onions—almost sweet—and add a lovely aromatic quality to our dish. When sautéed until soft, they release their natural sugars which deepen the flavor profile of our sauce dramatically! Make sure your shallots are finely chopped so they integrate seamlessly into the sauce; nobody wants large chunks ruining their delicate experience!
- ½ cup chicken broth (or use veggie broth). Chicken broth adds another layer of savory depth; however, if you prefer plant-based options or need vegetarian alternatives, vegetable broth works beautifully too! This liquid will deglaze any browned bits left behind from sautéing and infuse every element with rich flavor as it reduces down—a crucial step for developing complexity in our dish.
- 1 lemon (zested and juiced). The star player here—the lemon—brings brightness and acidity which balances all those rich flavors beautifully! Zesting before juicing ensures we capture those fragrant oils from the skin which will add aromatic intensity to both our sauce and finished plate—a truly extraordinary addition! Remember: freshly squeezed juice makes all the difference compared to bottled varieties—don’t skip this part!
- 3 tablespoons capers (drained). These little green gems provide bursts of briny flavor that contrast wonderfully against the creaminess of our sauce—they’re absolutely vital! Make sure they’re well-drained before adding them in so they don’t water down your dish; their tanginess lifts everything up into something spectacular!
- 1 cup heavy cream. Ahh, cream—the luxurious finishing touch that transforms our sauce into something utterly decadent! It creates an indulgent mouthfeel while balancing out sharpness from the capers and acidity from lemon juice—this combination makes every bite feel like pure bliss! Choose high-quality cream if possible; after all, we’re creating something special together here!
- 1 tablespoon dill (finely chopped for serving). Fresh herbs are what elevate dishes from good to unforgettable—and dill does precisely that here! Its lightness complements both fish and citrus impeccably while adding a splash of vibrant color right before serving—it’s like wearing jewelry on your dish!
Equipment You’ll Need:
Having the right tools makes all the difference when you’re whipping up magic in your kitchen—it transforms chaos into seamless creativity! While they might not be ingredients, these essential partners assist you every step of the way toward delicious success.
- Large skillet – A good-quality skillet allows for even heat distribution which is critical when pan-searing fish—you want those lovely golden-brown edges without burning anything else involved in this intricate dance! Stainless steel or cast iron options work best here since they develop wonderful fond—the concentrated flavor bits left behind after cooking—which are crucial when making sauces.
- Sharp knife – A sharp knife isn’t just safer; it’s essential for precision cutting whether you’re sectioning up your salmon or finely chopping shallots—dull knives can lead to uneven cuts resulting in inconsistent cooking times which could ruin all your hard work!
- Cutting board – A sturdy cutting board provides stability as you chop away at ingredients while protecting countertops from damage—look for one made from bamboo or plastic that’s easy on knives yet durable enough not to warp over time.
- Measuring cups & spoons – They may seem basic but having accurate measurements ensures consistency throughout recipes—a non-negotiable aspect if you want repeat success every time you make Salmon Piccata!
Now that we’ve gathered everything we need—from ingredients down through equipment—let’s dive headfirst into preparing this delightful dish together!
Step 1: Preparing Your Salmon
To start off strong with our Salmon Piccata (Ready in 20 Minutes), let’s prep those beautiful salmon fillets by cutting them into four equal pieces if they’re not already portioned out at your local market or butcher shop. This ensures uniform cooking throughout each piece which keeps things fair during dinner time—evenly cooked salmon means even bites full of scrumptious flavor without dry edges ruining anyone’s experience at my table—or yours! Sprinkle half a teaspoon each of kosher salt and garlic powder generously onto all sides; seasonings are key players here because they’ll enhance every bite’s overall deliciousness as they meld together during cooking—and don’t forget about dredging them lightly in flour afterward too!
Step 2: Searing Perfection
Next comes one exciting moment: heating up your large skillet over medium heat until hot enough where droplets of water dance across its surface before evaporating completely—that’s how you’ll know it’s ready for action! Pour approximately one tablespoon olive oil directly into its center allowing it time to warm through before gently placing seasoned salmon fillets inside carefully so they sizzle as soon as contact occurs—that sound? Pure music indicating we’re onto something amazing here already folks!! Cook these beauties undisturbed for about two minutes per side until golden brown forms around their edges while keeping watchful eyes open since overcooking would ruin everything—we want flaky perfection rather than dry disappointment upon serving!
Step 3: Building Flavor Foundations
Once those glorious fillets have reached optimal sear status (and look utterly irresistible), carefully lift them out using tongs transferring them onto plates temporarily—we’ll bring them back shortly once all other components come together beautifully within our luscious sauce created next!! Start by introducing finely chopped shallots alongside unsalted butter remaining within same pan where fish was originally placed letting heat continue doing its magic slowly over two-to-three minutes until softened nicely achieving translucent qualities desired prior proceeding further down road towards saucy glory awaiting us ahead!!
Step 4: Creating Our Sauce Symphony
For now comes exciting part where things get saucy indeed!! Add drained capers along with freshly squeezed lemon juice plus chicken broth straight onto mixture swirling around gently combining everything thoroughly whilst scraping along bottom surface capturing any flavorful fond left behind previously established during searing process earlier mentioned peeking within pan—we’re building layers upon layers here people!! Allow mixture simmer away until liquefied nature reduces down roughly by half which should take around two minutes maximum giving concentrated flavors time mingle properly enhancing overall complexity waiting eagerly ahead soon enough!
As we move through these steps together remember: patience pays off tenfold especially regarding timing down below leading towards perfect meal success ultimately culminating soon enough when plating arrives next round shortly thereafter—I promise it’ll be worth effort invested deeply throughout entire experience trust me wholeheartedly!! Let’s keep going strong now everyone…
Step 5: Creamy Indulgence Awaits
Now comes the moment where the magic truly unfolds. Once you’ve allowed the capers, lemon juice, chicken broth, and lemon zest to simmer together for about two minutes, it’s time to introduce that luscious heavy cream into the pan. I want you to take a moment here—this is where your Salmon Piccata will transform from a simple dish into something utterly extraordinary. As you pour in the heavy cream, watch as it mingles with the bright lemony notes and savory capers, creating a creamy sauce that looks like liquid gold. The richness of the cream balances out the tanginess of the lemon juice and the brininess of the capers, resulting in a symphony of flavors that will have your taste buds dancing.
This step is absolutely paramount because it adds a velvety texture to your sauce that clings beautifully to each piece of salmon. Allow this mixture to simmer on low heat for about three to four minutes; you want to see it bubble gently as it thickens ever so slightly. Don’t rush this step! The key here is patience—allowing time for those flavors to meld together makes all the difference. You’ll know it’s ready when it coats the back of a spoon; this is your cue to taste and adjust seasoning if needed. A pinch more salt or perhaps an extra squeeze of lemon can elevate this sauce even further, so trust your palate!
Step 6: Bringing Back the Salmon
With that delightful sauce simmering away, it’s now time to bring your salmon back into the spotlight! Gently nestle those beautiful fillets back into the pan, ensuring they’re swimming in that glorious creamy mixture. At this point, I want you to think about what you’re doing; you’re not just cooking fish—you’re nurturing a meal that’s going to bring comfort and joy to whoever sits at your table. Let these pieces cook for an additional three to four minutes over medium-low heat; this is where they absorb all those fragrant flavors from the sauce.
As they cook, don’t forget to spoon some of that rich sauce over top every now and then—this not only helps them stay moist but also infuses them with all those incredible flavors we’ve developed so far. You’re looking for that perfect doneness here; ideally, the salmon should flake easily with a fork when it’s ready—a sure sign that you’ve nailed it! Keep an eye on it because overcooked salmon can become dry and less enjoyable. Remember, we want tender, moist fillets with a creamy hug from our sensational sauce!
Step 7: A Touch of Freshness
At long last, we’re arriving at one of my favorite parts—the finishing touches! Once your salmon has reached its ideal doneness (about five minutes total cooking time after returning it to the pan), it’s time for a sprinkle of fresh dill. This aromatic herb adds not only flavor but also vibrancy and color to your dish—a feast for both the eyes and palate! Gently scatter that finely chopped dill over your salmon like confetti at a celebration; trust me when I say this fresh element is going to elevate your meal from great to absolutely unforgettable.
If you’re feeling fancy (and who doesn’t love feeling fancy?), you can tuck in some thinly sliced lemon rounds around your salmon in the pan as well. Not only does this add an extra burst of citrus flavor as they warm up but also enhances presentation beautifully when serving—after all, we do eat with our eyes first! Allow everything to soak together for just another minute before turning off the heat. It’s essential not just for flavor but also for creating that inviting aroma that fills your kitchen with warmth and anticipation.
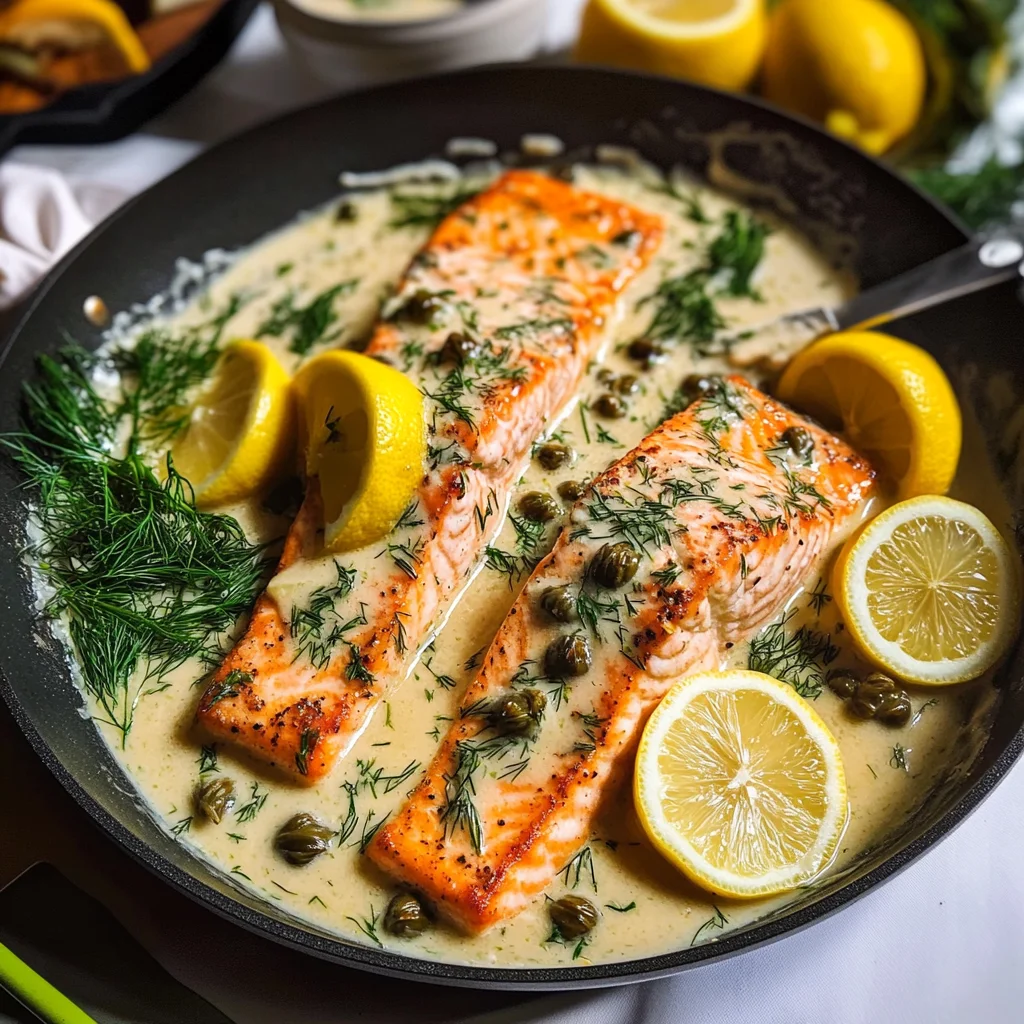
Step 8: Serving Your Salmon Piccata
Now comes perhaps my favorite moment—the serving! Carefully transfer those beautiful salmon fillets onto plates while making sure they get drizzled with plenty of that luscious sauce from the pan. I like serving mine alongside creamy mashed potatoes or light orzo pasta; both serve as perfect vehicles for soaking up any remaining sauce—because let’s be real: leaving behind even a drop would be criminal! You could also pair this dish with roasted vegetables or a crisp salad for some added freshness and crunch.
As you plate up this dish, take a second to appreciate what you’ve created—a meal that’s not only quick (ready in just 20 minutes!) but also feels elegant enough for special occasions or intimate dinners alike. The colors are vibrant; there’s warmth radiating from every element on that plate, promising profound satisfaction with each bite. And there you have it—your very own Salmon Piccata! I promise you once you dive into this dish, you’ll be thanking yourself (and me!) for bringing such joy into your kitchen tonight.
So gather around your table with family or friends and dig into this delightful creation—I can’t wait for you all to experience how utterly intoxicating it is! Enjoy every moment shared over this meal because food has an incredible way of bringing us closer together. Bon appétit!
Storage and Enjoyment Tips for Your Salmon Piccata (Ready in 20 Minutes)
Now that you’ve created this stunning dish, it’s time to dig in and enjoy every bite of your Salmon Piccata! The flavors meld together so beautifully, you might find yourself wanting to savor it all in one sitting. But if you do have leftovers—because let’s be honest, we can’t always eat an entire meal in one go—there are fantastic ways to store and enjoy those scrumptious morsels later. Trust me when I say that the love you’ve poured into this recipe doesn’t have to end with dinner; it can carry on into your lunch the next day!
Storing Leftover Salmon Piccata (Ready in 20 Minutes)
To preserve your delightful Salmon Piccata, start by placing any leftovers in an airtight container. Glass containers are my personal favorite because they keep things fresh and don’t absorb odors like plastic can. If you’re careful about how you store it, your salmon will keep beautifully in the refrigerator for up to three days. As a pro tip, try placing a slice of bread in the container with the salmon; it’ll help absorb moisture and keep the fish from becoming soggy! Now, when it comes to flavor after storage, I promise you won’t be disappointed—the creamy lemon-caper sauce continues to develop its flavors overnight, making each bite even more divine. To reheat, gently warm it on low heat on the stovetop or pop it in the microwave for just a minute or two until heated through. Spoon some of that luscious sauce over the top before serving again for an extra touch of indulgence!
Freezing Salmon Piccata (Ready in 20 Minutes) for Later
If you want to take your meal prep game up a notch, freezing Salmon Piccata is an excellent option! Simply allow your leftover salmon and sauce to cool completely before transferring them into freezer-safe bags or containers. Make sure to squeeze out as much air as possible before sealing them up tight; this will prevent freezer burn and maintain that rich flavor we all adore. When stored properly, your Salmon Piccata can last up to three months in the freezer! When you’re ready to indulge again, simply thaw it overnight in the refrigerator. Then reheat gently on the stovetop, adding a splash of broth or cream if needed to bring back that velvety texture. The convenience factor is phenomenal—imagine pulling out a homemade gourmet meal after a long day and enjoying that same symphony of flavors without any fuss!
Salmon Piccata (Ready in 20 Minutes)
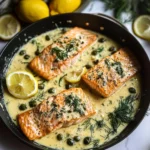
Indulge in the elegance of Salmon Piccata, a delightful dish that brings together tender salmon fillets and a creamy lemon-caper sauce, all ready in just 20 minutes. This quick yet sophisticated meal is perfect for busy weeknights or special occasions, showcasing the vibrant flavors of fresh ingredients. The enticing aroma of sautéed shallots and zesty lemon fills your kitchen, inviting everyone to gather around the table. With its beautiful presentation and luxurious taste, this Salmon Piccata will surely impress your guests and make any dinner feel like a celebration.
- Prep Time: 10 minutes
- Cook Time: 10 minutes
- Total Time: 20 minutes
- Yield: Serves 4
- Category: Dinner
- Method: Pan-searing
- Cuisine: Italian
Ingredients
- 1 tablespoon olive oil
- 1 ½ pounds salmon (cut into 4 equal pieces)
- ½ teaspoon kosher salt
- ½ teaspoon garlic powder
- ¼ cup all-purpose flour (for dredging)
- 2 tablespoons unsalted butter
- 1 medium shallot (finely chopped)
- ½ cup chicken broth
- 1 lemon (zested and juiced)
- 3 tablespoons capers (drained)
- 1 cup heavy cream
- 1 tablespoon dill (finely chopped for serving)
Instructions
- Season salmon with kosher salt and garlic powder, then lightly dredge in flour.
- Heat olive oil in a large skillet over medium heat. Sear salmon fillets for about two minutes per side until golden brown. Remove from pan and set aside.
- In the same skillet, melt butter and sauté chopped shallots until translucent.
- Add capers, lemon juice, chicken broth, and lemon zest; simmer for two minutes.
- Pour in heavy cream and let simmer for three to four minutes until slightly thickened.
- Return salmon to the pan, spoon sauce over fillets, and cook for an additional three to four minutes until cooked through.
- Garnish with dill before serving.
Nutrition
- Serving Size: 1 serving
- Calories: 540
- Sugar: 2g
- Sodium: 785mg
- Fat: 39g
- Saturated Fat: 20g
- Unsaturated Fat: 18g
- Trans Fat: 0g
- Carbohydrates: 16g
- Fiber: 0g
- Protein: 37g
- Cholesterol: 100mg