Frosted Lemon Cookie Recipe
There’s something utterly magical about the symphony of flavors that a simple lemon cookie can bring into our lives. It’s not just about the buttery softness or the sweet-tart balance; it’s a nostalgic journey that transports you back to sun-drenched afternoons, where laughter dances in the air, and every bite is like embracing a warm hug from a loved one. These Frosted Lemon Cookies are more than just a delightful treat—they embody moments of joy, connection, and celebration. With their creamy lemon frosting cascading over each perfectly baked cookie, they create an experience that is as refreshing as a gentle spring breeze. I promise you, once you take your first bite, you’ll understand why this recipe holds a special place in my heart.
From the first zest of the lemon to the final sprinkling of powdered sugar on top, every step in this frosted lemon cookie recipe transforms simple ingredients into an extraordinary dessert that is sure to impress. Whether it’s for a family gathering, a cozy afternoon tea with friends, or simply treating yourself after a long day, these cookies are versatile enough to suit any occasion. So grab your apron and let’s embark on this delicious journey together!
Frosted Lemon Cookie Recipe: Sweet Sunshine in Every Bite
These Frosted Lemon Cookies are not only easy to make but also incredibly rewarding. The combination of buttery soft sugar cookies infused with zesty lemon creates an irresistible dessert that’ll leave your taste buds singing. Trust me when I say that the creamy lemon frosting takes these cookies to another level! Let’s gather our ingredients and get started on this baking adventure.
Ingredients:
As we dive into making these delightful cookies, it’s essential to acknowledge each ingredient’s role in crafting something truly wonderful. Every component plays a part in creating those melt-in-your-mouth moments!
- 3/4 cup (1 1/2 sticks or 170g) unsalted butter, softened. This is crucial for creaming properly and achieving the light texture we’re aiming for in our Frosted Lemon Cookie Recipe. Softened butter allows for better incorporation of air into the dough during mixing, which leads to tender cookies with just the right amount of lift. When selecting your butter, look for high-quality options; European-style butter with its higher fat content will lend an even richer flavor and texture to your cookies.
- 1 cup granulated sugar. This ingredient does more than just sweeten; it contributes to that lovely golden crust and chewy texture that we all adore in cookies. Sugar also plays an important role in moisture retention and helps produce that delightful crispiness at the edges while keeping the centers soft and tender. Remember not to skimp on this—sugar is absolutely paramount for achieving the perfect balance!
- 2 large eggs. Eggs are essential for binding our ingredients together and adding moisture to our dough. They also provide structure and richness thanks to their fat content, which enhances flavor and texture immensely. When using eggs in baking, try to use room temperature ones as they integrate more smoothly with other ingredients—this step will help create a consistent batter that’s easy to work with.
- 1 1/2 tsp fresh lemon juice. This bright addition is what gives our cookies their signature tangy flavor! Freshly squeezed lemon juice elevates your dessert by providing acidity which balances out sweetness beautifully—a non-negotiable aspect if you want those flavor notes to sing harmoniously together.
- 1 Tbsp fresh lemon zest. Zest is where all the aromatic magic happens! It captures the essential oils from the skin of lemons—packed full of concentrated flavor that will infuse every bite with an invigorating citrus aroma. Make sure you zest only the outer layer of the skin; too much white pith can introduce bitterness into your cookies.
- 2 1/2 cups all-purpose flour. Flour forms the backbone of our cookie dough—it provides structure while still allowing those adorable chewy centers we crave! For best results, measure your flour correctly by spooning it into your measuring cup rather than scooping directly from the bag; this prevents packing too much flour which could lead to dry cookies.
- 1 tsp baking powder. This leavening agent adds volume and lightness to our cookies by producing carbon dioxide when mixed with wet ingredients—an essential step for achieving those fluffy textures we all love! Ensure your baking powder is fresh so it can do its job effectively; stale powder can lead to flat cookies that lack height.
- 1/2 tsp salt. While it may seem counterintuitive to add salt when you’re making something sweet, trust me! Salt amplifies flavors and balances sweetness beautifully—it brings everything together in a way that’s profoundly satisfying without making your cookies taste salty at all.
- 1/2 cup (1 stick or 113g) unsalted butter, softened (for frosting). Just like before, softened butter here is key for creating that creamy consistency we desire in our frosting! When well-creamed with powdered sugar, it transforms into smooth liquid gold—a luscious topping that’s impossible to resist.
- 4 cups powdered sugar. Essential for sweetness and structure in our frosting! The fine texture allows it to blend seamlessly with butter without any gritty residue—resulting in a velvety finish on top of each cookie.
- A dash of salt (for frosting). Just like we did before, adding salt helps enhance flavors even more within our frosting—it’s remarkable how such a small pinch can elevate everything!
- 1 Tbsp lemon zest (for frosting). Just as before, using fresh zest will infuse our frosting with delightful citrus notes—ensuring every bite has layers of flavor complexity!
- 2 Tbsp fresh lemon juice (for frosting). A splash of this tangy goodness not only contributes brightness but also helps achieve that perfect spreadable consistency we want in our creamy topping.
- 1 Tbsp milk (if needed). Depending on how thick or thin you’d like your icing, adding milk may be necessary for achieving that ideal spreading consistency! Start with less—you can always add more if needed—but keep an eye on how creamy you’d like it!
Equipment You’ll Need:
Now that we’ve gathered all our ingredients together lovingly, let’s talk about some essential tools that’ll make this baking experience smoother and more enjoyable! Having reliable equipment ensures things go off without a hitch while creating these delectable treats.
- Mixing bowls – A good set of mixing bowls is indispensable for any baker! A large bowl is perfect for combining wet ingredients while smaller ones come handy when preparing different components like frosting or zesting lemons separately.
- Electric mixer – While you could mix by hand if you’re feeling particularly strong or nostalgic (and trust me—the effort adds character!), an electric mixer saves time and effort when creaming butter and sugar together until light and fluffy—a key step toward cookie perfection!
- Citrus zester or microplane – Zesting lemons is easier than ever when you have one of these nifty tools at hand! They allow you to capture just the flavorful skin without hitting any bitter pith underneath—always aim for bright sunshine-colored zest!
- Measuring cups & spoons – Accurate measurements make all the difference between success and failure in baking recipes! Invest wisely here because precision ensures consistent results every time you whip up these beauties.
- Baking sheets or pans – Choose sturdy pans lined with parchment paper or silicone mats so nothing sticks while ensuring even baking across batches—no one wants half-baked cookies due uneven heat distribution!
With our ingredients prepped and equipment ready at hand, let’s shift gears into preparing these delightful Frosted Lemon Cookies!
Step 1: Let’s Get Zesty!
First things first: we need those vibrant lemons ready for action! Start by letting your butter sit out at room temperature until it’s softened beautifully—this will make creaming much easier later on! Meanwhile, wash two lemons under cold water; this helps remove any waxy residue left behind from packaging or transport so we can enjoy their pure essence fully when zesting them up later on! Using a citrus zester (or fine grater), carefully remove just the yellow outer layer—the zest—from both lemons being cautious not digging too deep into white pith underneath since it’ll lend undesired bitterness instead of bright tanginess we’re after here!
After zesting away both fruits’ skins until completely stripped clean reveal their aromatic oils bursting forth beneath surface layers—it’s sheer joy! Next up comes juicing them: cut each lemon in half then squeeze them until you’ve got about 1½ teaspoons worth freshly squeezed juice waiting patiently aside—we’ll use this shortly so don’t forget about it now!
Step 2: Cream Your Butter & Sugar
With everything prepped beautifully before us now comes time-consuming yet rewarding process known simply as “creaming.” In a large mixing bowl fitted with an electric mixer set at medium-high speed begin combining softened butter along with granulated sugar until mixture turns fluffy light color—a transformation signaling air has been successfully incorporated throughout mixture resulting endearing texture once baked off later down road! This should take roughly two minutes but don’t rush through step enjoying moment watching buttery goodness transform slowly alongside sweet grains dancing happily swirling around bowl like little fairies celebrating life itself!
Once creamed thoroughly beat eggs one at time gently folding each until fully integrated then pour remaining components including fresh juices/zest right into center ensuring no stragglers left behind clinging sides waiting patiently join party underway here—we want everything coming together harmoniously now don’t we?
Step 3: Stir In Dry Ingredients
Now it’s time add dry elements—the flour mixture consisting all-purpose flour combined alongside baking powder/salt—to batter already residing comfortably within bowl waiting eagerly join forces forming luscious dough soon arrive momentously during next steps ahead towards perfect cookie blissfulness awaiting us all around corner ahead… Stir slowly using spatula incorporating dry goods evenly throughout wet mixture taking care not overmix them either since doing so may result dense rather than fluffy delights come out ovens later down line; gentle motion ensures well-blended yet airy combo stays intact without losing precious air bubbles created earlier during creaming process mentioned above earlier too!
Step 4: Shape Your Cookies
Ahh finally onto shaping phase—the fun part where creativity meets practicality hand-in-hand together symphonically harmonizing perfectly against backdrop warm kitchen filled aromas wafting through air gently beckoning us onward!! Using clean hands roll dough into tablespoon-sized balls placing them spaced apart upon prepared baking sheets lined carefully either parchment paper/silicone mats previously mentioned earlier giving ample room around each ball allowing them spread naturally while baking evenly across surfaces below maintaining beautiful round shapes throughout entire batch brought forth next few minutes… Once placed gently press down lightly glass dipped sugar flatten slightly encouraging slight expansion during baking phase ahead retaining shape desired ultimately leading glorious end product soon arrive front doors inviting guests delightfully share joy created inside walls home await patiently outside world beyond reach today…
And voilà—we’ve set ourselves up beautifully towards success here!! Keep watch closely timer ticking down nearing completion feeling excitement build anticipation rise higher as delicious golden edges emerge revealing soft centers nestled warmly inside awaiting nibbles soon provided eager mouths everywhere nearby drooling already contemplating next bites yet come…
Stay tuned as we continue detailing further steps leading delicious conclusion soon nearing realization dreams held tight within hearts today inspiring us continuously onward toward discovery sharing joy lovingly crafted desserts made memories cherished forevermore…
Step 5: Shaping the Cookies—Creating Little Lemon Clouds
Now that your cookie dough is ready, it’s time to transform those simple ingredients into delightful little clouds of lemon goodness. Preheat your oven to 350°F (175°C) if you haven’t done so already. I find that taking a moment here to let the oven reach its optimal temperature ensures your cookies bake evenly, developing that charming golden bottom we all adore. Begin by rolling the dough into tablespoon-sized balls; this step is not just about aesthetics, but about ensuring consistent baking. If you make them too large, they may not cook through properly—the last thing we want is a gooey center instead of the tender bite we’re aiming for!
Once you’ve formed those perfect little spheres, place them on a cookie sheet lined with either a silicone mat or parchment paper lightly sprayed with cooking spray. This will help prevent sticking and allow for easier cleanup—trust me, you’ll thank yourself later! To flatten each dough ball, dip the bottom of a glass in sugar and gently press down. This technique not only creates an inviting shape but adds a delightful texture to the surface of each cookie. Don’t rush this step; take your time to appreciate how those glossy sugar-coated tops glisten as they await their moment in the oven.
Step 6: Baking Your Cookies—The Heart of Transformation
Place your cookie sheets in the preheated oven and set a timer for 9-10 minutes. As they bake, prepare yourself for an aromatic journey that will fill your kitchen with the scent of freshly baked lemon cookies—a truly intoxicating experience! The science behind baking is quite fascinating; during these precious minutes, the heat causes the butter to melt and expand while the sugars caramelize slightly, leading to that beautiful golden hue on the bottoms of your cookies.
Keep a watchful eye on them toward the end of baking. You want to remove them from the oven when they’re just barely golden brown on the edges but still soft in the center; they will continue to firm up as they cool. Remember, we’re aiming for that signature soft texture—overbaking can lead to crispiness that detracts from their buttery allure. Once ready, let them sit on the pan for about 3-4 minutes before transferring them to a cooling rack; this resting period allows them to firm up slightly without losing their deliciously tender quality.
Step 7: Cooling Down—Embracing Patience
After taking your cookies out of the oven and giving them those few moments on the pan to rest, it’s time to move them onto a cooling rack. This step is crucial! Allowing your cookies to cool completely ensures that they maintain their structure without becoming soggy or overly soft from residual heat trapped underneath. As they cool, you might notice how their aroma transforms from warm and comforting right out of the oven to refreshing and zesty as they settle; it’s truly an extraordinary experience!
While waiting, take this moment for reflection—or perhaps even sneak a taste test if you wish! But I encourage you: be patient! Letting these cookies cool completely also prepares them for frosting; if you frost too early, you risk melting that beautiful lemon icing right off—what a tragedy! So grab a cup of tea or coffee while you wait; each moment builds anticipation for what’s next.
Step 8: Crafting Your Creamy Lemon Frosting—The Icing on Our Dream!
Now comes one of my favorite parts—crafting that dreamy creamy lemon frosting which will elevate our cookies from delightful treats into something utterly extraordinary! In a mixing bowl, combine ½ cup softened butter with 4 cups powdered sugar—this classic combination is what gives us that luscious texture we crave in frosting. Using an electric mixer at medium speed is key here; it allows air to incorporate into your mixture as it blends into velvety perfection.
After you’ve mixed this duo thoroughly until it’s light and fluffy (about 2-3 minutes), add in your dash of salt and one tablespoon each of fresh lemon juice and lemon zest. This addition brings a brightness that perfectly complements our cookies! Continue mixing until everything is well combined; taste it along the way—you should feel an invigorating burst of citrus dancing across your palate which pairs seamlessly with our soft cookies.
If your frosting seems too thick after mixing everything together, don’t hesitate to add in one tablespoon of milk at a time until you’ve reached your desired consistency. Think about spreading it easily yet generously over each cookie—a non-negotiable aspect if you ask me! The ultimate goal is smoothness with enough body so it doesn’t just drip off but rather clings lovingly like a warm hug around every sweet bite.
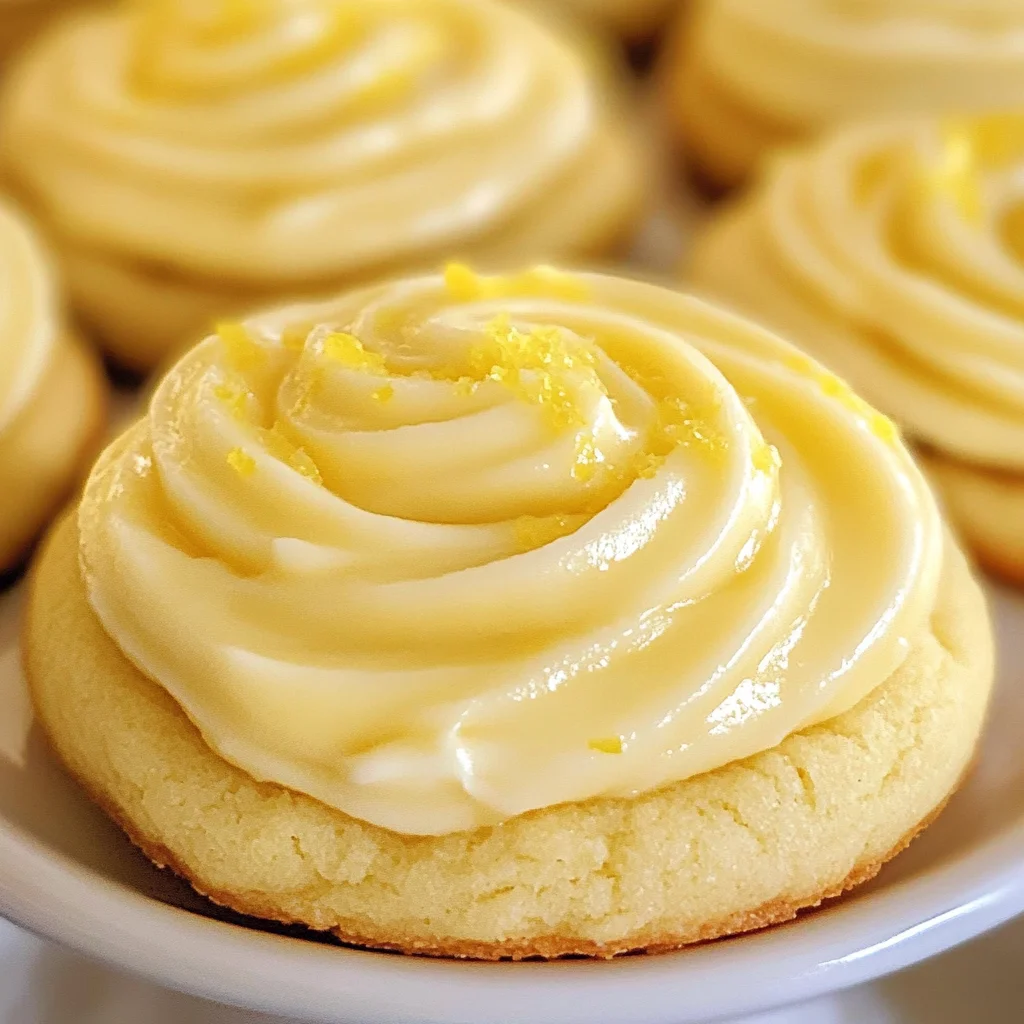
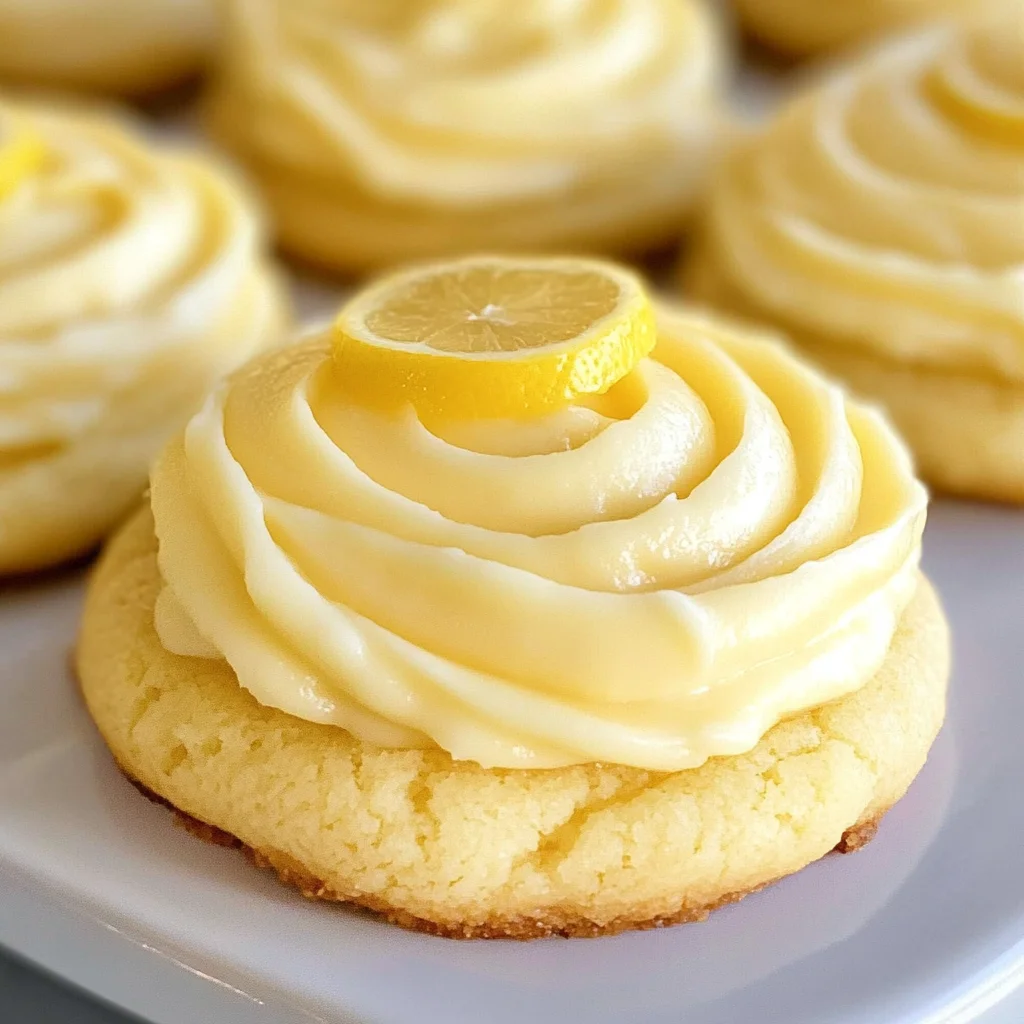
Final Touches: Frosting Your Lemon Cookie Masterpieces
With our cookies now fully cooled and our luscious frosting ready, it’s finally time for some fun! Grab a spatula or piping bag—whichever suits your fancy—and start decorating these lovely treats with swirls or dollops of creamy frosting atop each cookie. This part is where creativity truly shines; don’t shy away from making each cookie unique! A little sprinkle of extra lemon zest on top not only adds visual appeal but enhances that vibrant citrus flavor we’ve been working towards.
As you frost each cookie, take a moment to appreciate how those once-simple ingredients have transformed into something profoundly satisfying—a true testament to what love and patience in cooking can create. If you have any leftover frosting (which I doubt!), it can be stored in an airtight container in the fridge for future use—how perfect would it be paired with cupcakes or even drizzled over pancakes?
And there you have it—the complete Frosted Lemon Cookie Recipe! With every bite bursting with buttery softness and zesty brightness topped off by creamy frosting, I promise you’ll find yourself reaching for another before you’ve even set down your plate! Enjoy sharing these delights with friends or savoring them solo—you’ve earned every bit of happiness packed inside these glorious treats!
Storage and Enjoyment Tips for Your Frosted Lemon Cookie Recipe
Now that you’ve crafted these delightful, buttery soft cookies, it’s time to revel in the joy of enjoying them! The enticing aroma still lingers in the air, and I can already imagine the smiles on your loved ones’ faces as they take their first bite. But let’s not forget about those precious leftovers—because trust me, you’ll want to savor these cookies for days to come. Proper storage is crucial to keep their flavor and texture intact so that each cookie remains a little piece of heaven long after baking day.
Storing Leftover Frosted Lemon Cookie Recipe
To store your leftover frosted lemon cookies, simply place them in an airtight container at room temperature. This method keeps them fresh while allowing you to enjoy that incredible soft texture and luscious frosting for up to a week! If you find yourself with more cookies than you can handle, which is often the case because they’re just so irresistible, you might consider placing a slice of bread in the container. This little trick works wonders by keeping moisture levels balanced, ensuring your cookies stay soft and delicious rather than becoming stale. After a few days, the flavor may deepen as the lemon notes meld beautifully with the sweetness of the frosting—oh, it’s such a treat! When you’re ready to indulge again, simply serve them as is or pop them in the microwave for a few seconds for that fresh-baked warmth.
Freezing Frosted Lemon Cookie Recipe for Later
If you want to extend the pleasure of these cookies even further, freezing them is an excellent option. To do this properly, start by placing your frosted cookies on a baking sheet lined with parchment paper and freeze them until solid. Once frozen, transfer them into a freezer-safe bag or container and store them away for up to three months. This method preserves both flavor and texture superbly! When you’re ready to enjoy one (or several), simply take out as many as you’d like and let them thaw at room temperature for about 30 minutes. It’s like having homemade treats at your fingertips whenever that sweet craving strikes—how convenient is that? Plus, there’s something so special about biting into a cookie that tastes like it was freshly baked just for you!
Frosted Lemon Cookie Recipe

Indulge in the refreshing brightness of these Frosted Lemon Cookies, a delightful treat that perfectly balances soft, buttery cookie goodness with zesty lemon frosting. Each bite evokes memories of sunlit afternoons and joyful gatherings, making them an ideal addition to any occasion. The creamy lemon frosting adds a tart sweetness that elevates these cookies to a new level of deliciousness. Whether you’re hosting a gathering or simply treating yourself, this easy recipe is sure to impress friends and family alike!
- Prep Time: 20 minutes
- Cook Time: 10 minutes
- Total Time: 30 minutes
- Yield: Approximately 24 cookies 1x
- Category: Dessert
- Method: Baking
- Cuisine: American
Ingredients
- 3/4 cup unsalted butter, softened
- 1 cup granulated sugar
- 2 large eggs
- 1 1/2 tsp fresh lemon juice
- 1 Tbsp fresh lemon zest
- 2 1/2 cups all-purpose flour
- 1 tsp baking powder
- 1/2 tsp salt
- 1/2 cup unsalted butter, softened (for frosting)
- 4 cups powdered sugar
- A dash of salt (for frosting)
- 1 Tbsp lemon zest (for frosting)
- 2 Tbsp fresh lemon juice (for frosting)
- 1 Tbsp milk (if needed)
Instructions
- Preheat oven to 350°F (175°C).
- In a large mixing bowl, cream together the softened butter and granulated sugar until light and fluffy.
- Add eggs one at a time, mixing well after each addition. Stir in fresh lemon juice and zest.
- In a separate bowl, combine flour, baking powder, and salt. Gradually add dry ingredients to wet mixture until just combined.
- Roll dough into tablespoon-sized balls and place on lined baking sheets. Flatten each ball gently with a glass dipped in sugar.
- Bake for 9–10 minutes or until lightly golden around the edges; they should remain soft in the center.
- Allow cookies to cool on the pan for a few minutes before transferring to a cooling rack.
- For the frosting: In a mixing bowl, combine softened butter and powdered sugar until smooth. Add dash of salt, lemon juice, and lemon zest; mix well until creamy. Adjust consistency with milk as needed.
- Once cookies are completely cooled, frost generously with lemon icing.
Nutrition
- Serving Size: 1 cookie (30g)
- Calories: 150
- Sugar: 18g
- Sodium: 80mg
- Fat: 6g
- Saturated Fat: 3g
- Unsaturated Fat: 3g
- Trans Fat: 0g
- Carbohydrates: 22g
- Fiber: <1g
- Protein: <1g
- Cholesterol: 20mg