Lavender Earl Grey Cookies Recipe
When I think of the Lavender Earl Grey Cookies Recipe, I can’t help but feel a wave of nostalgia wash over me. These delightful cookies are not just a sweet treat; they are an enchanting experience that transports you to a sun-drenched afternoon tea in the English countryside, where the air is filled with the fragrant aroma of blooming lavender and the comforting notes of black tea. Each bite offers a symphony of flavors, perfectly balanced with the buttery richness of sugar cookies and the subtle floral essence of lavender and Earl Grey. The delicate interplay between these ingredients creates a moment that feels profoundly special—a moment I long to share with you.
What makes these cookies stand out is their ability to bridge tradition and innovation. My dear friend Amy Ho’s new book, Blooms and Baking, introduces us to this culinary masterpiece that beautifully marries classic cookie-making with unique flavor combinations. It’s an invitation to gather with friends or family, to bask in the warmth of shared laughter while savoring these exquisite treats. Whether you’re hosting a cozy gathering or simply indulging in a quiet afternoon alone, these cookies are sure to elevate any occasion into something truly extraordinary.
Lavender Earl Grey Cookies Recipe: A Floral Delight for Your Taste Buds
Welcome, my friend! Today we’re diving into a delightful recipe that I promise will become your new favorite: Lavender Earl Grey Cookies. These chewy, buttery sugar cookies are infused with floral notes that dance gracefully on your palate, making them an ideal dessert for any gathering—or just because you deserve a treat! With every bite, you’ll find yourself enveloped in warmth and comfort as if you’ve wrapped yourself in a soft blanket on a chilly day.
Ingredients:
As we embark on this culinary journey together, let’s take a moment to appreciate each ingredient that will come together in perfect harmony to create these stunning cookies.
- 2 ¼ cups (9.5 ounces or 270 grams) all-purpose flour. This staple ingredient serves as the backbone of our cookie dough, providing structure and stability. The right flour ensures that our cookies achieve that ideal chewy texture we’re after—too much flour can lead to dry cookies while too little can result in flat ones. When selecting your flour, look for a high-quality brand that’s finely milled for best results.
- 1 Tablespoon finely ground Earl Grey tea (from 3 tea bags or 4 teaspoons loose leaf tea). This unique ingredient infuses our cookies with its signature blend of black tea and bergamot oil, creating an unmistakable flavor profile that’s both sophisticated and comforting. Be sure to grind your tea leaves finely; otherwise, they may leave an undesirable texture in your cookies. Using loose leaf tea can often yield richer flavors compared to bagged varieties.
- ½ teaspoon culinary-grade lavender, finely ground. Lavender brings an ethereal floral note to our cookie dough that’s simply intoxicating when paired with Earl Grey tea. It’s important to ensure you’re using culinary-grade lavender—this means it’s safe for consumption and free from pesticides or additives that can ruin our lovely treats. If you’ve never used lavender before, start small; its flavor can be quite potent!
- ½ teaspoon baking powder. This leavening agent plays a crucial role in helping our cookies rise beautifully during baking, contributing to their lightness and chewiness. Baking powder works by releasing carbon dioxide gas when it’s combined with moisture and heat—this is what gives our cookies that delightful lift! Always check the expiration date on your baking powder; old leavening agents can lead to disappointing results.
- ¼ teaspoon baking soda. Working alongside baking powder, baking soda enhances browning and can add depth of flavor through caramelization during baking—think golden edges and slightly chewy centers! Just like with baking powder, freshness is key here; if yours has been sitting around for too long, it might not work as effectively.
- ½ teaspoon kosher salt. Don’t overlook this seemingly minor ingredient! Salt amplifies all the sweet flavors while balancing out the richness from the butter and sugar; it’s absolutely paramount for achieving well-rounded taste profiles in baked goods.
- 1 ¼ cup (8.80 ounces or 250 grams) granulated sugar. The sweetness from granulated sugar not only adds flavor but also contributes to tenderness in our cookie dough by interfering with gluten formation during mixing—a vital step for achieving those soft, chewy centers we crave! Opt for fine granulated sugar over coarse varieties for smoother incorporation into your dough.
- 1 cup (8 ounces or 227 grams) unsalted butter, at room temperature. This rich golden liquid is essential for creating that luscious mouthfeel we all love in baked treats! Room temperature butter is crucial for proper creaming—if it’s too cold or melted, your cookies might not turn out as intended. Aim for high-quality butter; European-style options contain higher fat content which enhances flavor dramatically.
- 1 large egg. Eggs serve multiple purposes: they bind ingredients together while adding moisture and richness to our cookie dough—a non-negotiable component! Be sure to bring your egg to room temperature before using it; this helps it incorporate more fully into the batter.
- 2 teaspoons pure vanilla extract. Vanilla extract is like magic—it ties all flavors together beautifully while adding depth and warmth that make every bite feel comforting! Always opt for pure vanilla extract over imitation varieties whenever possible; you’ll notice a significant difference in flavor quality.
- 2 Tablespoons granulated sugar (for topping). This simple addition creates an appealing crunch on top of each cookie as they bake—it’s like giving them a little sparkle! Feel free to adjust how much you sprinkle based on how sweet you prefer your treats.
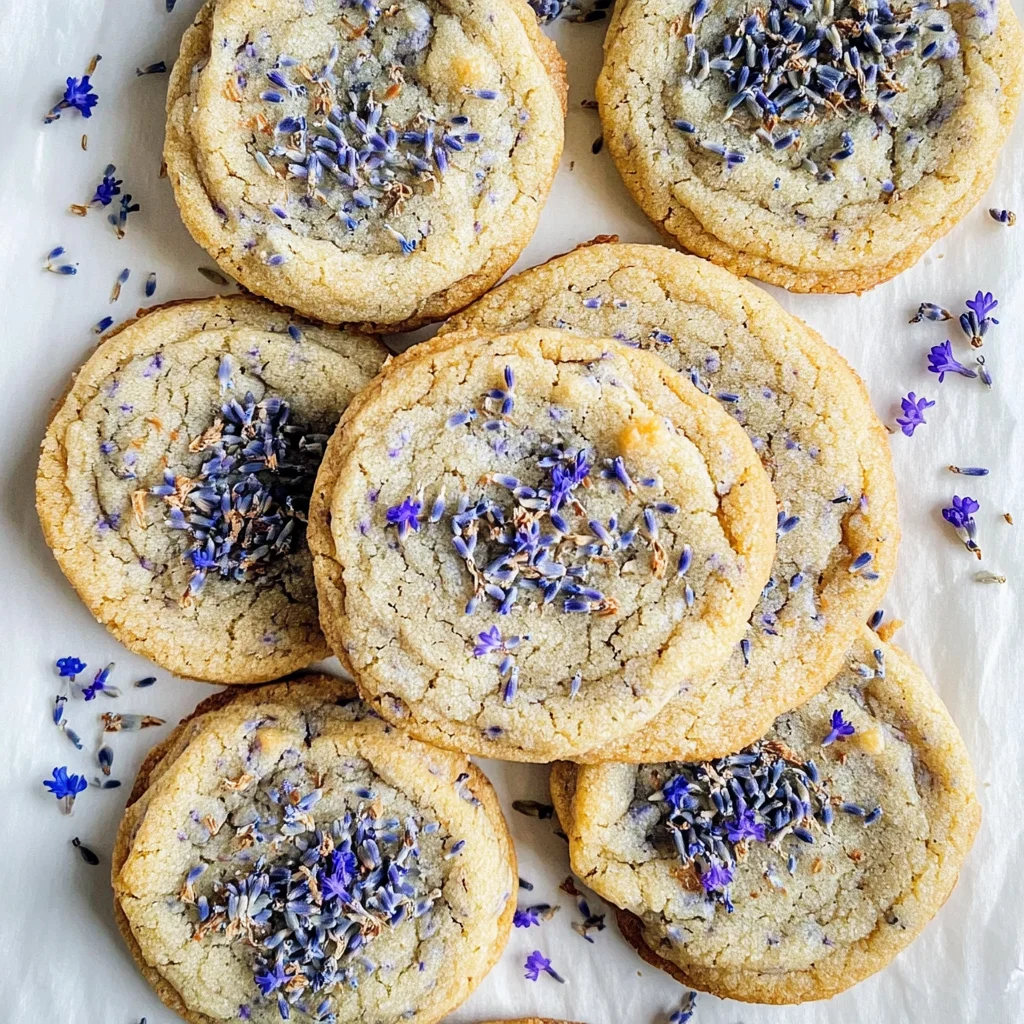
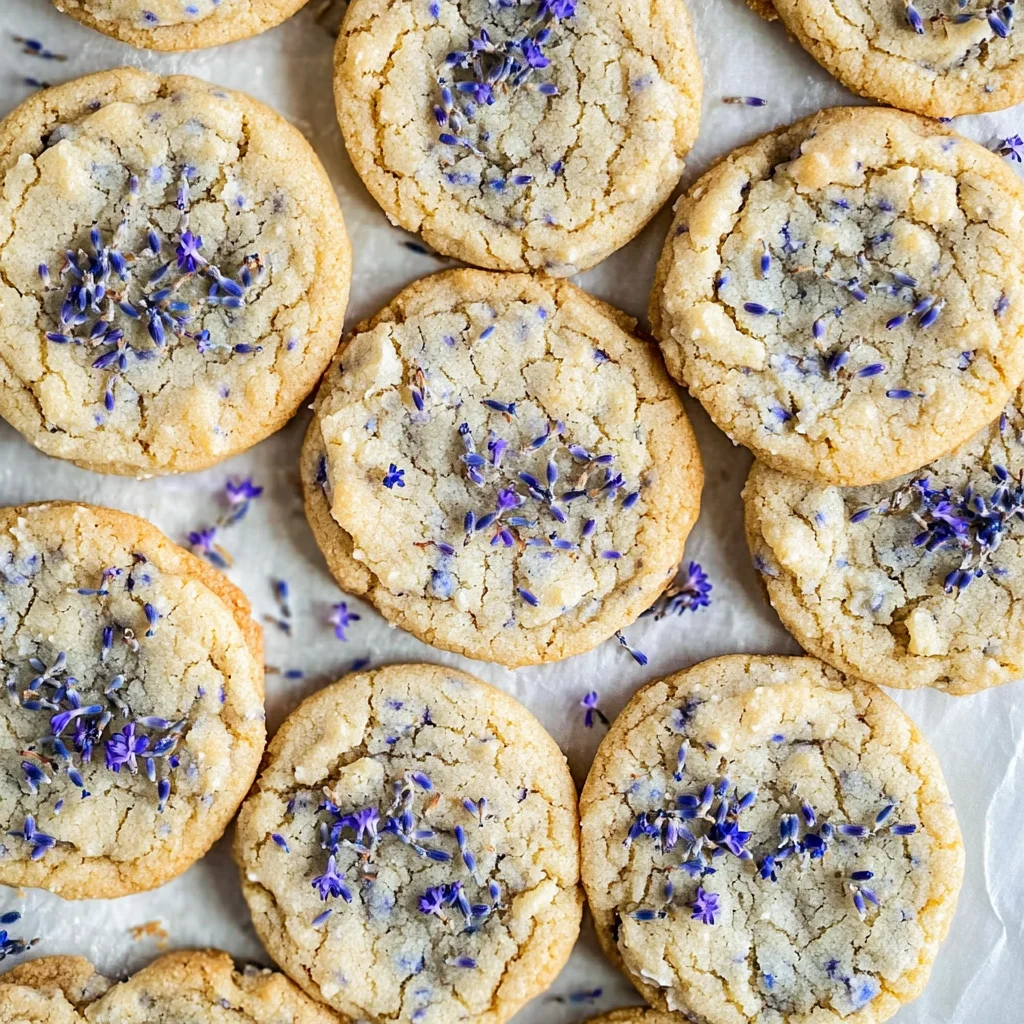
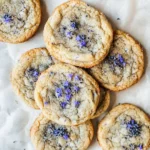
- blue cornflower petals (for garnish). These beautiful blue petals add both visual appeal and subtle herbal notes to your finished cookies—they’re entirely optional but highly recommended if you’re looking to impress your guests!
Equipment You’ll Need:
Having the right tools at hand makes all the difference when it comes time to bake these delightful Lavender Earl Grey Cookies! While they may seem like mere accessories compared to our ingredients, each piece of equipment plays its part perfectly in bringing this recipe together.
- Mixing bowls – A sturdy set of mixing bowls in various sizes is essential for combining ingredients without fear of spills or messes—plus it makes everything feel more organized! Stainless steel or glass bowls are excellent choices since they hold up well against heat during mixing processes.
- Electric mixer or whisk – An electric mixer will save you time and effort when it comes time for creaming butter and sugar together—this process is critical for achieving lightness in your cookies! If you prefer doing things by hand (which I completely respect!), just grab a sturdy whisk instead—it’ll give you some arm workout while still getting great results!
- Measuring cups and spoons – Precision matters so having accurate measuring tools allows us to recreate this recipe perfectly every time! Invest in good-quality nested measuring cups along with adjustable spoons; both will make life easier during prep work!
- Baking sheets lined with parchment paper – Lining your baking sheets prevents sticking while ensuring even browning across your delicious creations—we want those beautiful edges after all! If you don’t have parchment paper handy, silicone baking mats work wonders too!
Now that we’ve gathered our essential ingredients and equipment let’s get started on preparing these enchanting Lavender Earl Grey Cookies!
Step 1: Creaming Butter and Sugar
Start by placing your room temperature unsalted butter into the bowl of your electric mixer along with granulated sugar—the two should be mixed until fluffy and light, about 3 minutes at medium speed if you’re using an electric mixer or closer to 5–7 minutes if whisking by hand (and trust me—you’ll definitely feel it!). This process known as creaming is absolutely paramount because it’s how we introduce air into our mixture which leads directly towards achieving those soft yet chewy textures we desire from our final product! You’re looking for a pale yellow color once complete—if it looks too dense or oily instead? That might mean either under-mixing has occurred or perhaps butter was too warm after being left out longer than recommended!
Step 2: Adding Egg & Vanilla
Next up comes adding one large egg along with two teaspoons pure vanilla extract into this glorious mix—you want everything blended thoroughly until combined nicely but don’t overdo it here since excessive mixing can lead down paths toward gummy textures later on (nobody wants that!). As these ingredients meld together smoothly into one cohesive batter layer upon layer further builds upon itself leading toward greater complexity within flavor profiles overall!
Step 3: Incorporating Dry Ingredients
Now let’s introduce those lovely dry ingredients starting off first by combining flour alongside finely ground Earl Grey tea before finally incorporating both baking powder alongside baking soda—and don’t forget about kosher salt too here because it truly does round things out wonderfully when added last minute like icing atop cake layers themselves…so sprinkle away generously while gently folding everything until no visible streaks remain visible amongst mixtures changing colors slowly becoming more uniform throughout entire bowl contents!
Step 4: Infusing Floral Essence
At this point prepare yourself because we’re about ready dive deep into infusing flavors incredibly fragrant culinary-grade lavender hints abound throughout resulting transformation ahead awaits eagerly upon horizon… Take care though since overmixing doesn’t bode well either especially given fine nature involved therein—you want just enough stirring until evenly distributed amongst batter without losing essence behind magic happening within world wide web connecting us all via aromatic realms beckoning forth sweetness rising forth warm hues dancing delightfully inviting aromas swirling around kitchen space enticing everyone nearby come join festivities unfolding right here now before eyes measure twice cut once remember?
Breathe deeply through every step—it helps remind why we bake these treasures full heartedly wanting share joy experienced each time someone bites down celebrating beauty created moments spent working hands crafting something delicious alongside friends loved ones alike carried forth memories made within kitchens everywhere…
Step 5: Bring It Together – The Magic of Mixing
Now that you have your dry ingredients perfectly combined, it’s time to bring everything together into a luscious cookie dough that embodies the heart of our Lavender Earl Grey Cookies Recipe. Begin by creaming the softened unsalted butter and the granulated sugar in a large mixing bowl. I always find that using an electric mixer on medium speed for about 2-3 minutes helps achieve that fluffy, airy texture which is absolutely paramount to a tender cookie. As you mix, watch as the butter transforms from solid golden blocks into a soft, creamy blend; it should appear light and slightly pale in color. This step is crucial because incorporating air into the butter helps create cookies that are chewy in the center while crisping up beautifully at the edges.
Once your butter and sugar mixture looks just right, add in the egg and pure vanilla extract—oh, the scent of vanilla wafting through your kitchen is an experience all on its own! Continue to mix for another minute or so until these ingredients are fully incorporated. This combination not only enriches the flavor but also adds moisture, which keeps our cookies from becoming too dry. Trust me on this: taking care during this mixing stage will reward you with cookies that boast an enticingly tender bite.
Step 6: Infusion of Flavor – The Art of Combining
With your wet ingredients ready and waiting, it’s time to introduce our fragrant dry mixture. Gradually add in your flour blend—this includes those finely ground Earl Grey tea leaves and culinary-grade lavender petals—into the creamed mixture. I find it best to do this in three parts; sprinkle a third of your flour mixture into the bowl, mix gently on low speed until just combined, then repeat with the remaining flour until every last bit is incorporated. You want to be careful not to overmix at this stage; otherwise, we risk developing gluten which can lead to tough cookies instead of delightful morsels of joy.
As you fold in the final bits of flour, take a moment to appreciate how your dough transforms—it becomes thicker and starts clinging beautifully to itself. The aroma of lavender and bergamot will begin to envelop your space, creating an utterly intoxicating atmosphere that will make it hard to resist sneaking a taste! Just remember: if you see any streaks of flour lingering about, gently fold them in with a spatula instead of mixing vigorously; this will ensure a beautifully tender cookie without any unwanted toughness.
Step 7: Chilling Out – Patience Is Key
Here comes one of my favorite steps—the chilling process! Once your cookie dough has come together beautifully, it’s essential to wrap it in plastic wrap or transfer it into an airtight container and refrigerate for at least 30 minutes (or up to two hours if you have the time). Now, I know what you might be thinking: Why chill? Well, let me tell you—the chilling period allows the flavors to meld harmoniously together while also firming up the fat in the dough. This is critical because it prevents our cookies from spreading too much while baking, leading to those perfectly shaped delights we’re after.
While you’re waiting, use this time wisely! Perhaps brew yourself a nice cup of Earl Grey tea to sip on while you anticipate those delicious cookies. You’ll find that allowing them to chill enhances their flavor profile even more significantly—think about how each ingredient gets cozy with one another during this quiet time. Plus, when baked from chilled dough, you’ll notice a delightful contrast between crispy edges and chewy centers that will have everyone begging for seconds!
Step 8: Scooping Perfection – Prepare for Baking
When your dough has chilled sufficiently (and trust me; you’ll know it’s ready when it feels firmer), preheat your oven to 350°F (175°C). While that’s warming up—oh boy!—take out two baking sheets lined with parchment paper or silicone baking mats; this step ensures our cookies slide right off without any fuss later on. Now comes one of my favorite parts: scooping out portions of cookie dough! Using a medium-sized cookie scoop or simply two tablespoons, scoop out generous amounts of dough and place them about two inches apart on your prepared baking sheets.
As you do this, take a moment to admire how beautiful each scoop looks—you should see flecks of lavender speckled throughout. Think about how these little mounds will transform into golden-brown bites of bliss! Now sprinkle each cookie mound lightly with granulated sugar before adding some blue cornflower petals on top for an extra pop of color and flair—a charming touch that makes them visually stunning as well as delicious! Watching those vibrant hues contrast against the pale background really sets these cookies apart visually and adds even more floral notes when biting into them.
Next Major Phase – Baking Your Perfect Lavender Earl Grey Cookies Recipe
Step 9: The Baking Alchemy – Creating Cookie Perfection
Place one tray in the oven once it’s fully preheated and set your timer for about 12-15 minutes—not long at all! However—the magic happens here; keep an eye on them as they bake! You’ll notice how they begin puffing up ever so slightly before settling back down into irresistible shapes. The edges should turn golden brown while still maintaining a soft center; that’s what we’re aiming for—a harmonious balance between chewy perfection and subtle crispness around those edges.
As they bake, let those enchanting aromas fill your kitchen; there’s something truly extraordinary about how warm notes of bergamot dance alongside delicate lavender scents—a symphony of flavors that beckons everyone nearby! Be sure not to rush pulling them out too soon; they may still look slightly underbaked when they first come out—that’s perfectly normal! In fact, they’ll continue cooking slightly from residual heat after removing them from the oven—this is known as carryover cooking—and will contribute wonderfully to their deliciously chewy consistency.
Step 10: Cooling Down – Letting Them Rest
Once you’ve pulled your treasure trove of cookies from their baking journey, allow them a momentary rest on their baking sheets for about five minutes before transferring them onto wire racks for complete cooling. This step is non-negotiable because letting them sit allows residual steam from within each cookie to escape rather than turning them soggy upon immediate removal from heat—nobody wants a sad cookie!
During this cooling phase, savor those delightful scents wafting through your home—it’s almost like each cookie is whispering sweet nothings just waiting for someone special (that’s you!) to indulge in their exquisite flavors. Once they’ve cooled adequately—around 10-15 minutes depending on room temperature—they’re finally ready for devouring!
And there you have it—the complete journey through creating these utterly enchanting Lavender Earl Grey Cookies! Each bite delivers layers upon layers of flavor alongside textures that promise both comfort and joy. So whether you’re sharing these gems with friends or enjoying them solo over tea—I promise these cookies will elevate any moment into something truly special. Happy baking!
Storage and Enjoyment Tips for Your Lavender Earl Grey Cookies Recipe
Oh, my dear friends, the moment has finally arrived! You’ve baked your delightful Lavender Earl Grey cookies, and they are now waiting to be savored. The aroma wafting through your kitchen is nothing short of enchanting. But what happens when you have leftover cookies? Fear not! There’s a way to keep that magic alive.
Storing Leftover Lavender Earl Grey Cookies Recipe
To ensure your cookies stay fresh and delicious, I recommend storing them in an airtight container at room temperature. This helps maintain their chewy texture and prevents them from becoming too dry—nobody wants that! If kept properly, these lovely cookies can last for about a week. Trust me on this; I love to place a slice of bread in the container with them. This little trick works wonders by keeping the moisture levels just right, so you can enjoy that blissful chewiness even days later. And let me tell you, the flavor only seems to deepen as they rest—those hints of floral lavender and robust Earl Grey become more harmonious over time! If you’re looking to serve them warm and fresh again, simply pop them in the microwave for about 10-15 seconds; you’ll feel like you’ve just pulled them from the oven!
Freezing Lavender Earl Grey Cookies for Later
Now, if you find yourself with an abundance of these cookies (which is quite possible since they’re so irresistible!), freezing them is a fantastic option. To freeze properly, let your cookies cool completely before placing them in a single layer on a baking sheet lined with parchment paper. Freeze for about an hour until solid, then transfer them to a freezer-safe bag or container. They’ll stay good for up to three months—perfect for those days when you need a sweet treat without the fuss of baking from scratch! When you’re ready to indulge again, simply take them out of the freezer and let them thaw at room temperature or reheat them gently in the oven. It’s like having a little piece of joy waiting for you on a busy day!
So there you have it—everything you need to ensure your Lavender Earl Grey cookies remain as delightful as the moment they came out of the oven!
Lavender Earl Grey Cookies
Indulge in the enchanting flavors of Lavender Earl Grey Cookies, a delightful treat that will elevate any occasion. These chewy, buttery cookies are infused with the aromatic notes of Earl Grey tea and the delicate essence of culinary-grade lavender. Each bite is a harmonious blend of floral elegance and comforting sweetness, making these cookies perfect for afternoon tea or a cozy gathering with loved ones.
- Prep Time: 15 minutes
- Cook Time: 15 minutes
- Total Time: 30 minutes
- Yield: Approximately 24 servings 1x
- Category: Dessert
- Method: Baking
- Cuisine: American
Ingredients
- 2 ¼ cups all-purpose flour
- 1 tablespoon finely ground Earl Grey tea
- ½ teaspoon culinary-grade lavender, finely ground
- ½ teaspoon baking powder
- ¼ teaspoon baking soda
- ½ teaspoon kosher salt
- 1 ¼ cups granulated sugar
- 1 cup unsalted butter, at room temperature
- 1 large egg
- 2 teaspoons pure vanilla extract
- 2 tablespoons granulated sugar (for topping)
- blue cornflower petals (for garnish)
Instructions
- Preheat your oven to 350°F (175°C) and line two baking sheets with parchment paper.
- In a mixing bowl, cream together the room temperature butter and granulated sugar until light and fluffy.
- Add the egg and vanilla extract, mixing until well combined.
- In a separate bowl, whisk together the flour, Earl Grey tea, lavender, baking powder, baking soda, and salt.
- Gradually incorporate the dry ingredients into the wet mixture until just combined.
- Chill the dough for at least 30 minutes in the refrigerator.
- Scoop tablespoon-sized portions onto the prepared baking sheets, spacing them apart.
- Sprinkle lightly with granulated sugar and optional blue cornflower petals for garnish.
- Bake for 12-15 minutes until golden around the edges; let cool on the baking sheets for five minutes before transferring to wire racks.
Nutrition
- Serving Size: 1 cookie (approximately 30g)
- Calories: 150
- Sugar: 10g
- Sodium: 50mg
- Fat: 8g
- Saturated Fat: 5g
- Unsaturated Fat: 3g
- Trans Fat: 0g
- Carbohydrates: 18g
- Fiber: <1g
- Protein: <1g
- Cholesterol: 20mg