Healthy Sloppy Joes
As I sit here, reflecting on the comforting embrace of a home-cooked meal, I can’t help but think of one dish that always brings me back to simpler times—Healthy Sloppy Joes. This isn’t just another recipe; it’s a delightful blend of nostalgia and creativity that fills your kitchen with an intoxicating aroma reminiscent of family gatherings and carefree childhood days. The moment you take that first bite, you’re greeted by a symphony of flavors: savory ground beef mingling with a rich, tangy sauce that dances on your palate. I promise you, these Healthy Sloppy Joes are more than just food; they are a celebration of wholesome ingredients coming together to create something truly extraordinary.
Each time I make this dish, I am reminded of the joy that comes from cooking for loved ones. It’s not merely about nourishing our bodies, but also about forging connections and creating memories around the dinner table. Whether you choose to serve them on toasted gluten-free buns or nestle the savory filling inside baked sweet potatoes for a paleo twist, these Healthy Sloppy Joes invite conversation and laughter. They’re versatile enough for weeknight meals yet comforting enough for special occasions. Trust me, once you share this recipe with friends and family, they will rave about it long after the last bite has been savored.
Healthy Sloppy Joes: A Wholesome Twist on a Classic
I’m so excited to share my version of Healthy Sloppy Joes with you! This recipe is not only delicious but also packed with nutrients that make it guilt-free comfort food. You’ll find that it comes together effortlessly in one pan, allowing for minimal cleanup while still delivering maximum flavor. Let’s dive into this culinary adventure together!
Ingredients:
As we embark on this delightful culinary journey to create Healthy Sloppy Joes, let’s take a moment to appreciate each ingredient that contributes to this savory masterpiece. Each component plays a crucial role in achieving that perfect balance of taste and texture, making every bite a joy.
- 1 tablespoon olive oil – This golden elixir is essential for sautéing your vegetables and browning the ground beef. Olive oil not only adds depth and richness but also boasts heart-healthy fats and antioxidants. When purchasing olive oil, look for extra virgin varieties to ensure you’re getting the highest quality with the best flavor profile. This step is crucial; without it, your ingredients would stick to the pan rather than caramelize beautifully.
- 1 lb ground beef – The star of our dish! Ground beef provides protein and creates a hearty base for our sloppy joes. When selecting ground beef, aim for lean cuts (like 90% lean) to keep things healthier without sacrificing flavor. Browning the meat properly is key here—allow it to develop those flavorful crusty bits at the bottom of your skillet while breaking it up into small pieces as it cooks.
- ½ medium yellow onion, minced – Onions bring an incredible sweetness and depth when sautéed, transforming our dish from good to unforgettable. They release their natural sugars as they cook down, creating a liquid gold that infuses every bite with flavor. Make sure to mince them finely so they meld seamlessly into the filling.
- ¼ cup finely chopped green bell pepper – These vibrant little gems add freshness and crunch! Bell peppers are not only colorful but also packed with vitamin C. Dicing them finely allows them to soften beautifully without overpowering the dish’s flavor profile.
- ½ teaspoon salt (plus more to taste) – Salt is not just an afterthought; it’s absolutely paramount in enhancing all the flavors present in our dish. It brings out the natural sweetness of the vegetables and balances out acidity from tomatoes later on.
- ¼ teaspoon ground black pepper – A simple yet effective seasoning! Black pepper adds warmth and subtle heat, creating layers of flavor in our sloppy joes that will keep everyone coming back for more. Freshly ground pepper can elevate this dish even further—consider investing in whole peppercorns if you can!
- 2 garlic cloves, minced – Garlic is like magic in cooking; its fragrance can transport you straight into culinary heaven. Minced garlic releases its oils when sautéed, imparting an utterly intoxicating aroma that fills your kitchen with anticipation as it cooks down alongside onions and peppers.
- ¾ cup tomato sauce – This is where things start to get saucy! Tomato sauce serves as the foundation for our sloppy joe filling, providing acidity and sweetness while binding everything together beautifully. Opt for brands without added sugars or preservatives for a healthier option.
- ¼ cup unsweetened Primal Kitchen ketchup – Ketchup—a childhood favorite—gets an upgrade here! This version steers clear of refined sugars while still delivering that familiar tanginess we love in sloppy joes. Its smooth consistency helps thicken our sauce while adding just enough sweetness.
- ¼ cup water – Water acts as a gentle thinning agent here; it helps meld all those glorious flavors together while preventing our mixture from becoming too thick or dry during cooking.
- 1 tablespoon pure maple syrup – A touch of maple syrup adds an unexpected layer of complexity—a hint of sweetness perfectly balanced against tangy elements in our sloppy joe mix! Always go for pure maple syrup over imitation varieties; trust me on this one!
- 1 tablespoon apple cider vinegar – Vinegar brightens up dishes by cutting through richness—it’s like adding sunshine! The acidity here balances out all those hearty flavors beautifully while contributing additional health benefits such as aiding digestion.
- ¾ teaspoon chili powder – Here comes some warmth! Chili powder introduces depth with its smoky undertones without overwhelming spice levels—just what we need for balance in flavors!
- 1-2 teaspoons hot sauce (optional) – If you’re feeling adventurous or have spice-loving friends at your table (who doesn’t?), feel free to kick things up a notch! Just remember: start with less—you can always add more later if desired!
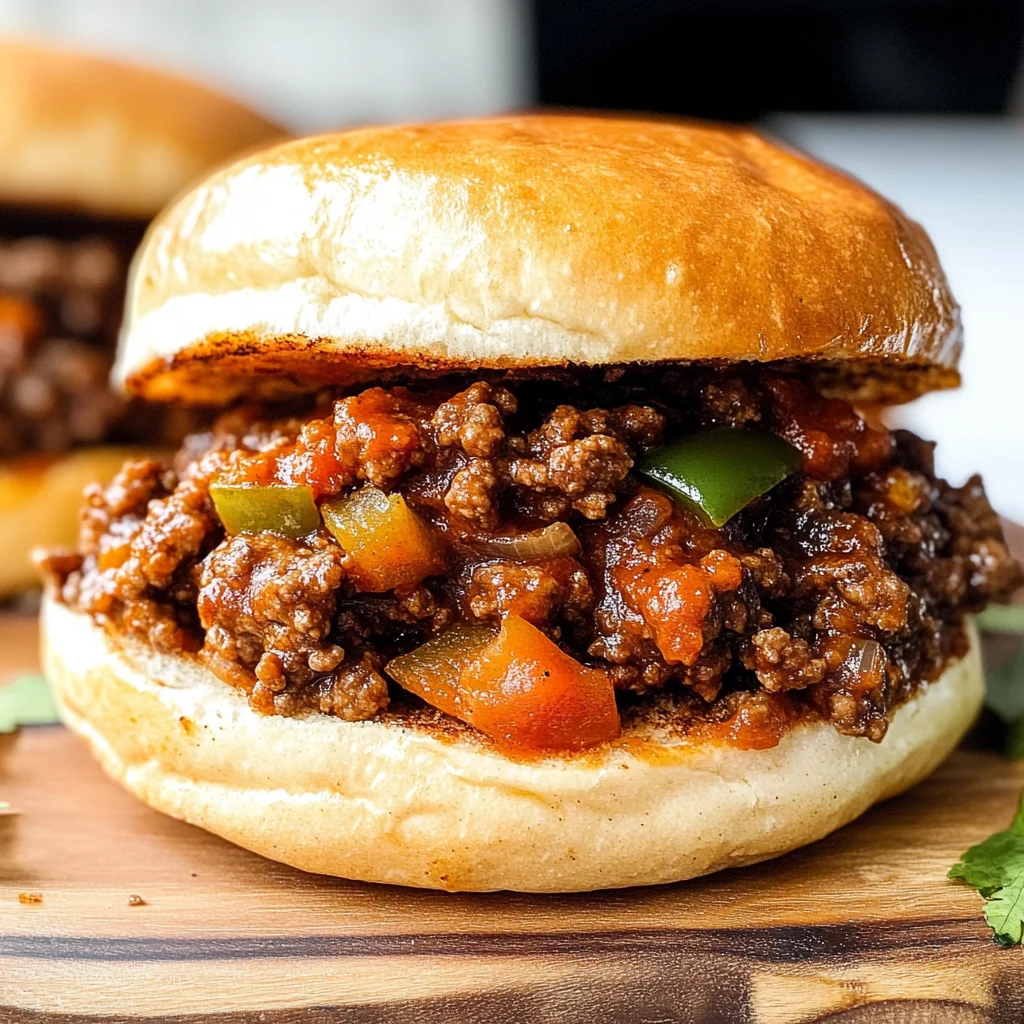
For serving: 4 gluten-free buns or baked sweet potatoes – Here lies your canvas! Toasted buns provide classic appeal while baked sweet potatoes offer a nutritious twist—both options allow you to truly enjoy every mouthful of those robust sloppy joes!
Equipment You’ll Need:
Before we dive into making these scrumptious Healthy Sloppy Joes come alive in your kitchen, let’s talk about some essential tools you’ll want by your side throughout this process. Having the right equipment not only makes cooking smoother but also enhances enjoyment as you whip up something wonderful!
- Large skillet or frying pan – This will be your trusty companion throughout cooking! A spacious skillet allows ample room for browning meat evenly while ensuring vegetables have space to soften without crowding them too much—a key factor in developing flavors effectively.
- Wooden spatula or spoon – A wooden spatula is perfect for breaking up ground beef as it cooks while gently scraping up any delicious browned bits stuck at bottom—the flavor treasure we don’t want wasted! Plus, wooden utensils won’t scratch non-stick surfaces; win-win!
- Measuring cups & spoons – Precision matters when crafting dishes like these healthy sloppy joes! Good measuring tools ensure each ingredient shines through exactly how intended—no guesswork needed here!
Now that we’ve gathered our ingredients and tools together like old friends reuniting at a long-awaited gathering let’s dive into preparing these mouthwatering Healthy Sloppy Joes!
Step 1: Sautéing Dreams into Reality
Start by heating olive oil in your large skillet over medium heat until shimmering—a signal it’s ready for action! Once hot enough (you’ll know because it’ll look almost “liquid gold”), add in one pound of ground beef directly into the pan. As it hits that sizzling surface—oh boy—you’ll hear an inviting sound that promises deliciousness ahead! Use your wooden spatula break apart chunks gently while cooking until browned evenly (about five minutes). Don’t rush this step; allowing meat proper time creates beautiful caramelization which intensifies flavors dramatically—the difference between simply cooked meat versus extraordinary!
Step 2: Building Flavor Foundations
Once browned beautifully (and before draining excess fat), let’s bring life back into our skillet by adding minced onion along with green bell pepper cubes immediately after draining most grease away leaving just about one tablespoon behind—that tiny amount ensures nothing goes wasted whilst enhancing taste further by capturing remaining essence left behind during cooking process! Stirring occasionally will allow veggies time soften perfectly within four-five minutes’ timeframe—they should become translucent yet still maintain slight firmness—nobody wants mushy fillings here!
Step 3: Inviting Aromas
After onions turn glassy (and oh-so-fragrant!), toss those two minced garlic cloves straight into pan alongside sautéed mix previously prepared—this step unleashes potent aromas that’ll fill home like warm hugs wrapping around everyone nearby urging them closer toward kitchen where magic unfolds before eyes… Allow garlic only thirty seconds max since burning alters its delicate flavor profile negatively—we’re aiming aromatic bliss not bitter notes!
Step 4: Sauce Central
Now comes my favorite part—the assembly where everything starts blending harmoniously together into something greater than sum parts alone! Pour three quarters cup tomato sauce followed by quarter cup Primal Kitchen ketchup alongside measured water directly onto mixture already bubbling away beneath fragrant veil created thus far… Then drizzle pure maple syrup along apple cider vinegar followed by chili powder plus optional hot sauce if desired—this amalgamation creates rich base bursting forth promising delightful tanginess enjoyed within each mouthful as simmer unfolds gradually over next ten minutes under gentle boil reduced afterwards covering lid snugly locking warmth inside keeping everything cozy whilst thickening gradually until preferred consistency achieved visible transformation happening right before eyes too exciting right?
Let’s savor every moment during preparation because believe me folks… once served atop crispy toasted gluten-free buns or nestled neatly within baked sweet potatoes? Pure joy awaits us all ahead!
And there you have it—a journey through crafting Healthy Sloppy Joes filled with care from start finish guaranteed stir hearts souls alike every time served around dining tables everywhere no matter occasion shared amongst loved ones friends alike!
Step 5: Simmering to Perfection — The Art of Flavor Integration
Now that you have a beautifully aromatic blend of sautéed vegetables and browned meat, it’s time to take this dish to the next level through simmering. Pour in the ¾ cup of tomato sauce and ¼ cup of unsweetened Primal Kitchen ketchup, followed by ¼ cup of water. This is where the magic begins! The combination of tomato sauce and ketchup creates a rich, tangy base that serves as the heart of your healthy sloppy joes. Stir this luscious mixture together until everything is well combined; you want every bit of your ground beef and veggies coated in this glorious sauce. Then, add in 1 tablespoon of pure maple syrup and 1 tablespoon of apple cider vinegar—these ingredients are non-negotiable! The maple syrup adds a hint of sweetness that balances the acidity from the tomatoes, while the vinegar brightens up the flavors, making them dance on your palate.
After you’ve mixed everything together, sprinkle in ¾ teaspoon chili powder for that comforting warmth and depth. If you’re feeling adventurous (and I hope you are), now’s the time to add 1-2 teaspoons of hot sauce for an extra kick! Bring this mixture to a gentle boil over medium heat—don’t rush this step, as it allows all those vibrant flavors to meld beautifully. As it bubbles away, you’ll notice how the aroma fills your kitchen; it’s utterly intoxicating and will make everyone eager for dinner. Once it’s reached a boil, lower the heat to let it simmer gently for about 10 minutes, covering your skillet with a lid. This simmering phase is crucial because it thickens the sauce beautifully while allowing all those flavors to integrate into one cohesive symphony. Keep an eye on it; if it seems too thick, feel free to add a splash more water!
Step 6: Taste Testing — Adjusting Flavors Like a Pro
After patiently allowing your sloppy joe mixture to simmer for those ten glorious minutes, it’s time for one of my favorite parts: taste testing! Remove the lid carefully—watch out for any steam that escapes—and grab a spoon. This is not just about checking if it’s ready; it’s an opportunity to adjust flavors so that they sing harmoniously together! Take a small bite (you can blow on it first if you’re worried about heat), but trust me, tasting at this stage is essential. You might find that a pinch more salt elevates those savory notes just right or perhaps that dash more chili powder enhances its warmth.
Remember, cooking is an art as much as it is a science; it’s all about finding what works best for your palate. If you find yourself craving more sweetness after tasting, don’t hesitate to incorporate another splash of maple syrup or even a touch more vinegar for brightness. Each ingredient has purpose here—salt enhances flavor while acidity brings balance—so take your time! I promise you, these adjustments will lead to an utterly extraordinary meal where each bite feels deeply satisfying and comforting.
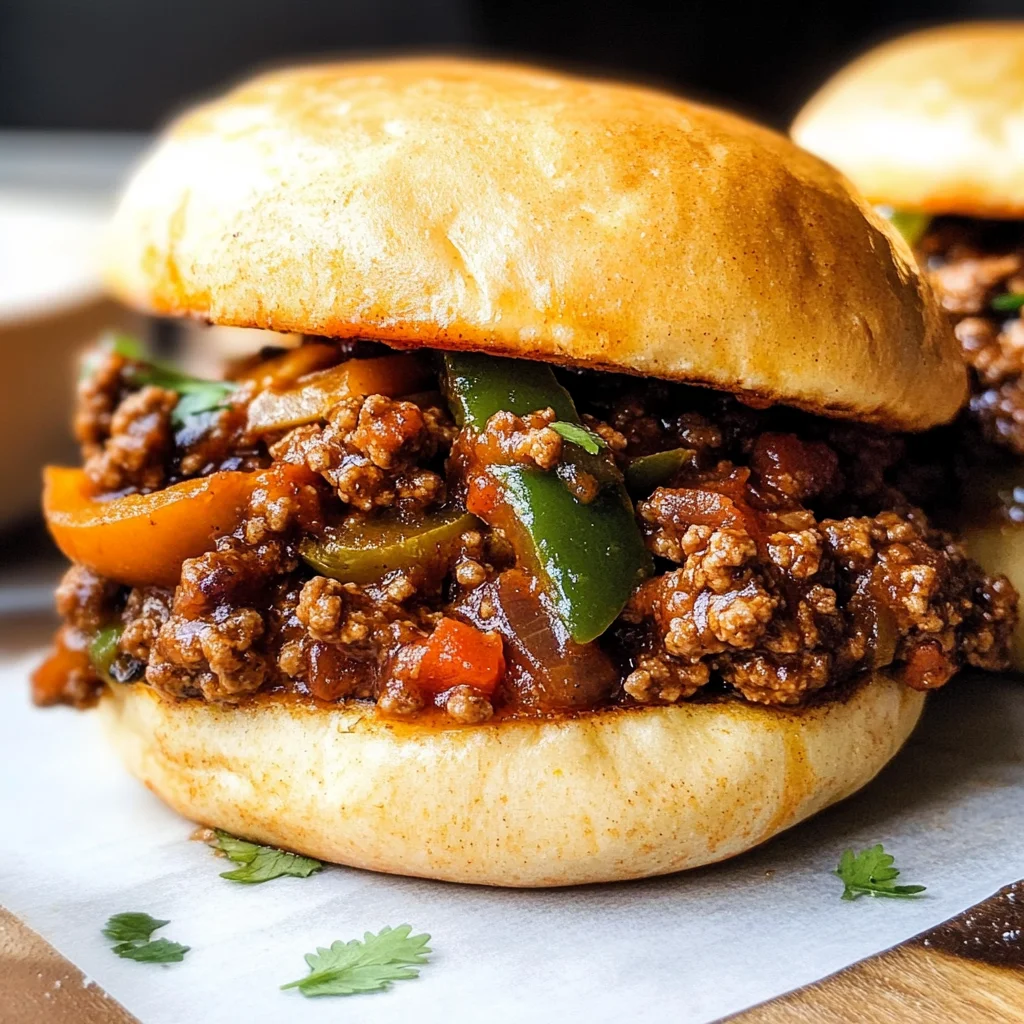
Step 7: Serving Suggestions — Elevating Your Healthy Sloppy Joes
As we approach the final stretch of our culinary adventure, let’s talk about how best to serve these healthy sloppy joes. For those who enjoy traditional aesthetics without compromising health goals, lightly toast 4 gluten-free buns until they’re golden brown and crisp on the edges—this step adds texture and prevents sogginess when we pile on our flavorful filling. Picture yourself assembling these sandwiches: imagine fluffy buns cradling that juicy meat mixture bursting with color and flavor! Alternatively, if you’re embracing a paleo lifestyle or simply want something different today, consider using baked sweet potatoes instead.
To prepare sweet potatoes perfectly, poke several holes into them with a fork (this allows steam to escape) and bake them at 400°F for about 45 minutes or until tender when pierced with a knife. Trust me when I say that stuffing these hearty sweet potatoes with our savory mixture creates an experience that’s not only delicious but also profoundly satisfying—the sweetness from the potato complements the robust flavors of our healthy sloppy joes beautifully! As you plate up each serving, don’t forget to drizzle any extra sauce from your pan over top—you want every bite drenched in that liquid gold!
Step 8: Final Touches — Setting Up for Success
Before diving into this feast you’ve created, let’s ensure everything’s perfect down to the last detail! If you’re using toasted buns, you might want to butter them lightly before putting them under the broiler for just a minute or two—it’s those little touches that elevate home-cooked meals into something truly special. And as you’re assembling your sandwiches or plating up stuffed sweet potatoes, consider garnishing with fresh herbs like parsley or cilantro—they add not only color but also freshness that complements all those deep flavors.
Don’t rush through this part; take your time assembling each plate thoughtfully because presentation matters too! As you bring everything together on the table—whether it’s family-style platters or individual servings—take note of how lovely everything looks; vibrant colors almost beckoning everyone to dig in! Remember, cooking isn’t solely about nourishment—it’s about creating experiences filled with joy and connection around food.
Final Thoughts — Embracing Family Traditions
As you sit down with loved ones around the table enjoying these healthy sloppy joes together—or perhaps savoring every bite solo—you’ll realize how deeply satisfying this meal truly is. It embodies comfort food at its finest while keeping health in mind; there’s something profoundly special about sharing meals made from whole ingredients without sacrificing flavor or fun! So gather around with friends or family—or even enjoy some well-deserved ‘me-time’ during dinner—and relish every moment spent enjoying what you’ve created because cooking connects us all in such beautiful ways. You’ve crafted not just food but memories waiting to happen!
Storage and Enjoyment Tips for Your Healthy Sloppy Joes
Now that your kitchen is filled with the mouthwatering aroma of your homemade Healthy Sloppy Joes, it’s time to dig in and enjoy this scrumptious meal with family or friends. But let’s be honest—sometimes, we make a little extra on purpose because these delightful bites are just too good not to savor later! If you find yourself with leftovers (which I genuinely hope you do, but if not, trust me, it’s worth making another batch), here are some fantastic tips for storing them so they remain just as delicious.
Storing Leftover Healthy Sloppy Joes
To keep your Healthy Sloppy Joes fresh and flavorful, transfer any leftovers into an airtight container that seals well—this helps lock in moisture and flavor. You can store them in the refrigerator for about 3-4 days, but I promise you, they’ll likely vanish long before that. For optimal quality, consider placing a slice of bread in the container; it absorbs excess moisture and keeps everything nice and juicy while also preventing sogginess. When you reheat the mixture in a skillet or microwave, you’ll find that the flavors meld even more beautifully after a day or two, creating an utterly intoxicating experience when you take that first bite. Trust me on this; there’s something profoundly satisfying about enjoying a meal that’s just as good on day two!
Freezing for Later
If you’ve made a larger batch or simply want to plan for those busy weeknights ahead, freezing your Healthy Sloppy Joes is an absolute game changer! To freeze them properly, allow the mixture to cool completely before transferring it into freezer-safe bags or containers. Make sure to squeeze out as much air as possible to prevent freezer burn—this step is crucial for maintaining flavor. When stored correctly, your Healthy Sloppy Joes will stay fresh for up to 3 months! When you’re ready to enjoy them again, simply thaw overnight in the fridge and reheat on the stove over low heat or in the microwave until warmed through. The convenience of having a wholesome meal at your fingertips makes this option especially appealing when life gets hectic. Just imagine pulling open your freezer door and seeing those vibrant flavors waiting patiently for you!
Healthy Sloppy Joes

Indulge in the comforting flavors of Healthy Sloppy Joes, a delightful twist on a classic dish that brings back fond memories while prioritizing nutrition. This easy-to-make recipe combines savory ground beef with a rich, tangy sauce, enveloped in toasted gluten-free buns or nestled in baked sweet potatoes for a wholesome meal. Perfect for busy weeknights or special gatherings, these Healthy Sloppy Joes are sure to ignite laughter and conversation around your dinner table. With every bite, you’ll enjoy a symphony of flavors that transforms simple ingredients into extraordinary comfort food.
- Prep Time: 10 minutes
- Cook Time: 20 minutes
- Total Time: 30 minutes
- Yield: Serves 4
- Category: Main
- Method: Cooking
- Cuisine: American
Ingredients
- 1 tablespoon olive oil
- 1 lb ground beef (lean)
- ½ medium yellow onion, minced
- ¼ cup finely chopped green bell pepper
- ¾ cup tomato sauce
- ¼ cup unsweetened Primal Kitchen ketchup
- 1 tablespoon pure maple syrup
- 1 tablespoon apple cider vinegar
- ½ teaspoon salt (plus more to taste)
- ¼ teaspoon ground black pepper
- 2 garlic cloves, minced
- ¾ teaspoon chili powder
- 1–2 teaspoons hot sauce (optional)
- 4 gluten-free buns or baked sweet potatoes
Instructions
- Heat olive oil in a large skillet over medium heat. Add ground beef and cook until browned (about 5 minutes).
- Drain excess fat, then add minced onion and green bell pepper to the skillet. Sauté for about 4-5 minutes until softened.
- Stir in minced garlic and cook for an additional 30 seconds.
- Pour in tomato sauce, ketchup, water, maple syrup, apple cider vinegar, chili powder, and any optional hot sauce. Mix well.
- Bring to a gentle boil, reduce heat to low, and let simmer for about 10 minutes, stirring occasionally until thickened.
- Serve on toasted gluten-free buns or baked sweet potatoes.
Nutrition
- Serving Size: 1 sandwich (approximately 200g)
- Calories: 320
- Sugar: 10g
- Sodium: 600mg
- Fat: 15g
- Saturated Fat: 5g
- Unsaturated Fat: 9g
- Trans Fat: 0g
- Carbohydrates: 32g
- Fiber: 3g
- Protein: 20g
- Cholesterol: 70mg