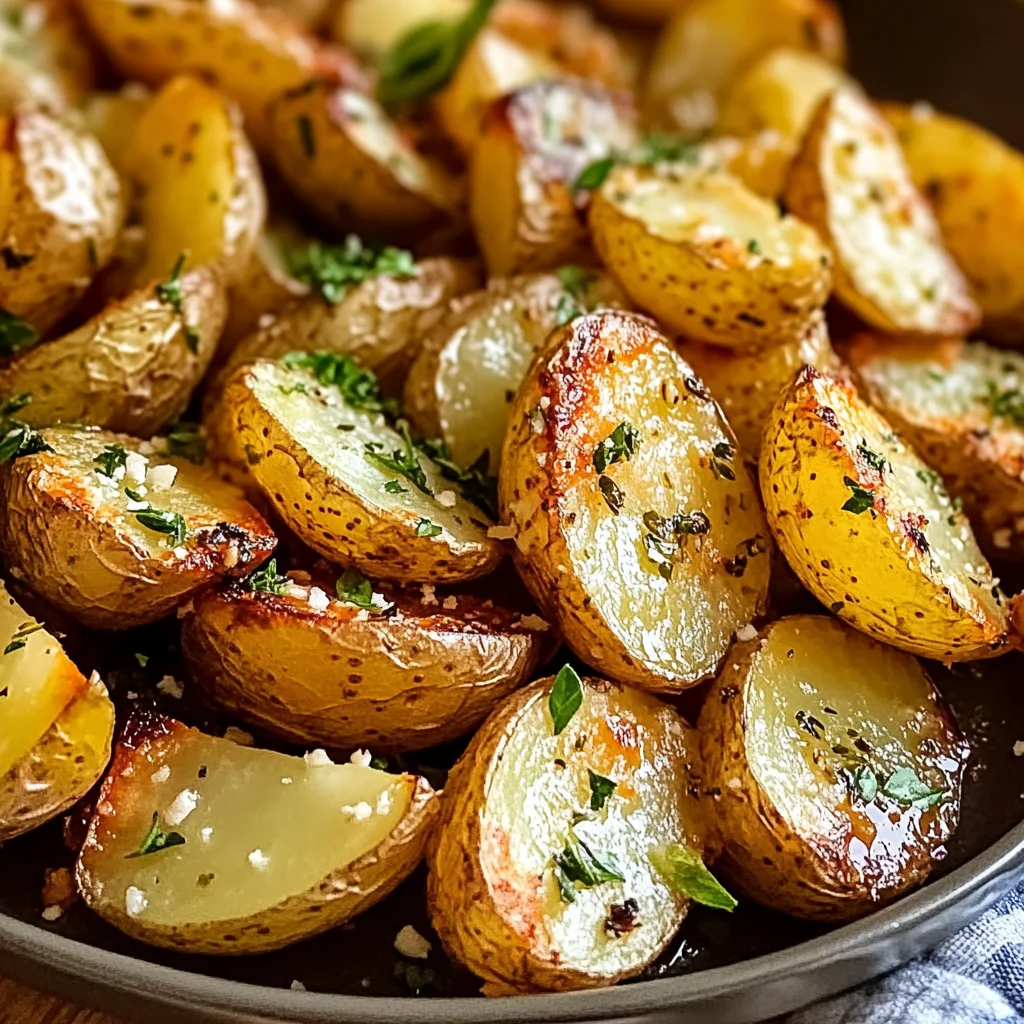
Authentic Greek Potatoes: Crispy Lemon Perfection!
There’s something truly magical about authentic Greek potatoes, isn’t there? The moment you take that first bite, you’re transported to a sun-soaked terrace overlooking the Aegean Sea, surrounded by laughter and music. The crispy golden edges give way to dreamy, fluffy interiors that practically melt in your mouth. These Authentic Greek Potatoes: Crispy Lemon Perfection! are more than just a side dish; they are an experience—a celebration of flavor, texture, and tradition all rolled into one. Infused with the tang of freshly squeezed lemon juice, aromatic garlic, and earthy oregano, every forkful is a journey through Greece’s rich culinary landscape. I promise you, this recipe will not only elevate your meals but also become a cherished part of your kitchen repertoire.
When I first discovered this recipe, it felt like uncovering a hidden gem in my culinary adventures. It’s fascinating how such simple ingredients can create something so profoundly satisfying. I’ve always been captivated by dishes that tell stories—not just the story of their origin but also of the love and care that goes into making them. Each time I prepare these potatoes, I’m reminded of family gatherings where delicious aromas filled the air and laughter echoed around the table. This dish is perfect for any occasion—whether you’re hosting a festive dinner or simply enjoying a quiet weeknight meal. Trust me on this; once you try these crispy lemon potatoes, they’ll find their way into your heart as they have into mine.
Authentic Greek Potatoes: Crispy Lemon Perfection!: Elevating Your Side Dish Game
Let’s embark on this culinary journey together! As we dive into the world of flavors and textures found in these delightful Greek potatoes, you’ll discover that cooking can be both an art and a joy. With each ingredient playing its unique role in creating memorable dishes, I can’t wait to share with you all the tips and tricks that will ensure your success in making these crispy delights.
Ingredients:
Gathering the right ingredients is essential for crafting these Authentic Greek Potatoes: Crispy Lemon Perfection! Each element has its own significance and contributes uniquely to the overall experience.
- 2.5-3 lbs Russet or Yukon Gold Potatoes. These varieties are ideal for achieving that perfect balance between fluffiness inside and crispiness outside. Russets are particularly starchy and yield an incredibly light texture when cooked, while Yukon Golds offer a creamy taste that enhances the dish’s richness. When choosing your potatoes, look for those that feel firm with no blemishes or sprouts—this ensures freshness and quality in your cooking.
- 1/2 cup (120ml) Freshly Squeezed Lemon Juice. Fresh lemon juice is absolutely paramount here! The bright acidity cuts through the richness of the olive oil and balances the flavors beautifully. Using bottled lemon juice won’t provide the same vibrant taste; fresh juice is where it’s at! Plus, squeezing them yourself means you get all those gorgeous essential oils from the zest too—utterly intoxicating!
- 1/2 cup (120ml) Good Quality Extra Virgin Olive Oil. Think of olive oil as liquid gold! A high-quality extra virgin variety adds depth to your potatoes while also helping them achieve that coveted crispy texture during roasting. Look for oils labeled “first cold press,” which indicates superior flavor extraction without compromising quality.
- 4-6 cloves Garlic, minced. Ah, garlic—the aromatic superstar! It infuses our dish with savory warmth and depth; there’s simply no substitute for fresh garlic here! When mincing garlic, use a sharp knife to avoid crushing it too much; this allows it to impart its flavor without becoming bitter during cooking.
- 2 tablespoons Dried Oregano. This herb brings an earthy note that’s quintessentially Mediterranean. Dried oregano works beautifully because it releases intense flavors during cooking—trust me when I say it’s non-negotiable for authenticity! If you have fresh oregano on hand during summer months, feel free to use it; just remember that fresh herbs are more potent than dried ones.
- 1 teaspoon Salt. Salt is essential—it enhances all other flavors present in our dish! Use kosher salt if possible because it dissolves well and doesn’t overpower other ingredients.
- 1/2 teaspoon Black Pepper. Freshly cracked black pepper adds a subtle heat that complements our dish’s brightness without overwhelming it—a little goes a long way!
- 1/2 cup (120ml) Vegetable or Chicken Broth. This liquid component helps steam the potatoes as they roast, ensuring they become tender while still developing those glorious crispy edges! Choose low-sodium broth so you can control salt levels better throughout cooking.
- Fresh Parsley or Oregano, for garnish (optional). Garnishing isn’t just about aesthetics; adding fresh herbs brightens up any dish visually while also boosting flavor just before serving!
Equipment You’ll Need:
Having the right tools makes all the difference in creating something wonderful together! While they might not be “ingredients,” these essential partners will ensure your cooking process is smooth and enjoyable.
- Large Mixing Bowl – A sturdy bowl is crucial for combining our marinade ingredients thoroughly before tossing our potatoes in—this ensures each piece gets evenly coated with flavor!
- Baking Sheet or Roasting Pan – Opt for heavy-duty options here; thin pans can warp under high heat which may lead to uneven cooking results or burned spots on your precious potatoes!
- Spatula – A good spatula is necessary for flipping those potato wedges halfway through roasting without breaking them apart—look for one that’s sturdy yet gentle enough not to damage their shape.
- Colander – To drain our soaked potato wedges after they’ve drawn out excess starch—this step helps achieve crispiness later on!
These tools are simple yet vital—they’ll make preparing your Authentic Greek Potatoes a breeze!
Preparing the Authentic Greek Potatoes: Crispy Lemon Perfection!
Step 1: Preparing Your Potatoes
First things first: let’s wash those beautiful potatoes! Start by scrubbing them gently under running water to remove any dirt or residue left from harvesting—they deserve some pampering! You can choose to peel them or leave their skins intact depending on personal preference; I find leaving skins on adds rustic charm as well as extra nutrients! Once washed (and peeled if desired), cut them into consistent 1-inch chunks or wedges—aiming for uniformity ensures even cooking throughout.
Step 2: Soaking for Crispiness
Now comes one of my favorite tricks—the soaking process! Place your cut potatoes into a large bowl filled with cold water and let them soak for 30 to 60 minutes. This crucial step draws out excess starch from their surface which can otherwise lead to gummy results instead of achieving optimal crispiness upon roasting. After soaking time has elapsed, drain thoroughly—it’s important not only to remove water but also to pat each piece dry using clean towels; this step cannot be rushed if you want that golden crunch!
Step 3: Preheating Your Oven
With our potatoes prepped beautifully, it’s time to preheat our oven to 400°F (200°C). Position an oven rack in the middle; this placement ensures even airflow around our baking sheet—a key factor when trying to achieve perfectly roasted veggies without burning!
Step 4: Creating Our Flavorful Marinade
In a very large bowl (one big enough to accommodate all potato pieces), whisk together freshly squeezed lemon juice with good quality extra virgin olive oil along with minced garlic cloves—oh my goodness—it smells heavenly already! Next add dried oregano followed by salt and black pepper before finally introducing those thoroughly dried potato pieces into this luscious concoction—we want every piece coated evenly so toss vigorously until every wedge glistens beautifully with marinade goodness!
As we continue through each step together toward creating these Authentic Greek Potatoes: Crispy Lemon Perfection!, remember how important patience is in cooking—rushing leads only towards disappointment while savoring every moment brings joy not only within ourselves but also shared among loved ones gathered around our tables enjoying delicious food made from love!
Step 5: Marinating the Potatoes for Flavor Infusion
Now that you’ve washed and dried your potato pieces, it’s time to bring them to life with a vibrant marinade. In an impressively large bowl—because trust me, you want enough space to toss those potatoes around—combine the freshly squeezed lemon juice and good quality extra virgin olive oil. This is not just about flavor; the oil serves as a protective barrier that helps the potatoes crisp up beautifully as they roast. Next, add in the minced garlic, which will release its aromatic oils and elevate the dish with its savory depth. The dried oregano follows suit, infusing each bite with a hint of earthy warmth that’s simply irresistible. Don’t forget the salt and black pepper; these seasoning staples are non-negotiable—they enhance every element in this dish, coaxing out flavors that would otherwise remain hidden.
Once everything is whisked together into a glorious blend of liquid gold, it’s time to add those thoroughly dried potato pieces. This step is crucial. You want to ensure that every piece gets lovingly coated in this marinade, so don’t be shy—toss vigorously! Visualize each wedge or chunk being enveloped in this zesty mixture. The acid from the lemon juice not only adds brightness but also helps in tenderizing the potatoes slightly, ensuring that when you bite into them later, they yield perfectly without losing their structure. Allow them to soak up this flavor for about 10-15 minutes while you prepare your baking sheet; this little wait is well worth it!
Step 6: Spreading Out for Optimal Roasting
With your marinated potatoes ready, let’s talk about the next important move: spreading them out on your baking sheet or roasting pan. Preheat your oven to 400°F (200°C)—this temperature is pivotal because it allows for even cooking while promoting that glorious crispiness we all crave. When you place those seasoned potato pieces on the pan, ensure they’re arranged in a single layer—no overcrowding here! Each piece needs its own space to breathe and develop that coveted golden-brown crust; if they’re too close together, they risk steaming rather than roasting.
As you arrange your potatoes, think of it as creating a canvas where each wedge will become beautifully bronzed and crispy—the visual appeal is simply delightful! If you find that one baking sheet isn’t enough, don’t hesitate to grab another; it’s better than cramming them all onto one sheet where they won’t achieve their full potential. This meticulous attention to detail will yield results that are not only visually stunning but also utterly delicious.
Step 7: The First Roast – Getting That Initial Crisp
Once your pan is prepped and ready to go, slide it into the oven for an initial roast of 20-25 minutes without disturbing those beautiful potato pieces. During this time, you’ll experience one of my favorite kitchen sounds—the gentle sizzle as they begin to cook. This is where the magic starts! The heat will start working its way through the potatoes, forming a crispy outer layer while softening their insides into fluffy perfection.
Why do we leave them undisturbed at first? It’s all about building layers of flavor and texture. By letting them roast without interference initially, they develop a crust that seals in moisture and enhances overall taste. Keep an eye on them during this phase—what you’re looking for are those early signs of browning around the edges; trust me when I say this is just the beginning of something delicious.
Step 8: Flipping & Adding Broth – Bringing It All Together
After your potatoes have roasted beautifully for 20-25 minutes, it’s time for some action! Carefully remove the baking sheet from the oven—this step requires some finesse so as not to burn yourself or spill any precious marinade! Using a sturdy spatula (or two if needed), gently flip each potato piece over; don’t worry if some of them resist a little—you might need to coax them free from their golden embrace.
This moment is absolutely paramount because flipping ensures even cooking on both sides and prevents any soggy bits from developing after we add our secret ingredient: broth! Pour half a cup of vegetable or chicken broth into the pan around the potatoes—it might seem counterintuitive at first because we’ve worked so hard for crispiness! But here’s why it matters: adding broth creates steam in the oven which helps cook through those thick wedges while still allowing for caramelization on their surfaces. By returning it back into the oven after this addition, you’re essentially providing a dual cooking method—a dreamy combination of roasting and steaming that leads to incredible flavor.
Final Steps – Crisping Up Perfection
Step 9: The Golden Finish – Achieving Ultimate Crispiness
After you’ve flipped those lovely wedges and let them bask in their bath of broth for another 25-35 minutes, keep an eye on their progress by flipping every 10-15 minutes. This action shouldn’t feel like a chore—instead think of it as an opportunity to engage with your food! As you scrape up any delicious browned bits from the bottom of the pan during these flips (these bits are packed with flavor!), visualize how they’re transforming each wedge into an extraordinary bite.
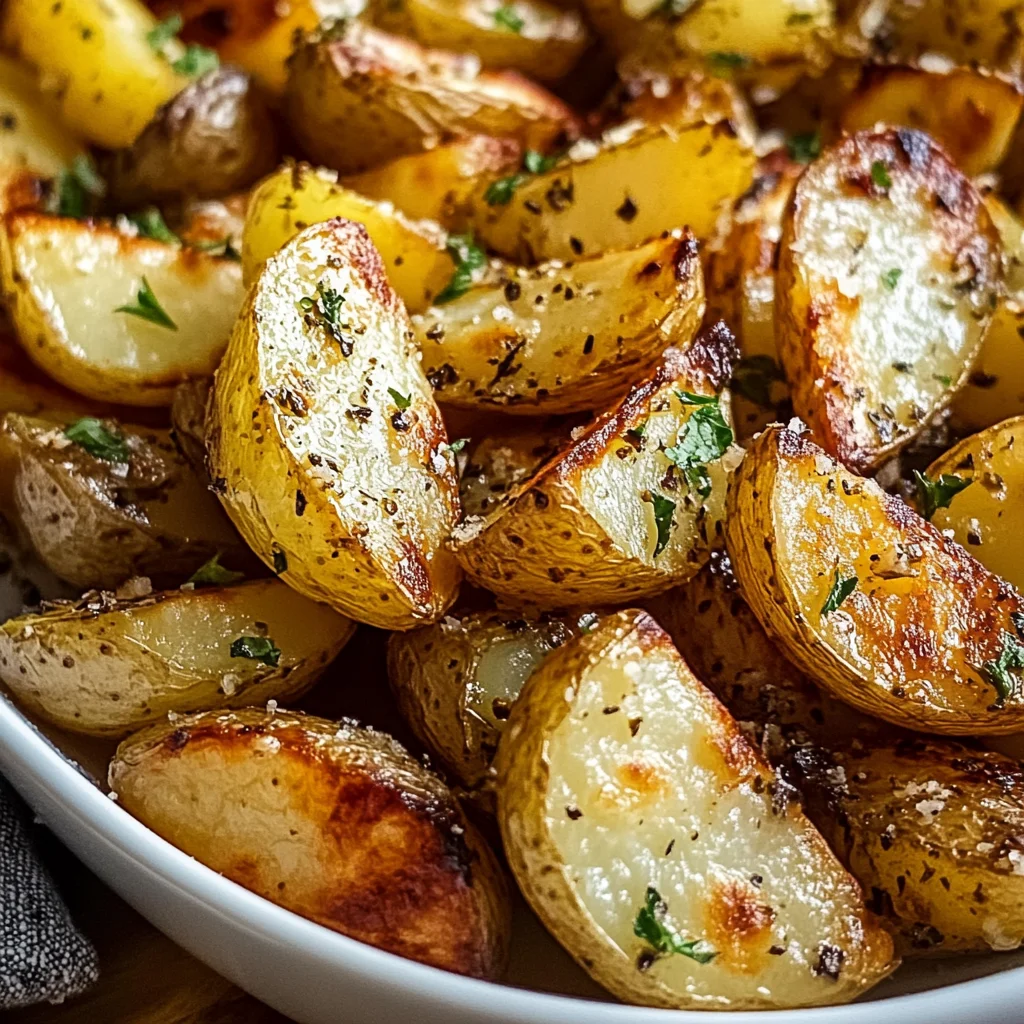
Towards the end of roasting time, when they’ve reached fork-tenderness inside but still have yet to achieve peak crispiness outside, consider raising your oven temperature slightly to 425°F (220°C) for those last glorious moments—or if you’re feeling adventurous, use your broiler for just 1-3 minutes (but stay vigilant!). This final touch is what takes these Authentic Greek Potatoes from simply delicious to truly extraordinary! You’ll know they’re done when every piece shines like gold under its crispy coat—a sight so enticing you might find yourself sneaking bites before serving!
Finally, once they’ve reached maximum crispiness—and trust me, you’ll know when—as soon as they’re out of that hot oven let them rest uncovered in their pan for about 5-10 minutes before diving in. During this resting period, flavors meld beautifully while ensuring each bite has just enough warmth without burning your tongue off.
Before serving these beauty wedges onto plates or bowls garnished with fresh parsley or oregano (if desired), take a moment—breathe deeply—and revel in what you’ve created together. These Authentic Greek Potatoes are more than just food; they’re an experience filled with love and passion that I’m thrilled to share with you!
Enjoy every crispy lemon-infused bite—you’ve earned it!
Storage and Enjoyment Tips for Your Authentic Greek Potatoes: Crispy Lemon Perfection!
Now that you’ve created the ultimate side dish, it’s time to indulge in those mouthwatering bites of Authentic Greek Potatoes: Crispy Lemon Perfection! The aroma of tangy lemon and savory garlic fills your kitchen, inviting everyone to gather around the table. But what happens if you find yourself with leftovers (if that’s even possible!)? Fear not! I’ve got some fantastic storage tips to help you preserve every last crumb of this delightful dish.
Storing Leftover Authentic Greek Potatoes: Crispy Lemon Perfection!
To keep your leftover Authentic Greek Potatoes at their best, transfer them into an airtight container. This is essential because it prevents moisture from seeping in and ruining that coveted crispiness we adore. Store them in the refrigerator, where they will stay fresh for about 3 to 5 days. To maintain their delightful texture, consider placing a slice of bread in the container; it will absorb excess moisture and keep your potatoes from becoming soggy. Now, while they may not be quite as crispy as when they first came out of the oven, I promise you that these golden gems will still deliver a flavorful punch even after a few days. For reheating, simply pop them back into a hot oven or air fryer until they’re warmed through and revived—there’s nothing quite like that sizzling sound as they re-crisp!
Freezing Authentic Greek Potatoes for Later
If you want to take your meal prep game up a notch, freezing these potatoes is an exceptional option! First, allow them to cool completely before transferring them to a freezer-safe bag or container. Try to spread them out in a single layer if possible, which helps prevent sticking together—nobody wants a clump of potatoes! Properly stored, they can last up to 3 months in the freezer without losing too much flavor or texture. When you’re ready to enjoy some frozen goodness, simply bake them straight from the freezer; just add a few extra minutes to the cooking time. It’s such a relief to know that you can have these mouthwatering potatoes on hand whenever cravings strike—just imagine pulling out a batch on a busy weeknight and transforming dinner into something extraordinary with minimal effort!
Authentic Greek Potatoes: Crispy Lemon Perfection!

Experience irresistible flavors with Authentic Greek Potatoes: Crispy Lemon Perfection! Try this easy recipe today and elevate your meals!
- Prep Time: 20 minutes
- Cook Time: 60 minutes
- Total Time: 1 hour 20 minutes
- Yield: Serves approximately 6
- Category: Dinner
- Method: Baking
- Cuisine: Mediterranean
Ingredients
- 2.5–3 lbs Russet or Yukon Gold Potatoes
- 1/2 cup Freshly Squeezed Lemon Juice
- 1/2 cup Good Quality Extra Virgin Olive Oil
- 4–6 cloves Garlic, minced
- 2 tablespoons Dried Oregano
- 1 teaspoon Salt
- 1/2 teaspoon Black Pepper
- 1/2 cup Vegetable or Chicken Broth
Instructions
- Preheat your oven to 400°F (200°C) and prepare a baking sheet.
- Scrub and cut the potatoes into uniform 1-inch chunks or wedges.
- Soak the potato pieces in cold water for 30–60 minutes, then drain and pat dry.
- In a large bowl, whisk together lemon juice, olive oil, garlic, oregano, salt, and pepper.
- Toss the dried potato pieces in the marinade until well coated.
- Spread the potatoes evenly on the baking sheet without overcrowding.
- Roast for 20–25 minutes before flipping them over gently.
- Add broth to the pan and roast for another 25–35 minutes until crispy.
Nutrition
- Serving Size: 1 cup (150g)
- Calories: 190
- Sugar: 1g
- Sodium: 300mg
- Fat: 8g
- Saturated Fat: 1g
- Unsaturated Fat: 7g
- Trans Fat: 0g
- Carbohydrates: 28g
- Fiber: 4g
- Protein: 3g
- Cholesterol: 0mg