
Wildberry Pop-Tarts
There’s something truly magical about baking, isn’t there? It’s not just about mixing flour and sugar; it’s about creating memories, evoking feelings, and connecting with those we love. When I think of Wildberry Pop-Tarts, I’m transported back to lazy afternoons in the kitchen, surrounded by the vibrant colors of fresh berries, the air thick with sweet aromas that whisper of childhood joy. Each bite is a delightful reminder of sun-drenched summer days and laughter shared over pastries hot from the oven. These homemade Wildberry Pop-Tarts are more than just a treat; they embody a celebration of flavors, textures, and a dash of nostalgia that keeps us coming back for more.
So let’s embark on this delicious journey together! We’re going to create Wildberry Pop-Tarts that will not only satisfy your sweet tooth but also impress anyone lucky enough to share them with you. Picture flaky crusts cradling a luscious homemade wildberry filling, all topped with vibrant icing that screams fun! I promise you, this kitchen adventure will be one for the books—a moment to cherish as you share these delightful pastries with friends or family.
Wildberry Pop-Tarts: A Sweet Journey into Nostalgia
These Wildberry Pop-Tarts are a tribute to simpler times when life was less complicated and flavor reigned supreme. They invite creativity in the kitchen while allowing your taste buds to revel in a symphony of berry goodness. With each pop-tart you create, you’re crafting not just food but an experience—a masterpiece bursting with color and flavor that can brighten even the cloudiest day. Trust me on this; once you make these from scratch, you’ll never want to go back to store-bought!
Ingredients:
As we dive into our culinary creation, you’ll find that every ingredient plays a pivotal role in bringing our vision to life. Let’s take a closer look at what we’ll need for these Wildberry Pop-Tarts.
-
3/4 cup blueberries. These little gems are packed with antioxidants and provide a burst of sweetness that’s both refreshing and indulgent. When selecting blueberries, opt for firm ones with a deep blue hue; they should have a slight bloom or waxy coat—this is nature’s way of protecting them! Fresh blueberries work beautifully here, but if they’re out of season or unavailable, frozen ones can be just as delightful—just remember to drain any excess moisture before adding them to your filling.
-
1/2 cup raspberries. Their tartness complements the sweetness of other berries perfectly—creating balance in our filling that keeps each bite interesting. Look for plump raspberries that have vibrant color without any mushy spots; they should smell fragrant and fruity! If you can’t find fresh ones, frozen raspberries are an excellent substitute too; just keep in mind they may release some juices as they thaw.
-
1/2 cup chopped strawberries. Strawberries bring their own sweetness and juiciness that elevates the wildberry filling’s texture. Choose strawberries that are bright red with green leaves still attached for optimal freshness. If you’d like a slightly different flavor profile, feel free to experiment by adding blackberries or even cherries!
-
1/4 cup blackberries, chopped or mashed. Blackberries add depth and complexity to our wildberry mixture with their slightly tart flavor profile and luscious texture. They should be plump and firm when picked; avoid any soft or overly squishy ones as they could compromise the integrity of your filling.
-
1 teaspoon lemon juice. This little squeeze adds brightness and enhances all the berry flavors by cutting through the sweetness—it’s truly magical! Always opt for fresh lemon juice when possible; bottled varieties can lack vibrancy.
-
1/2 cup pure cane granulated sugar. Sweetness is essential here—not just for flavor but also for balancing out the tartness of our berries while helping thicken our filling as it cooks down into gooey perfection.
-
3 tablespoons peeled chopped pears (or 2 tablespoons pear puree/sauce). Pears provide natural sweetness along with additional moisture—keeping our filling perfectly spreadable while imparting subtle fruit notes. If using pear puree or sauce instead, ensure it doesn’t contain added sugars so you maintain control over overall sweetness.
-
1/4 cup plain unsweetened applesauce. Applesauce serves two purposes: it acts like magic glue in our filling while infusing moisture without making it overly runny—a must-have!
-
2 tablespoons cornstarch. This is crucial for thickening our berry mixture so it won’t ooze out when we bake our pop-tarts! Cornstarch works wonders by absorbing excess liquid released from the berries during cooking—ensuring we achieve that perfect consistency.
-
2 cups all-purpose flour (or gluten-free flour). Flour is foundational to our pop-tart crust—it provides structure while ensuring tenderness within each flaky layer! If opting for gluten-free alternatives, look for blends designed specifically for baking as they’ll yield better results.
-
1/2 cup oat flour (blend 1/2 cup oats in blender). Oat flour adds depth and nuttiness to our pastry while enhancing its overall texture—plus it’s an easy gluten-free option if needed!
-
1/4 cup sugar (for dough). Besides contributing sweetness to balance out flavors in our crust, sugar helps achieve that golden-brown finish we’re all after!
-
1/2 teaspoon salt. Salt brings everything together—a necessity in baking that amplifies flavors across the board!
-
1 cup butter (cold & cubed). Cold butter is absolute paramount when making pastry dough since it creates those lovely flaky layers we crave—the colder it is before hitting heat means more distinct layers once baked!
-
1/2 cup cold water (adjust based on dough consistency). Cold water helps bind ingredients without melting butter prematurely—it’s important not to skip this step!
-
1 egg plus 2 tablespoons water (for egg wash). An egg wash gives our pop-tarts their beautiful golden sheen once baked—and trust me; it makes them look irresistible!
-
1-2/3 cups powdered sugar (for icing). Powdered sugar provides sweetness while achieving that smooth glaze we’ll drizzle overtop later on—it’s key for presentation too!
-
2 to 4 teaspoons milk (for icing). Milk helps achieve desired consistency in icing—add gradually until reaching perfection!
-
Neon violet and sky blue food gel color (optional). These vibrant colors aren’t just fun—they bring whimsy into play! Feel free to get creative here; use whatever colors spark joy within your kitchen!
Equipment You’ll Need:
Before we dive into making these delectable treats, let’s gather some essential tools—having the right equipment makes all the difference between good recipes and great ones! While these items may not technically be ingredients, they are indispensable partners on this culinary journey.
-
Mixing bowls – You’ll want several sizes on hand because different steps require varying amounts of space—for mixing dry ingredients versus wet ones, etc.! Opting for glass or stainless steel ensures durability alongside ease-of-use during clean-up as well.
-
Rolling pin – A trusty rolling pin is essential when shaping your dough into thin layers—allowing enough surface area for stuffing those delightful fillings inside while ensuring even thickness throughout each pastry shell.
-
Baking sheets lined with parchment paper – Parchment paper prevents sticking whilst aiding even browning during baking time—it makes transferring baked goods effortless too! Invest in high-quality sheets that withstand high heat without burning easily.
-
Pastry cutter or sharp knife – This tool comes into play when cutting out individual pop-tart shapes from rolled-out dough; using precise cuts ensures uniform baking times across all pieces rather than leaving some undercooked or burnt away entirely.
Now that we’ve gathered everything necessary let’s turn our attention toward preparing these scrumptious Wildberry Pop-Tarts…
Preparing the Wildberry Pop-Tarts
Step 1: Create Your Berry Filling
Begin by gathering those beautiful berries into a medium-sized saucepan over low heat—let their natural juices start mingling together harmoniously! Add in your lemon juice alongside granulated sugar—all these ingredients will meld beautifully while simmering gently on stovetop heat until softened about 10 minutes’ time frame should suffice here… Don’t rush this step either! Stir occasionally—you want flavors melding rather than burning onto bottom pan surface creating unwanted bitterness levels since nobody wants burnt fruit flavors ruining their sweet creations!
Next comes cornstarch magically acting like glue binding everything together once dissolved within remaining juices after cooking down—we’re creating luscious gooey goodness fit enough spoonfuls straight from pot itself if desired… Simply whisk cornstarch mixed into small bowl along with couple tablespoons cold water before pouring mixture directly back into saucepan stirring continuously until thickens noticeably around five minutes later… Voila! Your wild berry filling should be ready now—but allow cooling momentarily ahead transferring onto prepared surfaces whilst working remainder dough components towards completion stage…
Step 2: Prepare Your Dough
While waiting patiently upon completed cooling process regarding fillings preparation now shift focus towards developing delicious tender crusts necessary encasing those gorgeous fruity delights hidden inside… Start combining flours alongside sugars & salt within large mixing bowl ensuring uniformity achieved throughout dry components prior incorporating chilled cubed butter straightaway… Using pastry cutter blend thoroughly until resembles coarse crumbs resembling sandy beach paradise vibes before slowly drizzling cold water gradually ensuring cohesive ball forms underneath fingertips without being overly sticky feeling at same time…
Don’t hesitate testing how pliable dough appears upon kneading gently beneath palms too—you shouldn’t have cracks forming around edges nor excessive stickiness occurring either otherwise adjustments might need made accordingly moving forward towards next stages…
Step 3: Chill Out!
Once your dough has reached ideal consistency wrap tightly within plastic wrap then place inside refrigerator allowing rest period lasting at least half hour ideally longer if possible up-to two hours depending upon time allowed available prior getting started again later down road… Chilling allows better handling properties once rolling begins whilst solidifying butter content guaranteeing flakier end product emerges post-baking session later down line…
Step 4: Roll Out The Dough
After patiently waiting throughout chilling phase eagerly anticipate rolling dough out onto lightly floured surface ensuring proper coverage both sides avoiding unnecessary sticking which could happen otherwise ruining efforts put forth thus far… Aim achieving thin sheet approximately quarter inch thickness would suffice nicely here allowing ample room cut desired shapes effectively yet still retain structural integrity required during following assembly stages ahead… Cut rectangles measuring roughly four inches by six inches ensuring uniformity across entire batch prepared ahead full assembly stage soon approaching now exciting feelings building up anticipatory moments shared amongst friends family alike soon enjoying delectable treats emerging from ovens shortly thereafter…
Stay tuned—I can almost taste those freshly baked Wildberry Pop-Tarts already!
Step 5: Crafting the Wildberry Filling
Now that our crust is patiently resting in the fridge, let’s turn our attention to creating that divine wildberry filling that will elevate these Pop-Tarts from good to utterly extraordinary. Start by combining 3/4 cup of blueberries, 1/2 cup of raspberries, 1/2 cup of chopped strawberries, and 1/4 cup of blackberries in a medium saucepan over medium heat. As you mix these vibrant berries together, take a moment to inhale their sweet and tangy aroma; it’s like summer captured in a pot! The beauty of this mixture lies not only in its flavor but also in the symphony of colors it brings—deep purples and reds dancing together.
Once you’ve added your fruits, sprinkle in 1 teaspoon of lemon juice. This little addition is absolutely paramount because it enhances the natural sweetness while providing a delightful zest that brightens the overall flavor profile. Next, stir in 1/2 cup of pure cane granulated sugar, allowing it to dissolve into the warm berries. As the mixture begins to bubble gently, add 3 tablespoons of peeled chopped pears (or just use pear puree if you prefer) and 1/4 cup of plain unsweetened applesauce for an extra layer of moisture and sweetness. The pears bring a lovely texture that balances out the more aggressive tartness of the berries. Sprinkle in 2 tablespoons of cornstarch carefully; this is our thickening agent which will transform our luscious filling into something spreadable rather than soupy as it cooks. Allow this mixture to simmer for about 5-10 minutes while stirring occasionally—this is where magic happens! You’ll want to keep an eye on it; once it thickens up nicely and coats the back of your spoon, it’s time to remove it from heat. Trust me on this step; letting the filling cool slightly before using it will help prevent any sogginess when we fill our Pop-Tarts later.
Step 6: Rolling Out the Crust
With our wildberry filling cooling beautifully, let’s move on to rolling out that buttery tender crust we’ve been dreaming about! Take your chilled dough from the refrigerator—it should feel firm yet pliable—and place it on a generously floured surface. Using a rolling pin, start gently rolling out one half of your dough until it’s about 1/8-inch thick. It’s important not to rush this step; you want an even thickness so your Pop-Tarts bake uniformly. If you notice any sticking, don’t hesitate to dust with a bit more flour as needed—remember that patience is key here!
As you roll out, keep visualizing those golden brown pastries emerging from your oven; I promise you’ll thank yourself later for taking your time now. Once rolled out, use a sharp knife or pastry cutter to trim your dough into rectangles measuring approximately 3×5 inches. You should have enough for eight Pop-Tarts total—so aim for four top rectangles and four bottoms. Place these rectangles onto a parchment-lined baking sheet while you roll out the second half of your dough just like before. This method ensures everything stays organized and prevents any accidents while you’re working with dough. Remember, if there are any scraps left over after cutting, feel free to knead them together gently and re-roll—waste not want not!
Step 7: Assembling Your Wildberry Pop-Tarts
Now comes one of my favorite parts—the assembly! With all your components ready: the cooled wildberry filling and those perfectly shaped dough rectangles, it’s time to create little pockets of joy! Begin by placing about one tablespoon (or generous dollop) of that luscious berry filling right in the center of each bottom rectangle you’ve cut out. This part is crucial because too much filling can lead to overflow during baking—an absolute disaster we want to avoid at all costs! Trust me when I say that keeping things contained will yield those picture-perfect Pop-Tarts we’re aiming for.
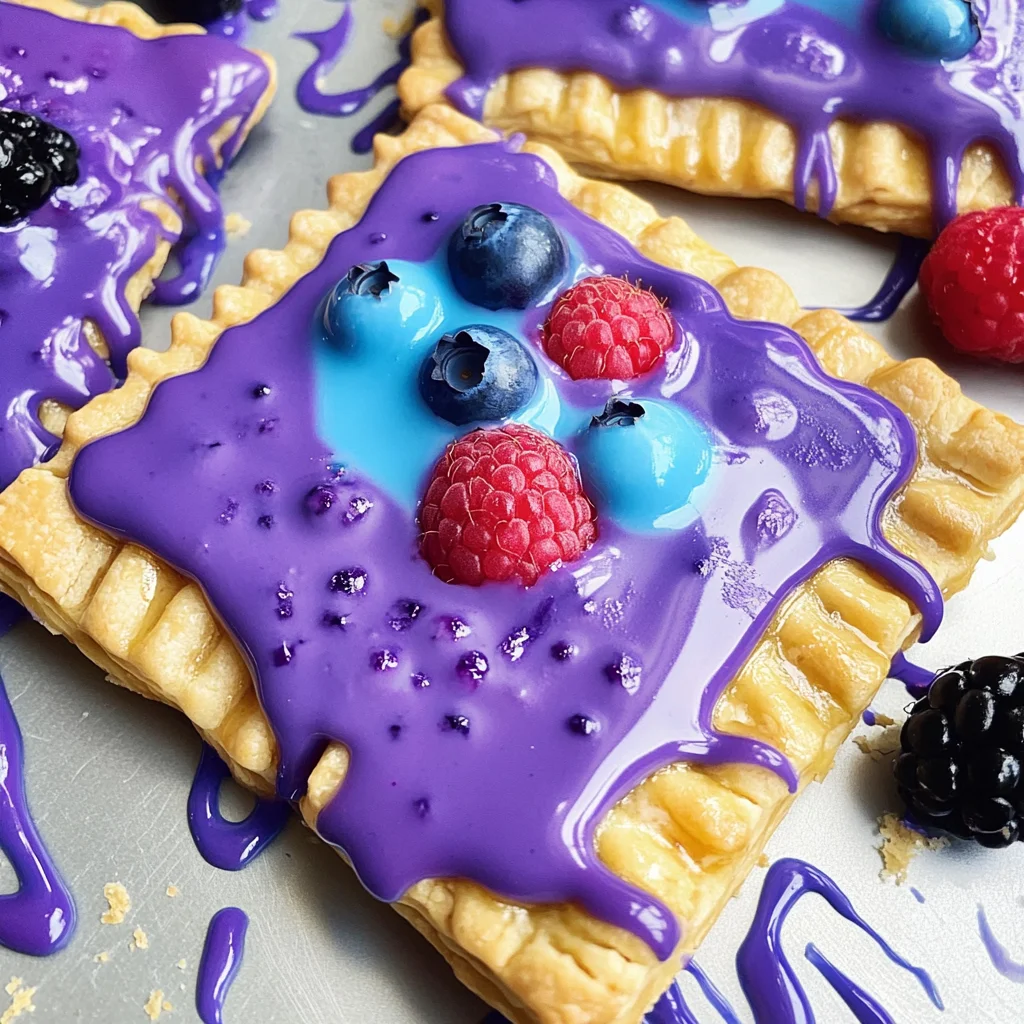
Next, take one of your top rectangles and carefully place it over each filled base rectangle. Gently press down around the edges with your fingers or use a fork to seal them tightly—that little crunch when biting into these beauties will be so rewarding! Make sure there are no air bubbles trapped inside; otherwise, they could burst during baking. To make things even prettier (and more professional-looking), use that fork again to crimp down along all edges for a decorative touch—that classic Pop-Tart look we all know and love! Finally, brush each assembled pocket lightly with an egg wash made from whisking together one egg with two tablespoons of water; this step is non-negotiable as it gives our pastries that beautiful golden sheen.
Step 8: The Baking Transformation
This is where anticipation builds! Preheat your oven to 375°F (190°C) while those beautifully assembled Pop-Tarts sit quietly on their baking sheet for about ten minutes before going into the oven—you want them relaxed and ready for action! Once preheated, slide them into the center rack and let them bake away for about 25 minutes or until they have turned a gorgeous golden brown hue—a sight so delightful that it’ll make your heart flutter! Halfway through baking, I encourage you to rotate your baking sheet if necessary because each oven behaves differently; we want every corner perfectly toasted.
During those precious moments while they bake, take some time for yourself—a little self-care never hurts anyone! But do keep an ear out; if you hear any alarming popping noises coming from your oven (which might indicate an overflowing filling), don’t panic—just adjust accordingly by keeping an eye on them as they finish up their transformation into deliciousness. When they’re finally done baking, remove them from the oven and let them cool on a wire rack before frosting—this is vital since hot pastries will melt any icing we put on top!
Conclusion:
What a journey we’ve taken together through this recipe! From gathering those vibrant berries to smelling the warm aroma wafting through your kitchen as they bake, making these Wildberry Pop-Tarts has been nothing short of magical. I genuinely hope that my excitement has rubbed off on you because what makes this recipe so extraordinary is how each layer builds upon another—the buttery crust cradling that tangy-sweet filling creates a symphony of flavors that’s simply unforgettable. It’s all about balance: the tartness of the berries dances beautifully with the sweetness of the icing, making every bite profoundly satisfying.
These Wildberry Pop-Tarts are not just a treat; they’re an experience waiting to unfold. The joy of creating something from scratch is palpable here—it connects us back to our kitchens and reminds us of simpler joys amidst our busy lives. Picture yourself pulling a batch from the oven, watching as they cool slightly before diving in; it’s moments like these that make cooking so rewarding! They shine brightly at brunch gatherings or cozy family breakfasts and can effortlessly brighten up any occasion.
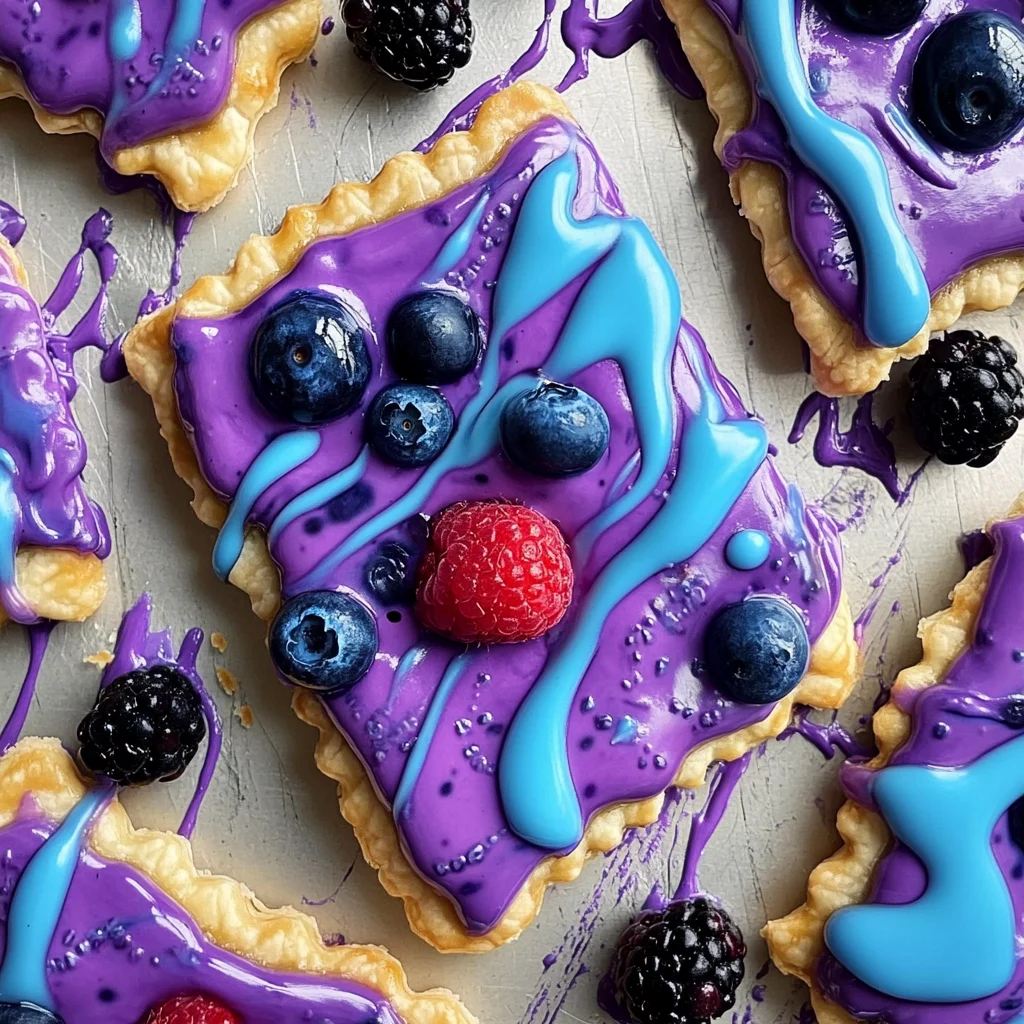
Imagine savoring one with your morning coffee while enjoying the sunrise or sharing them with friends during an afternoon tea—it’s all about connection! For an indulgent twist, pair them with a dollop of whipped coconut cream or serve alongside fresh fruit salad for added freshness and color on your plate. You could even drizzle some additional wildberry sauce over top for an extra pop—it adds another layer of deliciousness that will leave everyone asking for seconds!
Feeling adventurous? This recipe is wonderfully adaptable! Swap out different fruits based on what’s in season—think peaches or cherries—and experiment with various icings too! Adding lemon zest to your filling can amplify those fruity notes and brighten things up even more! You could also try mixing in some dark chocolate chips with your berries for a decadent twist that’ll elevate this classic treat into something truly extraordinary. I invite you wholeheartedly to explore these variations and share your experiences with me—I can’t wait to hear how you make this recipe uniquely yours!
Wildberry Pop-Tarts

Embark on a delightful culinary adventure with these homemade Wildberry Pop-Tarts, where nostalgia meets modern baking. Bursting with vibrant flavors from fresh berries, these flaky pastries are not just treats; they are memories waiting to be created. Imagine biting into a warm, buttery crust filled with a luscious wildberry medley of blueberries, raspberries, strawberries, and blackberries, all topped with colorful icing that brings joy to any occasion. Perfect for breakfast or as a sweet snack, these Wildberry Pop-Tarts will impress your family and friends alike. Get ready to experience the magic of baking as you create these delightful pastries from scratch—your kitchen will be filled with sweet aromas that evoke childhood memories!
- Prep Time: 30 minutes
- Cook Time: 25 minutes
- Total Time: 55 minutes
- Yield: Makes approximately 8 servings 1x
- Category: Dessert
- Method: Baking
- Cuisine: American
Ingredients
- 3/4 cup blueberries
- 1/2 cup raspberries
- 1/2 cup chopped strawberries
- 1/4 cup blackberries
- 1 teaspoon lemon juice
- 1/2 cup pure cane granulated sugar
- 3 tablespoons peeled chopped pears (or 2 tablespoons pear puree/sauce)
- 1/4 cup plain unsweetened applesauce
- 2 tablespoons cornstarch
- 2 cups all-purpose flour (or gluten-free flour)
- 1/2 cup oat flour
- 1/4 cup sugar (for dough)
- 1/2 teaspoon salt
- 1 cup cold butter (cubed)
- 1/2 cup cold water
- 1 egg plus 2 tablespoons water (for egg wash)
- 1–2/3 cups powdered sugar (for icing)
- 2 to 4 teaspoons milk (for icing)
- Neon violet and sky blue food gel color (optional)
Instructions
- Prepare the wildberry filling by combining the blueberries, raspberries, strawberries, blackberries, lemon juice, and sugar in a saucepan over medium heat. Cook until softened and thickened.
- In a large mixing bowl, combine flour, salt, and sugar. Cut in cold butter until crumbly.
- Add cold water gradually until dough forms. Chill for at least 30 minutes.
- Roll out the dough on a floured surface and cut into rectangles.
- Assemble by placing wildberry filling on half of the rectangles and cover with remaining dough pieces. Seal edges using a fork.
- Brush with egg wash and bake at 375°F for about 25 minutes until golden brown.
- Cool before icing; mix powdered sugar with milk and desired food color for decoration.
Nutrition
- Serving Size: 1 pop-tart
- Calories: 210
- Sugar: 12g
- Sodium: 90mg
- Fat: 10g
- Saturated Fat: 6g
- Unsaturated Fat: 4g
- Trans Fat: 0g
- Carbohydrates: 29g
- Fiber: 2g
- Protein: 3g
- Cholesterol: 30mg